
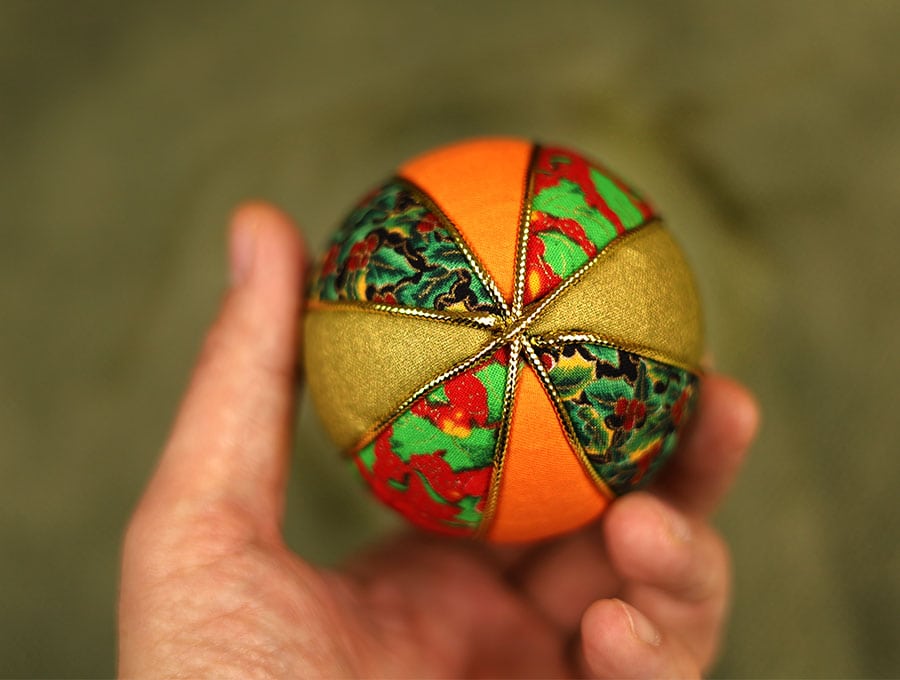
How to Make a no-sew Fabric Christmas Ball Ornament [Simple Kimekomi Striped Ornament]
The stunning no-sew fabric Christmas ball ornament uses your tiny fabric scraps. Yes, with HelloSewing nothing goes to waste! Kimekoni is a Japanese technique from the 18th century where fabric is tucked into grooves. I love this project because you can get the kids involved in choosing colors, and helping attach the panels of fabric – if they are old enough. For the younger ones you can tell Christmas stories or sing along to Christmas songs while you make the kimekoni striped ornaments. Preparing for festivities together is such a special time with children or grandchildren.
Christmas holidays, whether it is snowy outside in the northern hemisphere or warm in the southern hemisphere, mean lots of activities where the family can get together in preparation – making gingerbread houses, gingerbread cookies, mince pies, and decorating the tree, to name a few. Add to this making kimekoni striped Christmas ball ornaments this year as you listen to festive songs and enjoy a drink and snack together.
Below you will find my step by step written tutorial with VIDEO instructions for all the visual learners.
We occasionally link to goods offered by vendors to help the reader find relevant products. Some of the links may be affiliate meaning we earn a small commission if an item is purchased.
Table of Contents
How to make a no-sew fabric Christmas ball ornament
Supplies and tools
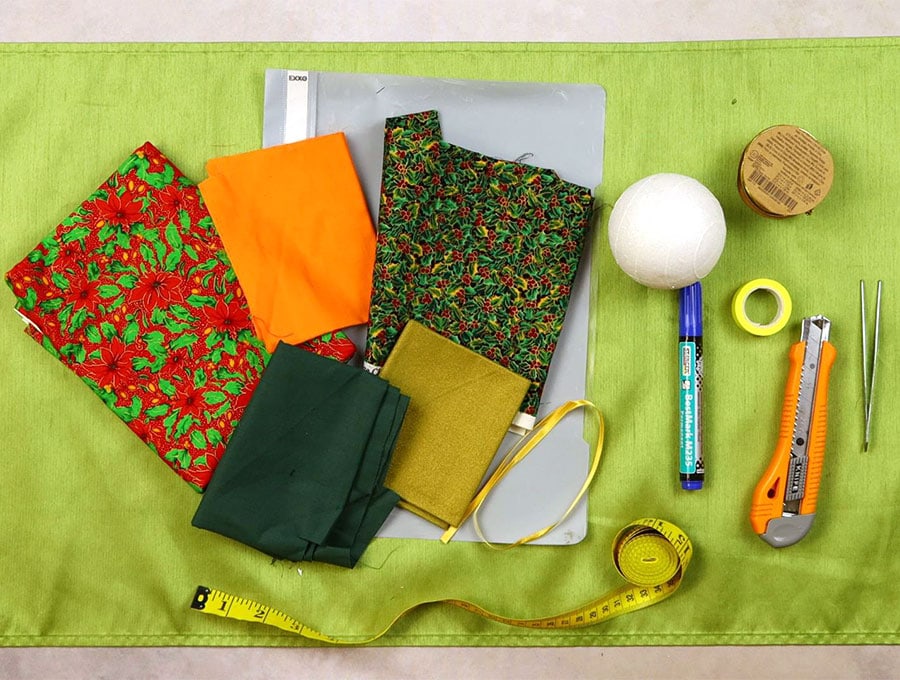
- Styrofoam ball – either a standard 3″(8cm) ball or a large 5″ (13cm)ball
- Scraps of fabric in at least 4 different colors
- Exacto or utility knife
- Tweezers
- Painters tape or washi tape
- Black marker pen
- Thin gold or silver cord
- 15 cm of thin ribbon in a color of choice
- scissors (or rotary cutter and a cutting mat)
- measuring tape
DOWNLOAD: pattern coming soon [Free pdf file]
Follow us for free patterns & tutorials! [easy-profiles]
How to make a Kimekomi Striped Ornament (no-sew)
Watch the diy kimekomi striped ornament video first and then follow the written step by step instructions below.
Please enjoy and don’t forget to Like and SUBSCRIBE over on YouTube to be kept up to date with new videos as they come out.
DIY Kimekomi Striped Ornament VIDEO TUTORIAL
INSTRUCTIONS:
STEP 1:
Grab a Styrofoam ball of 3 inches (8 cm) across and 3 inches (8cm) high and mark the top and bottom of the ball.
STEP 2:
Draw a line around the ball to connect the top and bottom, then grab a tape measure and connect and divide the marks into 4 equal parts on each side of the ball – let’s call this the equator.
STEP 3:
Mark the north and south pole, then connect the poles passing through the equator to divide the ball into 8 equal parts.
STEP 4:
Use painters tape or washi tape to cover one of the marked sections of the ball – this is to create the template for your pattern to cut the fabric. If the tape has gone over the marked lines just redraw the lines with your pen on the tape.
STEP 5:
Peel off the pattern and trim the areas outside the black marked lines then stick onto a piece of firm plastic. The clear front cover of a document folder works well. You now have your pattern and providing you keep it safe you can decorate dozens of these 3-inch (8 cm) balls without having to cut another pattern.
STEP 6:
Choose your fabric scraps. Laying out prints and plains that look good together. Try to pick one fabric in a print and one in a plain color, rather than too many prints next to each other. Place your pattern over the fabric, trace around it with a fabric marking pen, then cut it out just a little larger than the pattern.
STEP 7:
Repeat cutting out the shapes from your chosen fabrics until you have 8 pieces.
STEP 8:
Using a craft knife make small slits into the Styrofoam ball along the 8 lines you marked.
STEP 9:
Take you first piece of fabric and position it in place, then using a small screwdriver, small scissors or tweezers push the fabric into the slit in the ball, starting from the middle (think of it as the Equator) – the widest point and working down and up to the points (the North and South Poles). If you start at the poles it will be difficult trying to get the fabric to lie flat and taut.
STEP 10:
Repeat the previous with the next panel and continue around the ball until you have the 8 panels in place.
STEP 11:
Once all the panels are in place it is time to attach the thin gold or silver cord to add some glitter to the ball.
Put a pin in the north pole and wind the end of the cord around the pin, then push the cord into the slit, working your way down, then across the south pole and up again to the north pole. When you end cut, a little extra cord and remove the pin before pushing both the ends into the hole.
STEP 12:
Repeat the previous step until you have worked your way right around the ball and each segment has a line of glittery thread dividing the segments.
STEP 13:
The final step is to attach the hanging loop. Cut 8 inches (20 cm) of the gold or silver thread.
Fold in half.
Tie a knot in the two ends of the thread and then tuck it into the top of the ball using tweezers, scissors or the screwdriver. The Styrofoam will hold it securely in place and your ball is now almost ready to hang on the tree, except for the last step.
STEP 14:
Use your 15 cm of ribbon and tie a cute bow, trim the ends at an angle or in a V shape so they don’t fray then using a pin secure the bow to the top of the ball where the hanging loop is placed.
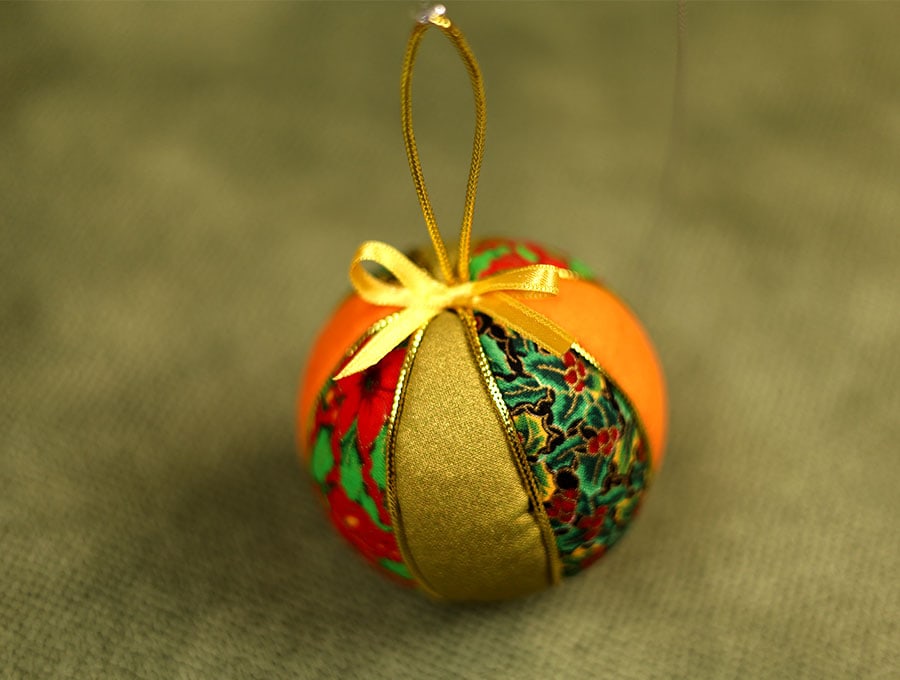
Finally, the kimekoni no-sew ornament is ready to go on the tree. We hope you had fun making these kimekoni striped Christmas ornament balls. Please share with someone looking for a holiday project to do with kids or grandkids, or with a couple of friends. It’s fun doing them over a festive drink with a couple of snacks. Do like and share then hit the subscribe button to make sure you don’t miss out on our fun projects in the future. Please share your photos of your Christmas tree or wreaths featuring the kimekoni ball ornaments, in the comments section. Here at HelloSewing we just love seeing your creativity.
No Sew Christmas Ball FAQs and tips:
Q: Can I attach rhinestones to the fabric?
A: You certainly can. There are two ways to do this – either use a few rhinestones from thee iron on transfer sheets and iron onto your fabric before attaching to the ball, taking care the rhinestones are not near the edge where the fabric will be tucked in. The other method is to use the stick-on rhinestones you can buy in sheets from craft shops. They may drop off if the ornaments are not packed carefully, but I guess for the next year you can replace a few. The iron-on ones are permanent.
Do you like this? Pin for later:
Wanna be friends? Click HERE and follow me on Pinterest
RELATED: