
Prosperity Hens Sewing Tutorial // DIY Fabric Prosperity Chicken // Good Luck Charms for Your Home
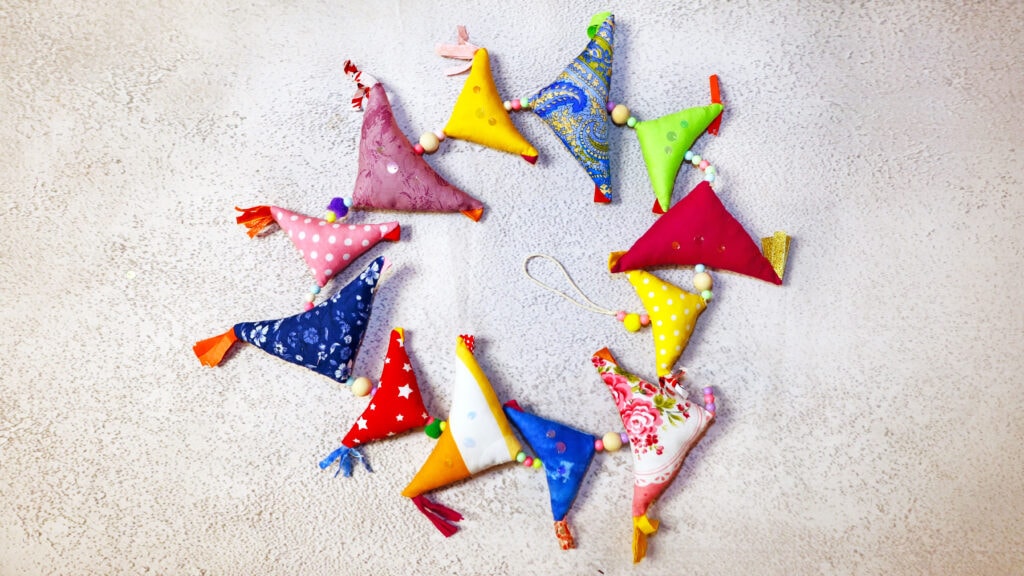
Want to invite a little good fortune into your home? Start with a chicken. For thousands of years, chickens have been a symbol of prosperity in Northern India—where owning a flock could mean the difference between hardship and abundance. These colorful fabric hens are traditionally given as gifts to celebrate life’s big moments and hung near doorways to invite good fortune into the home.
There’s an old tradition in Northern India that says if you hang a colorful hen near your doorway, prosperity will find its way in.
For thousands of years, chickens have been symbols of abundance in Northern India—because in the harsh climate, owning a flock of chicken could mean the difference between barely scraping by and living a life of plenty. These weren’t just birds. They were hope. They were survival.
Today, artisans still handcraft prosperity hens using jewel-toned fabric scraps, sparkling glass beads, silver accents, and tiny bells that chime softly when they move. Each one is unique and given as gifts to celebrate weddings, new homes, new babies—all of life’s beautiful milestones.
And now? You can make your own! Ill show you how to stitch up a flock of prosperity hens bursting with color, tradition, and maybe—just maybe—a little bit of magic.
Below you will find my step by step written tutorial with VIDEO instructions for all the visual learners.
We occasionally link to goods offered by vendors to help the reader find relevant products. Some of the links may be affiliate meaning we earn a small commission if an item is purchased.
Table of Contents
How to make the Prosperity Hens
Supplies and tools
- fabric – colorful fabrics – woven cotton works best, but you can use any fabric
- No products found.
- (optional) fusible interfacing for the lightweight fabrics
- matching thread
- scissors (or rotary cutter and a cutting mat)
- ruler or measuring tape
- iron and ironing board
- sewing clips or pins
- decoration: colorful beads, wooden beads, glass beads, pom poms, small bell
DOWNLOAD: Prosperity hens / chicken pattern [Free pdf file]
Follow us for free patterns & tutorials! [easy-profiles]
How to Sew Prosperity Chicken
Watch the diy prosperity hens video first and then follow the written step by step instructions below.
Please enjoy and don’t forget to Like and SUBSCRIBE over on YouTube to be kept up to date with new videos as they come out.
Prosperity hens (chicken) VIDEO TUTORIAL
INSTRUCTIONS:
Prosperity hens make a wonderfully thoughtful gift. Hang them alone or in a cluster in front of a window for added effect. They also make great Easter décor!
The prosperity hens are usually sold in the following strand sizes at shops and markets:
- Small 18 inches (47.7 cm)
- Medium 30 inches (76.2 cm)
- Large 45 inches (114.3 cm)
Use quilting cotton scraps, or other suitable cotton or linen fabric. Stretch fabric doesn’t work that well because you lose the integrity of the shape. If you feel you need to use stretch fabric you’ll need to interface it but by doing this you can lose the curved shape of the back when the string is drawn through the stuffed chicken. Be careful not over stuff because it makes it hard to draw the string through the shape.
Be creative in your use of fabric and design of the chicken – we aren’t trying for a realistic string of chickens but making our own vision of hens. Usually the strands end with a small to medium sized brass bell, alerting the shop or home owner to someone entering when they brush past them, but if you are hanging the string of prosperity chickens in a window some crystal beads at the end would catch the light beautifully.
There is no standard for the number of hens in a strands but I highly recommend 10 or more chicks per strand. More chickens equals more prosperity – right?
STEP 1:
Print out the free patterns in large and small from HelloSewing.com, then cut out the pattern pieces. There are three pieces to each pattern – body, head and tail.
- Body: 5 x 5 inches (13 x 13 cm)
- Beak: 1 ¼ x 1 ¼ inches (3 x 3 cm)
- Tail: 2 x 1 ½ inches (5 x4 cm)
STEP 2:
Fold the body piece diagonally, corner to corner, right sides inside, and clip.
STEP 3:
Fold the beak piece right sides outside, diagonally, and then again diagonally to make a 4 layer small triangle.
STEP 4:
Open up the right side of the body piece at the fold, and insert the folded beak, one folded edge lined up with the fold, raw edges to raw edges of the fabric, the beak piece facing in to the body of the fabric, and clip in place.
STEP 5:
To make the tail feathers cut into the tail piece from the short edge, 4 to 5 times stopping 3/8 of an inch (1 cm) from the other short edge.
STEP 6:
Roll the tail piece, so there are about 4 layers of fabric at the uncut end.
STEP 7:
Insert the tail piece into the other end of the folded body piece of the chicken, opposite the beak. It can be placed just below the fold, or a tiny bit further down from the fold – like 3/8 of an inch (1 cm). The tail feathers face inwards, and the raw edges of the rolled piece stick out a bit from the raw edge of the body, so that when stitched and turned out the right way you only see the tail ‘feathers’ ad not the rolled bit.
STEP 8:
Mark a gap of around 1 ½ inches (4 cm) in the area half way down the diagonal under the tail feathers through which to pull the fabric to turn it the right way out.
STEP 9:
Stitch down each open side, ¼ of an inch (6 mm) from the edge, backtacking at the ends of the gap, and backtacking across the beak and tail feather areas.
STEP 10:
Trim off the extra fabric at the corners, taking care not to cut too close to the stitch line. Fold back the raw edges of the gap in line with the seam and finger press.
STEP 11:
Pull the fabric through the gap, turning out the corners neatly.
STEP 12:
Start stuffing with fibrefill. The chicken body should be full but not overstuffed. In the video you will see a hemostat used – often used by sewists it allows you to grip the filling and get it into corners easily, but you can use your fingers, and a tool such as a chopstick to push the filling into the corners.
STEP 13:
Hand stitch the raw edges of the gap closed with a slip stitch, after folding them in line with the seam.
STEP 14:
Now it is time to make the whole flock. A speedier way to do it is to cut all the parts of a series of large and small hens and fold and pin bodies, tails and beaks in one operation. Then do all the stitching, followed by the trimming and stuffing.
STEP 15:
Once your 10 hens are ready it is time to string them in a line with different beads between each one. To start you’ll need some string (cut long enough to accommodate a hanging loop and pass through all the hens and add beads – rather longer than shorter in your estimate). You’ll also need a large needle and a variety of wooden, plastic or glass beads, even some pompoms. You can repurpose broken or unused bead necklaces and bracelets – there is no need to buy new beads.
STEP 16:
To decorate the chicks use stick-on rhinestones or sequins repurposed from a sequined top and attach them on with fabric glue. The rhinestones and sequins will catch the light adding an extra dimension to the prosperity hen hanging.
STEP 17:
Tie a simple hanging loop at the top using the string, then thread a couple of beads large enough to cover the tail from the knot, so it is hidden within the beads.
STEP 18:
Take the needle straight down though the back of the first hen and out the bottom, then add a few more beads before adding the next hen, working your way down to the end. Alternate the way each hen faces – one head pointing left and the next head pointing right. Pull the string a little tight as you finish adding each hen so the back of the hen curves in a bit, just like a real hen.
STEP 19:
To finish off the string a small brass bell would add extra sensory appeal, but if you don’t have one then use a few pretty crystal or plastic beads to catch the light, and end off by tying a knot, then fraying out the end of the string.
All that remains is to find the right place to hang your string of prosperity hens. I’m guessing this if going to be kind of addictive, so you’ll probably be checking through those tiny scraps of fabric in your stash to add them to a box or basket ready for making future strings of prosperity hens to give as gifts.
In northern India strings of prosperity hens hang in doorways, as the people believe they bring good fortune and prosperity to homes. Chickens provide us with so much – eggs, meat, and fertiliser for our gardens. They eat insect pests and provide companionship, if you have the time to spend with them. Now’s the time to make your own string of prosperity hens, using our free printable pattern at Hello Sewing.com that comes in a small and larger size. They’re easy to make, and a fun project to accomplish with kids who can choose the color combinations for each hen, stuff the shapes and select the beads to string them together.
If you enjoyed this then like and subscribe for more fun projects.
Do you like this? Pin for later:
Wanna be friends? Click HERE and follow me on Pinterest
RELATED: