
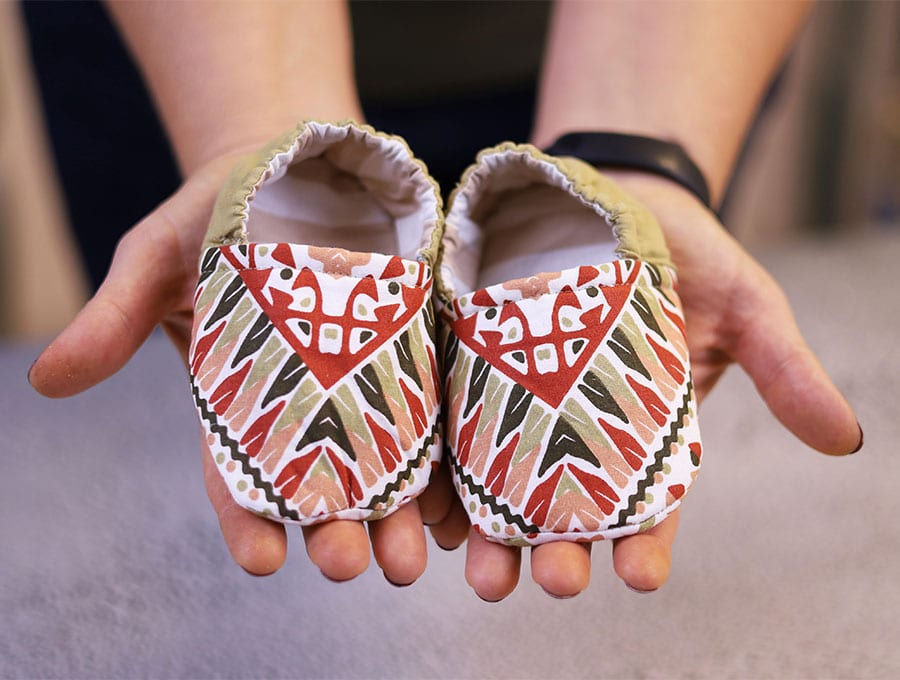
DIY Elastic Baby Shoes // Reversible Baby Shoes [VIDEO and Sewing Pattern in 6 sizes]
Looking for a sweet and practical sewing project? These elastic baby shoes are soft, comfy, and designed to stay snug on little feet — perfect for newborns up to 2 years old! In this tutorial, you’ll learn step-by-step how to sew your own pair using our free printable pattern, available in six sizes to fit growing babies and toddlers.
Many parents go out and buy sneakers with hard soles or tiny formed leather shoes for their babies and toddlers, but leading experts say that cloth or very soft leather shoes are better. Why?

Because babies just learning to walk need to feel the ground under their feet. When their shoes are flexible, their foot muscles are trained, giving them better motor control and balance using tiny muscle movements. Commercially made shoes that replicate adult shoes encase the foot in layers of foam and synthetic material that does not allow for this all-important development. Breathability is an important factor too – which is why soft leather or cloth makes for the best baby shoes. So, grab your materials, download the pattern, and let’s get started!
Below you will find my step by step written tutorial with VIDEO instructions for all the visual learners.
We occasionally link to goods offered by vendors to help the reader find relevant products. Some of the links may be affiliate meaning we earn a small commission if an item is purchased.
Table of Contents
- 1 How to make the baby shoes
- 2 Supplies and tools
- 3 How to Sew elastic baby shoes
- 3.1 Elastic Baby shoes VIDEO TUTORIAL
- 3.2 INSTRUCTIONS:
- 3.3 STEP 1:
- 3.4 STEP 2:
- 3.5 STEP 3:
- 3.6 STEP 4:
- 3.7 STEP 5:
- 3.8 STEP 6:
- 3.9 STEP 7:
- 3.10 STEP 8:
- 3.11 STEP 9:
- 3.12 STEP 10:
- 3.13 STEP 11:
- 3.14 STEP 12:
- 3.15 STEP 13:
- 3.16 STEP 14:
- 3.17 STEP 15:
- 3.18 STEP 16:
- 3.19 STEP 17:
- 3.20 STEP 18:
- 3.21 STEP 19:
- 3.22 STEP 20:
- 3.23 STEP 21:
- 3.24 STEP 22:
- 3.25 STEP 23:
- 3.26 STEP 24:
- 3.27 STEP 25:
- 3.28 STEP 26:
How to make the baby shoes
Supplies and tools
- fabric – 2 pieces of 100% tightly woven cotton (one main, one lining)
- fusible interfacing
- 1/4″ wide elastic
- matching thread
- scissors (or rotary cutter and a cutting mat)
- ruler or measuring tape
- iron and ironing board
- sewing clips or pins
DOWNLOAD: elastic baby shoes [Free pdf file]
Follow us for free patterns & tutorials! [easy-profiles]
How to Sew elastic baby shoes
Watch the diy baby shoes with elastic video first and then follow the written step by step instructions below.
Please enjoy and don’t forget to Like and SUBSCRIBE over on YouTube to be kept up to date with new videos as they come out.
Elastic Baby shoes VIDEO TUTORIAL
The importance of correct shoe size
Experts agree that a baby shoes needs to fit the foot – too small and it could cause issues like toe deformities and ingrown toenails. Too big and the child can easily lose balance as their foot slides around in the shoe and they curl their toes inwards to maintain grip on the shoe.
How much baby shoes are actually worn?
Anyone who has bought or been gifted fancy baby shoes knows that often the child will never wear them – either they grow out of them before they consent to having a shoe on their foot, or insist on having the shoes removed after a few minutes because they feel more comfortable without them as they have better balance and grip. We therefore need to give the children we are sewing for, whether our own kids or those of family members and friends, the best possible fit in a shoe that is comfortable and has a good grip.
Sewing cloth shoes is economical
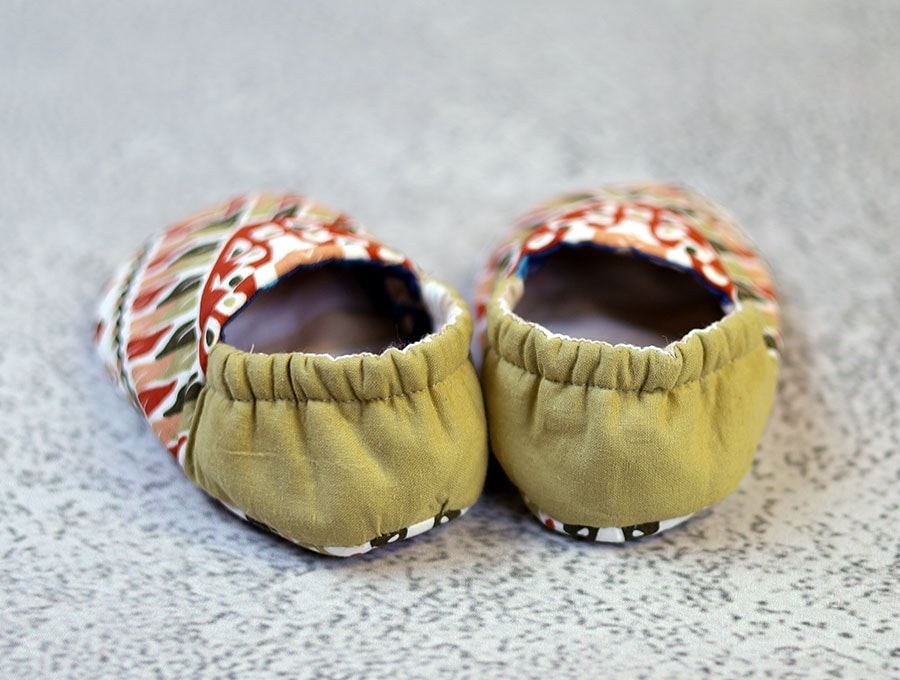
Sewing baby shoes is also very economical as you can make a few pairs in different sizes to accommodate the fast growing feet of little ones. These reversible baby shoes also allow better co-ordination to the outfits they are wearing, instead of having to buy two pairs of shoes.
How do I know the baby shoe is the right size?
Measure the baby’s foot and compare to the pattern. There should be a baby’s thumb width at the front of the shoe so their toes are not cramped, and at the back of the shoe a baby’s pinkie width. Take into account the seam allowance and as mentioned earlier rather go a tiny bit bigger than too small.
What do I use for the soles so they don’t slip?
Because these are reversible perhaps use a soft non-slip fabric. Toughtek, has a neoprene rubber coating, and Slip-Not, is a vinyl or polyurethane-coated fabric with embossed grip patterns. Make sure baby wear socks on so their feet are not in contact with the non-slip fabric. You can create a non-slip surface with Jippy Grip or a similar dotted gripper fabric, or apply dots from a hot glue gun, but bear in mind that the baby shoes will then no longer be reversible. Some people have added small pieces of leather, suede side out, attached with a strong fabric glue to make the shoes non-slip. The soft leather can also be stitched to the sole before assembling the shoe. Because these are meant to be reversible then you would have to do both sides of the sole – the inner and outer fabric. Most babies only walk from 9 months onward so up until then you probably won’t have to worry about non-slip soles.
INSTRUCTIONS:
STEP 1:
Cut out the pattern pieces to the size you require. Babies grow so fast it is better to cut a larger size than one that just fits – especially if you are planning it as a gift a few weeks’ time.
You will need to cut 2 soles, 2 toe pieces, 2 heel pieces, from the outer and the lining fabric as these baby shoes are made to be reversible – that is 12 pieces in total.
STEP 2:
Cut the fusible batting ¼ inch (6mm) smaller than the pattern pieces – you will need 2 soles, 2 toe and 2 heels pieces of batting.
STEP 3:
Lay out the pattern pieces – sole, toe and heel for the outer and lining, right side up, then mark the center of each piece, transferring the marks from the appropriate pattern pieces. This will enable you to line up the pieces correctly when it comes to joining them.
STEP 4:
Make a tiny v notch in the soles, heels and toes at the point where the marks have been made; this will make is easier to find the center when assembling the pieces.
STEP 5:
Place the batting on the wrong side of the outer shoe pieces, with the rough/sticky side down, flip then iron to attach according to the manufacturer’s instructions.
STEP 6:
Match up the heel pieces – right side to right side and pin in place.
STEP 7:
Stitch together the wider part of the heel pieces using a ¼ inch (6mm) seam allowance.
STEP 8:
Trim off any excess or uneven fabric from the seam with your scissors, taking care not to get too close to the stitch line and taking care not to cut away the center v notch.
STEP 9:
Fold open and finger press along the seam, then flip so you have both right sides outermost. Make sure the seam is flat and pin, so you have two baby shoe heel pieces ready to stitch.
STEP 10:
Press the pieces then stitch 3/8 of an inch (1cm) from the folded edge. Backtacking at the start and finish.
STEP 11:
Thread the ¼ inch (6mm) elastic through the back of the heel piece using a safety pin or a tube turner of you have one. Insert a pin at each end to secure the elastic. Repeat with the other heel piece.
STEP 12:
To attach the heel piece to the toe piece take the heel piece with the elasticised part facing the straight edge of the outer toe piece, pin the short side to the straight part of the toe piece. The pieces will be at right angles to each other, then repeat with the other short side to the other end of the straight part of the toe piece, bending the fabric to curve around. Repeat with the other shoe.
STEP 13:
Take the toe lining piece and match up the center snips, right side to right side, then carefully pin together, covering the raw edges on the sides of the heel piece. Repeat with the other shoe.
STEP 14:
Stitch around the straight edge of the toe piece with a seam allowance of ¼ inch (6mm). Do the same with the other shoe.
STEP 15:
Turn the toe pieces the right way out – suddenly what looked like a crazy bundle of cloth now looks like the upper for a shoe.
STEP 16:
Match up the marks on the front of the toe pieces and pin, then pin on the sides where the heel joins the toe piece, the rounded sides of the toe piece and across the straight part where the outer and inner were stitched together, making sure the seam is turned out and lies flat.
STEP 17:
Stitch around the semicircle of the toe pieces – across the straight edge and round the curved part.
STEP 18:
To attach the soles take the outer sole piece with the batting and place it right side to right side of the outer of the toe piece, aligning the center mark of the toe piece with the center mark on the front of the sole. Pin.
STEP 19:
Now take the lining sole piece and pin the lining to the lining of the toe piece, aligning the center marks of toe piece and the front of the sole. Pin all three – lining, outer, and toe piece together.
STEP 20:
Align the center of the heel piece with the center of the outer and inner of the sole pieces and pin together.
STEP 21:
Take your time working around the shoe, pinning everything in place, and making sure it all aligns as you ease the fabric together.
STEP 22:
Mark a gap of around 2 inches (5 cm) on the inner side of the toe piece through which you will pull the fabric once stitched.
STEP 23:
Stitch around the edge of the baby shoes with a seam allowance of ¼ inch (6 mm), backtacking on either side of the gap. Finger press the raw edges of the gap in line with the seam.
STEP 24:
Turn the baby shoe the right way out by pulling the fabric gently through the gap.
STEP 25:
With the lining side on the outside, take a hand sewing needle and matching thread and slip stitch the edges of the gap closed on each shoe.
STEP 26:
It’s time to let baby try the shoes on. If you have carpeting the shoes are fine as is. If you have slippery wood or tile floors then it is advisable to add some puffy glue or hot glue dots on the base of the shoes – but bear in mind if you do this they may no longer be reversible.

Experts agree that cloth baby shoes are far more healthy for correct foot development than fashion baby shoes, not matter how cute they look. Give the kids you love the best chance at healthy foot development by sewing these cloth baby shoes that are easy to put on and take off and that don’t impede baby’s balance. Our free printable pattern is available in 6 sizes.
Do you like this? Pin for later:
Wanna be friends? Click HERE and follow me on Pinterest
RELATED: