
Fabric box with folded corners – the perfect trinket box
The fabric box with folded corners is super easy to make. I can think of dozens of uses for it, from storing the jewelry you take off after a day at work, to charger cables, nail enamelss, sewing clips, a small pot plant … I could go on and on. There are people making and selling these online who are hard at work to keep up with the orders, making upwards of 20 a day, proving there is a demand for them. The size given in our step-by-step tutorial is for a medium size box but you can simply alter the dimensions of the square to make smaller or larger boxes. A set of three in different sizes would make a great gift.
Fill the folded fabric box with wrapped chocolates or other small treats for a gift. Afterwards a person can put them to good use. I can see these in a deep purple velvet for those with Boho tastes, a smart sand and cream for the Hamptons beach house style, or small chintz style prints for the country living style. This folded fabric box will enable you to make beautiful items from those tiny bits in your fabric stash.
Below you will find my step by step written tutorial with VIDEO instructions for all the visual learners.
We occasionally link to goods offered by vendors to help the reader find relevant products. Some of the links may be affiliate meaning we earn a small commission if an item is purchased.
Table of Contents
How to make a Fabric box with folded corners
Supplies and tools
- fabric – 2 pieces of printed woven cotton (one main, one lining) 25 x 25 cm (10×10″)
- fusible batting 24 x 24cm (9.5 x 9.5″)
- matching thread
- 4 buttons or beads
- Fabric marking pen
- scissors (or rotary cutter and a cutting mat)
- ruler or measuring tape
- iron and ironing board
- sewing clips or pins
- hand sewing needle + thread
DOWNLOAD: pattern coming soon [Free pdf file]
Follow us for free patterns & tutorials! [easy-profiles]
How to Sew a fabric box with folded corners
Watch the diy fabric box with folded corners video first and then follow the written step by step instructions below.
Please enjoy and don’t forget to Like and SUBSCRIBE over on YouTube to be kept up to date with new videos as they come out.
fabric box with folded corners VIDEO TUTORIAL
INSTRUCTIONS:
STEP 1:
Turn your outer fabric wrong side up on your pressing surface, then over it place the fusible batting with the fusible side down, lining up the edges equally as the batting is cut a little smaller than the outer – this is to reduce bulk when sewing.
STEP 2:
Attach the fusible batting with your iron according to the manufacturer’s instructions.
STEP 3:
Flip over the fabric with batting attached so the right side is uppermost and over it place the lining piece, right side down, so, right side facing right side. Clip in place.
STEP 4:
On one side mark a gap of (6cm) 2.5 inches roughly in the middle of the side.
STEP 5:
Stitch around the square ¼ inch (6mm) from the edge, starting at one side of the gap, backtacking to start and going right around the edge to the other side of the gap and backtacking to finish. Your stitch line will be just at the edge of the batting.
STEP 6:
Snip off triangular bits at the corners to reduce bulk when turning. Make sure not to snip too close to the stitch line.
STEP 7:
Turn the folded box the right way out by gently pulling the fabric through the gap. Use a turning tool or chop stick to ensure the corners are pushed out neatly, then turn in the raw edges of the gap in line with the seam and give the square a press.
STEP 8:
Stitch all around the edge, including over the gap, 1/8 of an inch (3mm) from the edge using a matching thread in your machine. Backtack at the finish then trim off threads.
STEP 9:
Place your square with the lining side down on your worktop and fold the bottom right corner to the top left corner so you have a triangle with the lining showing. Insert a pin or clip to hold the edges secure on each side while you complete the next step.
STEP 10:
Measure 2 ¾ inches (7cm) along the side adjacent to the folded edge and make a mark with your fabric pen. Repeat on the opposite side. Then move the pins you inserted earlier to correspond with the fabric marks as you will stitch these later.
STEP 11:
Grab the pinned edges and line them up, pulling out the extra fabric to make another triangle and pinning the opposite side as you did in Step 10. You will now have 4 pinned corners.
STEP 12:
Head over to your machine and stitch down a little way – around ¼ of an inch (6mm) from the pinned edge into the fabric on each of the 4 pinned edges, making sure to backtack at the start and finish.
STEP 13:
Turn the box so the lining is on the inside and ensure the pleated corners are neat then flip over the little triangle that shows some of the lining and pin in place towards the outer fabric. Repeat until all four corners are pinned.
STEP 14:
Using a matching thread to the lining color, handstitch the points of the corners so they don’t lift – it just takes a couple of stitches to secure them.
STEP 15:
Hand sew on a pretty button or bead towards the middle of each of the flipped over triangles. You can use a button with a shank, or flat buttons – whatever you prefer.
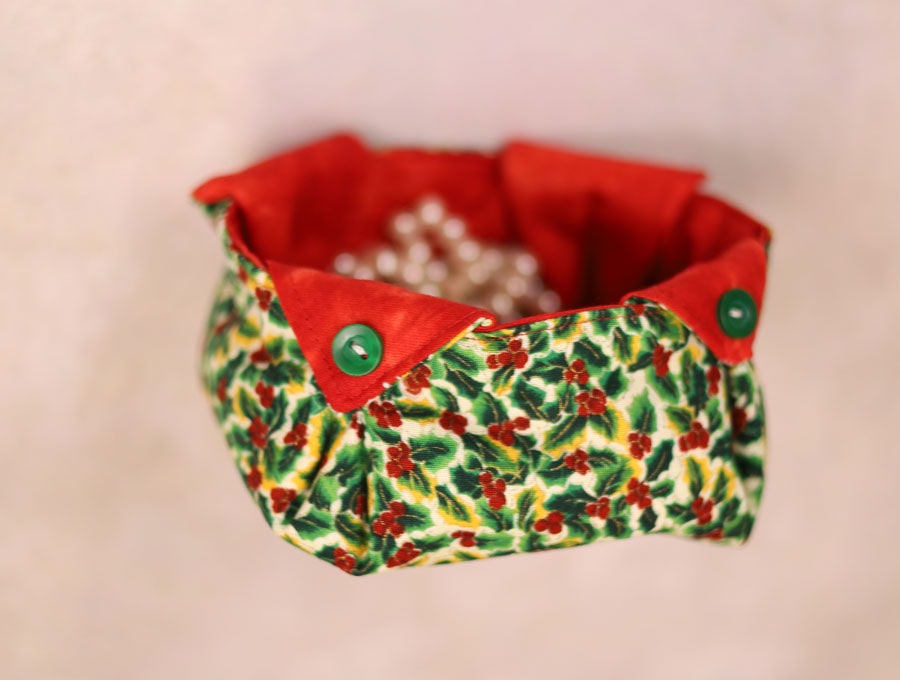
here’s how it looks on the inside

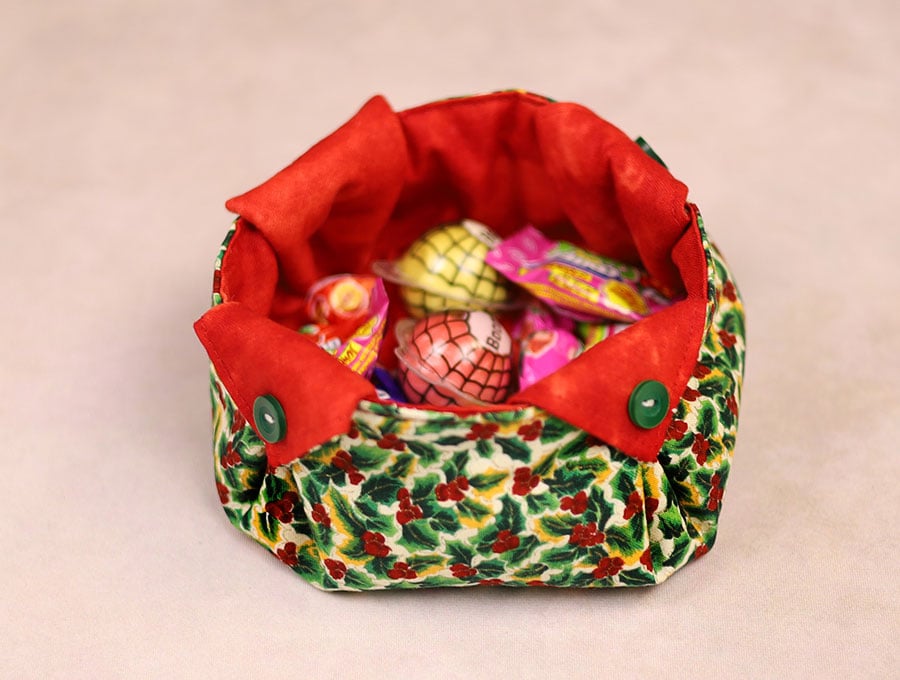
There it is – a gorgeous little folded fabric box ready to be put to use. I would make these for Christmas treats adding to the festive air of a Christmas table, or make them as gifts filled with goodies depending on a person’s interest – lipstick and eyeshadow for beauty aficionados, hair bands and scrunchies for girls with long hair, sewing clips and sewing threads for fellow sewing enthusiasts, miniature liqueur bottles or liqueur chocolates for men. Wrapped gingerbread biscuits would be great, a mini-Christmas cake or mini-plum pudding – yum!
The folded fabric box is a breeze to make. Watch our visuals to see how it is done and then follow the step-by-step instructions to make these boxes in a variety of colors suited to the people around you who would benefit from organizing their desks, sewing rooms, bedrooms and bathrooms. The folded fabric box uses up those gorgeous bits of fabric you’ve been keeping for something special. Now those fabrics can go on display as a very useful item. You can easily scale them to the size you want to keep your home organized.
Please don’t forget to like and subscribe for all the latest projects delivered to your inbox – never miss out on a project again.
Do you like this? Pin for later:
Wanna be friends? Click HERE and follow me on Pinterest
RELATED: