
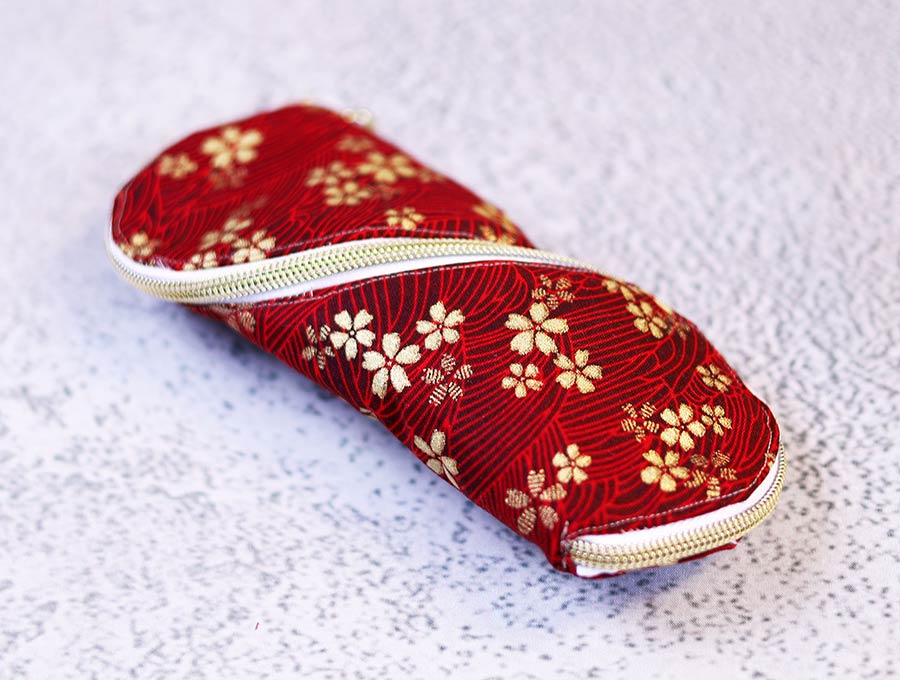
DIY Infinity Glasses Case [Eyeglasses Case Sewing Pattern + Video]
Learn how to sew the Infinity fabric glasses case in a matter of minutes. Protect your expensive eyeglasses or sun glasses from getting scratched with our great infinity case. We show you how to make the pattern. All you need is a little time and a few leftover bits of fabric from your stash and soon you’ll have this stylish glasses case ready to use.
Just get the eyeglass case pattern and follow the instructions below

open case – outside view

open case – inside view
Below you will find my step by step written tutorial with VIDEO instructions for all the visual learners.
We occasionally link to goods offered by vendors to help the reader find relevant products. Some of the links may be affiliate meaning we earn a small commission if an item is purchased.
Table of Contents
How to make a fabric glasses case
Supplies and tools
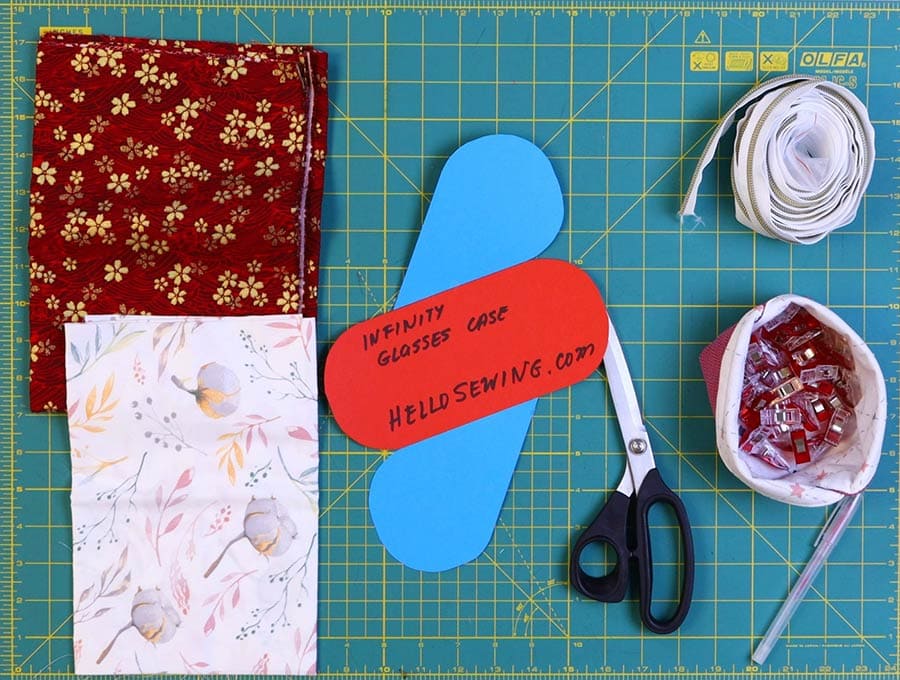
- fabric – 2 pieces of woven cotton (one main, one lining)
- batting
- zipper
- matching thread
- scissors (or rotary cutter and a cutting mat)
- ruler or measuring tape
- iron and ironing board
- sewing clips or pins
- Spray fabric glue if batting is not the fusible type
- The infinity glasses case pattern (below) or some card and tape to if you are making your own pattern
DOWNLOAD: infinity glasses pattern [Free pdf file]
Follow us for free patterns & tutorials! [easy-profiles]
How to Sew an eyeglass case
Watch the diy infinity glasses video first and then follow the written step by step instructions below.
Please enjoy and don’t forget to Like and SUBSCRIBE over on YouTube to be kept up to date with new videos as they come out.
Glasses Case VIDEO TUTORIAL
MATERIALS:
- Piece of outer fabric 8 x 7 inches (20 x 18 cm)
- Lining fabric 8 x 7 inches (20 x 18 cm)
- Piece of batting (fusible or plain) 8 x 7 inches (20 x 18 cm)
INSTRUCTIONS:
STEP 1:
Download the infinity glasses case template and print at 100% (no scaling). Trim any excess paper and place aside.
NOTE: if making your own pattern – scroll to the bottom of this post to find the instructions how to make your own glasses case pattern.
STEP 2:
Place the pattern over a double layer of fabric – outer and lining, right sides together and either using weights, a rotary cutter and self-healing cutting mat, or pins and a pair of scissors, cut around the pattern, cutting a bit larger all around by ¼ of an inch (6mm)
STEP 3:
Put the lining aside. With the outer placed in the same direction as you taped the pattern together pull the zipper apart, bend over the end where it starts, and pin with the right side of the zipper teeth facing the main fabric and the outer zipper tape on the raw edge of the fabric. Start at the intersection of the curves at the top, on the left, then work your way around to the right, down to the intersection of the curves at the bottom.
STEP 4:
Take the other side of the zipper and starting on the left of where you started in Step 9 work your way around to the bottom, clipping in place. Do not trim off the extra parts of the zipper where they meet at the bottom.
STEP 5:
Make small nicks or notches into the zipper tape, making sure not to get too close to the zipper teeth to enable the tape to lie flat around the curves.
STEP 6:
Using your zipper foot stitch along the edge close to the zipper teeth – working on the first side you pinned, then on the other side. Where the ends meet, bend the zipper to line up the sides, slip on the zipper pull and pull it up a little so it is sitting inside the fabric. Trim the ends so they are about half an inch outside the raw edges of the fabric.
STEP 7:
Attach the batting to the wrong side of the outer piece, either by ironing to attach if it’s fusible batting, or using a spray fabric glue to attach.
STEP 8:
Place the lining fabric, right side facing the right side of the outer fabric and clip all around.
STEP 9:
Stitch ¼ of an inch (6 mm) from the edge around the sandwich of fabric pieces, leaving a gap on one of the straight sides to turn the glasses case the right way out later. When you stitch across the zipper end make sure the zipper pull is inside the fabric, away from the stitch line.
STEP 10:
Make nicks in the fabric around the curves to ensure it lies flat when turned, trim off the extra bits of the zipper ends and use a quick pass of a lighter to seal the ends of the zipper so they don’t fray.
STEP 11:
Turn the glasses case the right way out by pulling the fabric gently through the gap, ensuring the edges are pushed out neatly, and the edges of the gap are turned in, in line with the rest of the fabric. Give it a press with an iron.
STEP 12:
Top stitch all around the edge of the glasses case.
STEP 13:
Pull the zipper up and you will see it will make the infinity shape. All you need to do is insert the glasses and fully close the zipper to ensure they are protected in their infinity case.
If you enjoyed this tutorial then please don’t forget to give us a like and subscribe to ensure you are up to date with all the latest videos and instructions for our practical projects.
To make your own pattern:
- Cut a piece of card to measure 8 x 7 inches (20 x 18 cm), then cut in half on the short side so you have 2 pieces of 8 x 3 ½ inches (20 x 9 cm).
- Cut another small piece of card into a circle with a radius of 1 ½ inches (4 cm) and use it and a pencil to round off the edges corners on each of the 4 sides of the one rectangle you cut in Step 1. Place the marked rectangle over the other one, clip together on the long sides and using your scissors trim off the corners as marked.
- With the card placed vertically on your worktop place the ruler at the top and measure down 1 3/8 inches (6 cm) and make a mark on the right-hand side.
- Measure 1 3/8 inches (6 cm) up from the bottom on the left-hand side and make a mark.
- Take a ruler and join the marks diagonally with a straight line, then cut the card along the line.
- Using sticky or masking tape, join the pieces together in the following manner:
- Full piece of card placed vertically on worktop.
- To the left of the full card, and right next to it, place one piece of the card you cut in half in Step 5, rounded edges lined up at the top, straight slant towards the bottom of the worktop, and tape together.
- Take the next half piece and place next to the large piece, to the right, rounded edges lined up with the bottom and straight slant facing upwards. Tape in place.
- Test by flipping the edges over so the cut pieces cover the full piece, then open out and place the pattern over a piece of batting and cut out exactly to the size of the pattern.
Make a soft glasses case with a clever infinity zipper pattern to keep reading, driving, and sunglasses scratch free! Use a few spare minutes and some fabric scraps to create this clever case that is sure to be a talking point. Once you have the pattern you can make up a few, as these make useful gifts that will be appreciated.
Do you like this? Pin for later:
Wanna be friends? Click HERE and follow me on Pinterest
RELATED: