
DIY Paintbrush Hanger Holder or Makeup brush holder // Simple Sewing project
Learn how to make this easy paintbrush hanger holder from old jeans or any other medium-weight fabric you have lying around. It’s a super simple beginner sewing project, perfect for the kids’ room so they can keep all their paintbrushes neatly organized. You can make a pocket for each brush or create fewer, larger pockets to hold multiple brushes. Did you know that I’ve been an artist in a previous life, so this sewing project is near and dear to my heart.
It also works great as a makeup brush holder or pencil organizer. Plus, you can adapt the idea to store your knitting needles or sewing supplies — after all, us seamstresses deserve to treat ourselves sometimes, right?
I don’t know about you, but we have a huge pile of old jeans lying around, and whenever I can put some of them to good use, it’s a win-win in my book!
Below you will find my step by step written tutorial with VIDEO instructions for all the visual learners.
We occasionally link to goods offered by vendors to help the reader find relevant products. Some of the links may be affiliate meaning we earn a small commission if an item is purchased.
Table of Contents
How to make a paint brush hanger holder
Supplies and tools
- fabric – 1 pieces of denim (or a pair of old jeans) or other medium or heavy-weight fabric
- matching thread
- scissors (or rotary cutter and a cutting mat)
- ruler or measuring tape
- iron and ironing board
- sewing clips or pins
- hanger
Follow us for free patterns & tutorials! [easy-profiles]
How to Sew a Paintbrush hanger holder
Watch the diy paintbrush hanger holder video first and then follow the written step by step instructions below.
Please enjoy and don’t forget to Like and SUBSCRIBE over on YouTube to be kept up to date with new videos as they come out.
brushes hanger holder VIDEO TUTORIAL
INSTRUCTIONS:
STEP 1:
Measure the horizontal bar of the hanger, between the hooks or clips, if you have any.
STEP 2:
Add 2 cm or 3/4″ for seam allowances to find your fabric width.
For example, I’m using a hanger that is on the smaller side and my horizontal bar is 25cm (10″) plus the seam allowance of 2cm (3/4″) so I need a piece of fabric that is 27 cm or 10 3/4″ wide.
STEP 3:
Fabric length:
For the standard size, use 30cm (12″) – My kid’s brush set is normal sized, so that is what I used.
For the large size, use 35cm (13 3/4″)
STEP 4:
Cut your fabric according to your measurements.
In my case that is 27 x 30 cm ( 10 3/4″ x 12″) – this will be your back piece)
STEP 5:
For the front pocket cut another piece from the same fabric that is 27 x 15cm (10 3/4″ x 6″)
STEP 6:
To prevent fraying, sew around both pieces of fabric using an overcast or a medium zig-zag stitch.
STEP 7:
Place the large piece of fabric right side up on your workdesk with the short edge at the top
Place the pocket piece on top, right side up. Align the bottom short edges. Pin the bottom edge.
STEP 8:
Stitch using 6mm (1/4″) seam allowance.
STEP 9:
Fold the top of the pocket piece 1cm (3/8″) towards the wrong side. Pin.
STEP 10:
Stitch from the right side, using 6mm (1/4″) seam allowance.
STEP 11:
Place the stitched piece on your workdesk, right side up. Straighten up the pocket piece to make sure it is laying neatly on top of the large back piece.
STEP 12:
Fold the sides 1cm (3/8″) towards the wrong side. Pin
STEP 13:
Stitch the sides.
If your machine is struggling at the beginning of the seam, make sure to place something at the back of the foot to lift it. You can use a hump jumper, or just a piece of folded denim or cardboard of similar side to the piece you are stitching.
STEP 14:
Measure the top of the pocket between the side stitches and divide into equal parts to make pockets for the brushes.
You can either make 6 larger pockets and each will hold 2 brushes.
or you can make individual pockets for the brushes. It’s entirely up to you.
STEP 15:
Divide the pocket space to the number of pockets you want to make and mark accordingly.
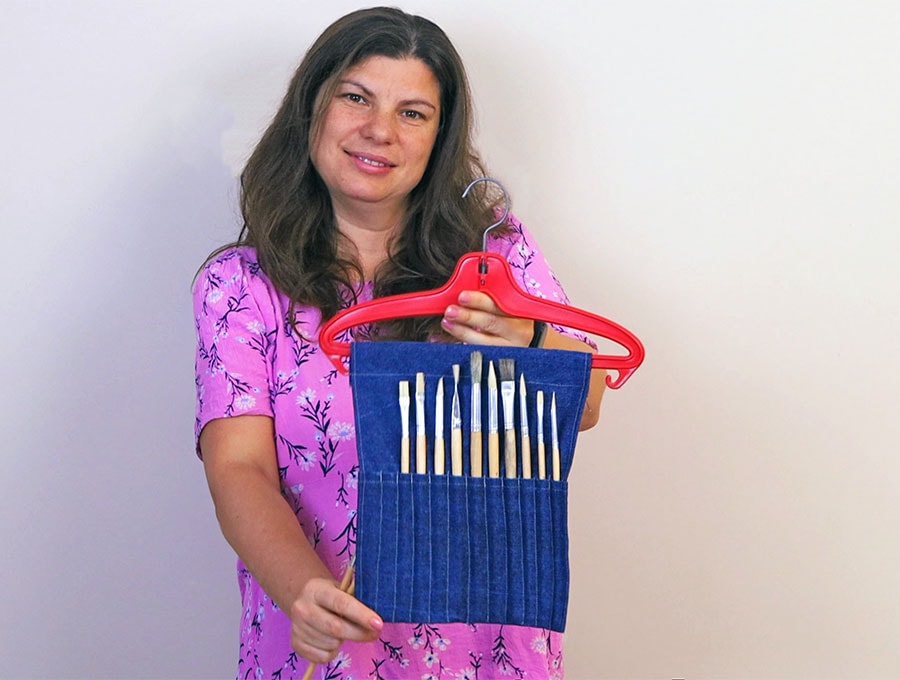
I decided to make individual pockets for my 12 brushes, so I divided the space into 12 mini pockets.
I stitched 11 vertical lines to make these pockets.
If you are making 6 pockets, you will sew 5 vertical lines.
STEP 16:
The last step is to fold the top of the paintbrush hanger holder along top of the cross bar.
Flip the whole piece around and pin the raw edge of the fold to the front fabric.
STEP 17:
Stitch as close to the cross bar as possible. You may use a zipper foot if you’d like.
Voila! The paintbrush hanger holder is ready!
Do you like this? Pin for later:
Wanna be friends? Click HERE and follow me on Pinterest
RELATED: