
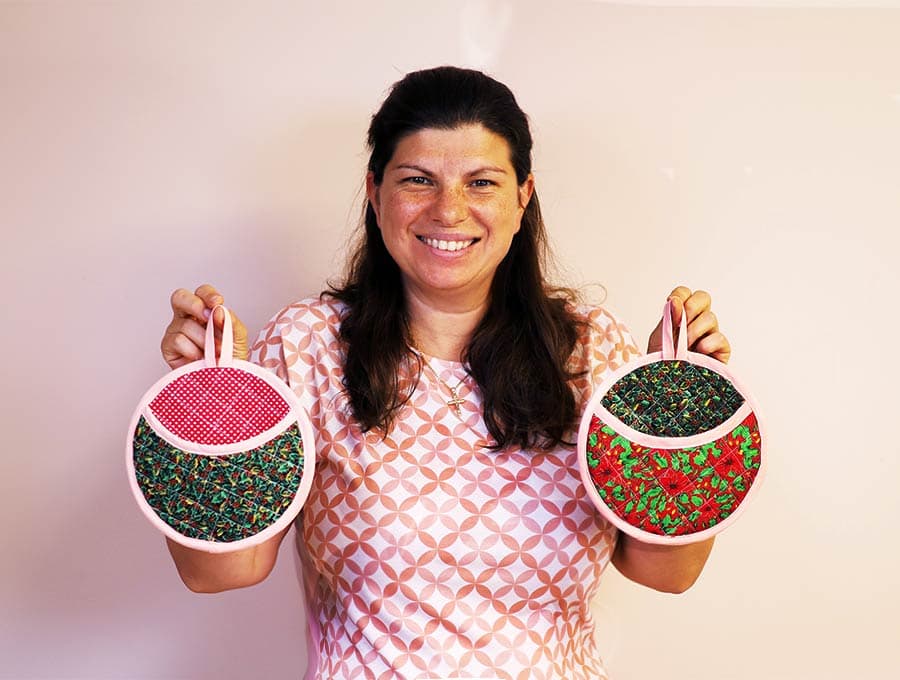
DIY Round Potholder [Sewing Pattern + VIDEO]
Learn how to make these lovely round potholders in a matter of minutes! Make these potholders reminiscent of a Christmas bauble from our free printable sewing pattern. They are a great gift for others or for your home this festive season. The pot holders are great way to get in a little quilting, decorate the heart of the home, and create practical festive season gifts. Yes, we’re starting early with our projects so you can make in advance and actually have time to enjoy the festive season this year!
Below you will find my step by step written tutorial with VIDEO instructions for all the visual learners.
We occasionally link to goods offered by vendors to help the reader find relevant products. Some of the links may be affiliate meaning we earn a small commission if an item is purchased.
How to make a Round Potholder
Supplies and tools
- fabric for the front and back of the pocket piece – 2 pieces of 100% woven cotton (one main, one lining)
- fabric for the front and back of the main piece – 2 pcs of cotton fabric
- insulation: 1 or 2 batting layers and/or isul-brite for main and pocket piece
- Double fold bias binding 3/8 of an inch (1 cm) wide to match or contrast
- matching thread
- scissors (or rotary cutter and a cutting mat)
- ruler or measuring tape
- iron and ironing board
- sewing clips or pins
DOWNLOAD: Round potholder pattern[Free pdf file]
Follow us for free patterns & tutorials! [easy-profiles]
How to Sew a Round Potholder
Watch the diy round potholder video first and then follow the written step by step instructions below.
Please enjoy and don’t forget to Like and SUBSCRIBE over on YouTube to be kept up to date with new videos as they come out.
DIY Round Potholder VIDEO TUTORIAL
INSTRUCTIONS:
STEP 1:
Assemble the fabric for the pocket – lining right side down on the worktop, on top of this the batting and on top, the outer fabric, right side up. Pin or clip together. Place the pocket pattern on top and set aside.
STEP 2:
For the main circular piece that take the heat of the pans or pots you have 3 options:
- OPTION #1: Use 1 or 2 pieces of batting
- OPTION #2: Use 1 piece of batting, and 1 piece of insul-brite, metallic side facing the back or lining piece of the potholder
- OPTION #3: Use I piece of batting, 1 piece of insul-brite and a second piece of batting
Whichever option you choose assemble as follows:
Main fabric right side down on the worktop, basting spray between each layer to keep the layers of batting and insul-brite (if using) in place, and finally the lining side right side up, and pin together. Place the circular pattern piece on top
STEP 3:
Decide the direction you are going to quilt your fabric. Use your quilting ruler to check what looks best against the paper pattern and direction of the print you have chosen.
STEP 4:
Use the quilting ruler and a fabric marking pen to mark your quilting lines for the main piece and for the pocket piece.
STEP 5:
Quilt the main piece and the pocket piece, starting from the middle and working your way to the sides.
STEP 6:
Once the fabric is quilted give it a light press with an iron before placing and pinning the pattern pieces for the main and pocket. Cut them out.
STEP 7:
Take the double fold bias binding, open out the folds and clip to the inner edge of the pocket piece, on the lining side. Leave a tiny bit extra on each end.
STEP 8:
Stitch the bias binding to the pocket piece along the first fold of the bias binding on your machine.
STEP 9:
Flip the bias binding over to the right side of the pocket piece and top stitch as close to the edge as possible, backtacking at the start and finish.
STEP 10:
Trim off the extra bias binding at the ends and place the pocket piece on the front of the circular piece. You may want to align the quilting lines of the pocket piece to the main piece but this is optional.
STEP 11:
Clip the pocket piece to the main piece. Fold the entire piece so the top ends of the pocket line up and mark the point in the middle with a pin as this is where the hanging loop will be placed.
STEP 12:
Snip off 4 inches (10 cm) of bias binding, fold along the length and stitch as close to the edge of the folds as possible to create the hanging loop.
STEP 13:
Place the ends of the hanging loop on either side of the pin and pin or clip in place after lining up the raw edges of the loop to the raw edge of the circle.
STEP 14:
Stitch across the ends of the hanging loop 1/8 of an inch (3 mm) from the edge to secure in place, backtacking over the ends.
STEP 15:
Take the length of bias binding, unfold one end, fold over ¼ of an inch (6 mm) and pin or clip to the back of the potholder, near the base of the pocket, working your way around the circle. When you come to the end, overlap the end of the bias binding over the fold where you started by 3/8 of an inch (1 cm).
STEP 16:
Stitch around the edge of the bias binding, starting just before the overlap, working your way around, stitch on the opened fold line of the bias binding. Do the overlap last so you can trim before stitching the ends down.
STEP 17:
Flip the bias binding over to the front of the potholder and clip in place neatly before top stitching as close to the edge of the binding as possible. The loop will be facing in towards the main fabric.
STEP 18:
Once done you can flip the hanging loop up and give it a press.
Your Round potholder is now ready to use. This pattern does not have to be made in Christmas fabrics – you can style them to match or add a pop of color to your kitchen – whatever color combinations take your fancy. These do, however, make a particularly good gift around the festive season when all the turkey roasting is going on. A potholder that looks like a large Christmas bauble is a fun addition to the kitchen. That’s when you need a set of holders large enough to deal with heavy roasting trays. They also add a festive touch to the kitchen. Print out our free sewing pattern, search up some cute fabrics from your stash, and get sewing.
Like and subscribe for more fun yet practical patterns and instructions from the HelloSewing studio.
Do you like this? Pin for later:
Wanna be friends? Click HERE and follow me on Pinterest
RELATED: