
DIY Zipper Scrunchie
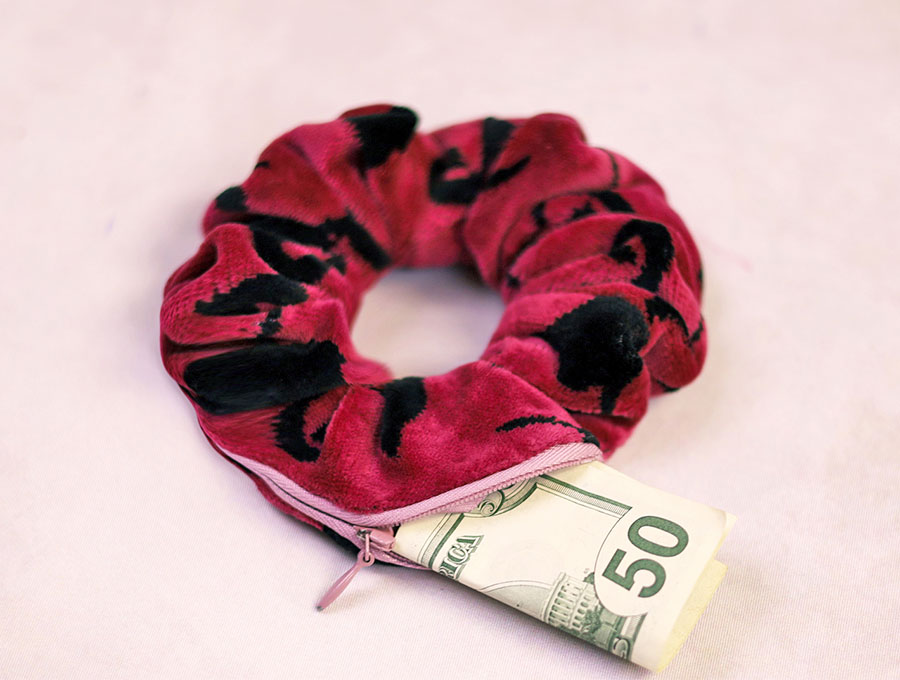
Learn how to make this practical little project – a zipper scrunchie. The hidden compartment is super convenient to store small items like keys and money. No need to carry your purse when going on a run or when you just want to just pop to a friend for a coffee.
Why would anyone need a zipper scrunchie? Well, it turns out everyone does at some stage. Like when you’re exercising and need to store your house key or a note to pay for a coffee after your run. This gorgeous scrunchie has a little zipper with a secret spot to store those tiny items when you’re on the move. Did you offer to wash up at a friend’s house and remove your ring? Then forgot it. The panicked phone calls, the trip out to fetch it… Secure it safely in your zipper scrunchie before you start and you’ll never have to worry again.
Below you will find my step by step written tutorial with VIDEO instructions for all the visual learners.
We occasionally link to goods offered by vendors to help the reader find relevant products. Some of the links may be affiliate meaning we earn a small commission if an item is purchased.
Table of Contents
How to make a Scrunchie with a Zipper
Supplies and tools
- fabric for scrunchie – 4 x 28 inches (10 x 70 cm)
- Zipper – the invisible type. Cut it down to between 3 and 3 ½ inches (8 to 9 cm)
- Elastic – 1 cm wide 7 inches (18 cm)
- matching thread
- scissors (or rotary cutter and a cutting mat)
- ruler or measuring tape
- iron and ironing board
- sewing clips or pins
- Turning tool or safety pin
- Lighter – to seal the cut end of the zipper
Follow us for free patterns & tutorials! [easy-profiles]
How to Sew a zipper scrunchie
Watch the diy zipper scrunchie video first and then follow the written step by step instructions below.
Please enjoy and don’t forget to Like and SUBSCRIBE over on YouTube to be kept up to date with new videos as they come out.
DIY Scrunchie with a Zipper VIDEO TUTORIAL
INSTRUCTIONS:
STEP 1:
Take your piece of fabric for the scrunchie of 4 x 28 inches (10 x 70 cm) and fold to find the middle. Then open it out, lay the zipper so the middle of the zipper length lines up with the mark, then make a mark at each end of the zipper.
STEP 2:
Set the zipper aside and fold the fabric along the length. Copy the marks to the other side of the fabric.
STEP 3:
Open the zipper and pin to one side of the scrunchie, right side of zipper to right side of fabric, then pin the other side lining up to the marks you made.
STEP 4:
Attach your zipper foot to the machine and stitch down each side of the zipper, backtacking at the start and finish.
STEP 5:
Test the zipper runs smoothly, open the zipper and then clip the long edges of the scrunchie together in preparation for sewing.
STEP 6:
Stitch along the length of the scrunchie starting 5/8 an inch (1 cm) from the end and finishing 5/8 of an inch (1 cm) short of the other end. Backtack at the start and end of the zipper opening.
STEP 7:
Use your turning tool or a safety pin to pull the scrunchie the right way out then pin the ends together, right side to right side. Make sure you have no twist in the scrunchie fabric.
STEP 8:
Make sure the zipper is still open before stitching across the ends to join them 3/8 of an inch (1cm) from the end.
STEP 9:
Straighten the scrunchie and turn the raw edges in line with the seam, then stitch to close, 1/8 of an inch (3mm) from the edge. Trim off threads.
STEP 10:
Thread the piece of elastic through the scrunchie using a safety pin. Tip: put a safety pin both ends so if an end accidentally gets pulled inside the fabric it’s easy to thread out again. You can tie off using a double knot as you see in the visuals. Alternatively, you may choose to stitch the ends after overlapping them by ½ an inch, either on your machine or by hand. Stitch securely, back tacking to make sure the stitching does not come loose.
Your zipper scrunchie is all ready to use – securely holding your hair plus holding an all-important locker key or house key in place.
If you are one of those people who have tried tying a key to your shoelace, or slipping a note inside your shoe when out for a jog, then you seriously need the zipper scrunchie. It has a tiny zip in the scrunchie to slip in a key, a ring or a note to keep them safe when you aren’t carrying a purse and just need somewhere to store a small item while you are out. Using a remnant from your fabric stash you can whip one of these up in a few minutes.
If you enjoyed this tutorial then please give us a like and subscribe to keep up to date with all our latest sewing tutorials.
Do you like this? Pin for later:
Wanna be friends? Click HERE and follow me on Pinterest
RELATED: