
Gold Leather Stripe Pillowcase – Sew in just 10 minutes
Create a feel of luxe with cushion covers that have a gold leather stripe through them – or any other color – bronze, silver, black or white – whatever takes your fancy. The best part – it will take you around ten minutes to make one. Just the thing to complete your holiday look. Imagine striped pillowcases in a wheat colour with a silver stripe for a beach house, reflecting sun on water and beach sand, or black and white pillowcases for a city apartment, gold against purple velvet for a Boho home.
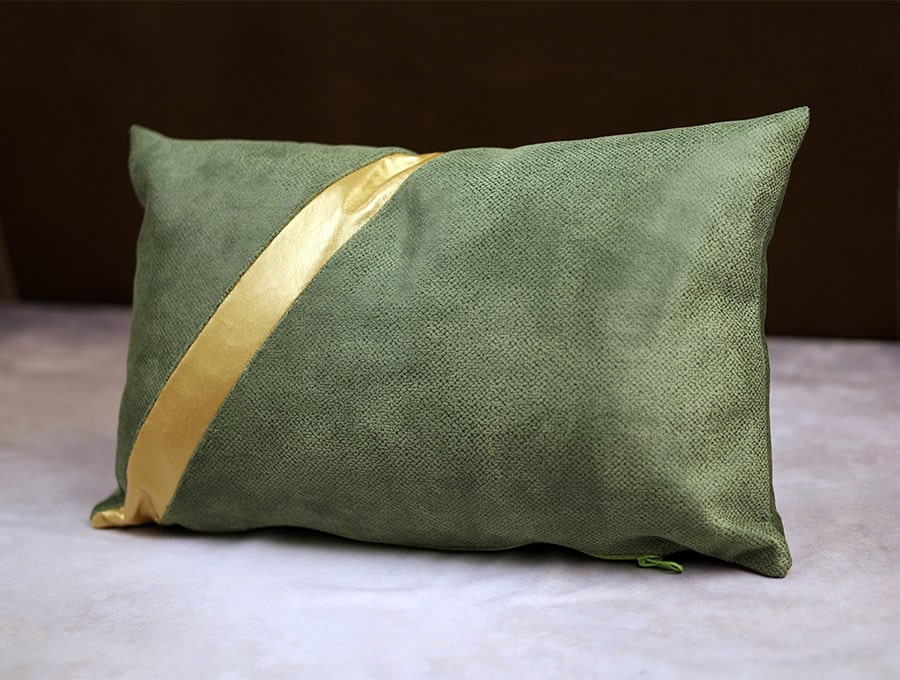
Once you see how easy it is to make this striped pillowcase you’ll want to make a few matching ones to dress up your sofa. With a zipper they are easy to take off and wash. The best part is once you have the hang of making these pillowcases they take about 10 minutes each!
Below you will find my step by step written tutorial with VIDEO instructions for all the visual learners.
We occasionally link to goods offered by vendors to help the reader find relevant products. Some of the links may be affiliate meaning we earn a small commission if an item is purchased.
Table of Contents
- 1 How to make a Gold Leather Stripe Pillow with zipper
- 2 Supplies and tools
- 3 How to Sew a Gold Leather Stripe Pillow
- 3.1 Gold leather stripe pillow VIDEO TUTORIAL
- 3.2 INSTRUCTIONS:
- 3.3 STEP 1:
- 3.4 STEP 2:
- 3.5 STEP 3:
- 3.6 STEP 4:
- 3.7 STEP 5:
- 3.8 STEP 6:
- 3.9 STEP 7:
- 3.10 STEP 8:
- 3.11 STEP 9:
- 3.12 STEP 10:
- 3.13 STEP 11:
- 3.14 STEP 12:
- 3.15 STEP 13:
- 3.16 STEP 14:
- 3.17 STEP 15:
- 3.18 STEP 16:
- 3.19 STEP 17:
- 3.20 STEP 18:
- 3.21 STEP 19:
- 3.22 STEP 20:
- 3.23 STEP 21:
- 3.24 STEP 22:
How to make a Gold Leather Stripe Pillow with zipper
Supplies and tools
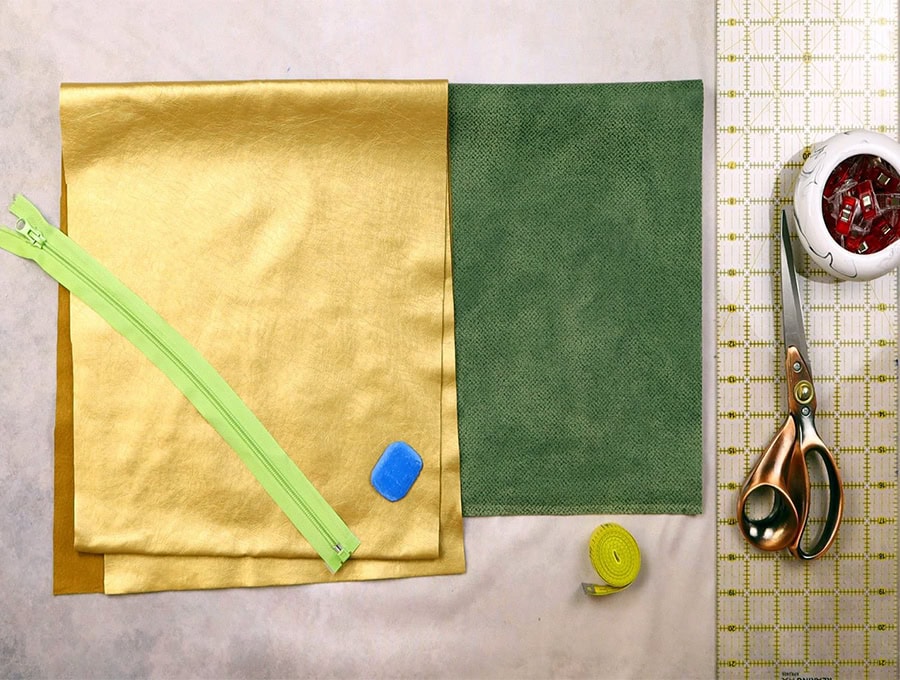
- fabric – upholstery fabric of medium weight 30 x 24.5 inches (76 x 62 cm)
- Piece of faux gold leather fabric to make the stripe
-
18 inch zipper to match the main fabric
- pillow form insert
- matching thread
- scissors (or rotary cutter and a cutting mat)
- ruler or measuring tape
-
Fabric marking pen
- iron and ironing board
- sewing clips or pins
Follow us for free patterns & tutorials! [easy-profiles]
How to Sew a Gold Leather Stripe Pillow
Watch the diy gold leather stripe pillowcase video first and then follow the written step by step instructions below.
Please enjoy and don’t forget to Like and SUBSCRIBE over on YouTube to be kept up to date with new videos as they come out.
Gold leather stripe pillow VIDEO TUTORIAL
INSTRUCTIONS:
STEP 1:
Lay out your 30 x 24.5 inches (76 x 62 cm) piece of fabric right side up on your worktop.
STEP 2:
Measure 3 ¼ inches (8 cm) up from the bottom right hand corner and make a mark using a fabric marking pen.
STEP 3:
Go to the top left corner of the fabric and measure 3 ¼ inches (8 cm) down and make a mark.
STEP 4:
Line up the top left hand corner with the 3 ¼ inch (8 cm) mark on the right bottom of the fabric using a quilting ruler, and draw a line to connect them.
STEP 5:
Move the ruler down to the 3 ¼ inch (8 cm) mark on the left side and line up with the bottom right hand corner and draw a line to connect them.
STEP 6:
Using scissors or a rotary cutter and self-healing cutting mat cut out the 3 ¼ inch (8cm) diagonal strip you have marked.
STEP 7:
Place that strip over your faux gold leather material right side up and pin or clip to hold it in place on the right side of your gold fabric while you cut out the strip.
STEP 8:
Take the gold strip and place it correctly so the edges line up between the two pieces of the main fabric. This strip is replacing the strip you cut out.
STEP 9:
Fold the gold strip down over the bottom piece of fabric and line up the edges, then clip in place before running a line stitching ¼ inch (6mm) from the edge.
STEP 10:
Open up the stitched piece and line up the bottom of the cushion fabric above the stripe, with the edge of the gold strip, clip in place then run a line of stitching ¼ of an inch (6mm) from the edge.
STEP 11:
Now that you have a rectangular piece of fabric with a gold strip running diagonally across it you now fold the seams away from the gold strip on each side and run a line of topstitching 1/8 of an inch (3mm) from the gold stripe, stitching on the main fabric and remembering to back tack at the start and finish
STEP 12:
Trim the edges so they are neat, then fold the rectangle in half on the long side, right sides facing each other and lining up the edges. Clip or pin in place.
STEP 13:
Make a mark for the gap to turn the pillow cover in the middle on the long side opposite the fold – it should be 18 inches(45.7 cm) in length.
STEP 14:
Stitch around the pillow, starting from one side of the gap with a backtack and going right around the pillowcase until you end up at the other side of the gap, ending with a backtack.
STEP 15:
Trim off the excess fabric at the corners before turning the right way out by pulling the fabric through the gap, pushing out the corners so they lie flat.
STEP 16:
Take your zipper and open it up, placing one side in line with the folded seam of the gap and pinning or clipping in place.
STEP 17:
Pin or clip the other side of the zipper on the opposite side of the gap, with the fabric folded in line with the seam.
STEP 18:
Change to a zipper foot on your machine and stitch as close to the zipper teeth as possible. When you come near the end, lift the presser foot with the needle still in place in the fabric and close the zipper as bit, then continue stitching to the end of the zipper.
STEP 19:
To make the turn leave the needle in the fabric, lift the presser foot and swing 90 degrees to stitch across the zipper width, making sure to backtack as this is where the fabric takes strain. Leave the needle in the fabric, swing again 90 degrees to start going up the other side of the fabric.
STEP 20:
Once you have gone a little way up the side, leave the needle in the fabric, lift the presser foot and ease the zipper pull back to the fully open position and continue sewing once you have depressed the presser foot.
STEP 21:
When you get to the end of the zipper leave the needle in the fabric, lift the presser foot and swing 90 degrees to stitch across the zipper width, making sure to backtack. Life the presser foot and swing the fabric, leaving the needle in the down position and work about 1 inch (2.5 cm) down the first line you stitched ending with a backtack.
STEP 22:
Place your pillow insert inside the pillow, zip up and display your new pillowcase proudly.
If you enjoyed this tutorial then please share with a friend who might enjoy sewing. Like and subscribe, and once you’re a subscriber leave a comment and photos of your pillowcases in the comments section. Yes, we know you’re not just going to stop at one but create a few of these sophisticated looking pillowcases for your sofas!
Do you like this? Pin for later:
Wanna be friends? Click HERE and follow me on Pinterest
RELATED: