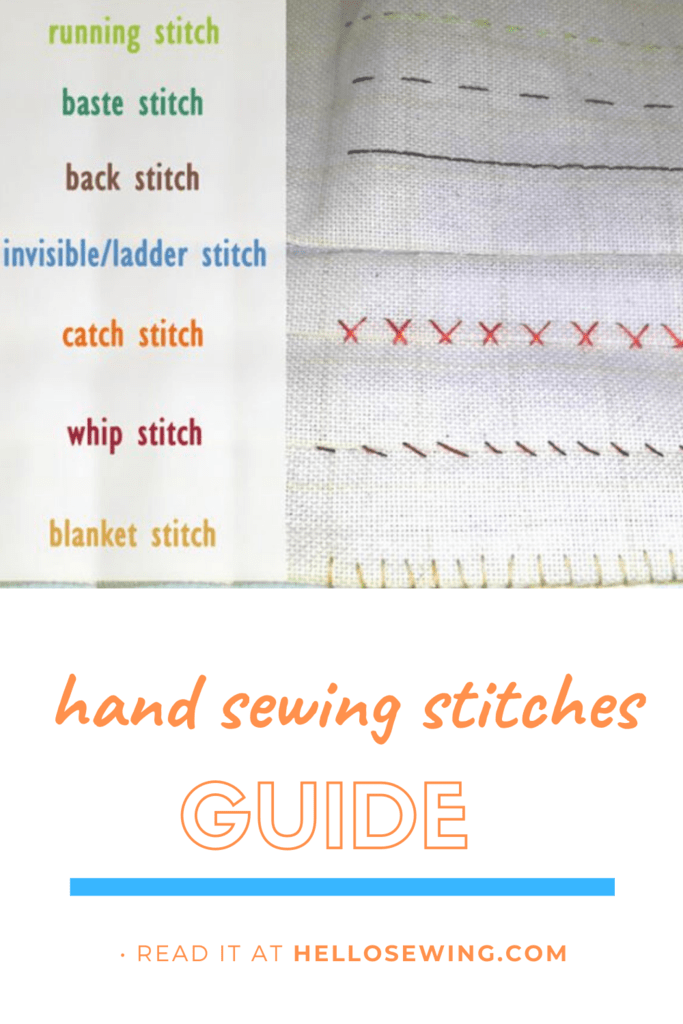
Guide to Basic Hand Sewing Stitches
No matter how smart and modern your sewing machine is, any sewist – be it a beginner or a professional needs to know the hand sewing basics and the main hand sewing stitches. You will need an appropriate needle, thread and a needle threader. The finer the fabric – the thinner the needle you should use. The needle threader will save you time and will eliminate the sense of frustration of being unable to get the thread through the tiny needle eye.
Here is an easy guide to all you need to know about the main hand stitches and ways to learn how to do them.
Make a practice sampler
In order to be able to get a sense and a clear view of how you are doing with your hand stitching, it is a good idea to start by making a sampler out of cotton muslin sized 9” x 11” and use a ruler and pencil or marker to draw straight lines where your stitches will be. This will act as a guideline, and will give you a perfect view of how you are managing the different hand stitching techniques. Once you are ready, get the needle, the needle threader and the thread of your choice ready and start stitching line by line. Here are the basic hand stitches to start with
Table of Contents
How to Sew the Basic Hand Sewing Stitches:
-
Basting stitch
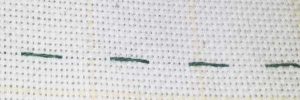
This is a simple and yet indispensable stitch you should master. It is used for hand stitching your fabrics or pattern on the fabric before machine sewing a hemline or pocket placement. This basic hand stitch is an easy to do alternative to pinning. It is done with a single thread, so that you can easily remove it once you are done with the sewing without damaging the fabric of your garment. Tie a knot at the end of the single thread and make wide stitches of about 3 to 8 inches from one another. Be careful not to make it too tight or too loose, because this will cause the fabric to become deformed. The goal is to keep it flat, so that you can trace the pattern properly. Once you are done with the hand stitching, secure the thread at the end so that it stays in place until you need it. Later, when your little seamstress moves on to sewing with a sewing machine
(browse here to see which models we love hellosewing.com/best-sewing-machine-for-kids-tweens-teens/) , she will need to use this stitch before using the machine
-
Running stitch
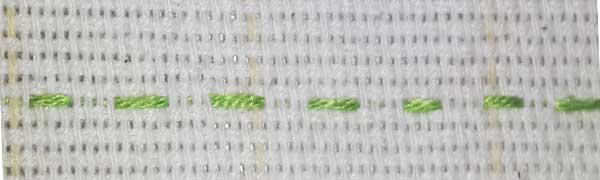 This is a small hand stitch which is used for attaching fabrics together or for joining fabric at the seams. Use a single thread with a knot at the end and make several of the running stitches at once, so that it goes faster. Once again, make sure that the thread is neither too loose nor too tight so that the two pieces of fabric remain flat. Once you are done, secure the end with a few back stitches.
-
Back stitch
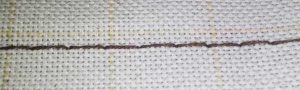 This is a stronger and more secure hand stitch which done with a single thread. Make a single stitch in and out of the fabric, and then go back with the needle to a spot before the previous stitch came out. Then bring your needle one stitch ahead of the previous one. Once you are done, the front should look straight and neat in a row, whilst the back should have longer and overlapping stitches. Make sure the fabric is flat by avoiding stitching too tight or too loose.
-
Whip stitch
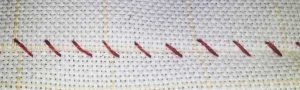
image is available for Creative Commons use, license 4.0
The whip stitch is usually used is for hemming, and the thread keeps going over the edge of the fabric in order to enclose it. It is also frequently used to create a seam in two pieces of fabric or joining two finished edges together – such as sewing the sides of a jumper or joining the shoulder seams. Because the whip stitch wraps around the edge of the fabric/s, it is less likely to fray or come apart.
-
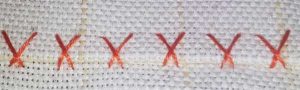
Overcast stitch
This stitch is similar to the whip stitch. It is used for safe finishing of the fabric edges in order to keep them neat and to stop them from getting unraveled at the raw edges. The overcast is made with short, diagonal stitches over the edge of the fabric. You should start from the back of the fabric at ¼ of an inch from the raw end and pull out the needle at the front. Then go to the back again, so that the thread encloses the raw edge as you go. Make sure you maintain the same spacing and stitch length. Double overcasting involves crossing the diagonal stitches over and forming small x-s as you go. The double overcast stitch will give your fabric edges a very smooth finish.
-
Catch stitch
 This is the one to use when you want to make a hem which has some stretch. It resembles the herringbone.
The needle catches a couple of threads from the first fabric and then should go to catch the same amount of threads from the second fabric.
image is available for Creative Commons use, license 4.0
It is also called buttonhole stitch as apart from edging blankets, it is also used for making buttonholes. The stitches are spaced at a quarter or half inch apart. Start from the back of the fabric and bring the needle at ¼ of an inch from its end. Pull the threat through to the front. Then place the needle at a very small distance from the previous starting point and pull it from the front to the back of your fabric. Place the thread beneath the needle point and then pull it out.
-
Ladder stitch / Slip stitch / Blind hem stitch
 Three ways to call the same thing. This is an invisible hand sewn stitch which is used for hemming. Pull the needle through the folded hem of the garment, then pull it out in order to catch a few threads of the fabric and push it back through the folded hem. The less visible the thread is from the front of the hem – the better.
-
Vertical hem / couch stitch
This is another one you can use for sewing your hem without the threat being visible from the front of the fabric. Fold the hem and pull out the needle and thread from behind the fold. Once your needle comes out vertically catching two threads of the fabric you should proceed to make the net stitch. Once you are done, only tiny dots of thread should be visible.
-
Half back stitch
Used as a decorative one, this involves carrying the next stitch back only at half the length of the previous one.
Once you are done practicing, you can start hand stitching your actual project. Even though it may seem old fashioned and outdated, hand sewing is an essential skill which every sewist should learn to use for the appropriate sewing tasks.
All the stitches at a glance
Image available for Creative Commons use, license 4.0
Takeaway
I firmly believe that everyone needs to learn how to sew by hand. Unfortunately not everyone has a crafty lady in his/her life to teach them the basics. That’s why I created this visual guide to the most common hand sewing techniques.
Which of the 7 basic hand stitches you find the easiest? Let me know in the comments
Pin it for later: