
Guide to the Basic Machine Sewing Stiches
Are you overwhelmed with the huge choice of stitches your modern sewing machine has? Don’t worry – you are not alone. Even professional sewists find it difficult to manage to learn all the possible stitching options provided by the latest sewing machines. For more detailed information you can always refer to your sewing machine manual if you want to find out more about all the variations of the stitches it offers. Remember that different types of machines have different options, but for starters, here are some basics regarding the stitches of your sewing machine which you should be aware of and use for your projects:
Table of Contents
GROUP 1 – MAIN STITCHES
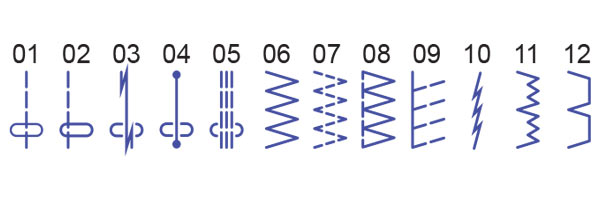
- The straight stitch
This is the one type of stitch which you will probably be using most often while working on your garment. It is the most basic stitch that even the children’s models have (see for yourself – https://hellosewing.com/best-sewing-machine-for-kids-tweens-teens/). The straight back and forward stitch can be used for simple top stitching, stay stitching, under stitching and for seams.
- The straight stitch with the needle far left
You can use this option in order to sew up to the far left if necessary.
- The lock-o-matic stitch
This stitch option will knot your stitch at the beginning and at its end, so you so not need to back stitch.
- The locking stitch
Like the previous one, this stitch will make a knot at the start and end of the stitch, but it will be invisible.
- The triple stretch stitch
Use this stitch for sewing parts of the garment where both sturdiness and stretch are required, such as shirt armpits.
- The zigzag stitch
This is the classic zigzag stitch you will be using often for various projects. It is commonly used for finishing as a combination with a straight stitch. Your machine should have the option of choosing and adjusting both the length and width of your zigzag stitch.
- The multiple zigzag stitch
Perfect for edge finishing of stretchy fabrics which tend to pucker when you use the regular zigzag stitch.
- The overcasting stitch
Use this one for finishing fabric edges. Some sewing machines have a special overedge foot for easy guiding of the fabric while you use the overcasting stitch option.
- The knit stitch
A great stitch for stretchy or knitted fabrics. Use it to stitch along the fabric edge and after that trim any excess fabric close to the wide stitches.
- The stretch stitch
Used for stitches which should stretch and for knits.
- The blind hem stretch
Use this option when you need to sew a blind hem on a fabric which is stretchy.
- The blind hem stitch
For sewing blind hems. It consists of a few straight stitches followed by a wide catch/zigzag stitch. The fabric is folded under the stitch, and only small dots are visible on the top. It can require some practice, but once you master it, it is a perfect option for quick hemming of skirts and pants.
GROUP 2 – BUTTONHOLE STITCHES
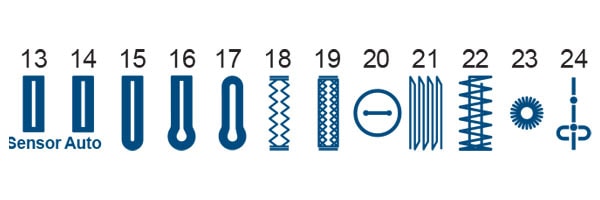
- Sensor buttonhole stitch
This option is available in some sewing machines and features a special foot in which you can fit your button, so that the machine can sew a buttonhole in accordance to its size.
- Automatic buttonhole stitch
This one allows you to enter the size of the button, and the sewing machine will automatically make a buttonhole with the appropriate size.
- Round end buttonhole stitch
For making buttonholes on medium weight fabrics.
- Keyhole buttonhole stitch
Suitable for making buttonholes on delicate, light fabrics.
- Rounded keyhole buttonhole stitch
Use this option when working on heavy or medium weight fabrics and bigger buttons.
- Stretch buttonhole stitch
To be used for making buttonholes on stretchy fabrics.
- Knit buttonhole stitch
Suitable for making a buttonhole on a knit fabric.
- Button sewing stitch
Used for sewing on a buttons – usually this option is paired with a special foot where the button should be fitted.
- Darning stitch
For repairing tears, holes and rips on the fabric.
- Tracking stitch
For reinforcement of the stitch at places where extra strength is necessary, such as at the crotch area or when sewing pockets on garments.
- Eyelet stitch
Makes an eyelet hole on the fabric.
- Basting stitch
GROUP 3 – SATIN STITCHES
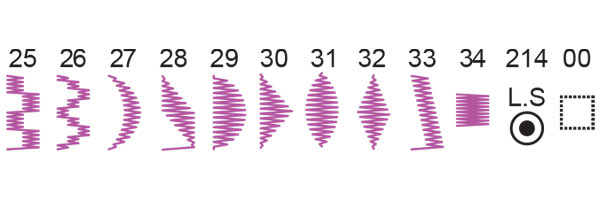
Stitches 25-34 All those are basically different decorative zigzag stitches which can be used for edging blankets and other projects. These can be either used separately or you can combine them in a pettern combination which the machine will sew repeatedly.
GROUP 4 – EDGE STITCHES
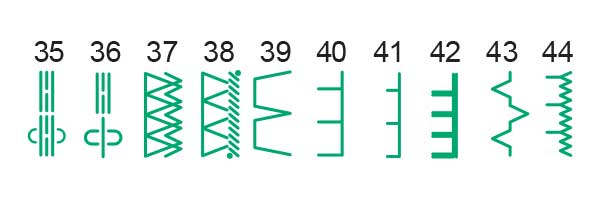
- Saddle Stitch
It is formed with one stitch forward, two stitches backward, and a fourth stitch forward. It is used for topstitching suits, denim outfits, and blazers to achieve great looking hand-sewn look.
- Sculpture stitch
Similar to the one above this one is again used for topstitching and outline stitching to make the appearance of the piece of clothing much more attractive.
- Double overedge stitch
For finishing fabric edges which are prone to fraying.
- Overlock stitch
For making a professional looking fabric edge finish which is very similar to what a serger will do.
- Shell tuck stitch
Another decorative stitch option for lightweight fabric edging.
- Applique stitch
For appliqueing, and for adding a pretty and neat applique edge.
GROUP 5 – FANCY STITCHES
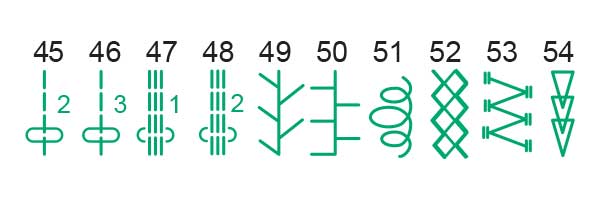
There are also a number of fun and great looking stitches for decorating and experimenting. Have fun with those and use your creativity to design great looking items
===============================================================
Are you already feeling confused and overwhelmed after reading all these options? Believe me, once you start trying out the different stitches which your sewing machine can do, and when you learn how and when to use them – you will find some or most of them absolutely indispensable for your future projects. Do not rush into trying each and everyoption at once. Take it slowly and learn how the different options work for different types of fabrics and projects. Once you master these, there is no doubt that you will find other stitching options and clever techniques which you can use for more advanced projects.
Go ahead, and start experimenting with the wonderful stitching options which your machine has!