
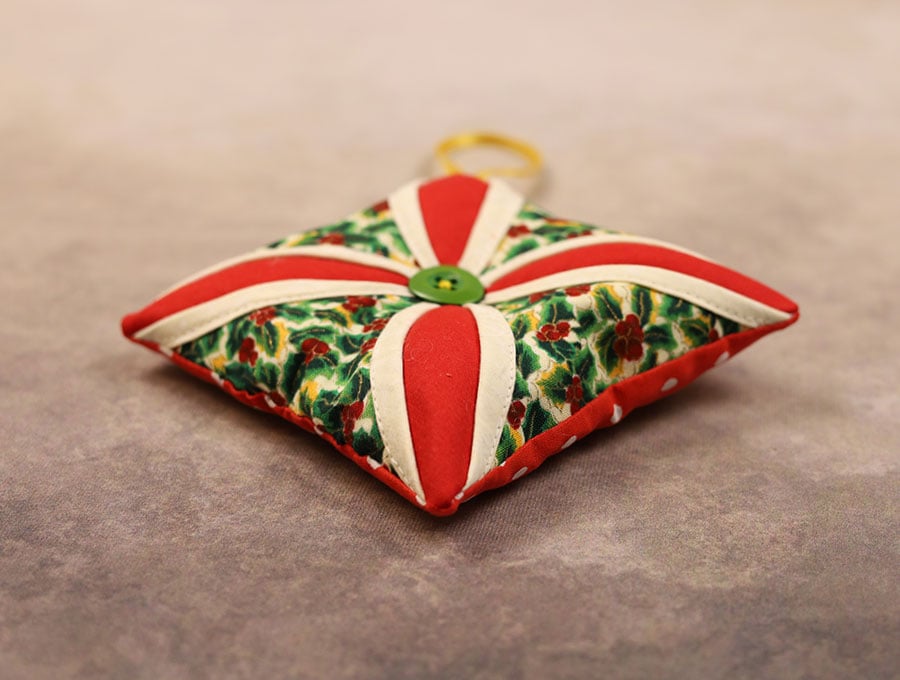
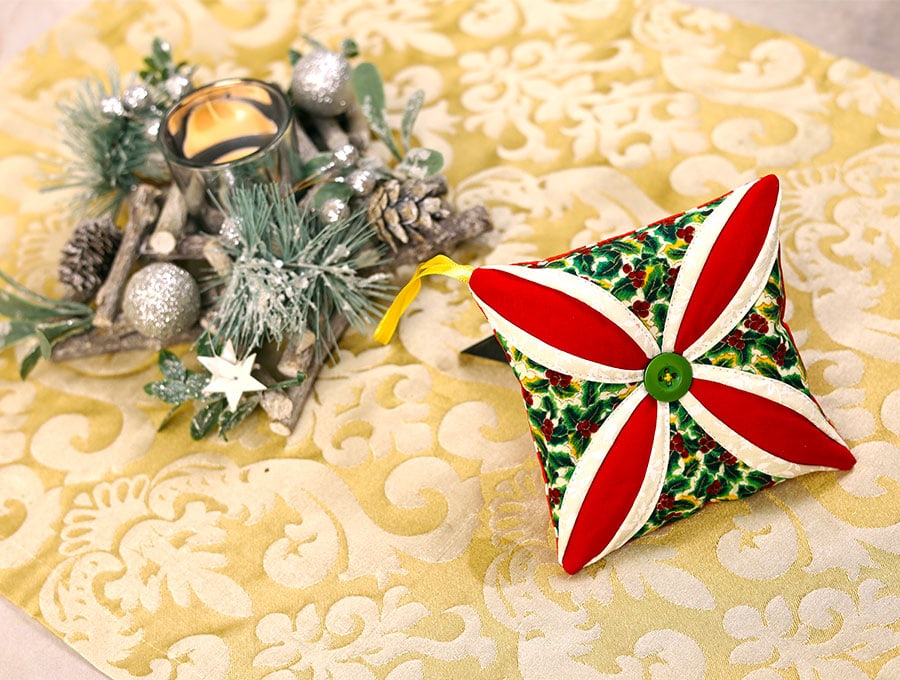
How to Make Cathedral Window Christmas Ornaments
How are your origami skills? These Scandinavian Cathedral Window Christmas Ornaments use a bit of folding, some gluing and sewing. The secret to creating pretty Cathedral Window Christmas ornaments is to use a good quilting cotton and make sure you size the fabric so it is stiff enough to retain its shape. Our easy step-by-step tutorial will take you through the steps needed to create the ornament. It is sure to attract the attention of your guests who will wonder how you made it, but if you ever created a paper Chatterbox as a kid you will be halfway there to creating the Cathedral window.
Use up smaller pieces of left-over Christmas print fabric or even plain colors mixed with some contrasting print fabrics. It is essential to use a contrast of light and dark fabrics to get a good effect rather than fabrics with similar tones. You can slip a wrapped chocolate or a small gift into the finished Cathedral Window Christmas ornament making it even more fun to explore the tree on Christmas morning.
Below you will find my step by step written tutorial with VIDEO instructions for all the visual learners.
We occasionally link to goods offered by vendors to help the reader find relevant products. Some of the links may be affiliate meaning we earn a small commission if an item is purchased.
Table of Contents
How to make a Cathedral Window Ornament
Cathedral Window Ornament Supplies and tools
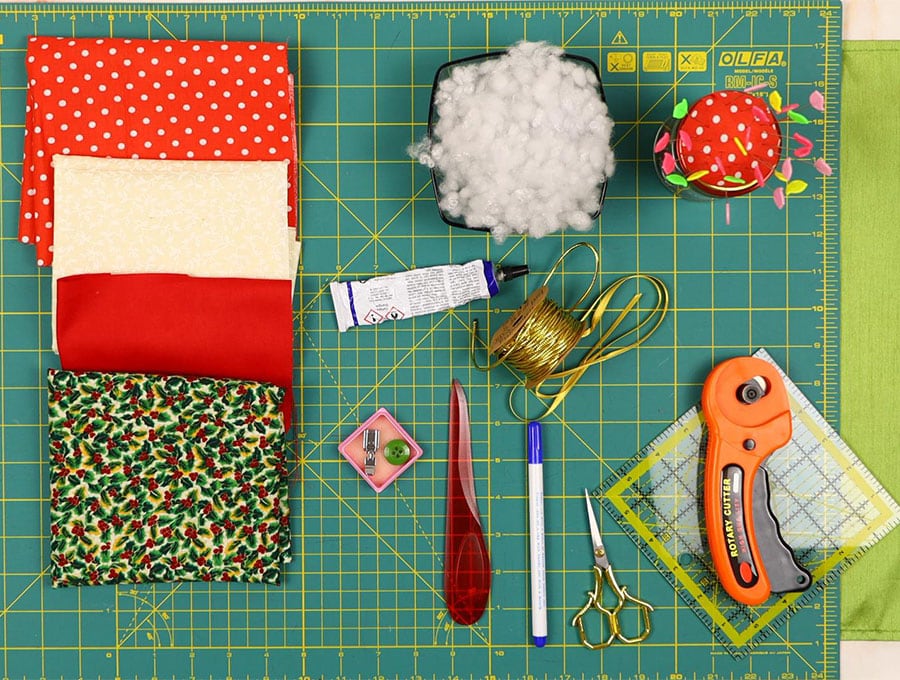
- fabric – 4 small pieces of cotton fabrics, see below for sizing
- polyester stuffing
- 7-inch (18cm) piece of ribbon in gold or a matching color
- a button
- fabric glue
- fabric marker
- matching thread
- scissors (or rotary cutter and a cutting mat)
- ruler or measuring tape
- turning tool
- iron and ironing board
- sewing clips or pins
DOWNLOAD: [Free pdf file]
Follow us for free patterns & tutorials! [easy-profiles]
How to Sew a Cathedral Window Ornament
Watch the diy Cathedral Window Christmas Ornament video first and then follow the written step by step instructions below.
Please enjoy and don’t forget to Like and SUBSCRIBE over on YouTube to be kept up to date with new videos as they come out.
Cathedral Window Ornament VIDEO TUTORIAL
INSTRUCTIONS:
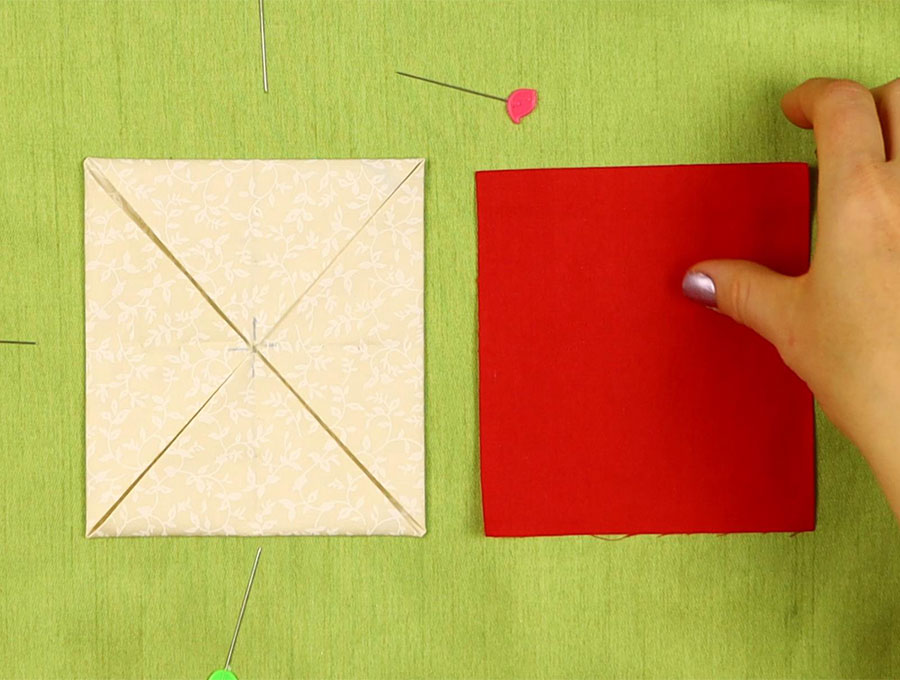
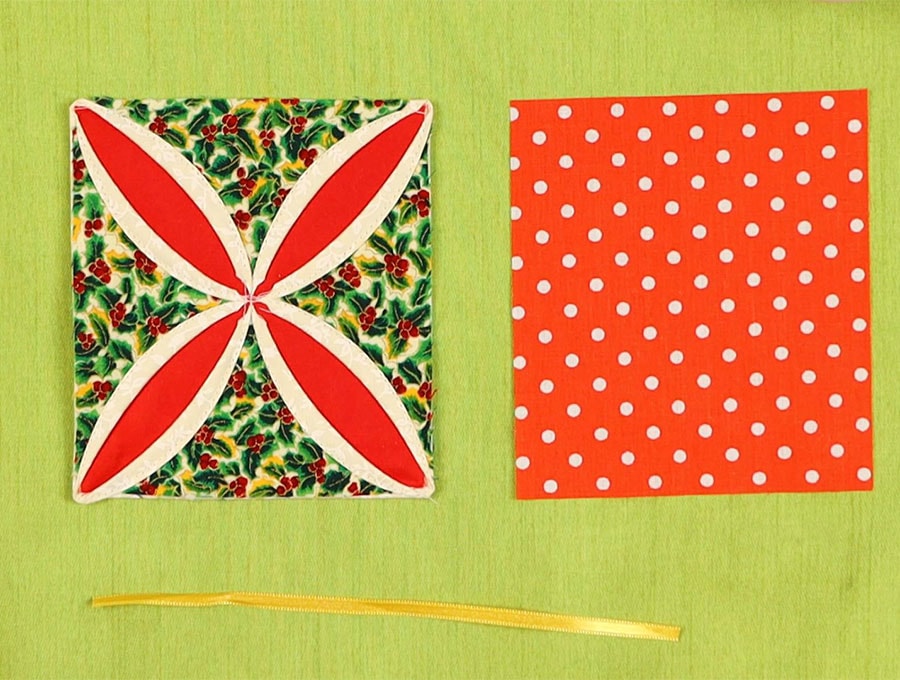
Cut the Fabrics:

- Frame: 1 x 10 x 10-inch (25 x 25 cm) fabric in main color
- Inner: 1 x 5 x 5-inch (13 x 13 cm) fabric in contrasting color
- Back: 1 x 5 x 5-inch (13 x 13 cm) fabric
- Accent: 1 x 4.5 x 4.5-inch (11.5 x 11.5 cm) fabric in a different contrasting color
7″(18 cm ribbon) for the hanging loop
STEP 1:
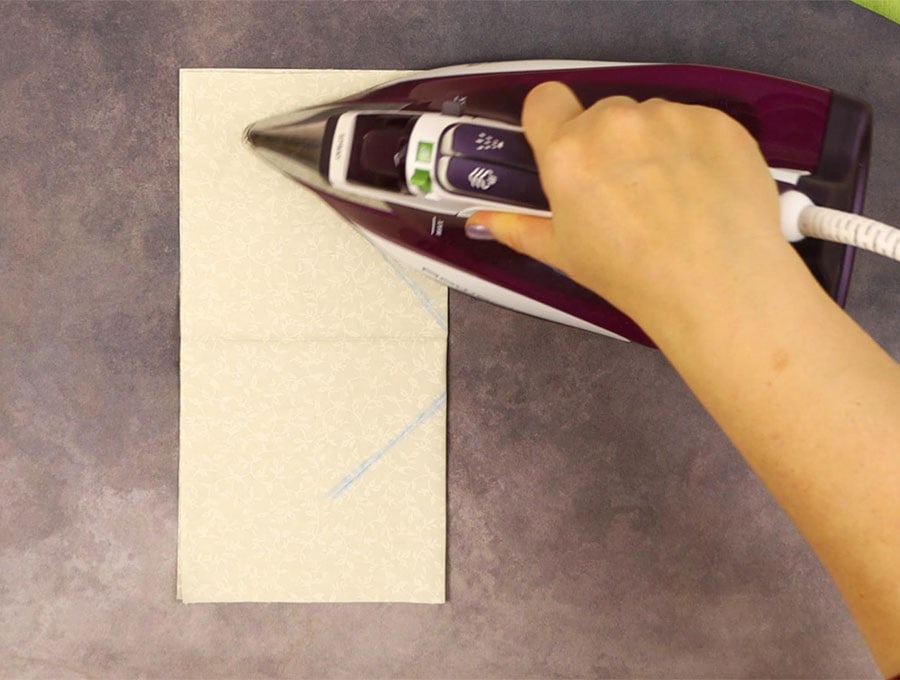
Take the frame fabric and with wrong sides facing each other fold and press exactly in half, then fold again in half so you have four equal squares pressed into the fabric.
STEP 2:
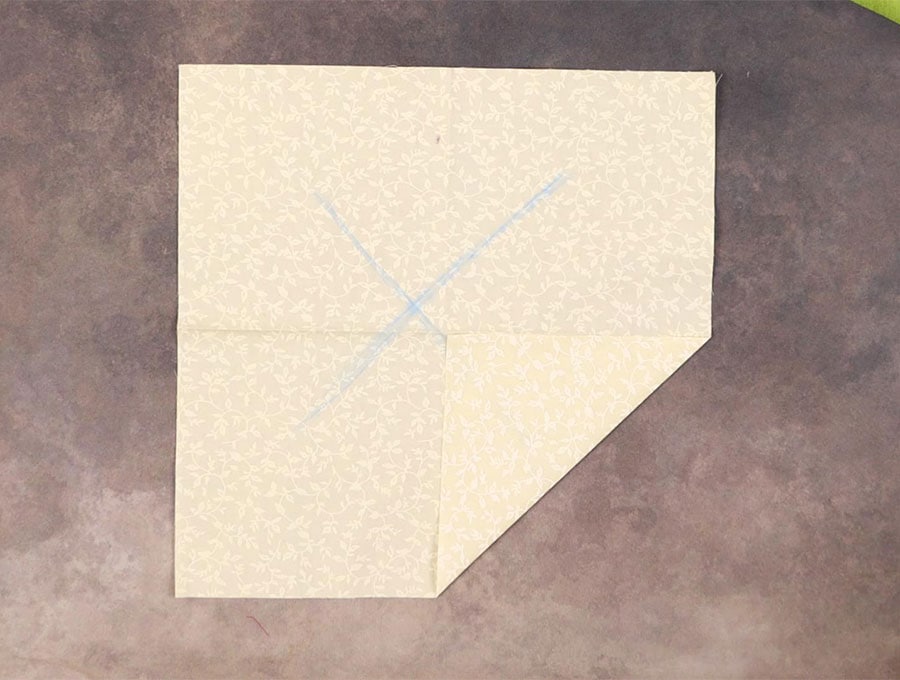
Fold out the fabric then with the wrong side facing upwards, fold one corner into the centre point. Repeat with the other three corners, pressing each fold as you go. This is something like origami with fabric! You will end up with a neat square.
The key to this is accuracy- make sure those points are exactly lined up before pressing.
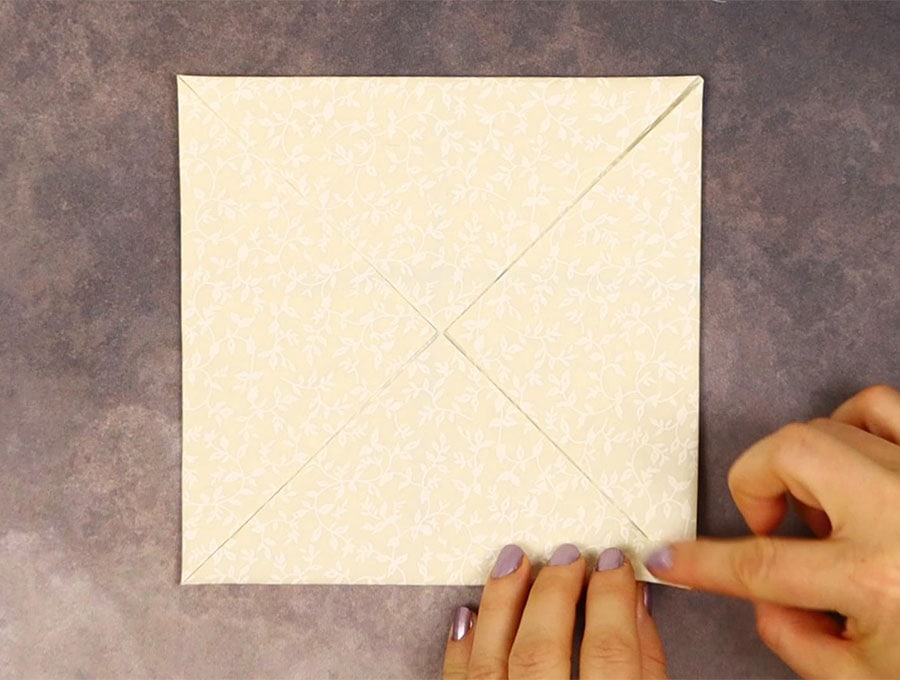
STEP 3:
With the solid piece of fabric facing down on the worktop and the folded sides uppermost, grab a corner and fold again towards the middle. Give it a press then repeat with the other three points, folding each exactly towards the middle.
STEP 4:
Now lay the fabric down with the four new folds uppermost.
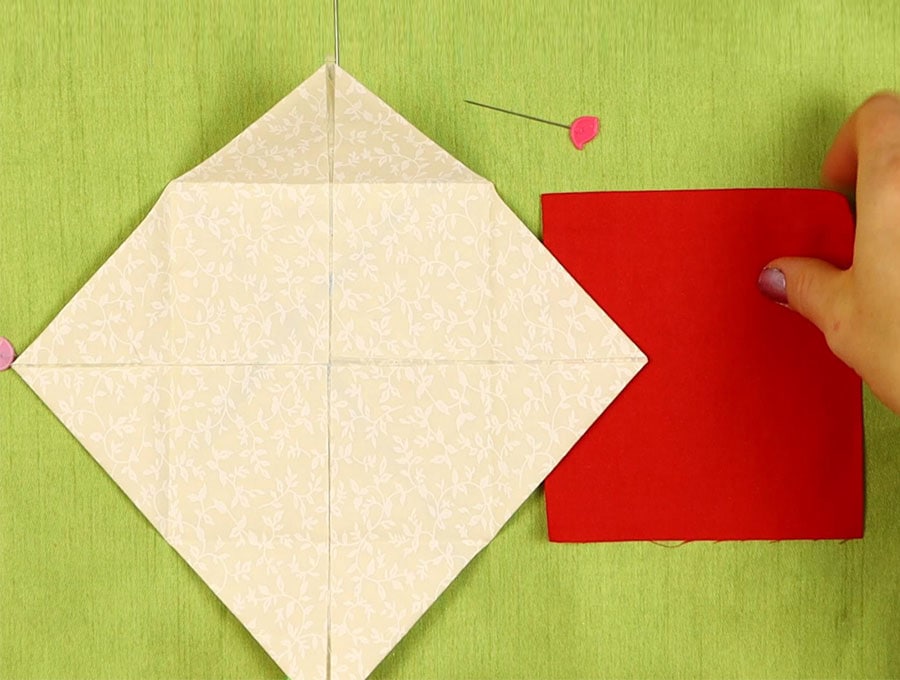
Open them up and place the insert piece of fabric into the space, right side up. If it is a little larger just trim it down slightly to fit. It does not need to be glued but if you are worried about it moving then use a little dab of fabric glue on the four corners to keep it in place.
STEP 5:
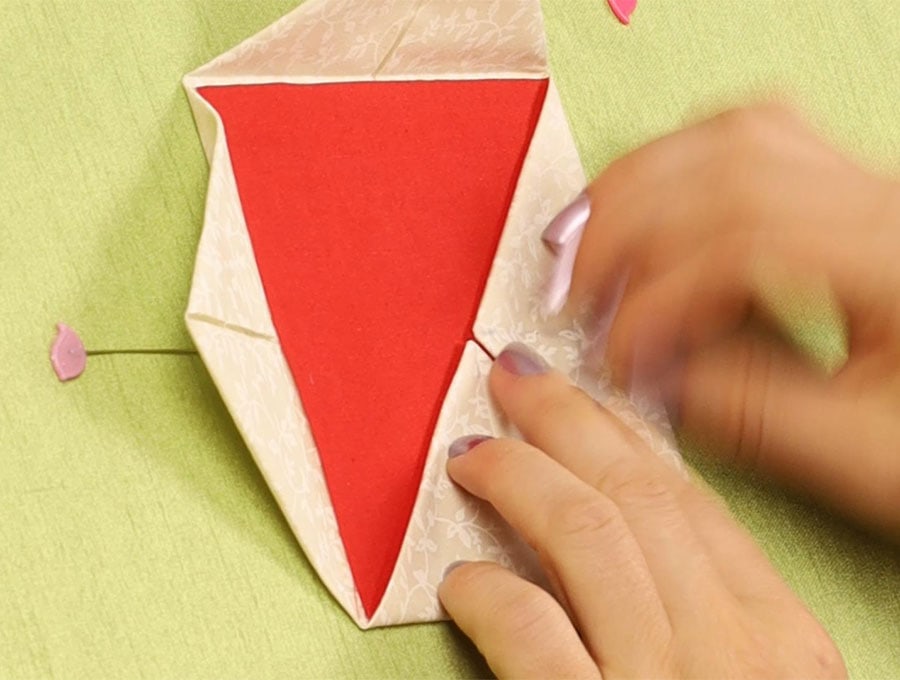
Fold the pressed corners closed again, completely encasing the insert and pin each corner through all layers of fabric.
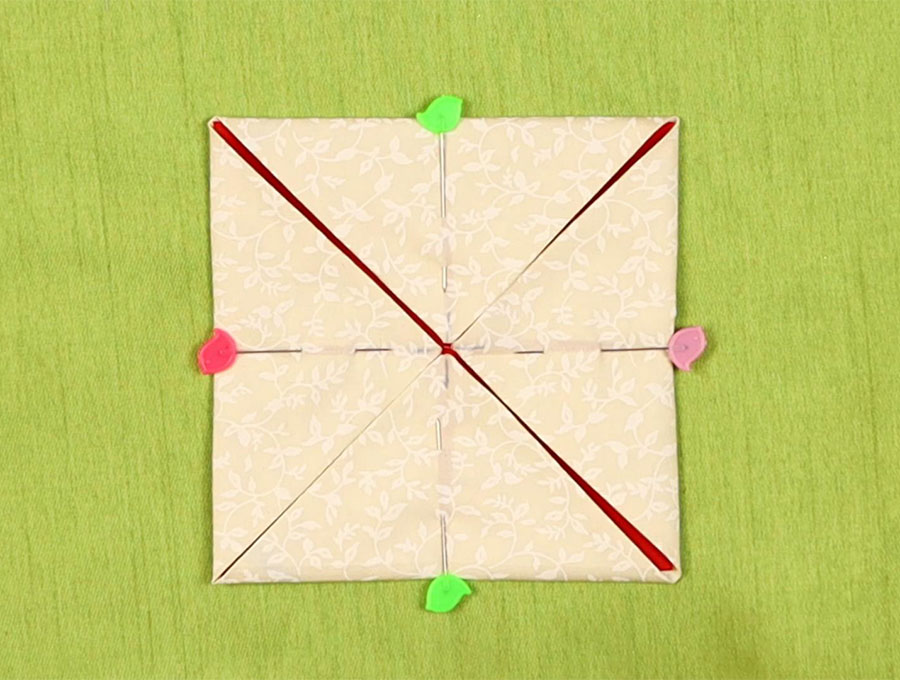
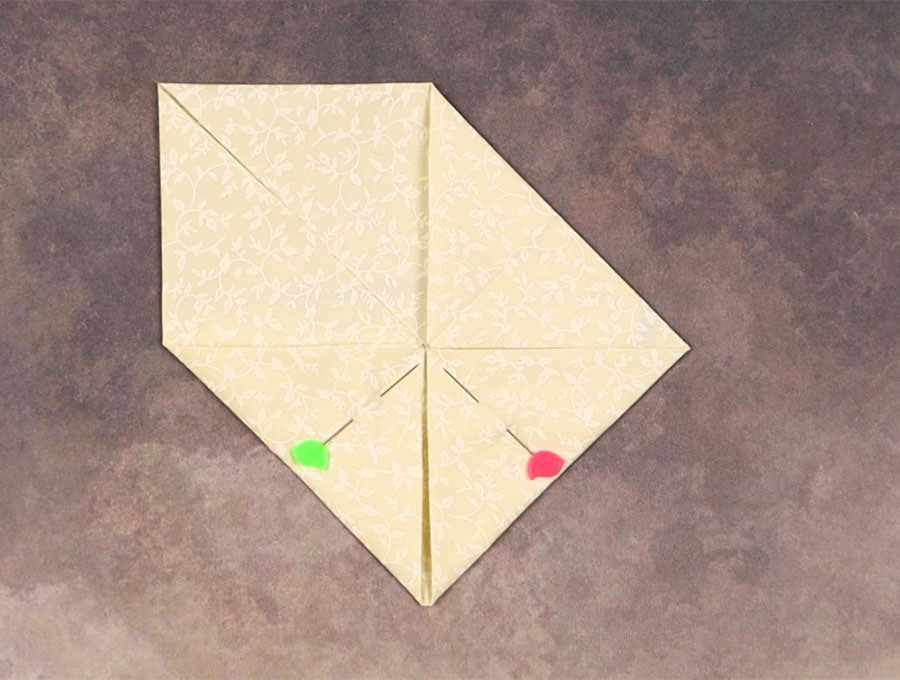
STEP 6:
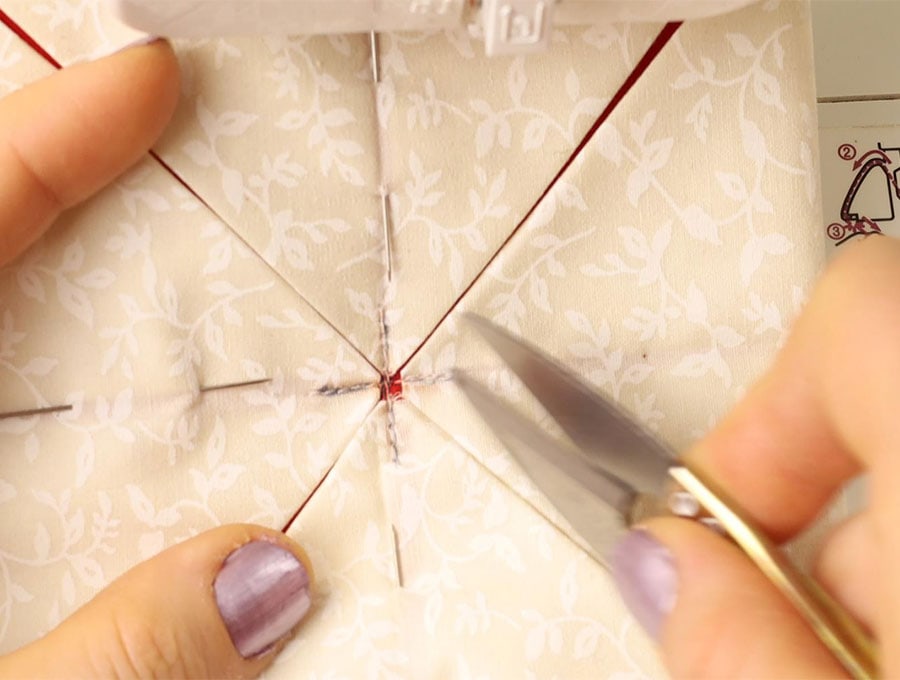
Mark and stitch from ¼ inch (6mm) vertically above the point where the four corners touch in the middle and go through the center and ¼ inch (6mm) down past the center, back tacking at the start and finish. This needs to be secure because this point takes a reasonable amount of pressure when the cathedral window is created. Now stitch horizontally across as before to create a cross. Remove the pins and set aside.
STEP 7:
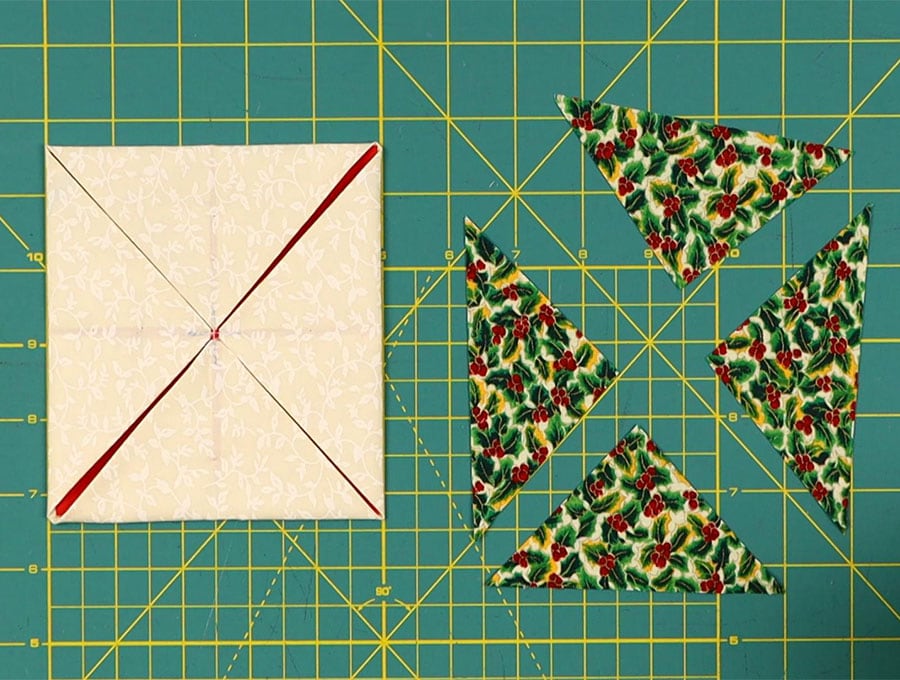
Take the accent piece of fabric and using your ruler and rotary cutter cut diagonally across from corner to corner, then without moving the fabric cut across corner to corner on the opposite diagonal so you have 4 triangles of fabric.
STEP 8:
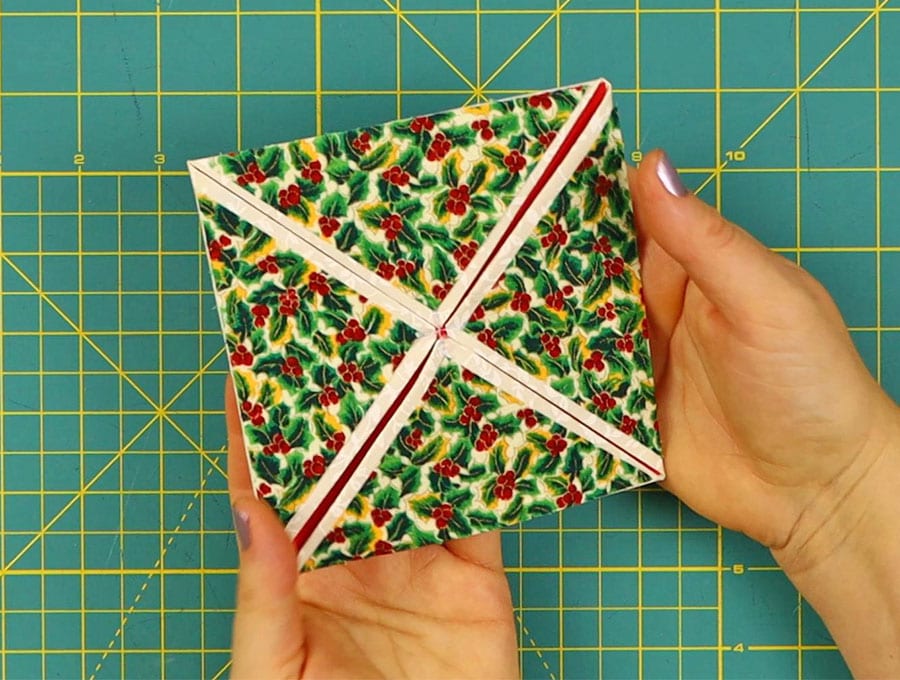
Put fabric glue on the back of one triangular piece and glue to the side where you stitched a cross over the folded fabric, lining up the longer side of the triangle with the bottom of the fabric square and sticking it down about 1/8 of an inch (3mm) from the folded side. Repeat with the other three pieces, making sure the corners of the triangles are well glued and do not lift.
STEP 9:
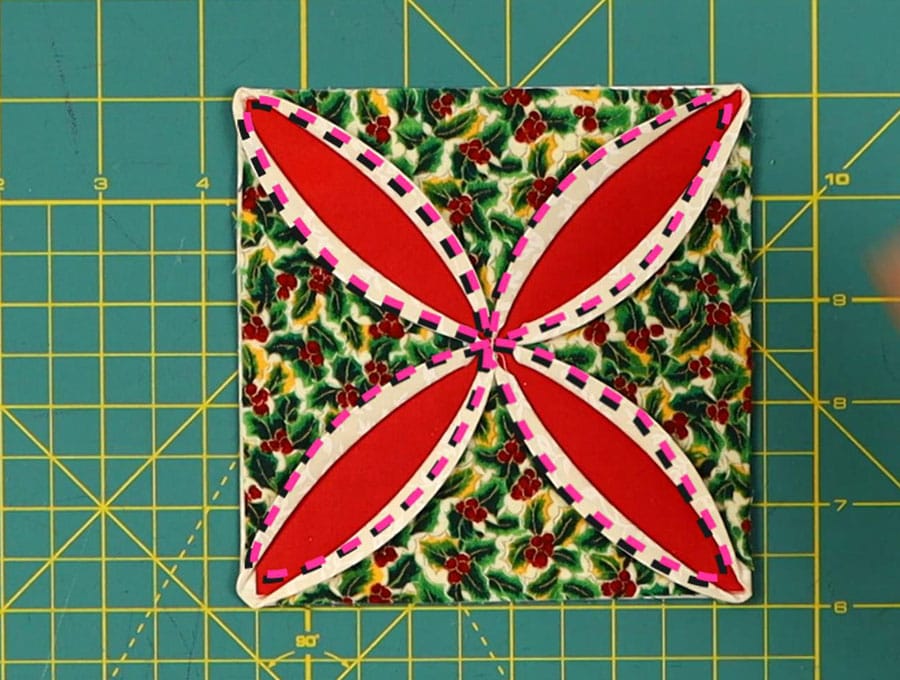
Time to stitch the cathedral window. Always start from the canter and work towards the corners. Alter the position of your needle to the left or right depending on where you need to stitch. Starting from the center, stitch one piece folded back slightly to show the insert underneath – when you fold it back it will form a slight arc. You need to stitch as close to the edge as possible for a neat finish and to cut the threads after sewing each of the eight lines you need to fold back to create the cathedral window effect. If you don’t trim as you go you risk getting a ball of thread stuck in the machine.
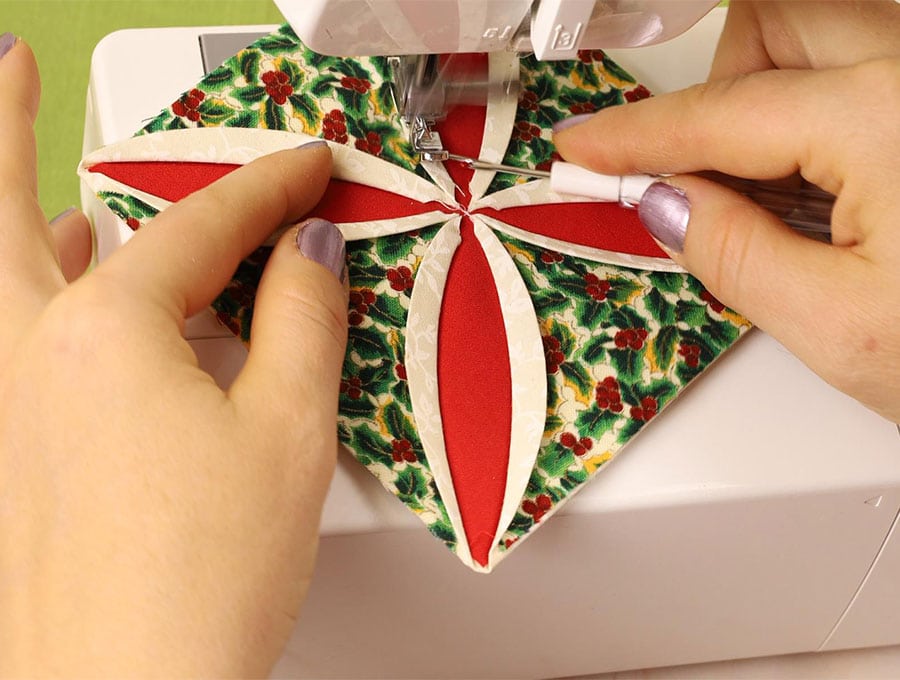
PRO TIP: You can fold and iron the arcs first, then just stitch it all at once. In this case you don’t need to start from the center, I’d like to start from a corner and sew it all at once, no trimming as you go. It is much faster that way in my opinion. Watch the video to see it in action.
STEP 10:
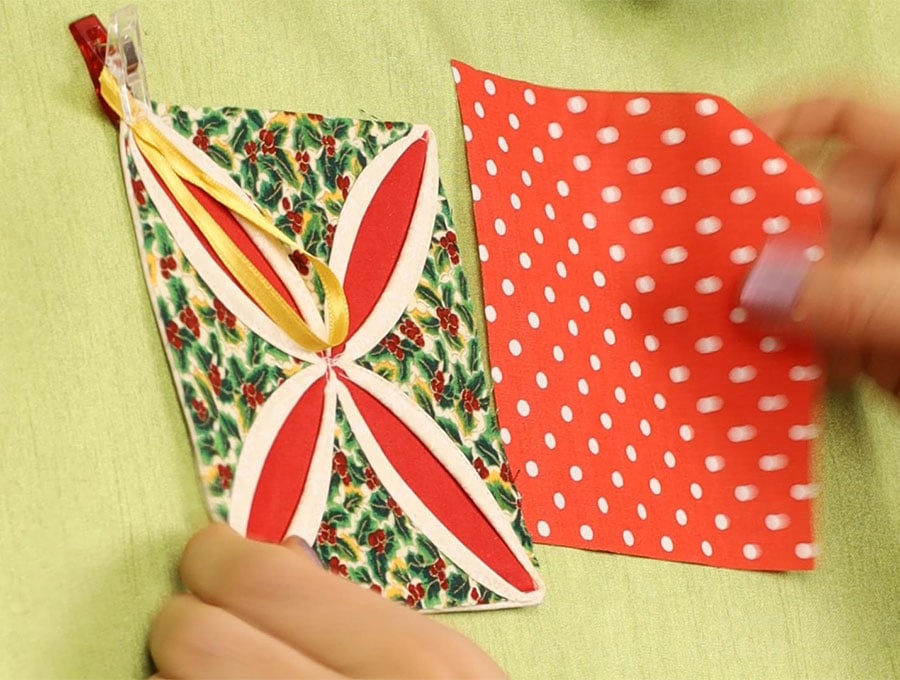
Attach the ribbon to hang the ornament. You will need a piece that measures 7 to 10 inches (18 to 25 cm) long which you fold in half then pin the ends to a corner of the square with the ribbon facing into the center of the square as you still need to stitch on the backing. Just give it a dab of glue to hold it in place or run a couple of stitches across the ribbon ends to hold them in place less than ¼ inch (6mm) from the corner – you seam allowance for attaching the backing is just ¼ inch (6mm) and you don’t want the stitches beyond the seam allowance.
STEP 11:
Attach the backing piece of by laying the right side of the fabric over the cathedral window front and pinning or clipping in place. Make sure the ribbon will not be caught in any seams and is neatly tucked towards the center.
STEP 12:
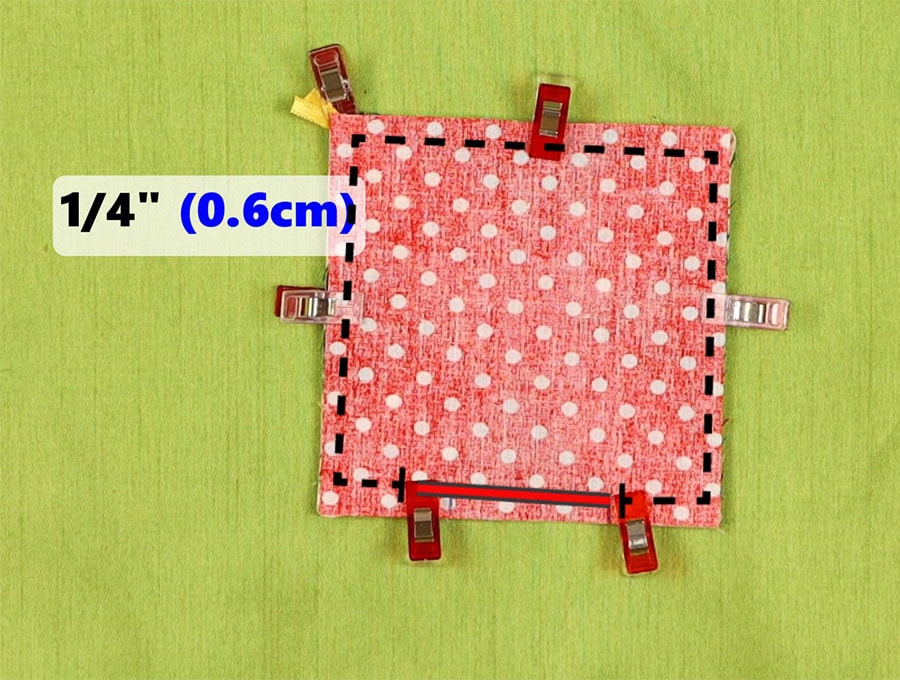
Stitch all around the edges ¼ of an inch (6mm) from the edge, leaving a gap of 2 inches (5 cm) in the center of one of the sides. We always leave the gap in the center rather than near a corner so it is easier to close. When you come to a corner leave the needle in the fabric, lift the presser foot and turn the fabric gently, depress the foot and carry on.
STEP 13:
Clip off the corners to reduce bulk, then proceed to pull the cathedral window through the gap you left in one side.
STEP 14:
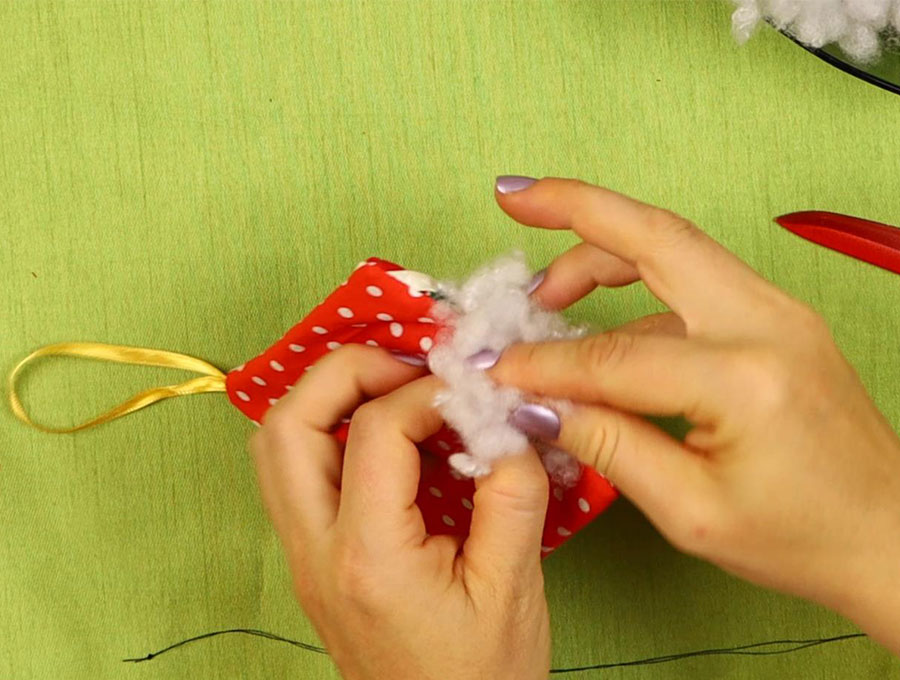
Push out the corners using a chopstick or a specialized turning tool then press with an iron. Fill with polyester stuffing.
STEP 15:
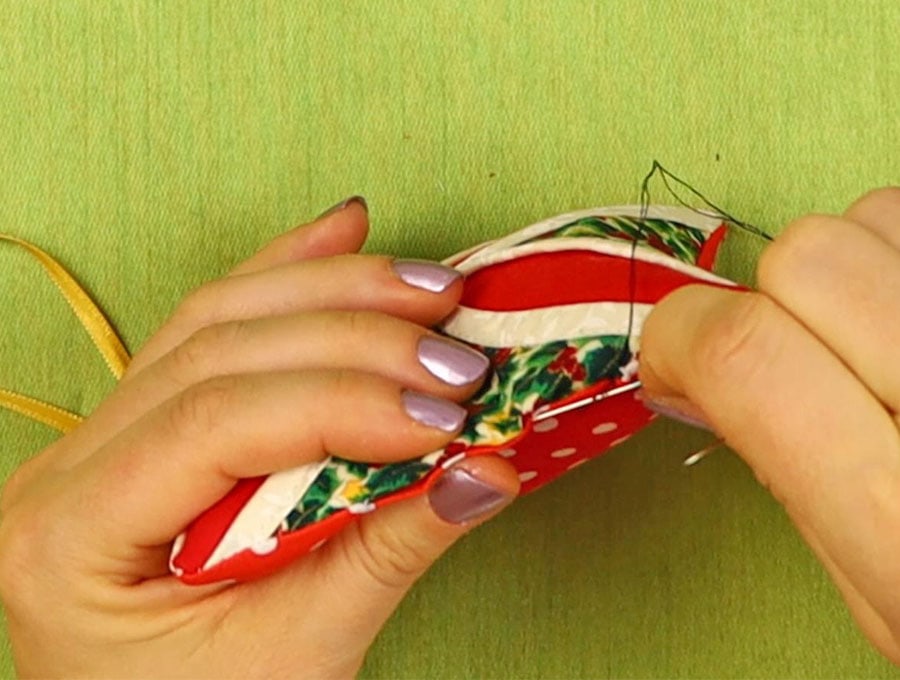
Turn under the edges of the gap and slip-stitching it closed with matching thread.
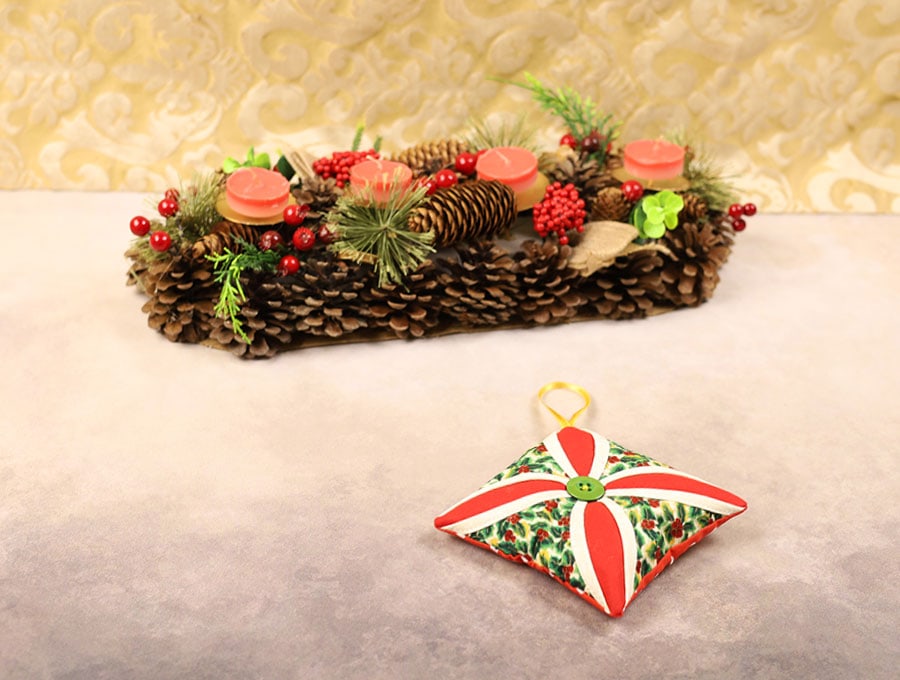
Now are now ready to hang the Cathedral Window Christmas Ornament on the tree from the ribbon you attached. These are so pretty and make a great gift to give special family members and friends who are far away. At least they will have something made with love you can easily post to them. Having handmade ornaments that can be reused from year to year is both sustainable and creates great family Christmas memories.
Fancy a little fabric origami? Then do try our Cathedral Window Christmas ornament with its lovely contrast of three different fabrics that incorporates folding, gluing and some sewing to create an ornament that will attract plenty of attention. People will be asking,” How do you do it?” Out visuals and step-by-step tutorial make it really easy to follow. The first three folds are the ones you probably used to create the chatterbox as a kid, so you’re halfway there! Give it a try and let us know how it turned out for you.
If you enjoyed this tutorial then please like and subscribe. We are looking forward to seeing the color combinations you use for your cathedral window Christmas ornaments.
Do you like this? Pin for later:
Wanna be friends? Click HERE and follow me on Pinterest
RELATED: