
Gift bags out of old paper bags and fabric scraps
Sustainable? Yes. Attractive? Yes. Free? Yes.
The paper bags you acquire on shopping trips from fashion and other stores are well made, and can be repurposed as gift bags for all occasions – from birthdays to Christmas, and every event in between. All you need is a few scraps of attractive fabric, fabric glue, paint pens and imagination. Once you have removed the items from the bag after a shopping trip, evaluate the bags to see how easy it would be to cover the branding on the bag. Some have writing all over and are difficult to disguise with fabric while others make repurposing fairly simple with a single logo on the back and front.
Below you will find my step by step written tutorial with VIDEO instructions for all the visual learners.
We occasionally link to goods offered by vendors to help the reader find relevant products. Some of the links may be affiliate meaning we earn a small commission if an item is purchased.
Table of Contents
How to craft gift bags out of paper bags and fabric scraps
Supplies and tools
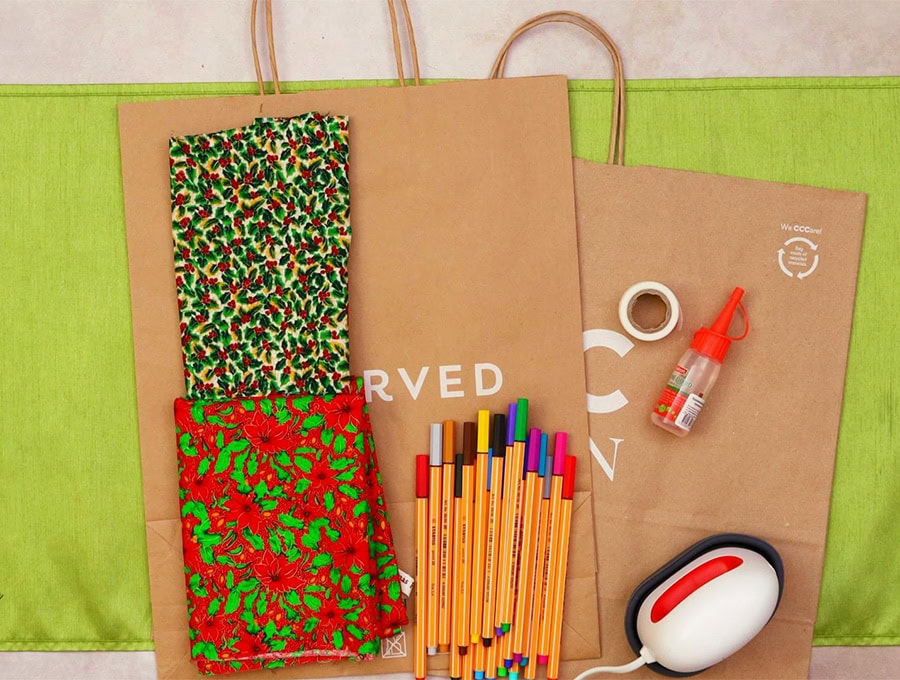
- paper bags
- fabric offcuts
- Mathematical compass
- Fabric glue or double sided iron-on Vilene
- (optional) Hot glue gun, if gluing ribbon to the bag
- Your choice of marker pens or acrylic paint pens
- Sequins, buttons, sparkles, and ribbon if you choose to add these
- scissors (or rotary cutter and a cutting mat)
- ruler or measuring tape
- iron and ironing board
Follow us for free patterns & tutorials! [easy-profiles]
How to craft personalized gift bags
Watch the diy brown paper bags with fabric scraps video first and then follow the written step by step instructions below.
Please enjoy and don’t forget to Like and SUBSCRIBE over on YouTube to be kept up to date with new videos as they come out.
Paper bags + fabric scraps VIDEO TUTORIAL
INSTRUCTIONS:
Method 1 – circular shapes
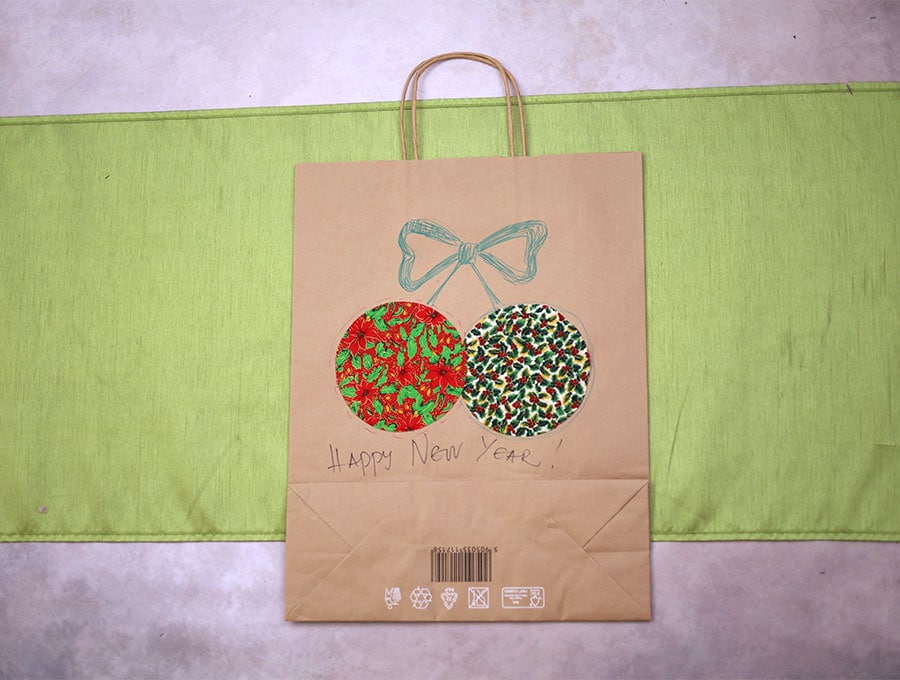
STEP 1:
A common theme for Christmas is Christmas baubles on gift bags so to make the circular baubles measure the length of the writing, and find the midpoint. So, say you measure the writing at 6 inches (15.3 cm) divide that in half to 3 inches (7.52cm) – this will be the radius of the bauble. Grab the compass and open the arms of the compass to 3 inches (7.52cm).
STEP 2:
Draw a circle on the wrong side of a fabric you have selected.
STEP 3:
Cut it out.
STEP 4:
Set the fabric over the branding to test how it should be placed.
You can make tiny marks with a pencil on the top bottom and sides of the fabric circle to help you place it once you have the glue on it.
STEP 5:
Put fabric glue on the wrong side of the fabric and carefully place it in position over the writing. If you prefer you can use double sided iron-on tape like you use to keep applique pieces in position. In this case apply to the back of the circle then iron in position on the paper bag.
STEP 6:
Now you can use a pencil to draw the top to the bauble and a ribbon bow.
Once you are satisfied with the shape then colour in with marker pens, OR
if you have pretty ribbon then you can tie a bow and place it above the fabric circle and use a hot glue gun to fix the ribbon bow to the packet. Sometimes the writing on the paper bag may be very long in which case you can place two baubles slightly overlapping over the printed branding to cover it.
Method 2 – straight edge shapes
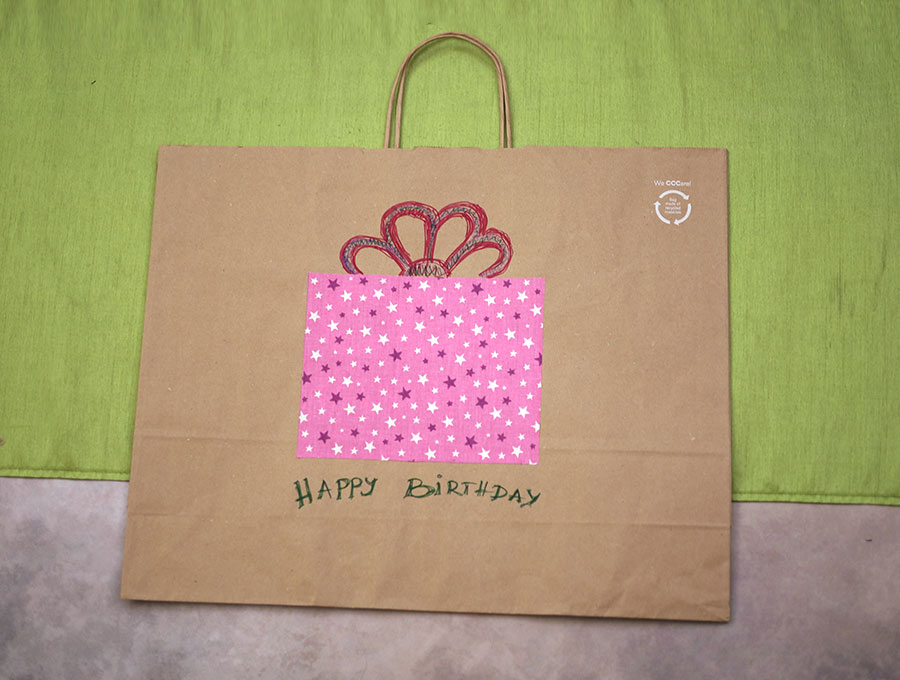
STEP 1:
If you have a rectangular or square chunk of writing to cover then measure the width and height of the writing.
STEP 2:
Draw the rectangle or square to the size you have measured on the wrong side of a fabric you have selected.
STEP 3:
Cut out the shape.
STEP 4:
Set the fabric over the branding to test how it should be placed.
You can make tiny marks with a pencil on the top bottom and sides of the fabric circle to help you place it once you have the glue on it.
STEP 11:
Put fabric glue on the wrong side of the fabric and carefully place it in position over the writing. If you prefer you can use double sided iron-on tape like you use to keep applique pieces in position. In this case apply to the back of the shape then iron in position on the paper bag.
STEP 12:
Now you can use a pencil to draw the top to the ‘present’ represented by the fabric shape and add a ribbon bow, either drawn and colored in or with a real bow attached with a hot-glue gun. For color I prefer the acrylic paint pens to marker pens as the acrylic paint has better covering quality.
STEP 13:
If you have sequins or sparkles add these to decorate the fabric.
If you have ever felt bad about dumping a well-constructed high-end paper bag in the trash then this tutorial is definitely for you. Re-purpose these quality bags into gift bags with the addition of leftover fabric to cover the brand name and create something gorgeous. We supplied you with the method and plenty of ideas of what you can add to the bags to suit all occasions.
FAQs, tips and Alternative ideas:
- You can make a Christmas tree by cutting triangles of fabric from large to small and overlapping them to cover the writing. Decorate the top and the triangle points with some sparkles, attaching these with a hot glue gun.
- Beads and hessian will make for a rustic look for a brown paper bag. Before gluing down the hessian just check whether you can see the writing through the weave of the hessian – if you can use a sheet of white paper cut to the same size and glue it down first before gluing the hessian over it. Add buttons to decorate or pieces of handmade paper, pressed flowers, dried grasses or whatever you think suits the rustic theme. For gift bags for men use strong plain colors and geometric shapes that overlap, decorating with some dark color buttons.
- For Easter change the shapes from circles to ovals cut from fabric and decorate accordingly. Find an online template and cut out Easter bunny shapes, an Easter basket or a cute chick hatching out of an egg to decorate the bags!
- You can create gorgeously imaginative fabric birds from scraps of fabric and glue them onto the bag to decorate it. Pinterest has some great ideas for fabric birds and this will use up the tiniest of fabric scraps. If you do these on smaller gift bags they can become a display feature in an entrance or a kitchen.
Most importantly, have fun reusing well-constructed paper carrier bags as gift bags that are recycled, sustainable, attractive and free! Please share photos of the bags you have created in the comments section. Like, subscribe and share to keep the creativity flowing and we’ll send you the latest ideas straight to your inbox.
Do you like this? Pin for later:
Wanna be friends? Click HERE and follow me on Pinterest
RELATED: