")
How to Make a Rag Quilt (the Easy way)
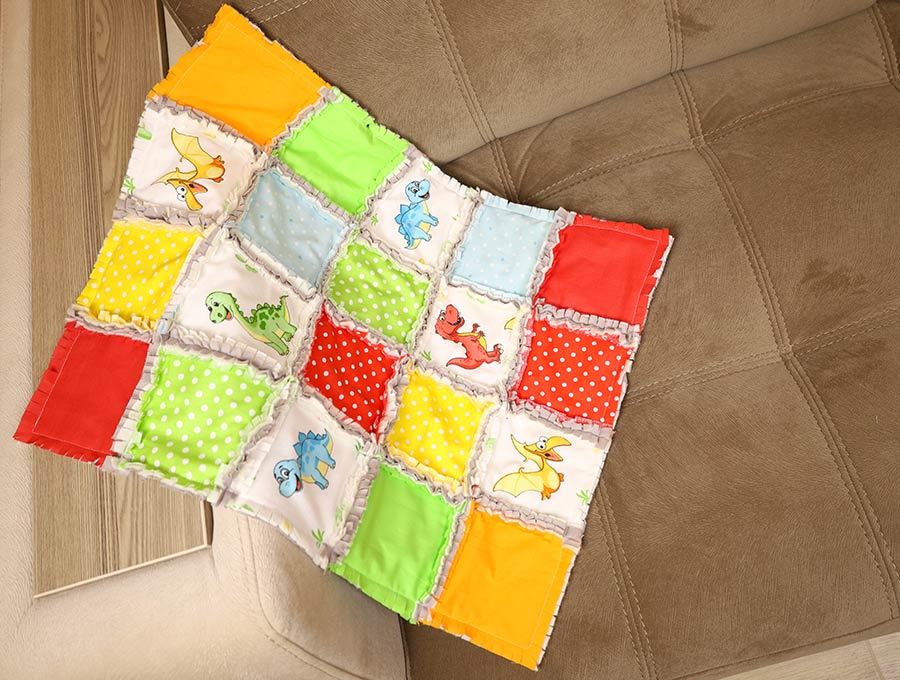
If you want a fast, fun, Bohemian style quilt then try a rag quilt. It is stitched on the right side of the fabric and has a ragged fluffy look on the front, while the back remains smooth. Even if you have never made a quilt before you will be able to make a beautiful rag quilt by following our step-by-step tutorial how to make a rag quilt. Within a day you could have a rag quilt ready to go, compared to the weeks and months it may take to create a traditional pieced quilt. These quilts are very much in vogue at the moment, so follow the tutorial below to see how the quilting is done. You’ll be so proud of yourself when you create your first rag quilt. Feel free to get creative with your fabric choices – there are no quilt police to tell you what you can and can’t do. The quilting is done on each square before you piece it together, making it super easy, instead of having to have one of those specialized long arm quilting machines.
Below you will find my step by step written rag quilting tutorial with VIDEO instructions for all the visual learners.
We occasionally link to goods offered by vendors to help the reader find relevant products. Some of the links may be affiliate meaning we earn a small commission if an item is purchased.
Table of Contents
- 1 How to make a rag quilt for beginners – the ultimate tutorial
- 2 Calculating yardage and number of blocks for the rag quilt
- 3 Rag quilt Supplies and tools
- 4 How to Sew a Rag Quilt
- 4.1 Rag Quilt VIDEO TUTORIAL
- 4.2 Rag Quilting INSTRUCTIONS:
- 4.3 STEP 1: Pick fabrics and plan your pattern.
- 4.4 STEP 2: Cut your fabrics
- 4.5 STEP 3: Stack and pin the layers
- 4.6 STEP 4: (optional) Quilt the sandwiches
- 4.7 STEP 5: Arrange the pattern
- 4.8 STEP 6: Sew the quilt
- 4.9 STEP 7: Sew around the edge
- 4.10 STEP 8: Clip the seams
- 4.11 STEP 9: Wash and dry
- 5 Rag Quilts FAQs, Tips and Troubleshooting:
How to make a rag quilt for beginners – the ultimate tutorial
Choosing fabrics for a rag quilt
You can pretty much choose whatever fabric you like – it doesn’t have to be quilting cotton and in fact it shouldn’t be if you want a genuine looking rag quilt. This is because the quilt is meant to keep you cozy, so a backing of something like fleece will give that warm fuzzy, I’m-never-going-to venture-out-from-under-here feel. Now fleece is non-fraying so it is perfect for the backing, but for the middle and front layers you’ll need at least one high fraying fabric and one medium fraying fabric otherwise you don’t get the fluffy edges to the quilt squares. You can have a flannel or batting in one of the middle layers, or even cotton. Most rag quilts have three layers, but you can go for four layers if you like – just make sure they are all fairly light weight otherwise sewing though them all could become a bit of a mission. Below we have lists of high fraying to low or non-fraying fabrics to help guide your choices.
High fraying fabrics:
- Denim – repurpose old jeans where the fabric has worn soft
- Flannel
- Woven cotton – choose some loose weave cotton
- Silk – silk scarves that you no longer wear are a great source
- Chiffon –repurpose tops
- Georgette – repurpose cocktail wear
- Satin – prom or bridesmaid dress repurpose
Medium fraying fabrics:
- Linen
- Quilting cotton
- Cotton sateen
- cotton
Low fraying fabrics:
- Fleece
- Stretch fabrics like cotton lycra or track suiting fabric
- Polyester and polyester cotton blends
If you have an attractive fabric you are thinking of using and not sure how it will fray, then you can always cut a small piece and tease out the edges by rubbing back and forth to check how it will tend to fray.
Calculating yardage and number of blocks for the rag quilt
Before starting you will need to have this information:
- Size of finished quilt
- Size of squares to cut
- Number of different fabrics to be used
- Width of each fabric

First off measure the bed and overhang, or the cot that you plan on making the rag quilt for.
So, let’s say the bed is a single one then the standard quilt size is 55 x 47 inches (140 x 120 cm)
You need to calculate how many squares will fit into that size so that you have whole squares.
If the squares are 6 inches across then with a standard seam allowance of 1/2inch on each size the finished square will be 5 inches (12.7 cm)
Divide width and height to the finished size of the square to work out the number of squares you will need:
55 inches (140 cm) divided by 5 inches (12.7cm) = 11 squares
47 inches (120) divided by 5 inches (12.7cm) = 9.2 squares, but since you can’t have parts of a square round it off to 9 squares.
11 x 9 squares give a total of 99 squares per layer
TIP: If you want to go faster, use larger squares. If you use 8″ squares for the quilt above, you will only need 56 squares per layer.
Pro tip: All sizes use a ½” (12mm) seam allowance for the smaller squares, but once you get up to 8-inch squares and above a 1-inch seam allowance gives a better proportion of ragged edge.
BONUS: I’m working on a Rag Quilt Calculator Chart to help you get the correct sizes for anything from a lap quilt to a queen size quilt – I’ll upload it in couple of days.
Rag quilt Supplies and tools
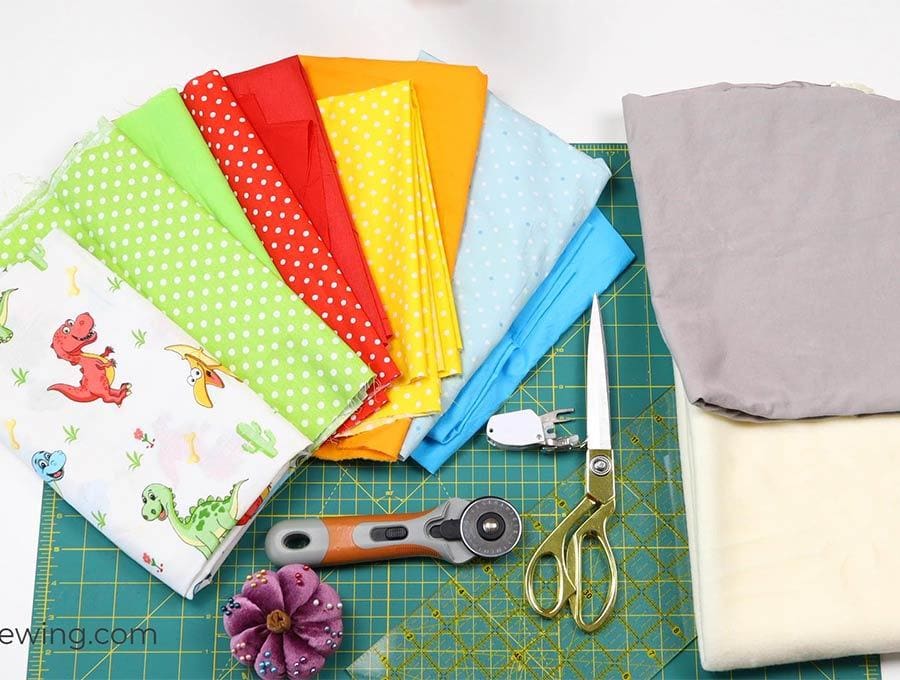
- A mix of fabrics for the patches on the front
- Flannel or batting for the middle layer
- fabric for the back
- scissors (or rotary cutter and a cutting mat)
- ruler or measuring tape
- sewing clips or pins
- sewing machine
OPTIONAL but great to have:
- a walking foot for your sewing machine
-
spring-loaded rag quilting scissors unless you are making a mini rag quilt, this one is a must-have. Your hands will thank you
Follow us for free patterns & tutorials! [easy-profiles]
How to Sew a Rag Quilt
Watch the diy rag quilt video first and then follow the written step by step instructions below.
Please enjoy and don’t forget to Like and SUBSCRIBE over on YouTube to be kept up to date with new videos as they come out.
Rag Quilt VIDEO TUTORIAL
Rag Quilting INSTRUCTIONS:
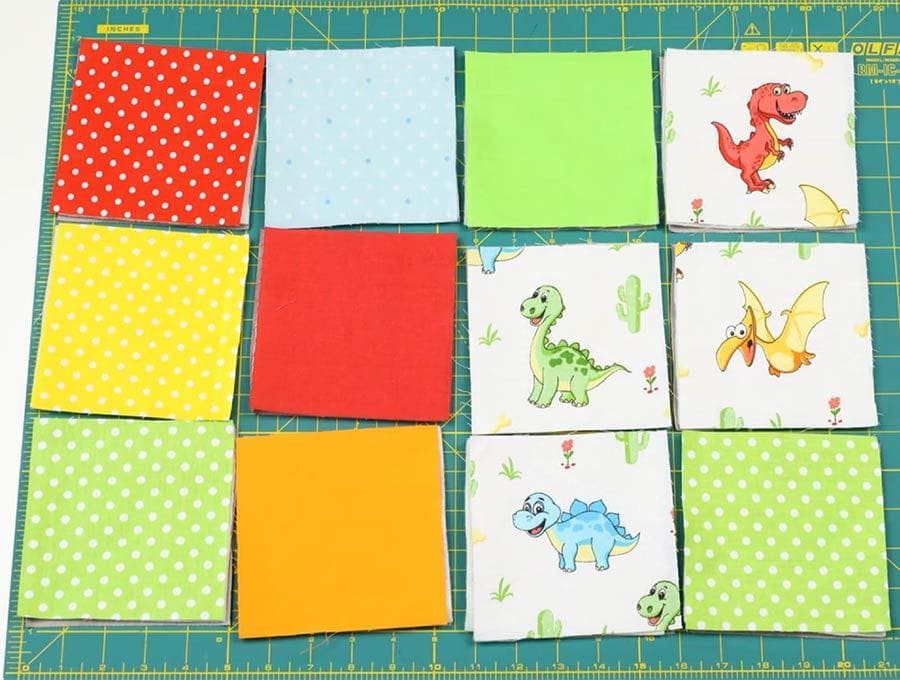
STEP 1: Pick fabrics and plan your pattern.
Now you can do a random scattered pattern with all the squares you have, or choose a more regular pattern, whether it is a checkerboard or some kind of symmetrical geometric pattern, that you can design on graph paper.
Check out these links for free rag quilt pattern inspiration
The amount of fabric will depend on the size quilt you are making. If using 6 inch squares with ½ inch (12mm) seam, with 11 rows of 9 squares each, you will have a finished size of your rag quilt of 55 x 45 inches.
For the purposes of this tutorial I made a mini quilt (so you can see the whole thing on camera) using 5-inch squares allowing for the standard ½ inch (12mm) seam. The size we chose for this tutorial worked out to 5 rows of 4 squares making a quilt with a finished size of 18 inches x 20 inches.
STEP 2: Cut your fabrics
If you have chosen a geometric pattern you will need to count the number of squares needed of each color before you start cutting, just to make sure you have enough fabric. Then you need your middle layer(s) and a back layer. Most people use a rotary cutter and cutting board for accuracy, but you can cut the squares with scissors. Just pay attention to accuracy because like all quilting, the more accurate the cuts the easier the quilt is to piece together.
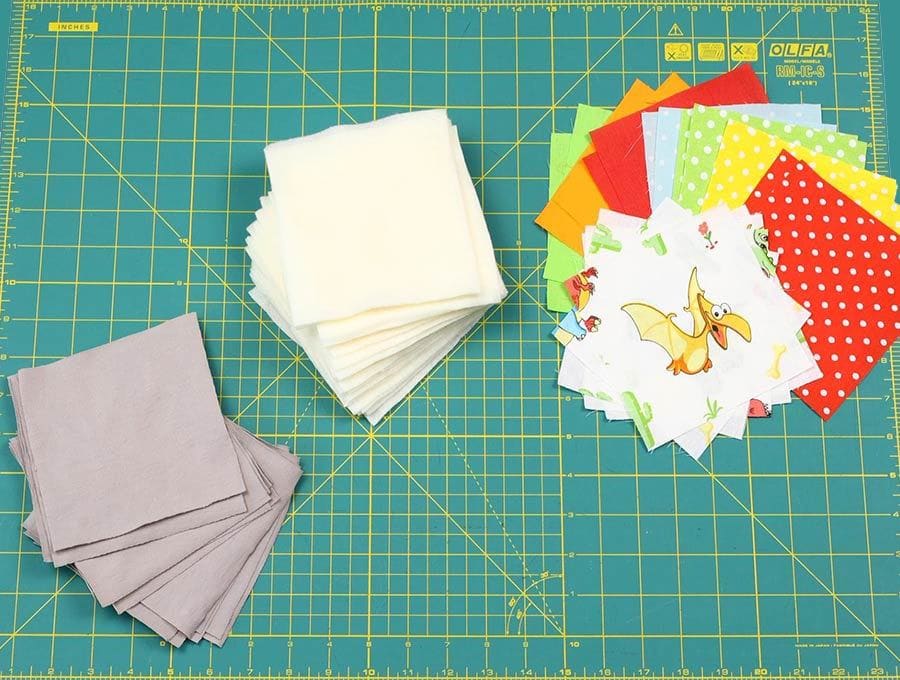
STEP 3: Stack and pin the layers
It’s important to be organized about stacking and pinning the rag quilt layers. Now if you are using fabric for all three layers you can cut all the pieces as 5-inch squares. However, if you are using batting as the central layer then you will need to cut the batting square just a little smaller, so the batting does not stick out of the frayed edge. To get the measurement for a batting square, subtract the seam allowance on each side from the square size – so ½ + ½ = 1 inch. In this case for the tutorial it will be 5 -1 = 4 inches.
Pin the layers for the rag quilt together and stack. At the bottom will be the backing (probably polar fleece), with the right side facing down, then a layer of cotton, flannel or batting, then the top layer with right side up. This is called a quilt sandwich.
STEP 4: (optional) Quilt the sandwiches
This step is optional if you are not using BATTING.
Quilting the sandwiches keeps all the layers in place, resulting in a better-quality quilt. We are going to be using an X to quilt, stitching from corner to corner across the square. You can sew any shape other than an X that takes your fancy, but most people just go with the X. While doing this keep the quilted squares in their respective piles.
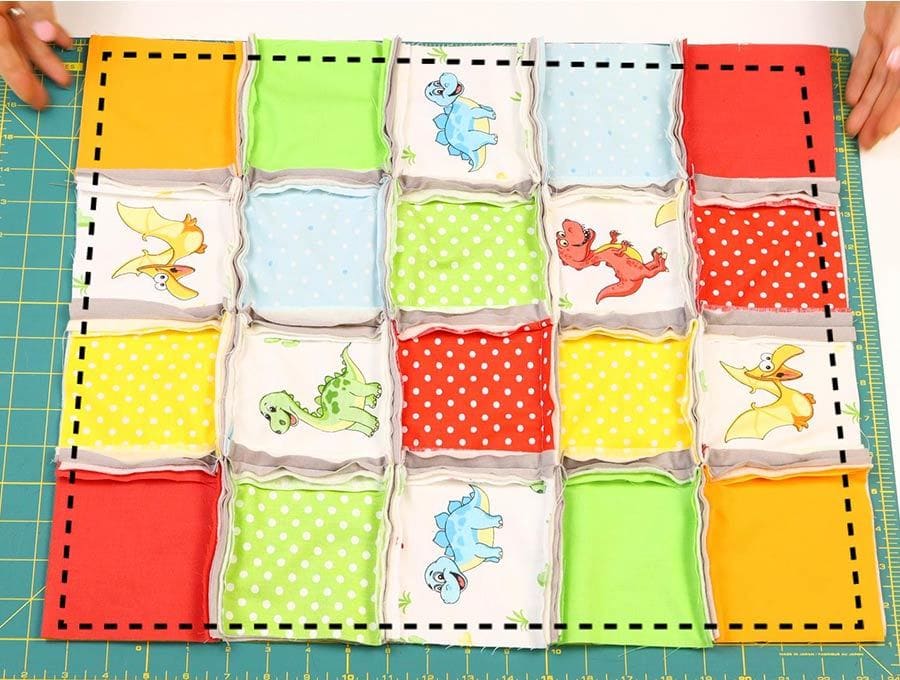
STEP 5: Arrange the pattern
Arrange the pattern once all the pattern pieces have been quilted. You may need quite a large space depending on the quilt size to see how the pattern works out.
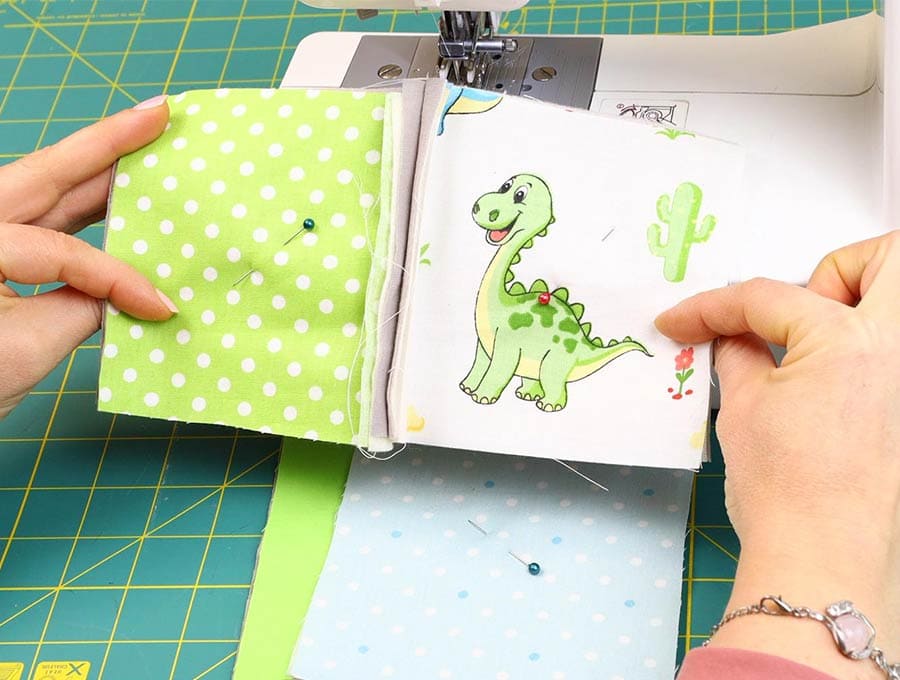
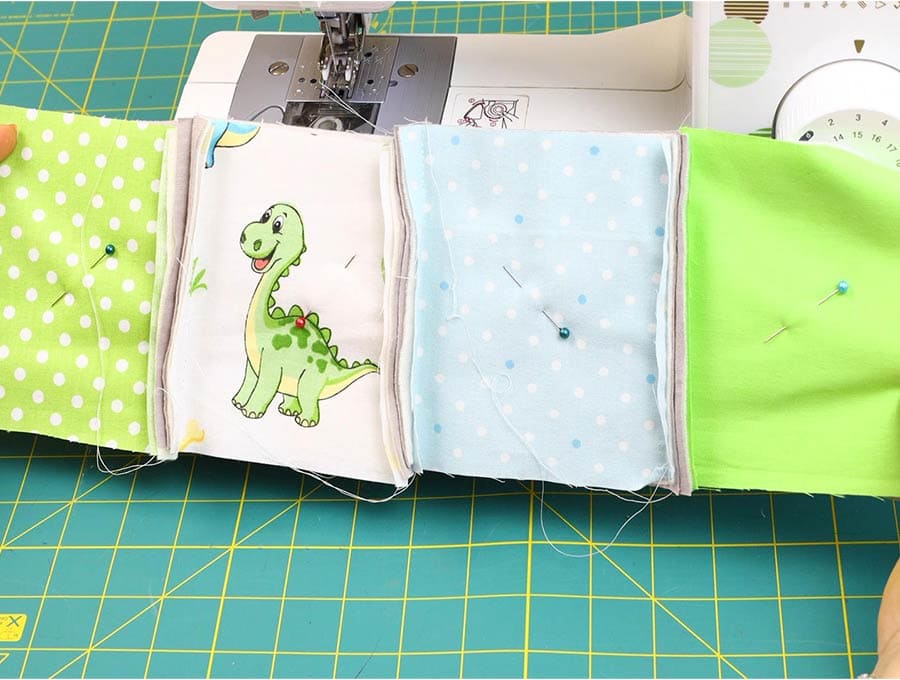
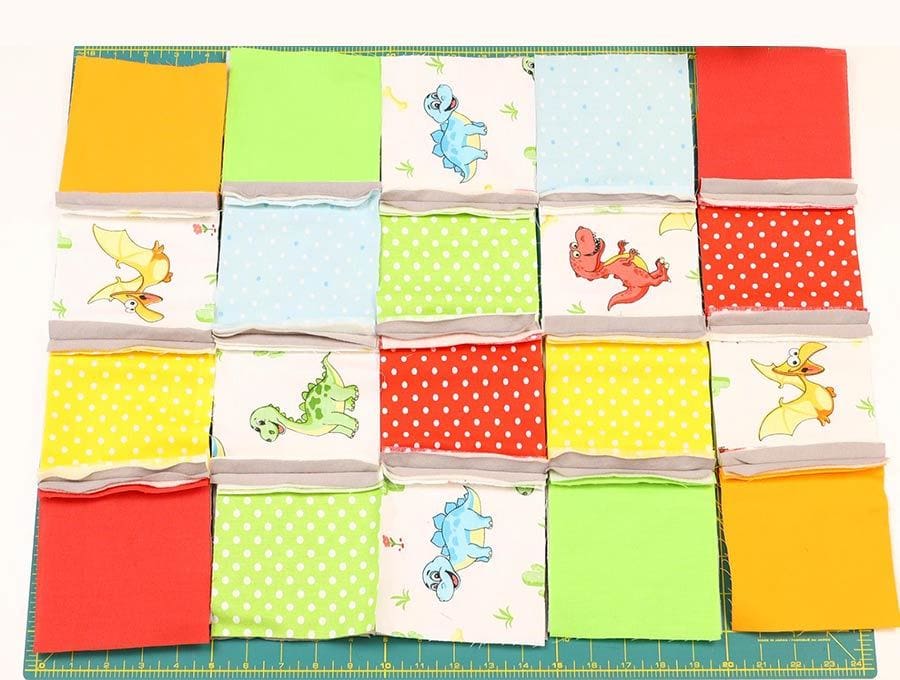
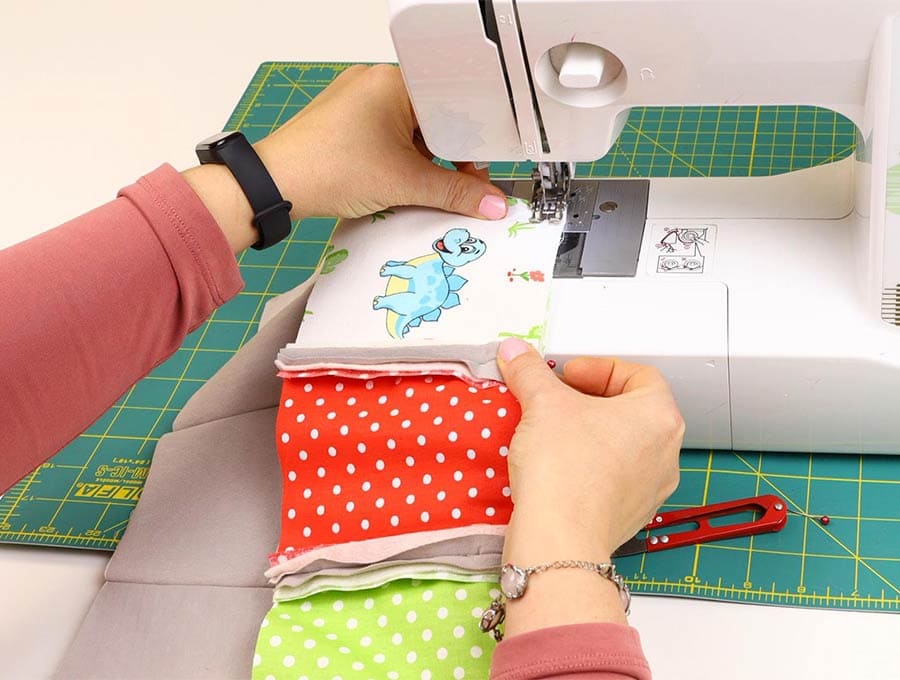
STEP 6: Sew the quilt
Start sewing the quilted sandwiches together. Remember, rag quilts have all seams on the FRONT!
There are two ways to proceed. Either work row by row, stitching the squares together to make a long rectangle OR work from the center outwards piecing two pieces, then another two together to create a larger square until you have joined up all the squares.
- Start by sewing two adjacent quilt sandwiches together allowing for a ½ inch seam allowance at the front. You will be stitching on the right sides of the quilt sandwiches to join them, lining them up so the edges meet. Don’t be disturbed if the frayed edges don’t look quite straight – once the edges are clipped they look better.

- Now join the squares adjacent to the first two, creating a row (or a block).
- Sew all rows (or blocks) for the quilt
- Sew rows (or blocks) together. It is beneficial to slow down when sewing over seams. There are a considerable number of fabric layers, and by slowing down you reduce the risk of a broken needle. When you are lining up the seam rows either twist the seams to opposite sides or open and fingerpress the seams so you are not sewing over too much thickness at one time.
Either way works, so just pick one and be consistent.

STEP 7: Sew around the edge
When you have joined all the squares together run a line of stitching all around the edge of the quilt to prevent it fraying. Back tack at the start and finish of this seam. There is no need to create a quilt binding.
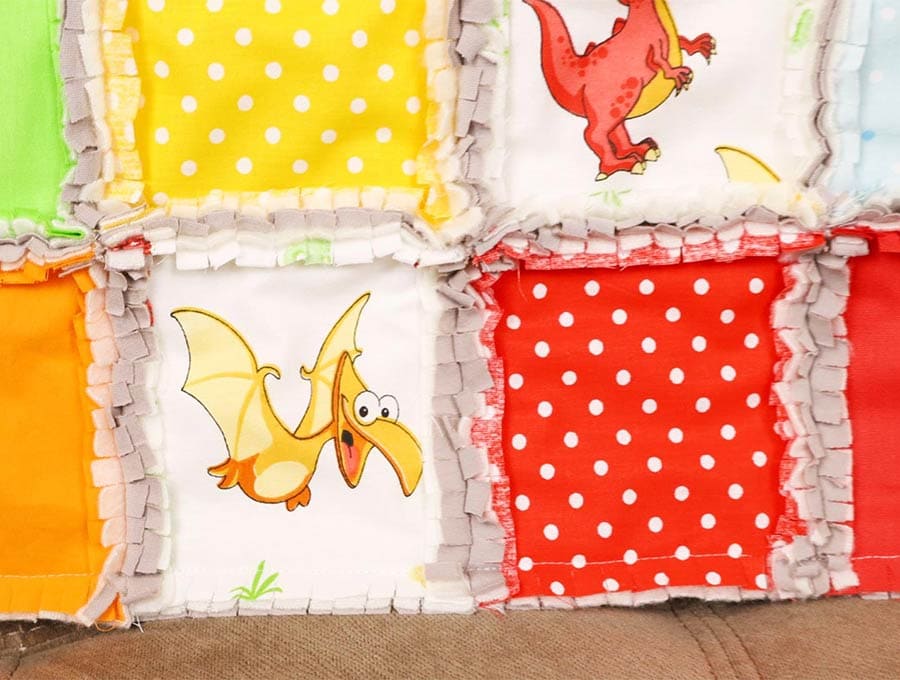
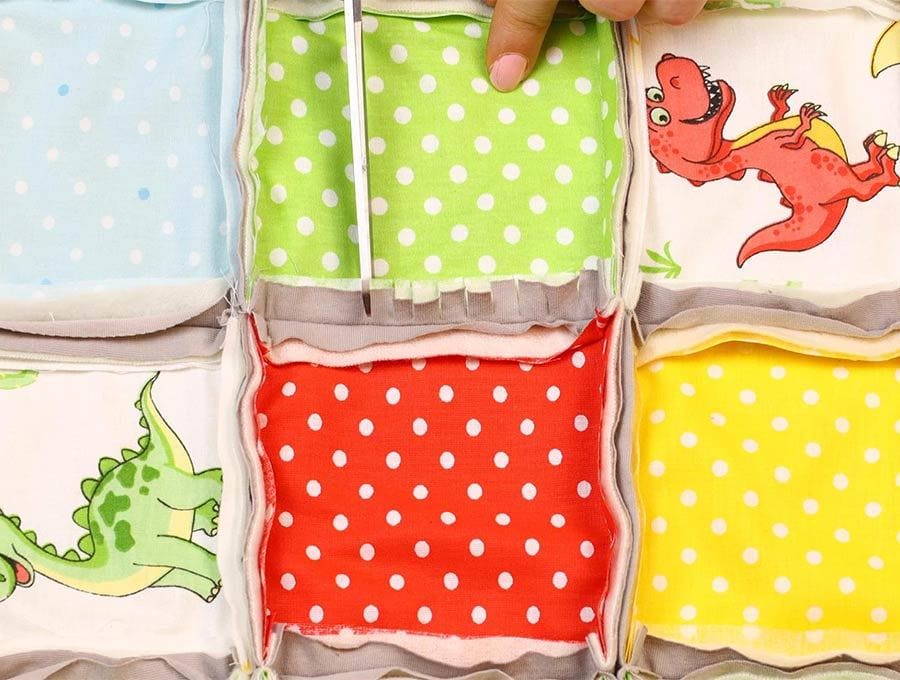
STEP 8: Clip the seams
The next step is clipping all along the seams around ¼ inch to ½ inch apart. I prefer to use 1/4″ as it looks a bit better, but 1/2″ is also good and is easier on the hands. Make sure you do not clip all the way to the stitch line, but just around ¾ of the way through – this clipping will help create the fringed rag effect.
STEP 9: Wash and dry
Wash the quilt on a cold wash cycle and add 2 cups of vinegar instead of the usual detergent. The vinegar will help set the colors and will encourage the exposed seams to fluff up and rag. You will find there will be a considerable amount of lint from the washing and drying process, so make sure to check and clear the filters on both the washing machine and the drier.
That’s it your rag quilt is ready!
Rag Quilts FAQs, Tips and Troubleshooting:
Q: Are rag quilts easy?
A: Rag quilts are easy to make and a great way to use up various scraps of fabric. There is none of the pressure of quilting after piecing a quilt together as the quilting is done first before joining the pieces.
Q: What is the best material to make a rag quilt?
A: Polar fleece for the back is warm and lightweight. The middle layer and outer layers can be any material you choose although less expensive cotton fabrics will give a good ragged look.
Q: What is best size of squares for a rag quilt? Are small or large blocks better?
A: It is all about proportion – use smaller squares on smaller items like cot or toddler blankets and larger blocks for quilts for double beds. If you are using smaller blocks the seam allowance up to 6-inch squares is traditionally ½ inch. If you are using larger squares from 7 inches upwards to 12 inches, then the seam allowance needs to be 1 inch to allow for a deeper fringed effect, so it is in proportion to the block size.
Q: How many layers do you need for a rag quilt?
A: You need a minimum of three layers – one for the outer design, one for the middle to give some padding to it and one layer for the backing. Some people, who chose to use very lightweight fabric for the outer layer, like silk and chiffon may include an extra layer of fabric to provide an opaque background for the silks and chiffons, after which the layer of flannel is included and then the polar fleece as the backing.
Q: How do you cut squares for a rag quilt?
A: Measure your fabric accurately according to the size you want, using a cutting mat and the ruler guide with a rotary cutter to ensure you are cutting the pieces on the straight grain and that they are symmetrical.
Q: How do you sew rag quilt squares together?
A: Start at the middle of the design and work outwards in blocks joining squares by placing two blocks with the right sides facing outwards, then stitching on the right side, so the eventual effect will be a fringed seam where each block is joined.
Q: How do you fluff a rag quilt?
A: Put it through a washer with 2 cups of vinegar and cold wash, then place it in the drier. The heat will automatically cause the fabric edges to fluff up.
Q: Do rag quilts need batting?
A: This is a personal choice. Some rag quilts may benefit from batting if flimsy fabrics have been chosen for the outer layer. The batting will provide warmth and loft. The other choice is to use flannel for the interior layer. If using polar fleece as backing it may not be necessary to use batting as the layers of cotton and fleece provide enough thickness to the quilt when added to the outer layer.
Q: Do you bind a rag quilt?
A: A rag quilt can be bound the same way you bind any other quilt, but they are usually not bound, with the fringed edge providing the perfect edging to match the style of quilt.
Q: How do you cut a corner on a rag quilt?
When it comes to corners on the inside of the quilt simply cut along the rows in a parallel fashion – do not be tempted to cut at angles. For the edges of the quilt follow the same procedure, cutting straight along the whole side.
This rag quilt tutorial is just one of many easy items we have for you to sew that will use up fabric from your stash, making something beautiful with the left-overs from other projects. Get step-by-step tutorials delivered straight to your inbox when you subscribe.
Do you like this? Pin for later:
Wanna be friends? Click HERE and follow me on Pinterest
RELATED: