
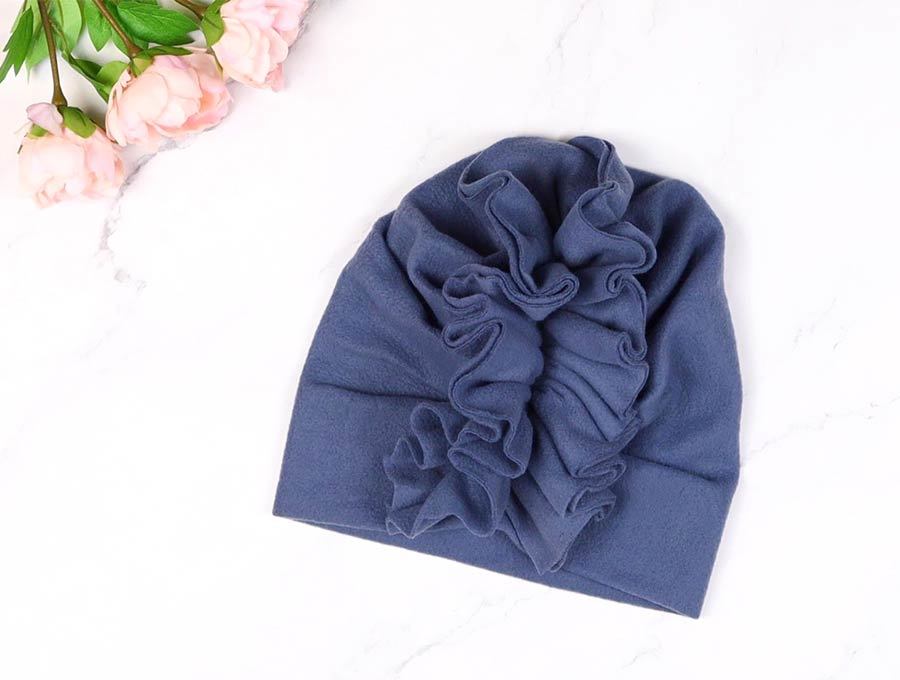
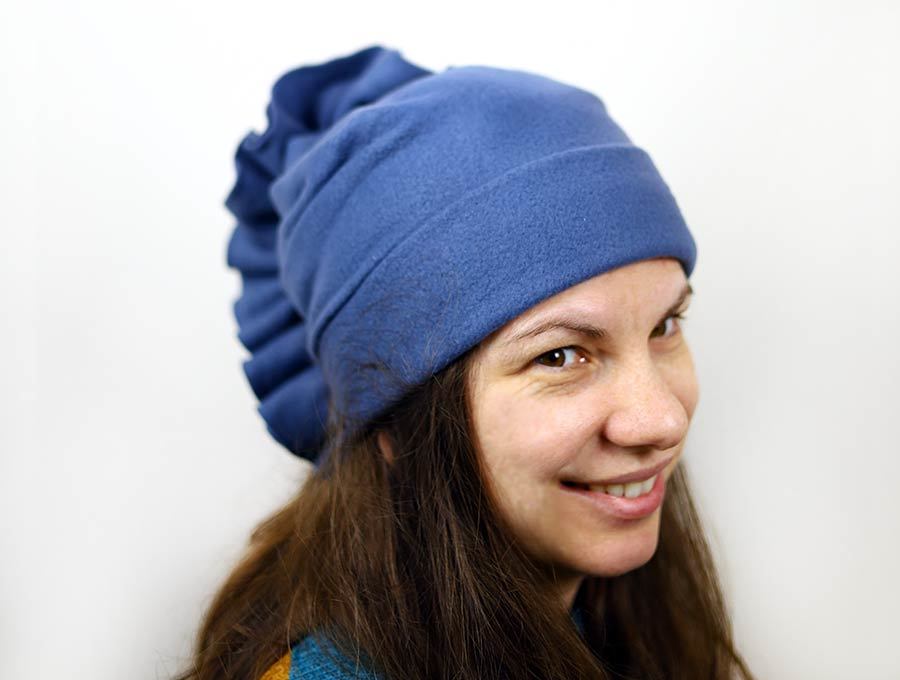
DIY Winter Hat with Pleats and Gathers
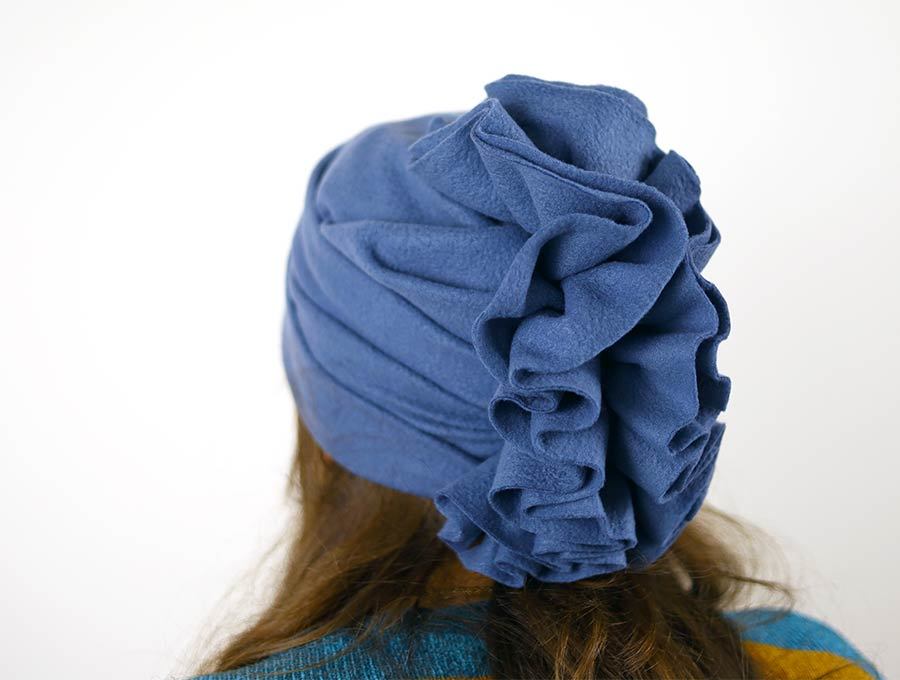
This is the type of hat stars are seen wearing when snapped at airports, or on the streets, by the paparazzi. The winter hat with pleats and gathers is really very stylish – it has a sleek look at the front and provides some interest at the back. It’s the type of hat that will keep your ears warm in winter at no cost to your fashion forward consciousness. The types of fabric suited to this hat are fleece, matte lycra, jersey knit, wool knit – in fact any fabric that is soft and comfortable, has some stretch, does not fray and is not too bulky. Our step by step tutorial shows how to make this delightful hat that would suit any stylish girl whether she is 3 or 83.

Plain colors are probably the most sophisticated look for adults, but for children a pretty printed pattern would also look adorable. I’m imagining these hats in white, powder blue, black or charcoal grey, mid grey, and possibly a spurge of color like hot chili red or periwinkle blue, a warm mustard and possibly that dark green that goes so well with russet.
In fact, my hands are itching I’m so excited to make these. It’s now just a question of getting head measurements from friends and family without giving away the surprise. But, for starters, let’s make one for ourselves first.
Below you will find my step by step written tutorial with VIDEO instructions for all the visual learners.
We occasionally link to goods offered by vendors to help the reader find relevant products. Some of the links may be affiliate meaning we earn a small commission if an item is purchased.
Table of Contents
- 1 How to make a pleated winter hat
- 2 Supplies and tools
- 3 How to Sew a winter hat
- 3.1 Pleated winter hat VIDEO TUTORIAL
- 3.2 PLEATED WINTER HAT INSTRUCTIONS:
- 3.3 STEP 1: Measure your head
- 3.4 STEP 2: Cut the fabric for the hat
- 3.5 STEP 3: Cut the decoration piece
- 3.6 STEP 4: Mark a curve
- 3.7 STEP 5: Pin
- 3.8 STEP 6: Cut out
- 3.9 STEP 7: Sew
- 3.10 STEP 8: Fingerpress
- 3.11 STEP 9: Hem
- 3.12 STEP 10: Pleat
- 3.13 STEP 11: Pin the top
- 3.14 STEP 12: Sew the hat
- 3.15 STEP 13: Fold decoration piece
- 3.16 STEP 14: Gather
- 3.17 STEP 15: Handstitch the decoration
- 3.18 STEP 16: Finish
- 4 FAQs, Tips and Troubleshooting:
How to make a pleated winter hat
Supplies and tools
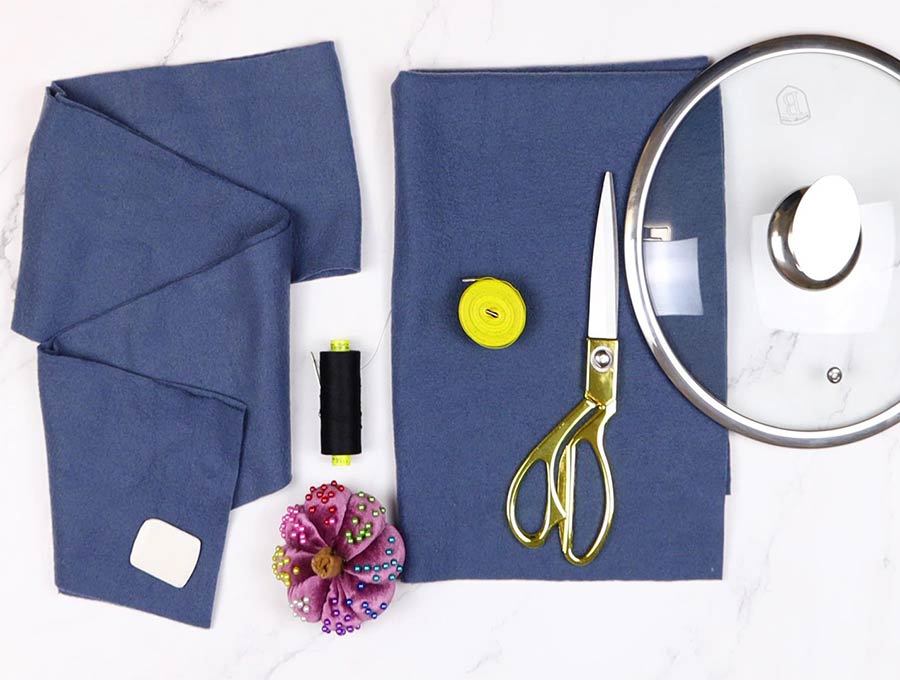
- fleece fabric ~ a fat quarter + 60″ x 4.5″ for the decoration piece
- matching thread
- scissors (or rotary cutter and a cutting mat)
- ruler or measuring tape
- hand sewing needle and thread
- sewing clips or pins
- sewing machine
Follow us for free patterns & tutorials! [easy-profiles]
How to Sew a winter hat
Watch the diy winter hat video first and then follow the written step by step instructions below.
Please enjoy and don’t forget to Like and SUBSCRIBE over on YouTube to be kept up to date with new videos as they come out.
Pleated winter hat VIDEO TUTORIAL
PLEATED WINTER HAT INSTRUCTIONS:
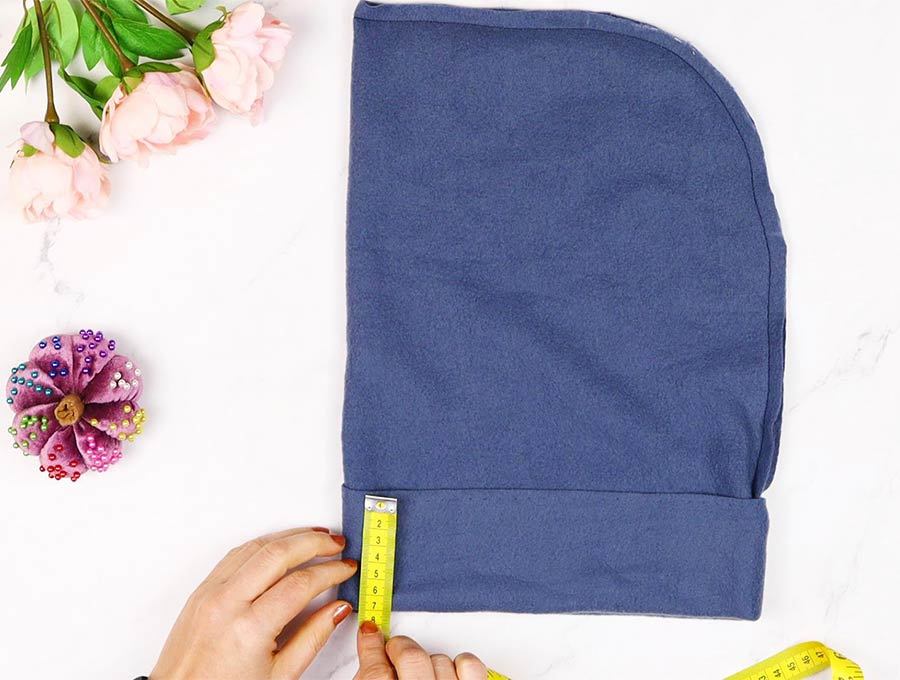
STEP 1: Measure your head
Using a sewist’s tape measure, measure your head circumference from just above the eyebrows and around the back (A). A tip for measuring is to start with the end of the tape measure just above the gap between the eyebrows then take it around the head to meet again at the front, and do this in front of a mirror so you can see the tape measure at the back of the head is roughly in line with the eyebrows and has not slipped too far down or it is sitting too high on the head. Next measure from the forehead, again just above the eyebrows to the nape of the neck (B). Write down these measurements.
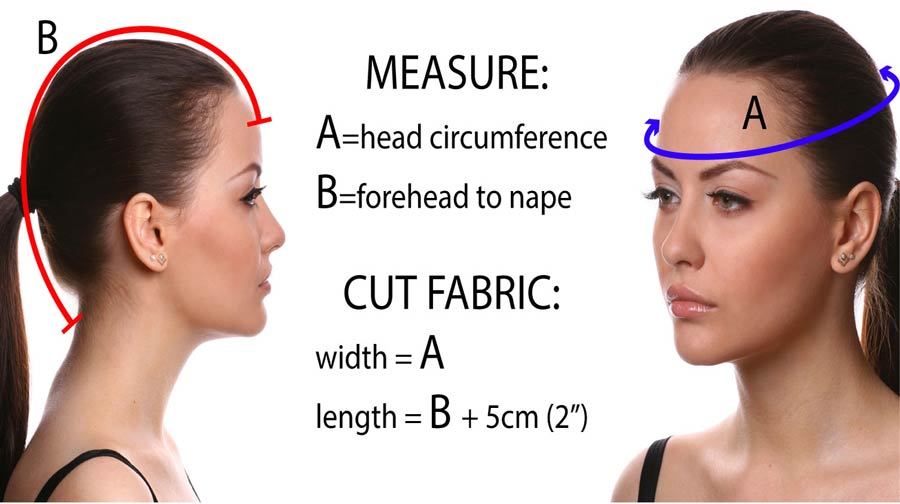
So you’ll need to measure:
- A – head circumference
- B – from forehead to nape
My measurements are A – 22.5” (57cm), B – 16” (40) cm
STEP 2: Cut the fabric for the hat
You will need to cut 2 pieces of fabric. One large piece for the hat, and one long narrow piece for the decoration.
Lay your fabric out on the table checking the stretchy part is lying parallel to the bottom of your worktable. Measure (A) (from top to bottom of the table, then measure (B) plus 2” (5cm) for seam allowance going across from left to right.
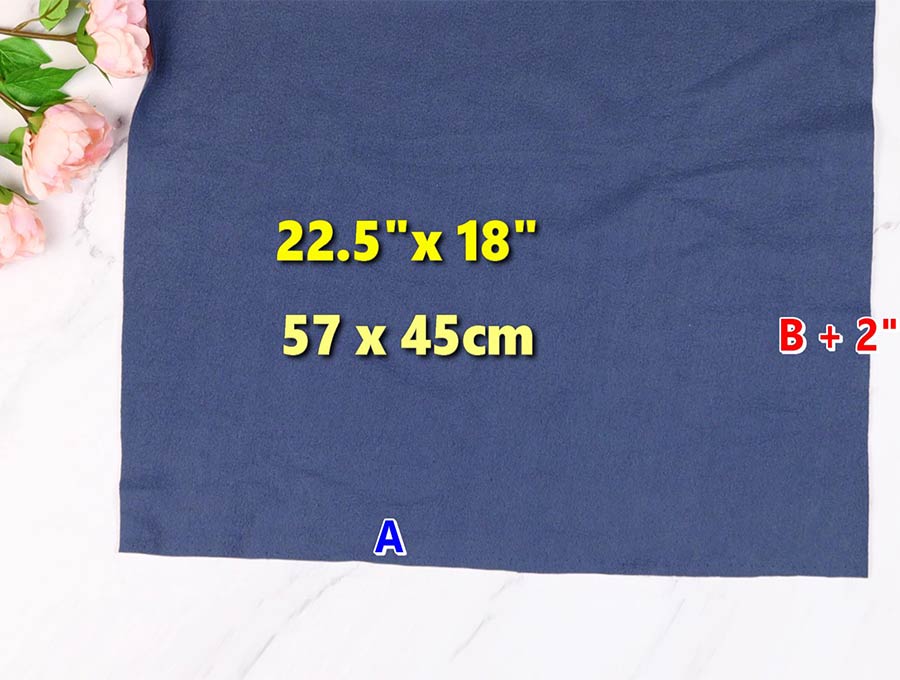
Cut a piece of fabric:
- width – A
- length – B + 2″ (5cm)
The piece I cut for my hat was 22.5 x 18” (57 x 45cm).
STEP 3: Cut the decoration piece
Cut the decoration piece 60″ x 4.5” (150cm x 11.5cm) and set it aside for the moment while you finish working with shaping the hat piece.
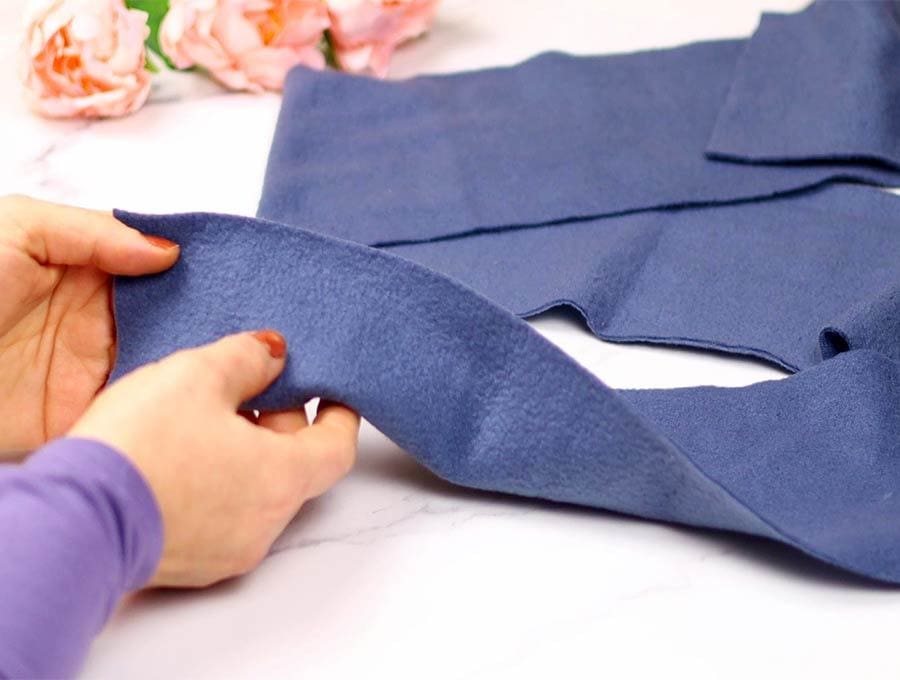
STEP 4: Mark a curve
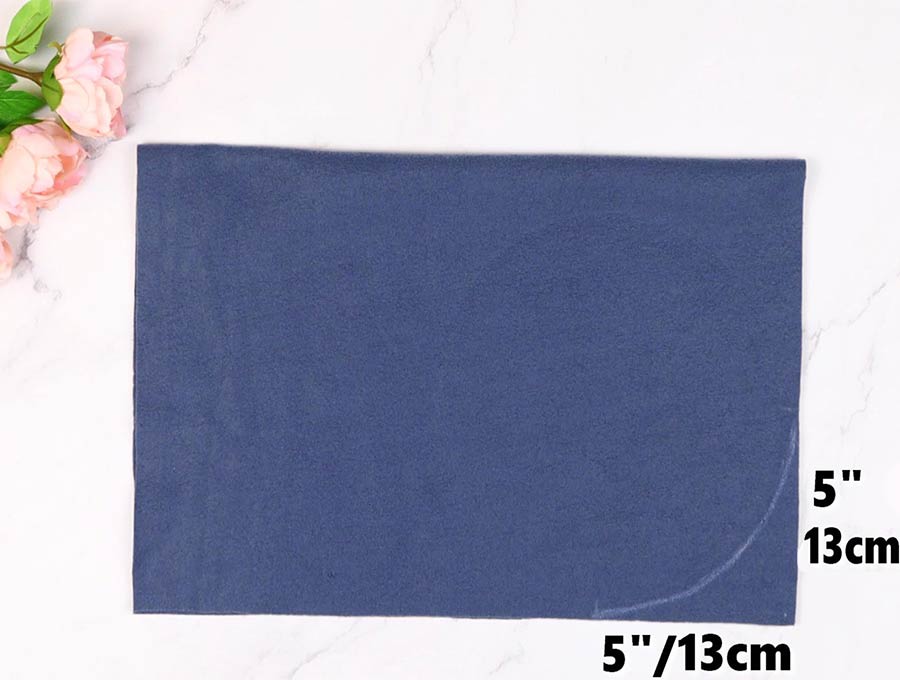
Taking the main hat piece, fold it down towards the bottom of the table, right side to right side, along the width (measurement A) and line up the corners neatly. Then mark 5 inches (13cm) up from the lower right-hand corner and 5 inches (13cm) to the left of the corner, making two dots with an erasable fabric pen.
Connect the dots in a curve by using a plate or a lid suited to the distance the dots are apart, and draw in the curve using your fabric pen.
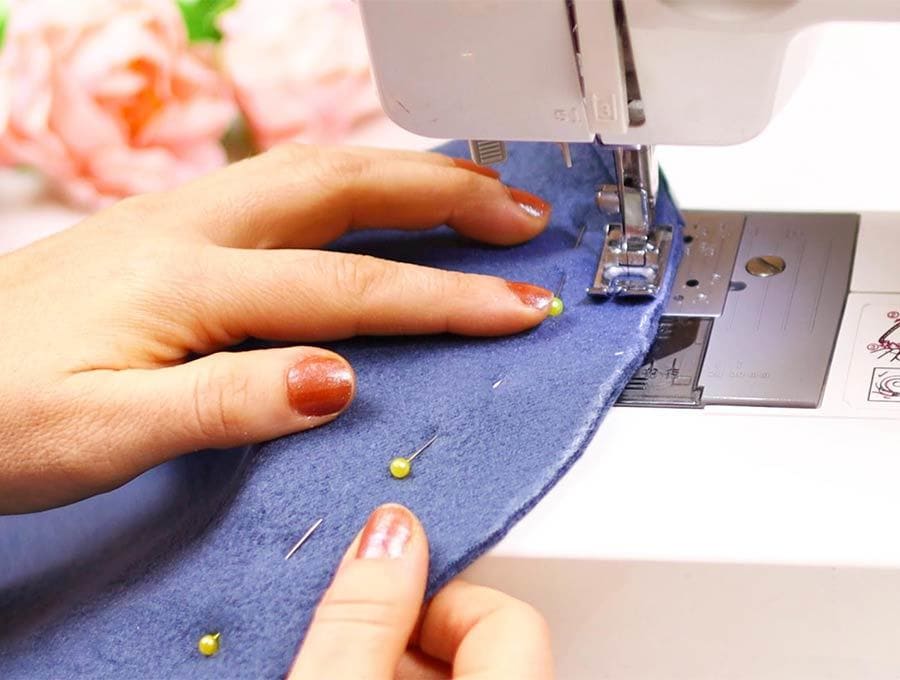
STEP 5: Pin
Pin the fabric together on the inner side of the curve to avoid if moving when you cut.
STEP 6: Cut out
Cut off the extra material lying outside of the curve.
STEP 7: Sew
Sew along the edge with the curve 3/8” (1 cm) from the edge.
You have what now looks like a long hood with no opening except at the bottom– but we still have the hem and pleating to do. Don’t worry that we did not allow for the seam you have just sewn – the fabric is stretchy and we want it to fit snugly so it does not slip down over a person’s eyebrows, so no seam allowance was given.
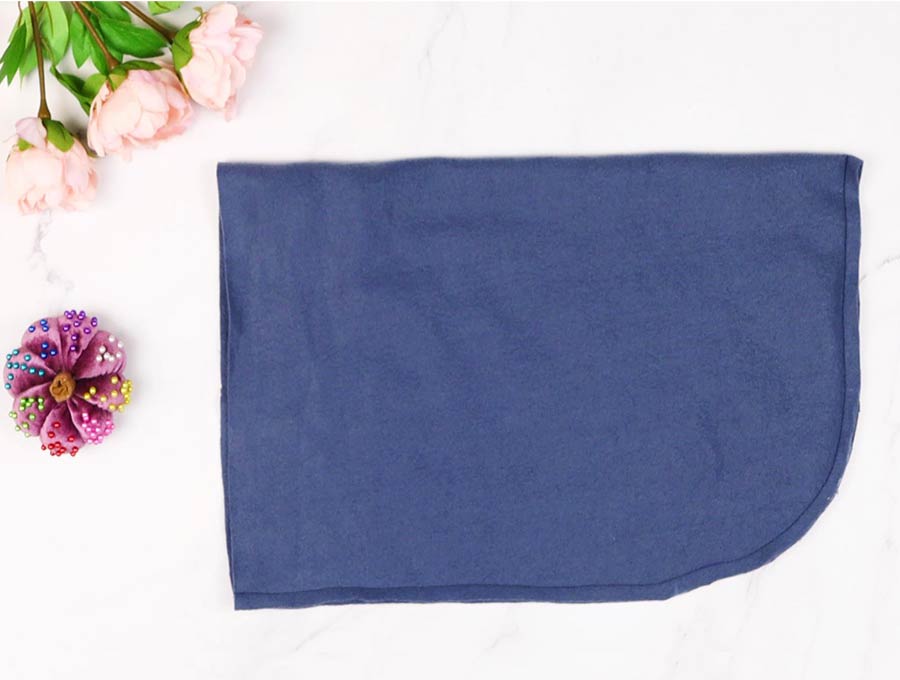
STEP 8: Fingerpress
Finger press the seam open – we say finger press because fleece material does not take kindly to ironing.
STEP 9: Hem
With the wrong side outwards turn up 3” (7.5cm) to create a ‘hem’ and blind stitch by hand starting from the seam, making sure the seams are open and lying flat, working your way around the hat.
The blind stitch involves putting the needle into the fabric just above where the turn up ends and making a very small stitch, then catching up the piece that is turned up near the edge and pulling the needle through. Repeat, leaving a gap where the cotton is hidden under the hem as you pick up the next bit of the main hat, then catch the turn up. It will create a seam that is invisible on the right side of the fabric – unless you part the pile of the fleece with your fingers and look really closely.
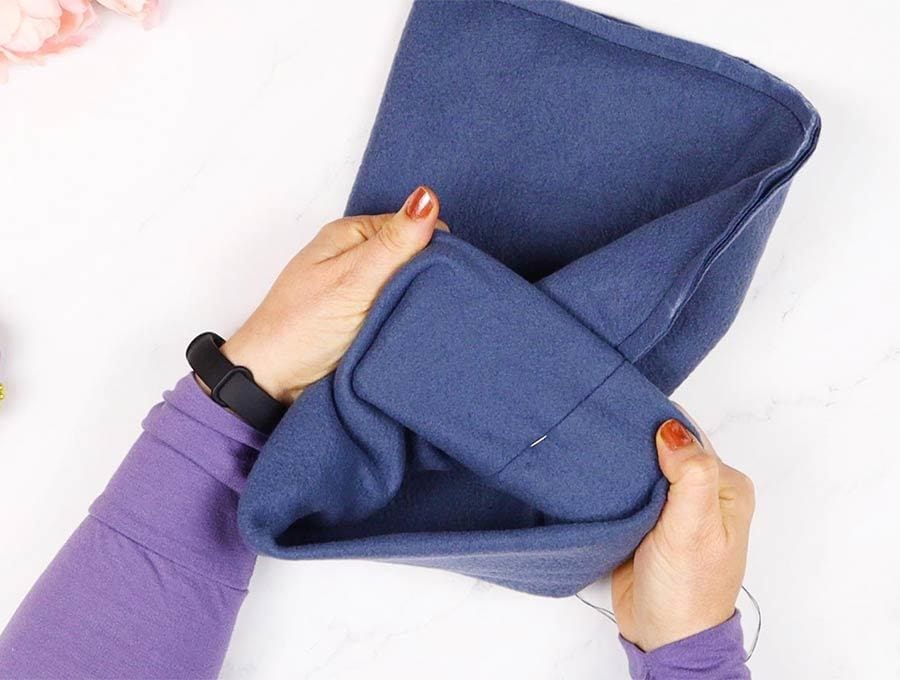
STEP 10: Pleat
Once the hem is done, turn the hat right side out and start with the pleating.
Holding the hemmed each steady, fold up to a depth of 3 inches, then secure with pins on either side of the seam, which has been finger pressed open. Repeat until you have five pleats going up the hat along the back seam, each around 3 inches deep. The fifth pleat will be at the top of the hat and you will pull the pointed part of the top down into the pleat and pin on either side.
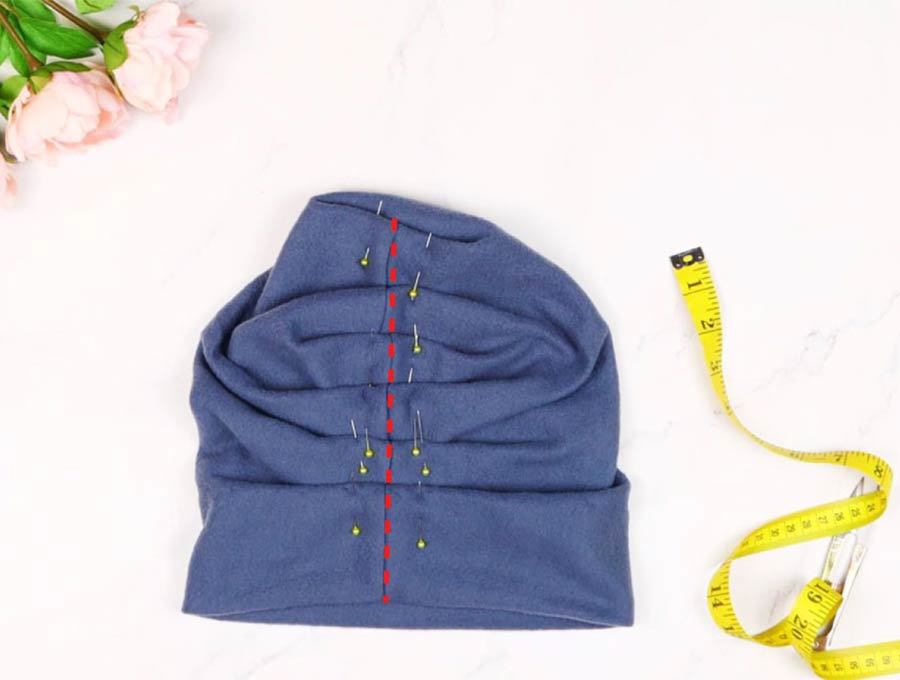
STEP 11: Pin the top
Turn the hat inside out, while pinned, and make sure that the pointed tip is folded downward and caught by a pin on the right side so that it does not wiggle free when sewing.
STEP 12: Sew the hat
Now turn the hat carefully back the right way out, and starting from the base, topstitch next to the seam on the right side in the same color cotton as the hat. You will be working through quite a few layers of material so make sure everything is lying flat, and that you start slowly and back stitch before carefully moving forward with the stitches. Backstitch again at the top.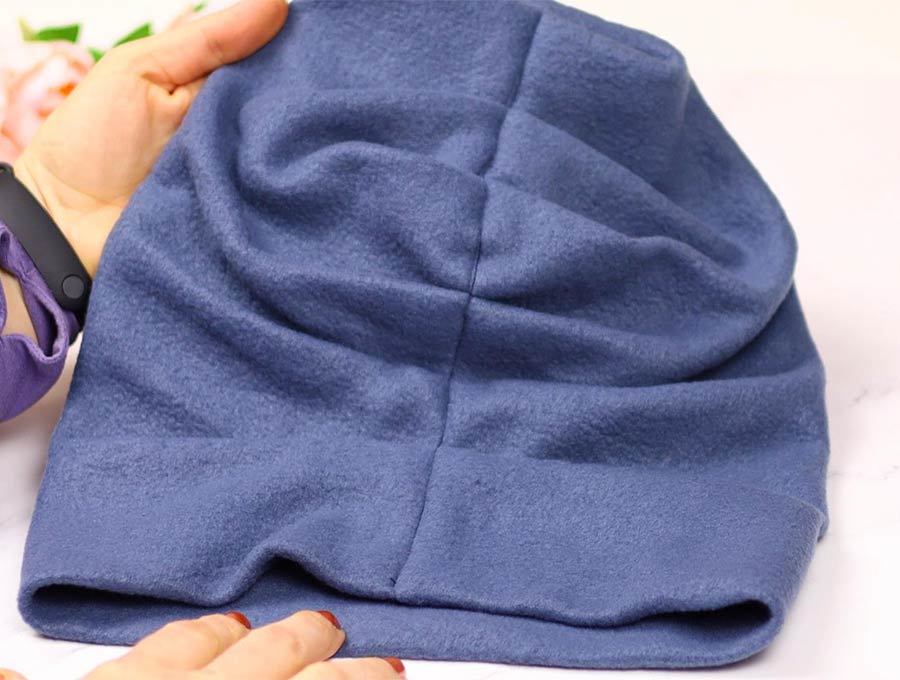
STEP 13: Fold decoration piece
Fold the decoration strip in half along the 60-inch (150cm) length so you have a folded piece measuring 60 (150) inches by 2 ¼ inches (5.75cm).
 About 1/4 of an inch (6mm) from the fold run a row of hand stitches along the length of the fabric that are fairly large – this is called a basting stitch and serves to act as the base from which to pull up the cotton gently to form an even gather along the whole length of the fabric.
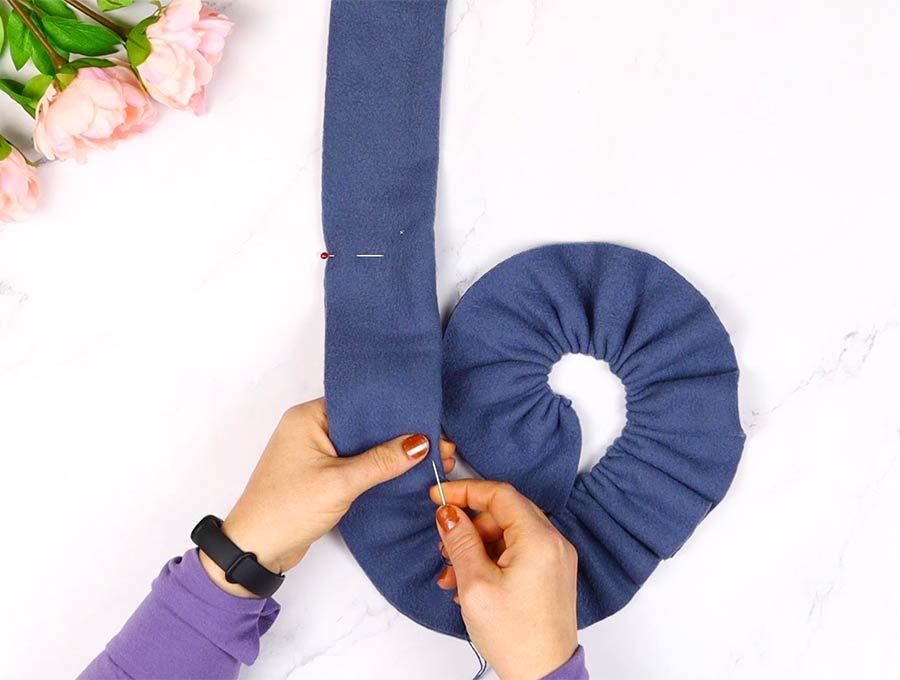
STEP 14: Gather
Gather the thread up until it reaches from the base of the seam at the back, to the top of the hat, and down again to the base.
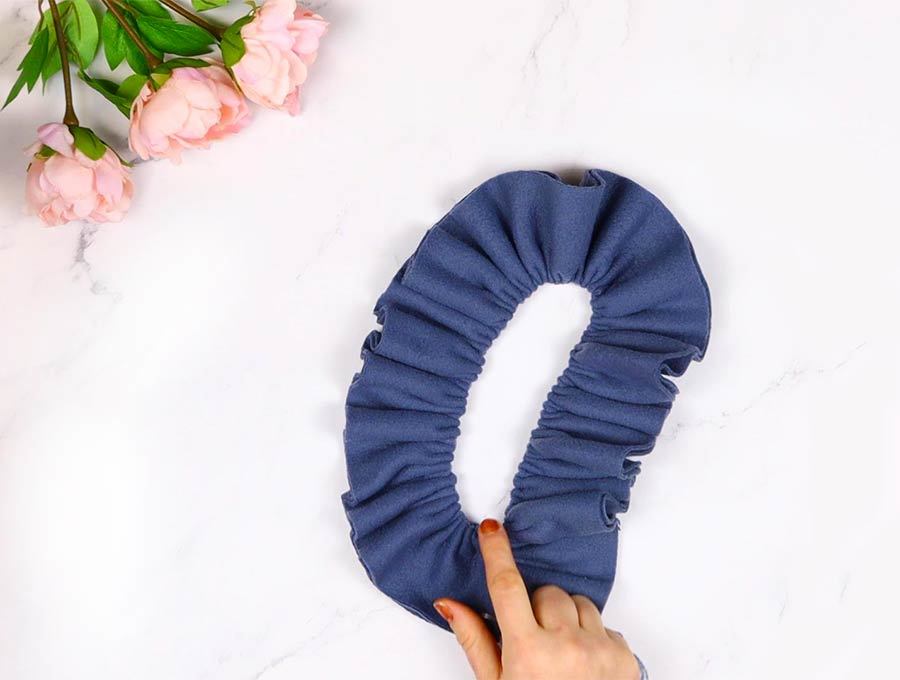
STEP 15: Handstitch the decoration
Hand stitch the decoration piece to the back of the hat by starting right at the base of the seam at the back. A tip is to secure the one end of the base, then the other end next to it on the hat before proceeding with the stitches up to the top. If both ends are fastened it just makes it easier to ease the gathers evenly as you stitch up the one side, turn at the crown securing the gather, and stitch down the other side.
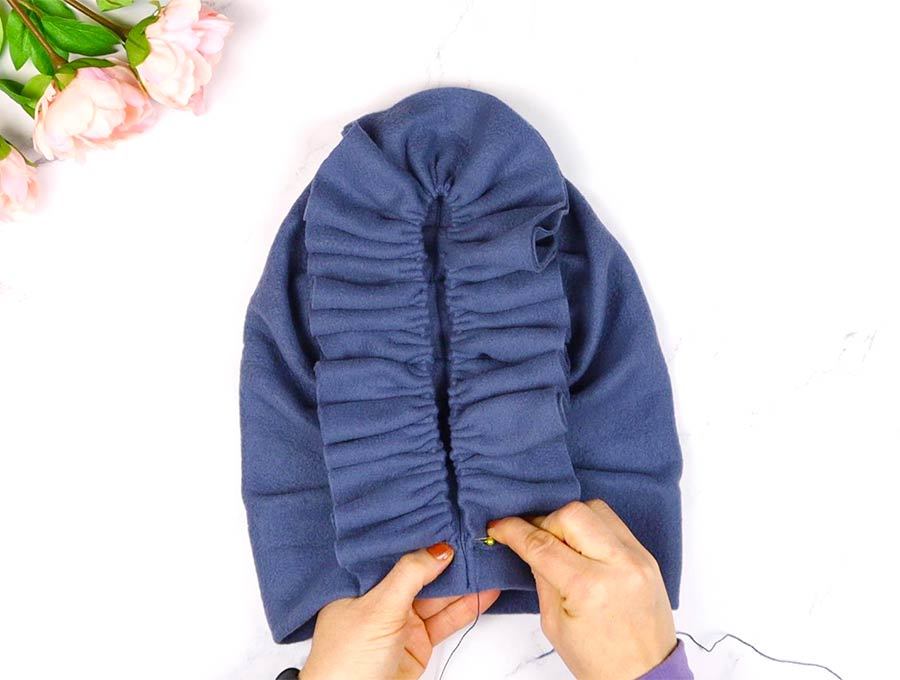
STEP 16: Finish
Hand stitch the top of the decoration to the top of the fabric for a nicer look.
That’s it your winter hat with pleats and gathers is ready!
FAQs, Tips and Troubleshooting:
- Q: Can I make more of a ruffled gather at the back of the hat?
A: Yes, this is quite easy – since you stitched two layers together, once complete, you can fluff them out by separating each of the two layers, pulling them apart gently going up one side and back down the other side so you have 4 separate layers. This should make it even fluffier.
- Q: I’m worried the single layer of top stitch across the pleats might pull loose with wear, how can I reinforce the stitching?
A: If your machine does a triple stitch then by all means set it to this to give a really firm topstitch that secures the pleats in place. If you are worried about the pleats pulling loose with wear, then once you have completed a top stitch with a normal straight stitch on one side of the side then turn at the top by leaving your needle in the fabric, lifting the presser foot and swinging the fabric around, depressing the presser foot and stitching down the other side of the seam – you now have two rows of top stitching securing the pleats.
Do let us know how your pleated hat turned out by subscribing and posting in the comment section. If you would like more step-by-step tutorials accompanied by a video presentation to reach your inbox directly, then all you need to do it hit that subscribe button.
Do you like this? Pin for later:

Wanna be friends? Click HERE and follow me on Pinterest
RELATED:
Another cool idea – 4 in 1 beanie hat
Adorable bucket hat for the summer