
DIY Fabric Scissors Holder with FREE Scissors Case Pattern
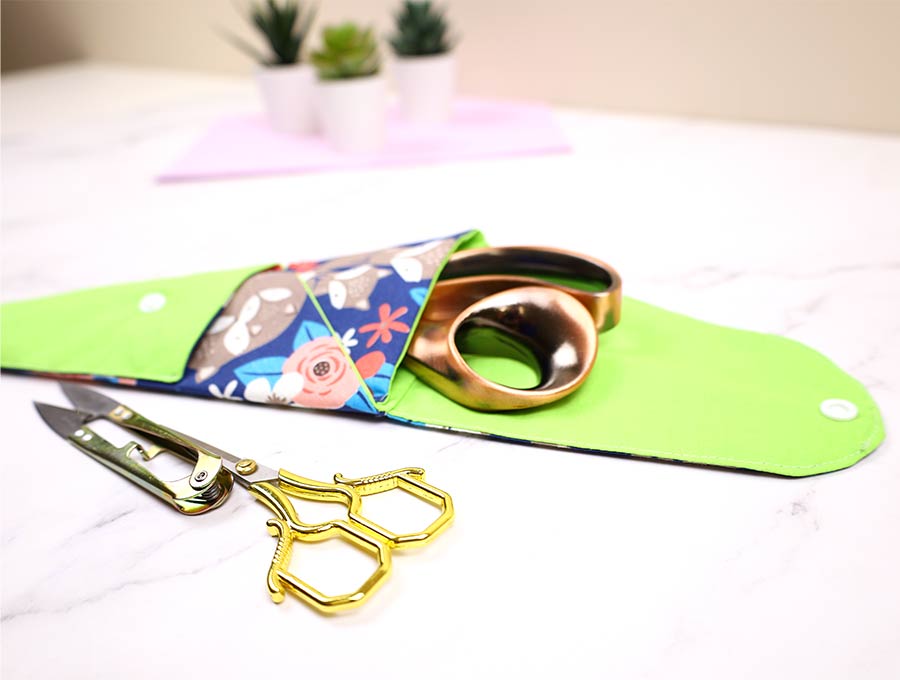
Get this free scissors case pattern and whip up this easy DIY scissors holder to keeps your three main types of sewing scissors in one place. Also, the DIY scissors pouch can be conveniently kept inside a sewing cupboard or basket out of reach of children and partners. Many sewists go on rampages, hunting for their scissors only to find them in a child’s room, “Because I needed to cut stuff out for my project!” the offender will protest. Sometimes the fabric cutting scissors end up in a partner’s workshop with bits of glue stuck to them. Aargh! If mom’s scissors are in plain view kids don’t even bother looking under their piles of junk for their own. Ditto for partners! Of course, once fabric cutting scissors have been abused cutting carpeting and craft paper the miscreants may as well just keep them because they’ll be ruined. So, let’s cut to the tutorial that will keep precious scissors safe from prying hands.
The first step is to choose your fabric and lining – both should be a sturdy cotton, with the lining a plain color, picking up one of the colors in the patterned fabric to give the DIY scissors pouch a coordinated look. You will also need a piece of fusible interfacing.
Below you will find my step by step written tutorial how to make scissors pouch with free scissors holder pattern and VIDEO instructions for all the visual learners.
We occasionally link to goods offered by vendors to help the reader find relevant products. Some of the links may be affiliate meaning we earn a small commission if an item is purchased.
Table of Contents
- 1 How to make a Scissors Pouch
- 2 Scissors Holder Supplies and tools
- 3 How To Sew a Scissors Holder
- 3.1 Scissors Holder VIDEO TUTORIAL
- 3.2 Scissors Case INSTRUCTIONS:
- 3.3 STEP 1: Prepare the scissors pouch pattern
- 3.4 STEP 2:
- 3.5 STEP 3: Fuse interfacing to the fabric
- 3.6 STEP 4: Pin lining to main fabric
- 3.7 STEP 5:
- 3.8 STEP 6:
- 3.9 STEP 7:
- 3.10 STEP 8:
- 3.11 STEP 9:
- 3.12 STEP 10:
- 3.13 STEP 11:
- 3.14 STEP 12:
- 3.15 STEP 13:
- 3.16 STEP 14:
- 3.17 STEP 15:
- 3.18 STEP 20:
How to make a Scissors Pouch
Scissors Holder Supplies and tools
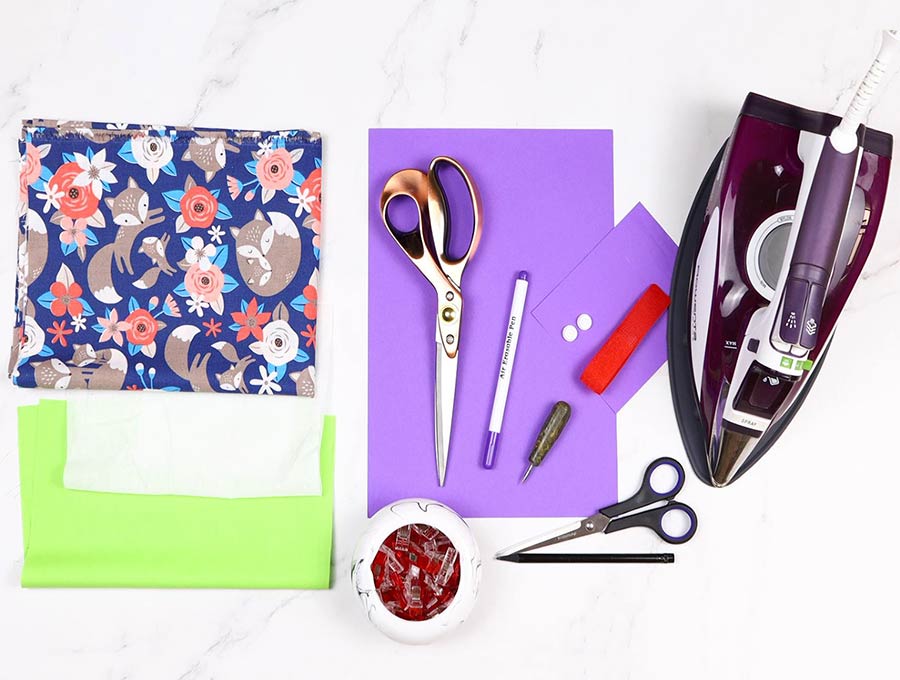
- fabric – 2 pieces of 100% tightly woven cotton (one main, one lining)
- fusible interfacing
- matching thread
- scissors (or rotary cutter and a cutting mat)
- ruler or measuring tape
- iron and ironing board
- sewing clips or pins
Closure options:
- plastic snaps (you will need a sewing awl and snap pliers
- press studs
- hook and loop dots/tape
DOWNLOAD: scissors case pattern (Free PDF file)
Follow us for free patterns & tutorials! [easy-profiles]
How To Sew a Scissors Holder
Watch the diy scissors case video first and then follow the written step by step instructions below.
Please enjoy and don’t forget to Like and SUBSCRIBE over on YouTube to be kept up to date with new videos as they come out.
Scissors Holder VIDEO TUTORIAL
Scissors Case INSTRUCTIONS:
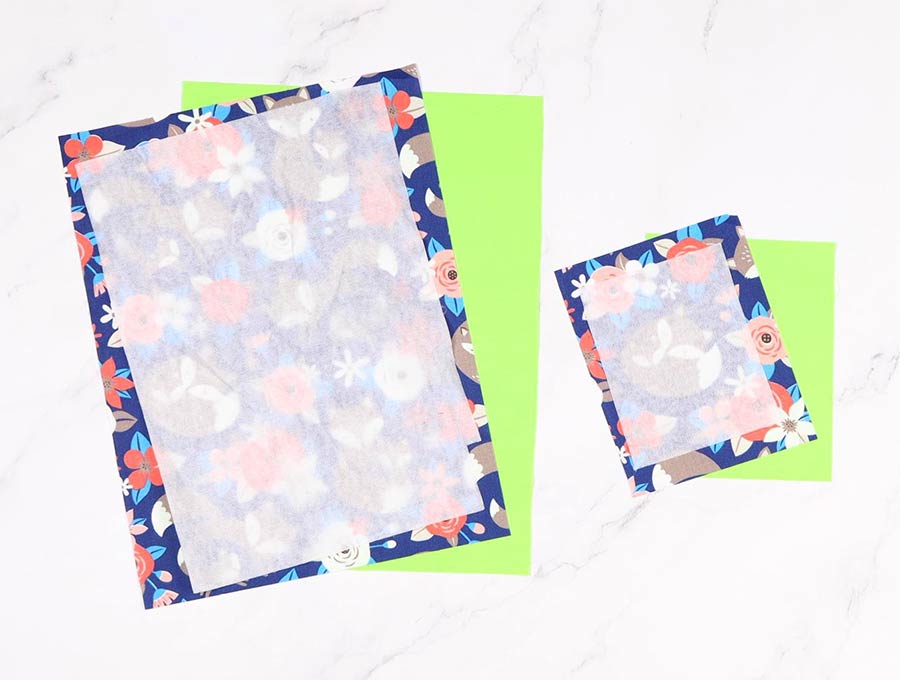
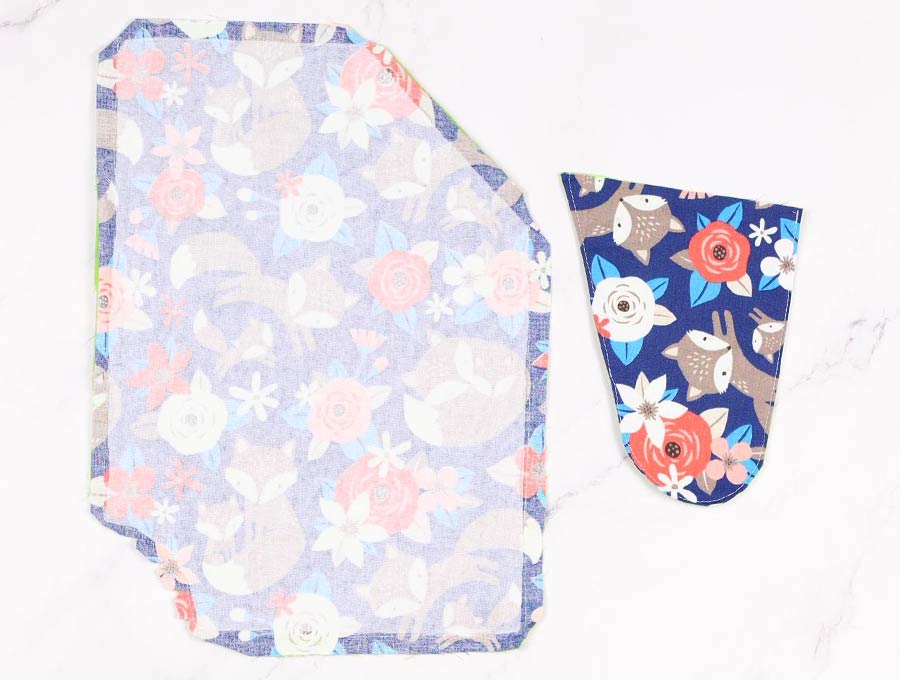
These are the sizes of the fabric and interfacing you will need to make the fabric scissors holder with 3 pockets. It fits up to TWO 9.5″ (24cm) scissors!
Outer fabric (patterned):
9 1/8″ x 12 1/2″ (23 x 31.5cm)
5 3/4″ x 6 3/4″ (14.5 x 17 cm)
Lining fabric (plain):
9 1/8″ x 12 1/2″ (23 x 31.5cm)
5 3/4″ x 6 3/4″ (14.5 x 17 cm)
Interfacing or fusible fleece:
8 3/8” x 11 ¾” (21 x 29.5cm)
5 x 6” (12.5 x 15cm)
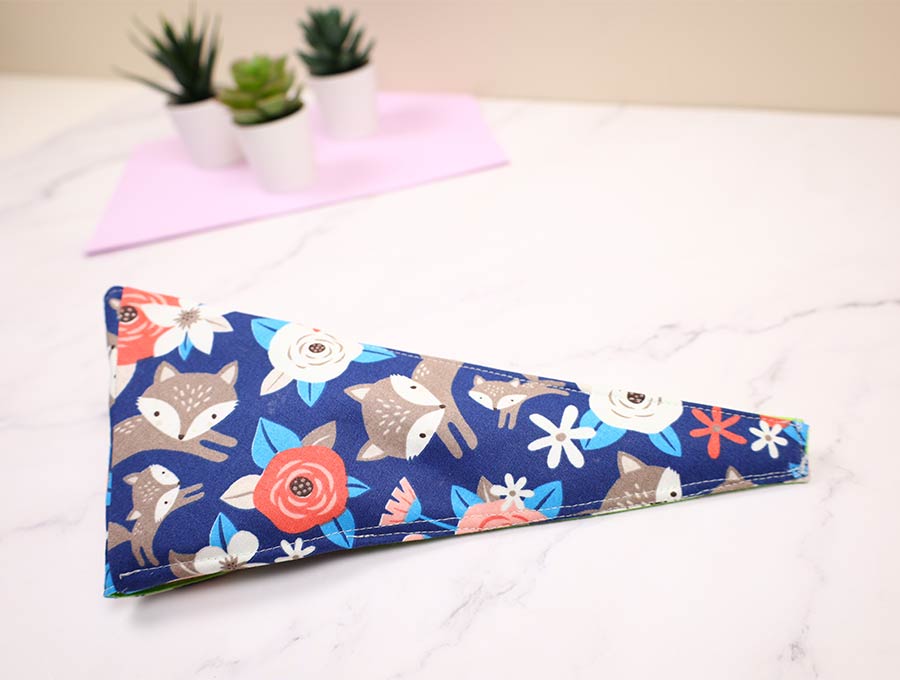
Finished size of the scissors pouch:
W x H: 4½″ x 9½″ (12cm× 24cm)
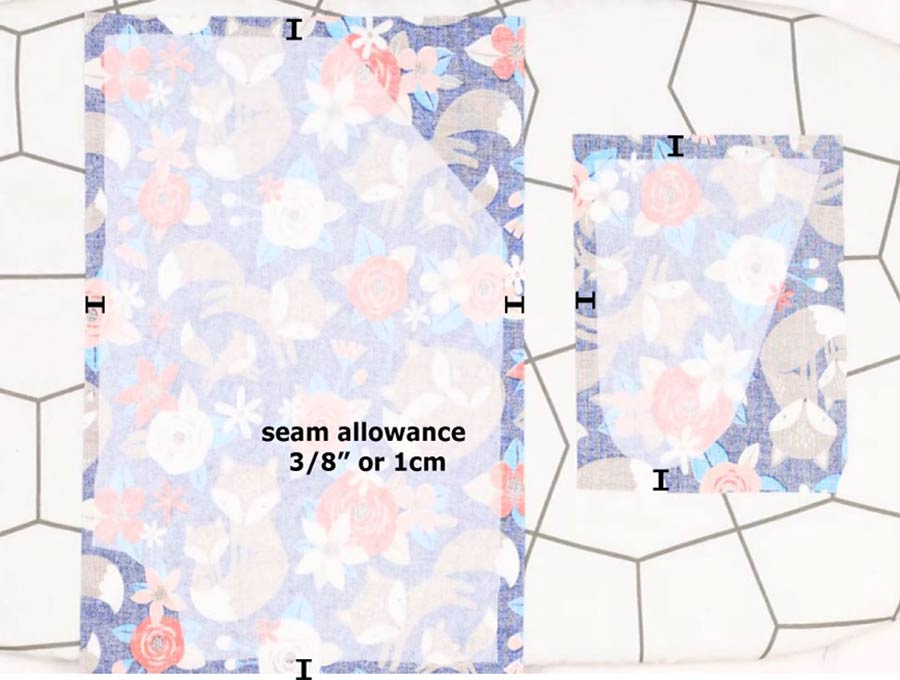
Seam allowance 3/8” (1cm) unless stated otherwise
Once you have your material and interfacing ready, set them aside while you do the folds for the DIY scissors pouch with a piece of A4 paper which is standard at 8 3/8” x 11 ¾” (210 mm x 297 mm)
STEP 1: Prepare the scissors pouch pattern
You can either download my free printable scissors pouch pattern or make your own template using 2 sheets of paper. If you making your own follow the steps below, if you are using my scissors case pattern, skip to step 2.
You will need either 2 A4 sheets of paper or 1 large sheet of paper from which you will need to cut one large piece 8 3/8” x 11 3/4” (21 cm x 30 cm) and one smaller piece 5 x 6”(12.5 x 15cm)
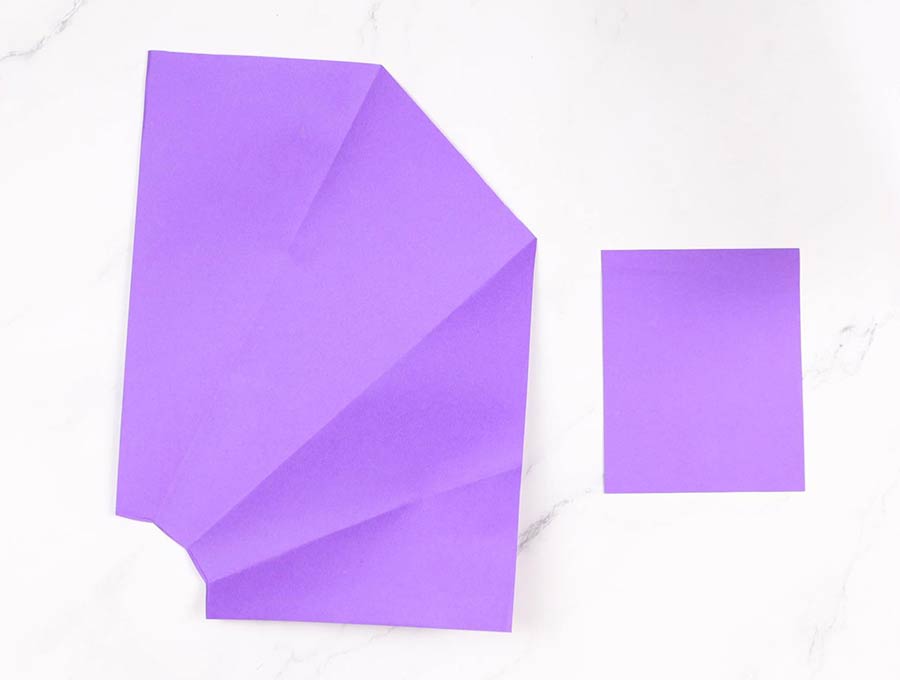
1.1. . Place the A4 piece of paper on the workspace in front of you with the shorter end facing you (portrait style). Now lift the bottom right corner and fold it up towards the left until the bottom edge lines up with the left-hand side edge. Press the fold in place with your fingers.
1.2. Unfold and take the bottom right-hand side corner and fold it upwards so the bottom edge is in line with the first fold line you created. Finger press in place.
1.3. Take the top left-hand corner and bring it across to line up with the first fold line created. Press in the fold with your fingers. Now fold the lower small fold up and across to meet the left-hand side of the second fold you created. You now have a piece of paper roughly in the shape of an ice-cream cone.
1.4. Trim the triangle off of the left-hand corner where the top of the folded paper from the left reaches the right-hand side.
1.5. Place the folded paper with the widest point of the ice cream cone, facing up on the table and measure 2 inches (5cm) from the pointed folded base, then cut off the folded point with scissors, in a straight line.
1.6. Lay the folded piece of paper over the smaller piece of fusible interfacing [5 x 6” (12.5 x 15cm)] with the back of the folded paper (not the zig zag bits) over the fusible interfacing, fusible side down onto the table. Line up the top edge and left-hand side of paper with the edge of the interfacing. There will be a longish triangular piece of interfacing sticking out on the right-hand side. Mark with a fabric pen alongside the edge of the paper where it meets the interfacing and cut off the extra piece.
1.7. Slide out the interfacing and without turning it over place directly over the top of the folded piece of paper, lining up the top corners. Now use a fabric pen to create the rounded edge of the flap. Try to get both sides even, then trim off the excess interlining.
1.8. Once you unfold the piece of A4 paper you will have a slightly curved bit on the lower left corner (that was the point of the ice cream cone shape). The top right-hand corner will be missing a triangular piece. This is your pattern for the DIY scissors pouch.
STEP 2:
Lay the paper over the piece of fusible interfacing, fusible side facing the table, and using fabric scissors trim off the top right corner and the lower curved bit of the interfacing.

STEP 3: Fuse interfacing to the fabric
Now take the fusible interfacing and lay it with the fusible side down on the wrong side of the outer patterned fabric.
Lay the smaller piece of fusible interfacing, fusible side down over the smaller piece of patterned fabric, which will have the wrong side facing upwards. Place the interfacing so you are 3/8″ 1cm away from the fabric edge to allow for the seam allowance.
Using an iron, fuse the interfacing to the larger piece for the scissors pouch, and repeat the process with the smaller piece which will be the flap for the DIY scissors case.
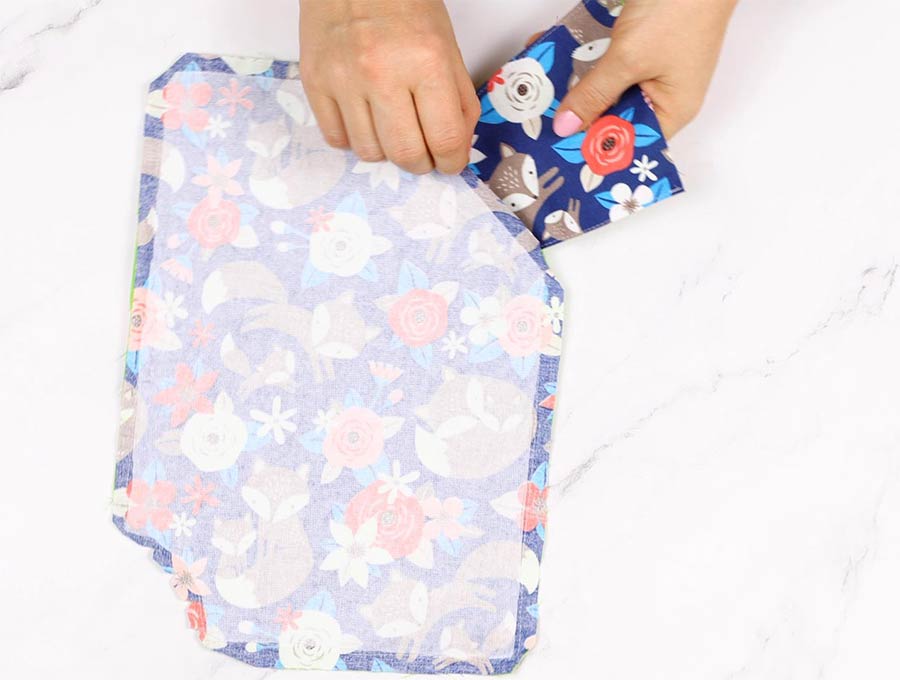
STEP 4: Pin lining to main fabric
Lay the lining fabric right side up on the table and place the fused pieces right side to right side over the lining. Pin the pieces for the pouch and the lining together, leaving the top corner on the right that is missing open. This is where you will later insert the flap. Also leave a piece about 2 inches (5cm) long on the left-hand side open. This is to turn the scissors pouch right way out.
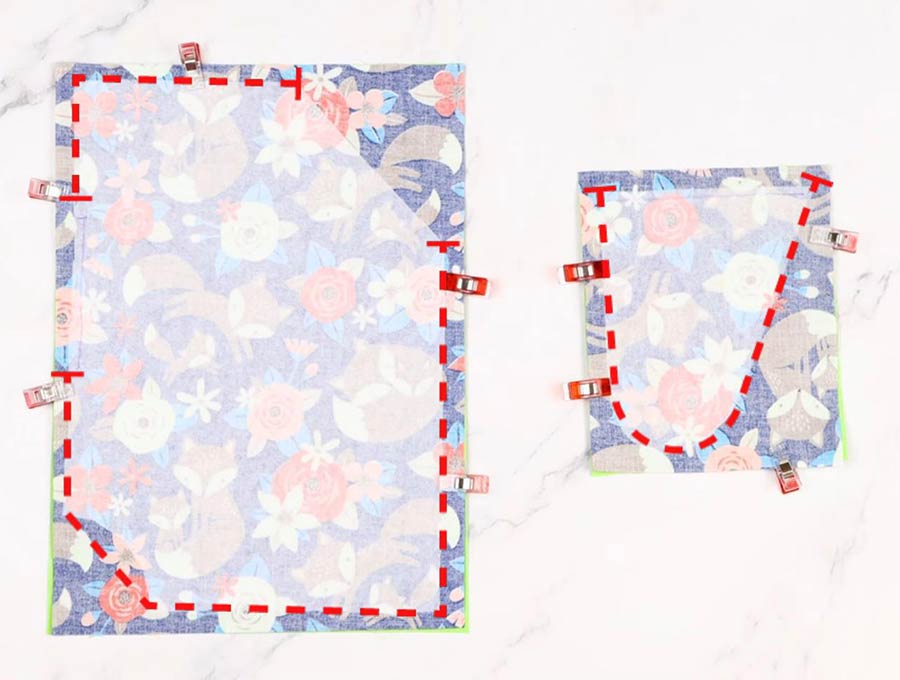
STEP 5:
Stitch all around the edges except for the top right corner and the piece on the side. Lift the presser foot at corners, leaving the needle in the fabric to create a neat unbroken stitch. Backstitch where you leave both gaps.
STEP 6:
On the larger piece make little parallel snips in towards the curved stitch line, and cut off the corners at an angle, taking care not to trim too close to the stitch-line. This removes excess fabric allowing the seams to lie flat when turned.
STEP 7:
For the flap stitch around the sides and curved edges leaving the top open. Repeat with the parallel snips towards the stitch line on the curve of the flap piece for the pouch.
STEP 8:
Turn the flap piece right way out, and press flat before top stitching around the sides and curved edge.
STEP 9:
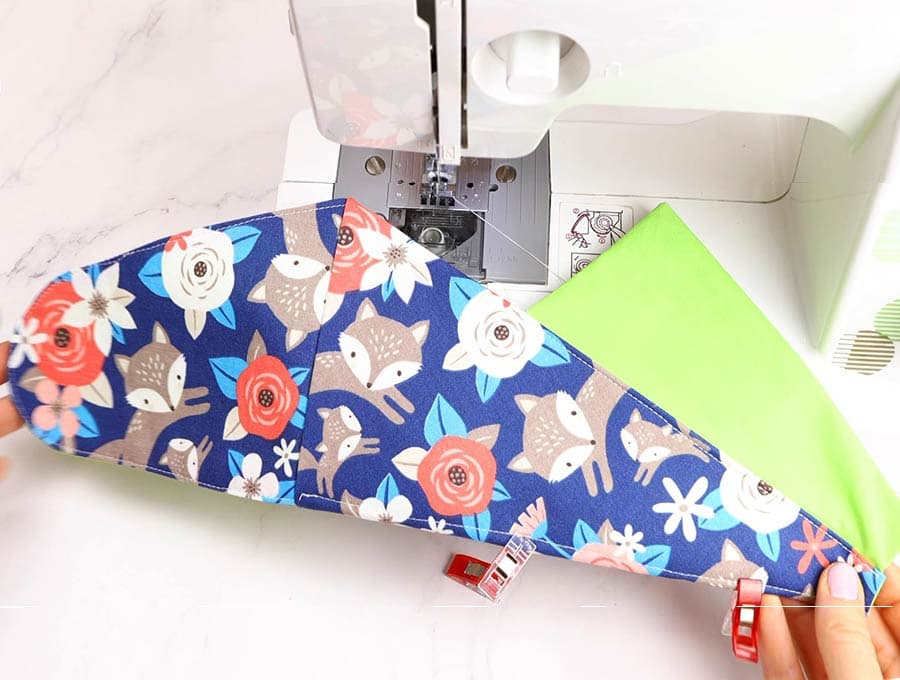
Insert the flap into the top corner of the main piece, making sure the patterned piece of the flap is lying right side to right side with the patterned piece of the pouch. Line up the raw edges, with the right sides of the flap piece facing into the main body of fabric.
STEP 10:
Stitch across the 4 thicknesses of fabric of the slanted corner to secure the flap in place.
STEP 11:
Pull the fabric through the gap you left on the side to turn it the right way out. Make sure all the edges are neatly turned out and press in place, tucking under the raw edges of the gap in line with the rest of the fabric.
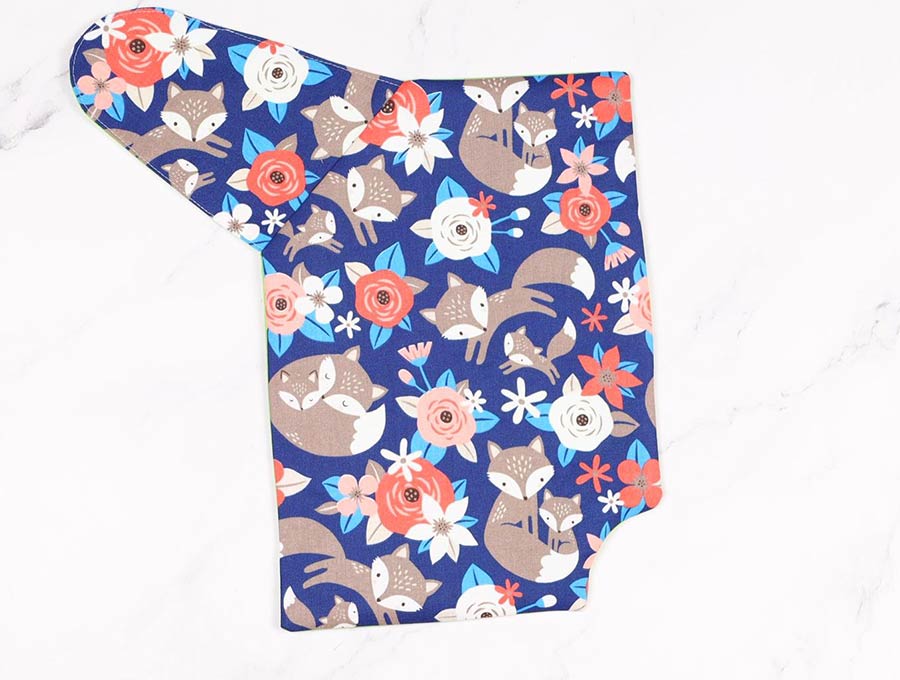
STEP 12:
Place the pouch, patterned side onto your work surface and with the lining uppermost. You can lay the paper across the fabric to help you in making the folds if you prefer. I’d like to fold and press everything down first to make the creases, and then re-fold the case and stitch each fold down and this creates the most precise folds. You can fold and stitch if you prefer as it’s quicker, it’s entirely up to you.
First fold the top left-hand side across and pin in place, then stitch down the edge, back tacking at start and finish.
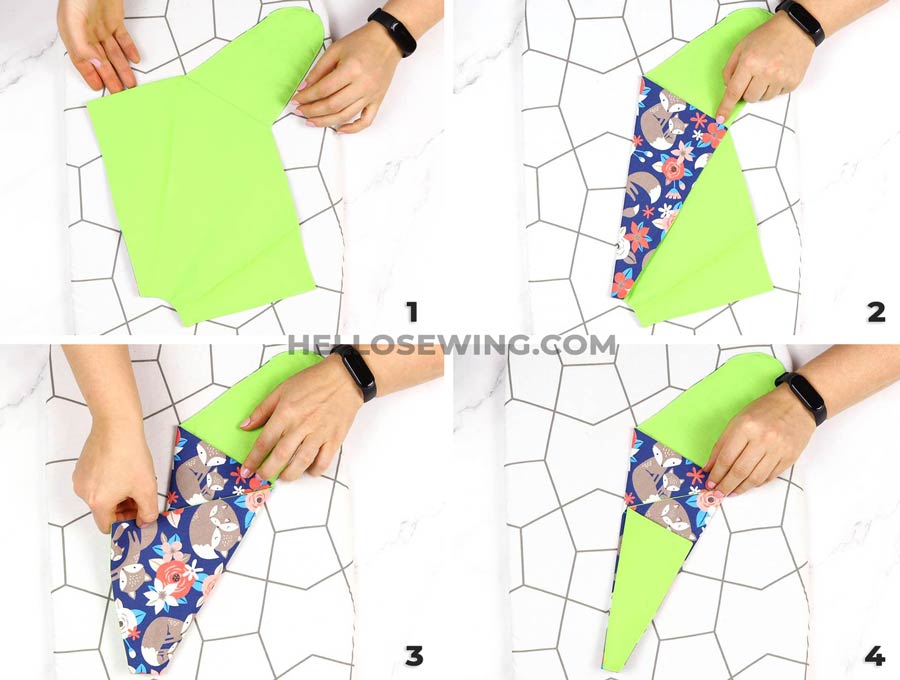
STEP 13:
Now fold the right-hand side over to the left to fit snug against the stitch line you have just created. Clip in place.
STEP 14:
Turn over the pouch so the back is facing upward and stich along the right edge, back stitching at start and finish.
STEP 15:
Lastly, fold the extra piece back from the left to the right, over the patterned piece – the lining side will be showing on this one, and stitch on the right-hand side edge, taking the stitch line down to the end. Keep the needle down in place, lift the presser foot, turn, lower the foot and stitch across the end of the scissors pouch, back tacking as this is where the pointed ends of the scissors will be.
STEP 20:
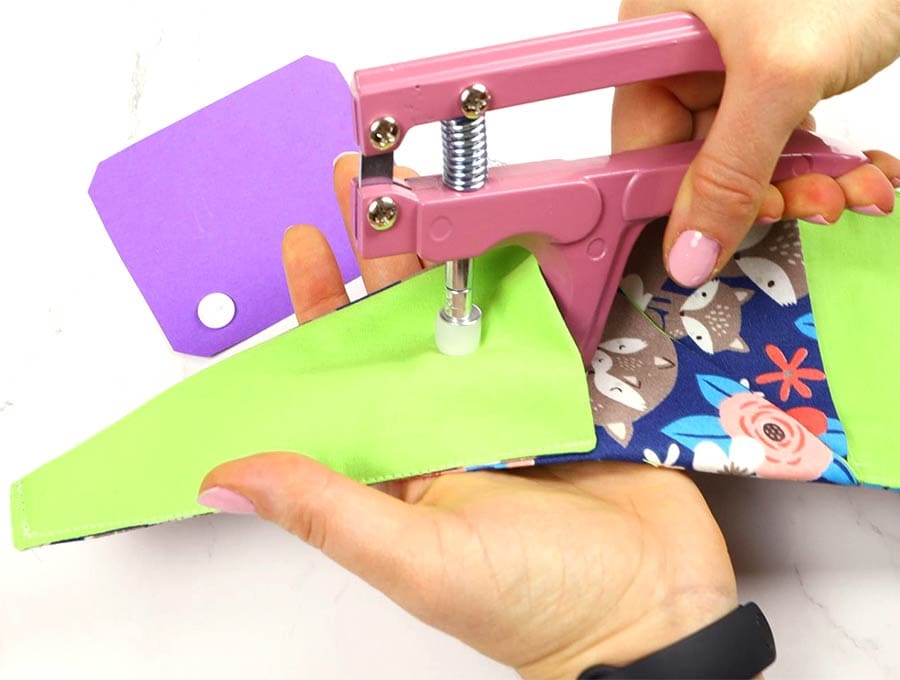
Open the flap over the pouch and using chalk mark the spot where you want to stitch a press stud to keep the pouch closed. Fold it down and the chalk will make a mark on the pouch itself so you can line up the two pieces of the press stud accurately. Stitch the two press stud halves in place or press the plastic snaps with pliers.
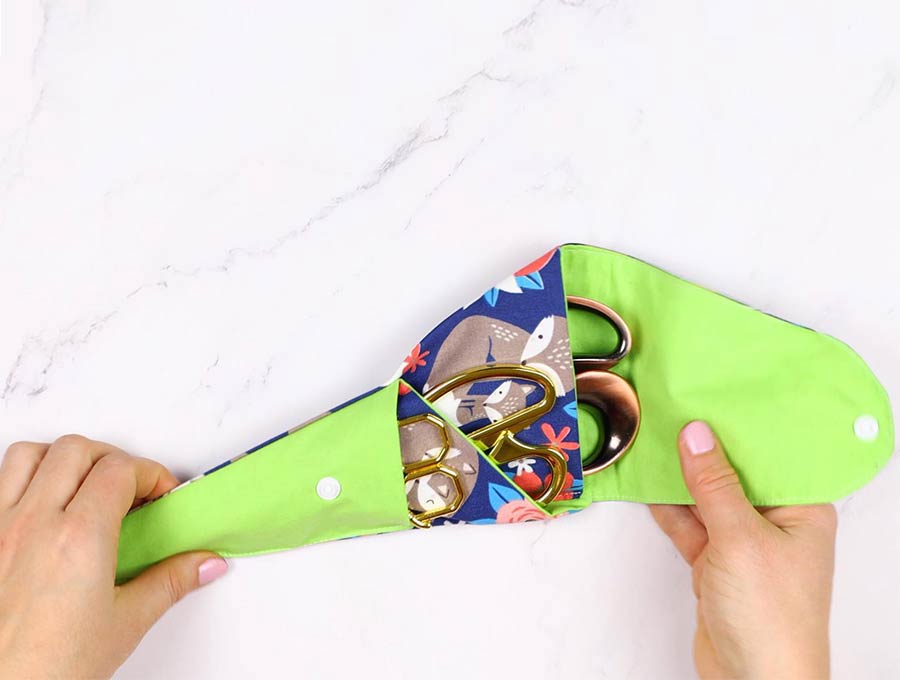
Now you are ready to slide three pairs of scissors into place in their neat little scissors pouch.
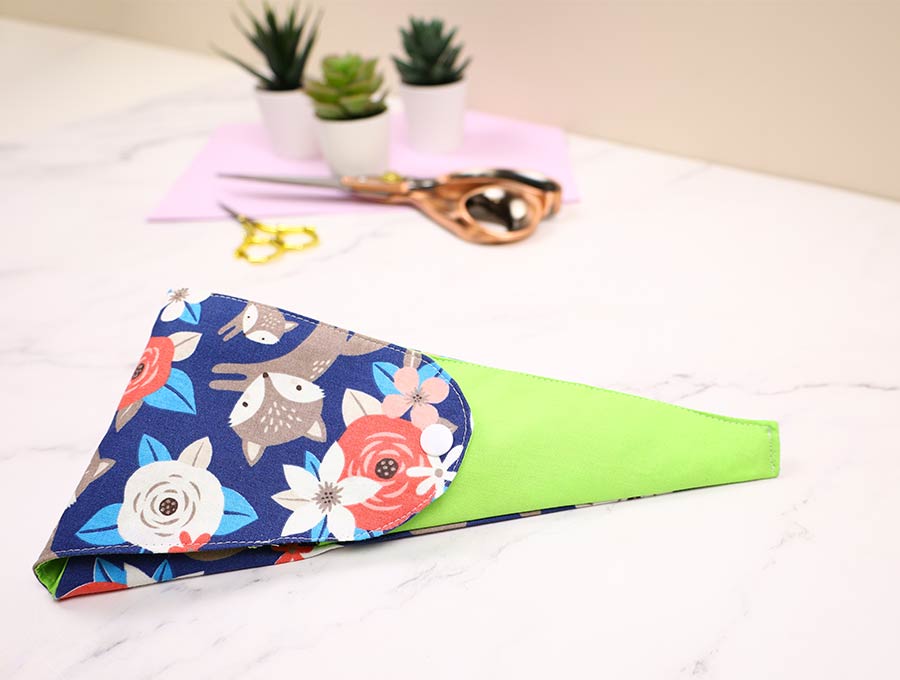
Our tutorial makes it super easy to follow the process of making the three scissors DIY pouch in easy steps. If you are a true sewist you will be kind of precious about your scissors. The DIY scissors pouch keeps them safely together and out of temptation from those who would make them blunt by cutting paper and other craft materials. Get the free scissors case pattern and enjoy making this DIY scissors pouch, and be inspired to make a couple to give to fellow sewists. And OK, you might want to make a couple for the kids to keep their craft scissors in place too.
If you enjoyed this tutorial then please click here to subscribe to have other easy sewing projects with step-by-step instructions delivered straight to your inbox.
Do you like this? Pin for later:
Wanna be friends? Click HERE and follow me on Pinterest
MORE: Clever Sewing Patterns to Organize Your Sewing Space:
If you are anything like me, you love creating pretty things every day and I’ve discovered that I feel way more creative and productive when my space is well organized. Here’s a selection of ideas:.
Triangular pattern weights – hold your patterns in place with these cute pattern weights. You can cut up to 6-8 layers of cotton fabric at once to make the work go even faster.
Easy cord wrap – tame all cords in the house with this super simple, yet ingenious cord keeper
Triangular pouch – to keep your clips, or other itty-bitty things inside
DIY phone stand – Watch your favorite sewing videos handsfree