
How to Make Silk Tie Dyed Easter Eggs – EGGstraordinary Beautiful
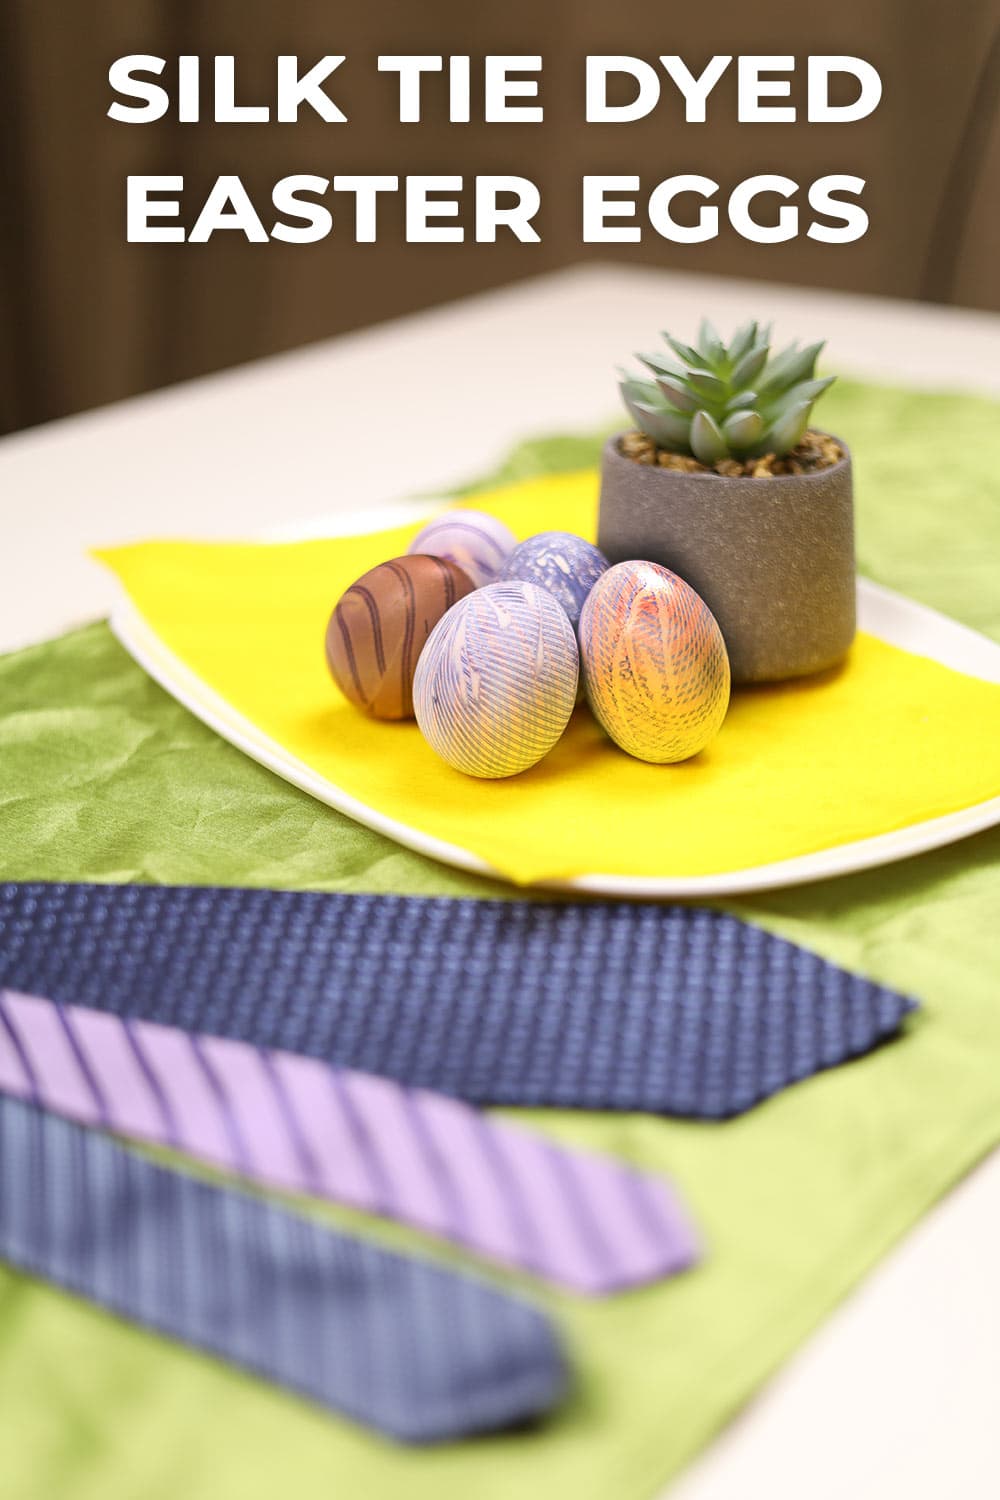
These silk dyed eggs are gorgeous – something so totally different and classy, plus they add the sentimental value of old silk ties, from a grandfather or great grandfather to Easter celebrations. There are just three steps to silk dyeing eggs which can be used for Easter decorations. They are not edible as they are boiled for a long time, so make sure to have some chocolate eggs available for kids too otherwise they may be disappointed with the Easter Bunny. There is also the option of blowing the eggs first, using the contents for scrambled eggs, then dyeing the egg shells, so they can be kept for years.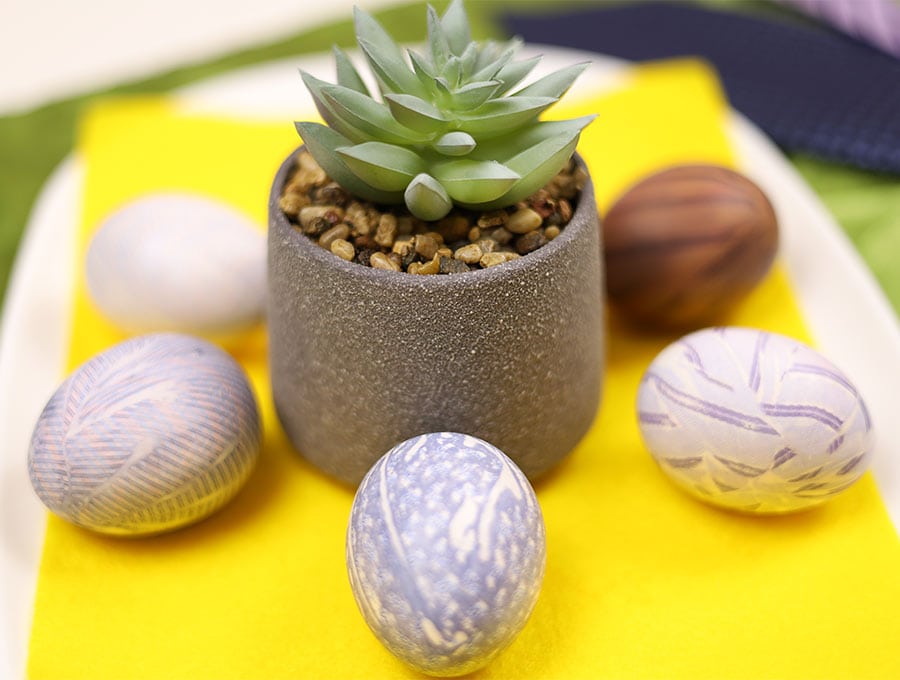
Finding 100% silk
Now it is really important to have 100% silk for this dye transfer method to work. If you don’t have silk ties lying around at home then try the local thrift shops. But, don’t just confine yourself to ties – any patterned fabric that is labelled 100% silk will work, like old blouses or scarves. Polyester, or any other silk lookalike fabrics, although they may feel similar, simply will not work. Ask around among neighbors and friends too – often they will hoard items that are no longer worn – now you can transfer them into a keepsake, and maybe give them a couple of the eggs you made with their items.

Check the labels indicating 100% silk – on ties they will either be found on the back of the main body of the tie or hidden under the flap on the larger or smaller end of the tie. On blouses they will be at the back of the neck or hidden in a side seam. Sometimes people cut off the labels on scarves, but don’t be afraid to experiment if it feels like real silk.
Choosing colors and patterns
When we wear clothing we often like the more designs, but for the silk dyeing process the darker and more striking the design the better it will transfer to the egg. So, avoid the pastels unless you particularly want a pale egg. Also, don’t be afraid to experiment – this is one of those activities you can do with kids where half the fun is in discovering what works well and what doesn’t. You may get a gem from what you thought was a rather ‘ugly’ tie or scarf.
Choosing the eggs
Choosing the eggs. For the pattern to show up well you will need white eggs. When a friend was blowing eggs and painting on them with colored inks she would use duck eggs as they are beautifully white. She would carefully blow them first then decorate them. We cover how to blow an egg in the FAQ section if you prefer to prepare your eggs this way rather than boiling them.
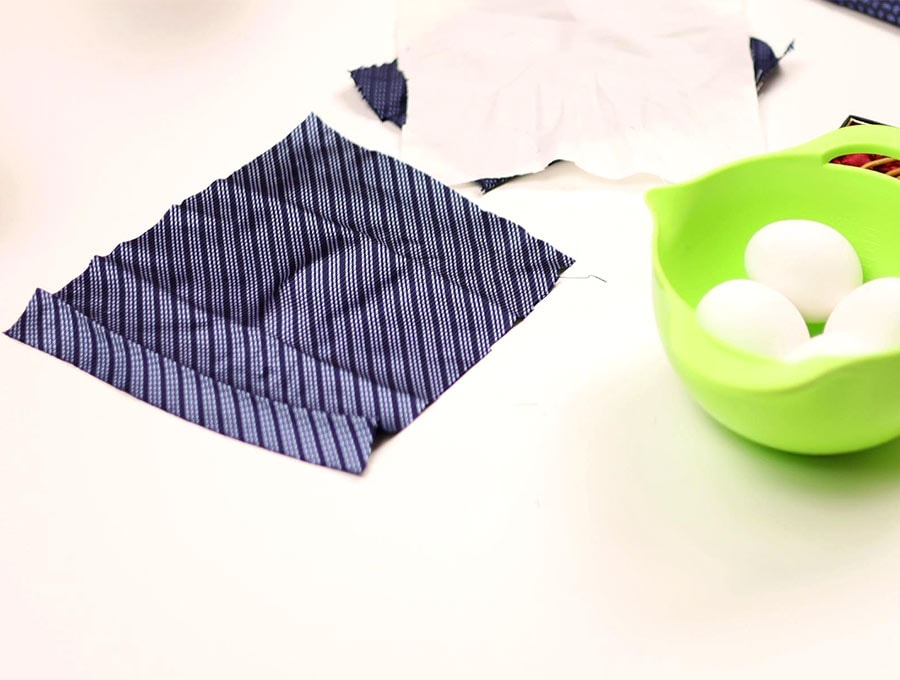
Size of fabric for an egg
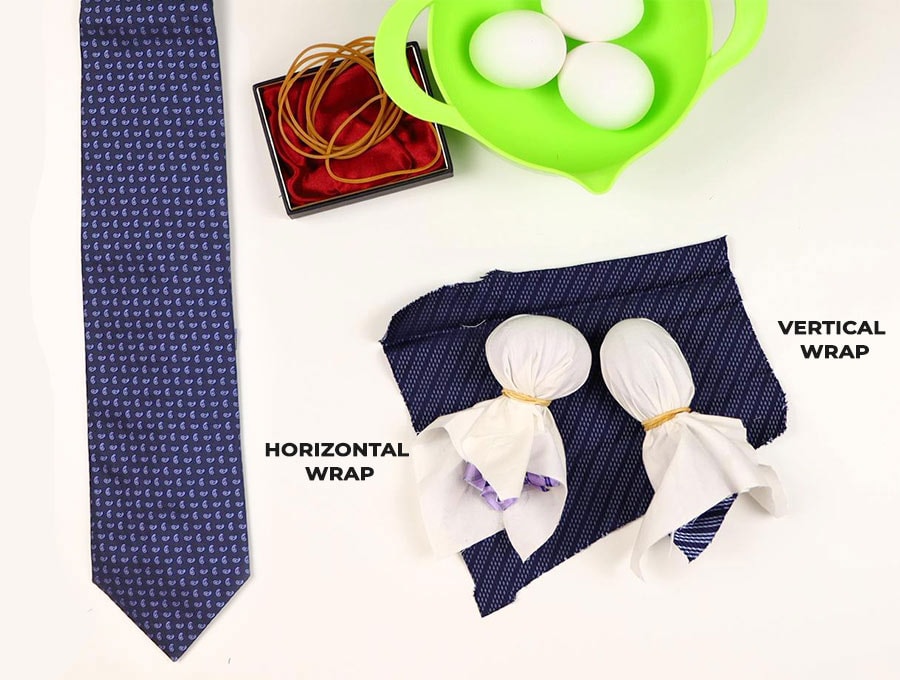
The fabric from a tie will cover three normal size hen eggs. You will need to open up the tie, carefully removing the interlining and lining. Then place you egg on the opened-out fabric and check that you can gather the fabric up over the egg and secure it at the top with a piece of string, twisty tie or rubber band. All parts of the egg need to be covered by the fabric so the design transfers to the whole egg. When using scarves and blouses you can easily work out the size by cutting a test piece from an old sheet to see how much fabric you need – incidentally you will need a piece of plain old sheeting or other white cotton fabric for each egg you silk-dye to prevent colors mixing when you boil your eggs.
Below you will find my step by step written tutorial with VIDEO instructions for all the visual learners.
We occasionally link to goods offered by vendors to help the reader find relevant products. Some of the links may be affiliate meaning we earn a small commission if an item is purchased.
Table of Contents
Dying Easter Eggs with Old Silk Ties
Supplies and tools
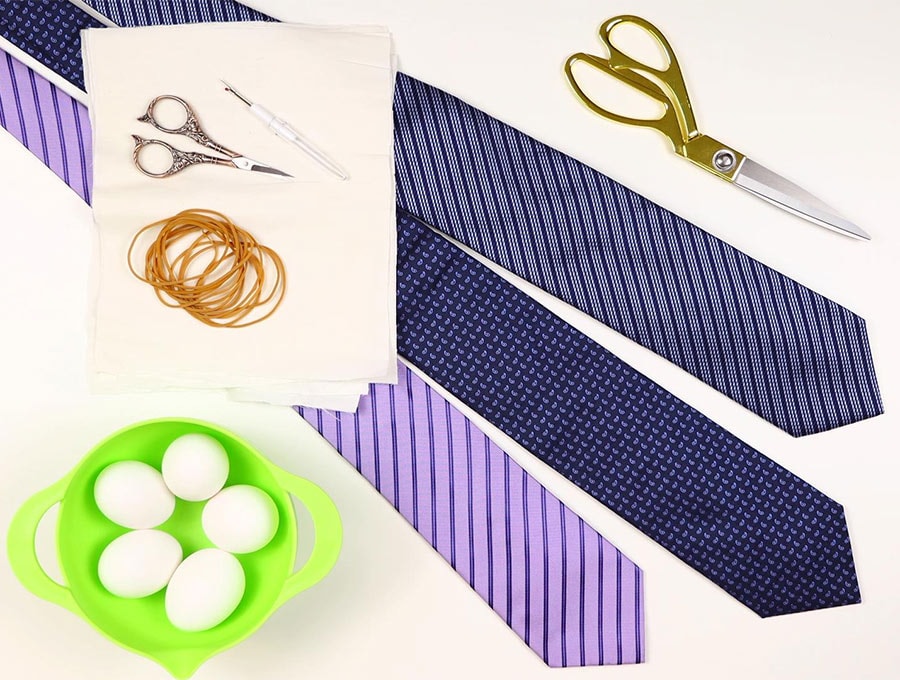
- fabric – 100% silk ties or material
- fabric – white or off-white cotton fabric
- twisty ties or rubber bands
- scissors
- uncooked white eggs
- pot
- white vinegar
- water
Follow us for free patterns & tutorials! [easy-profiles]
How to Dye Easter Eggs with Silk Ties
Watch the video that shows the step by step process of dying easter eggs with ties and then follow the written step by step instructions below.
Please enjoy and don’t forget to Like and SUBSCRIBE over on YouTube to be kept up to date with new videos as they come out.
Silk Dyed Easter Eggs VIDEO TUTORIAL
Silk Dyed Eggs INSTRUCTIONS:
The Three Step Method to silk dyeing eggs
Dying Easter eggs with ties is super easy.
First deconstruct the ties and remove the lining
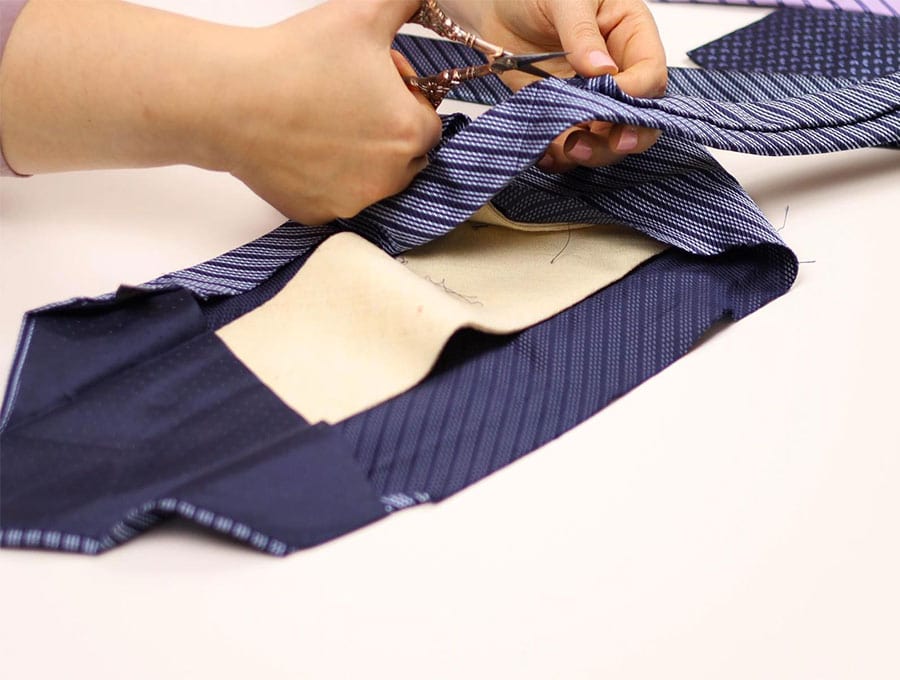
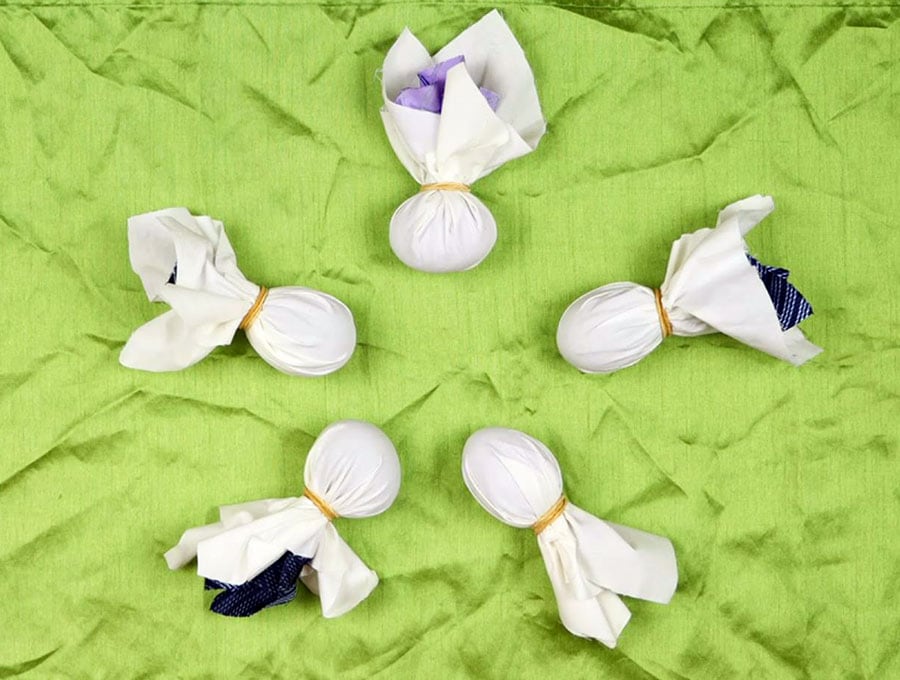
Once you have your silk pieces cut to size, each with a slightly larger piece of old white cotton sheeting, or any white cotton scrap to prevent dyes mixing, you are ready to proceed.
The method given here is suitable for 12 eggs – if you do more you’ll have to increase the amount of vinegar and water used.
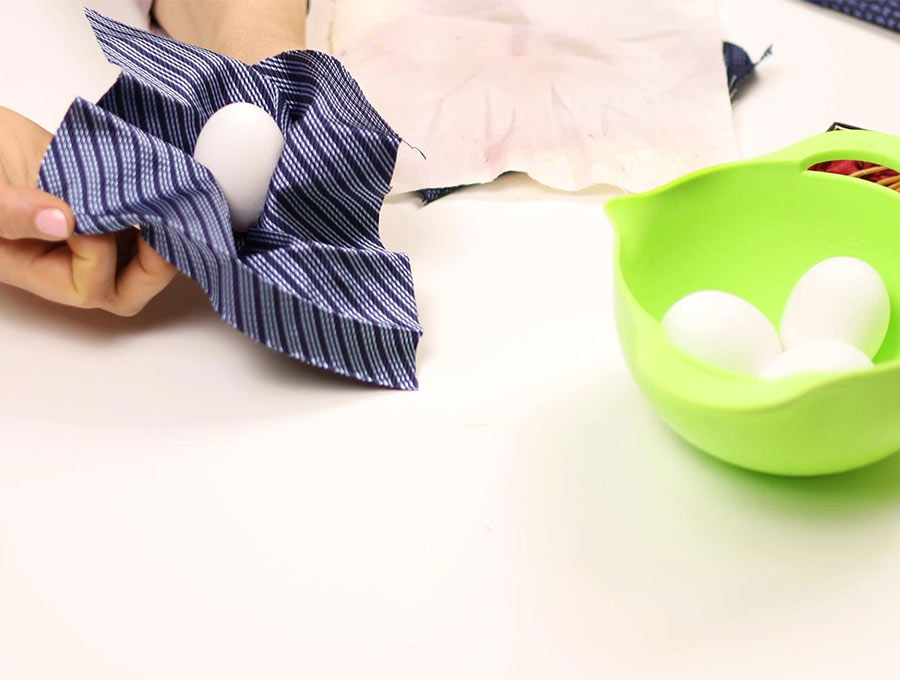
STEP 1: Wrap the eggs
Wrap each egg in a piece of silk fabric, making sure the right side of the fabric is in contact with the egg and that it covers all parts of the egg and is as smoothly drawn over the egg as possible, gathering at the top with a twisty tie or cotton string.
Then place the white square over the egg, working from the base and drawing the fabric together at the pointed end and securing with a twisty tie or cotton string.
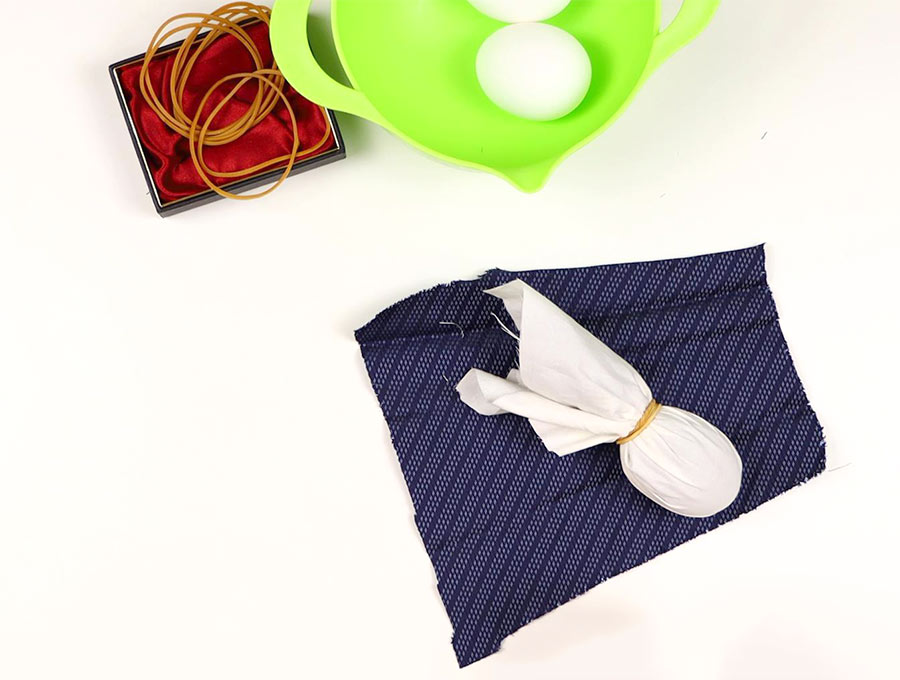
You can do both layers together but I feel you get a better pattern transfer by securing the silk first as close to the egg as possible and trying to make sure there are no pleats and wrinkles.
do this for all eggs
STEP 2: Boil
Place the double wrapped eggs gently into a pot, then add cold water to cover them. The water must be a minimum of one inch above the top of the eggs. If you are using eggs that have already been blown there will be a problem with them floating to the top of the water. You can weight them by tying in a small pebble to the string, putting the blown egg in a deep sided pot and covering with water. Then add 6 tablespoons of white vinegar.
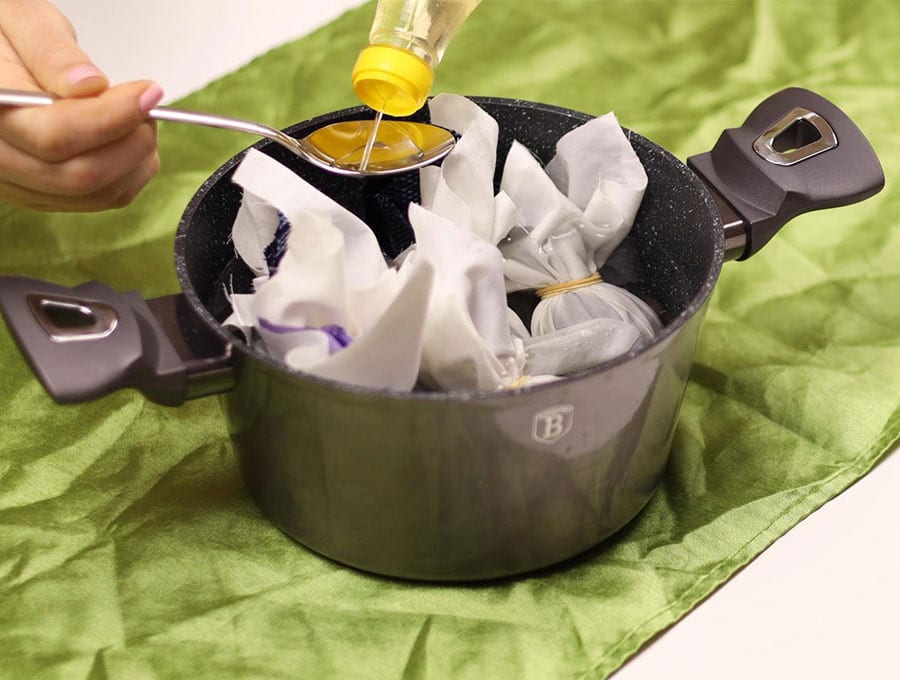
Place the heat setting to medium and bring the water to a boil, then cook for at least 20 minutes to give the dye time to transfer to the eggs.
Remove eggs from the pot with a slotted spoon and gently put them onto a baking sheet that you have lined with paper towels so they can cool down. Don’t be in too much of a hurry to remove the cloth pieces – tempting I know, but have patience.
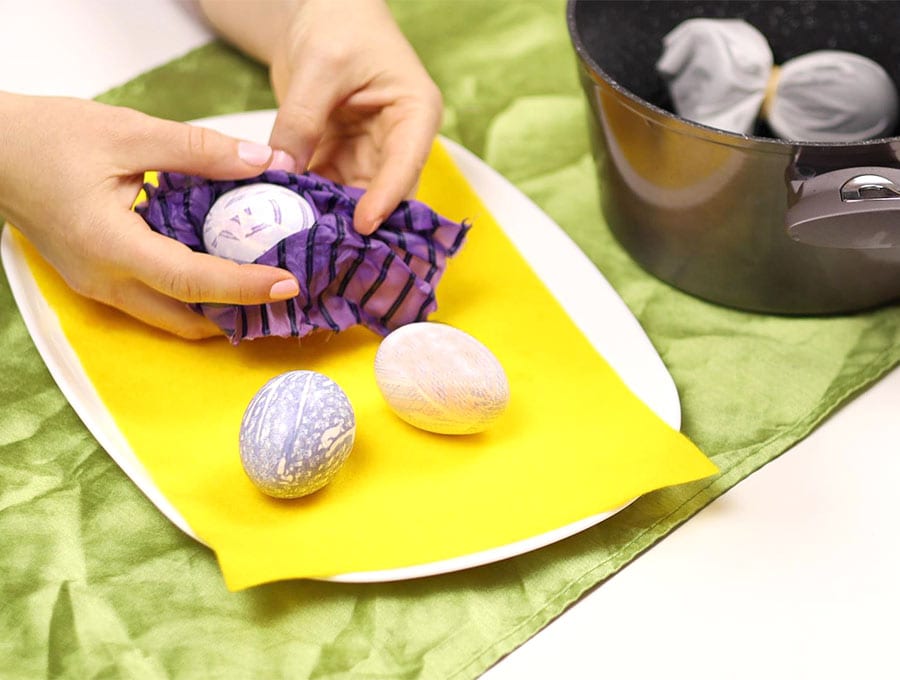
STEP 3: Unwrap
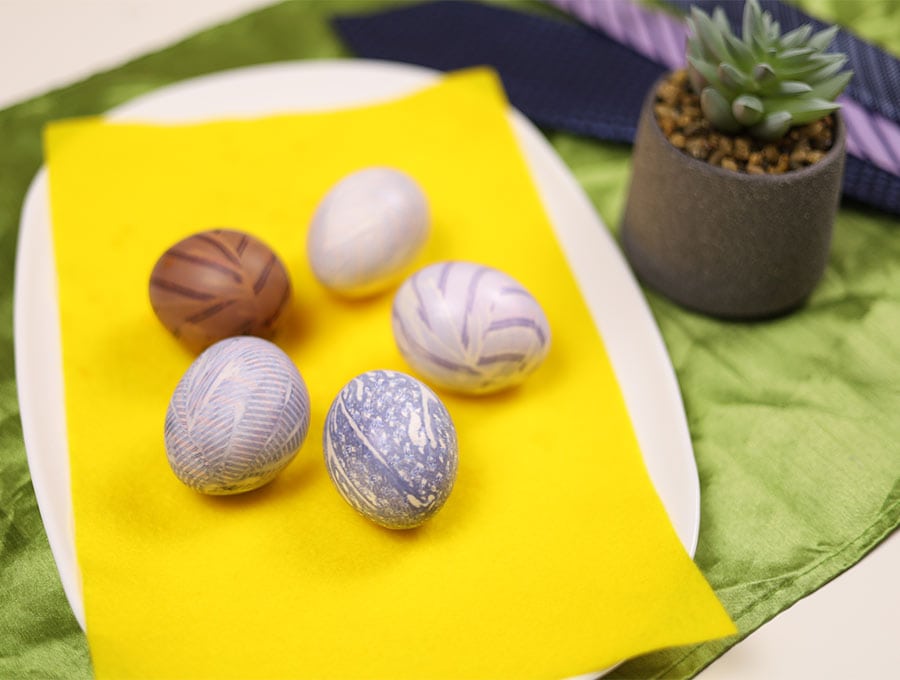
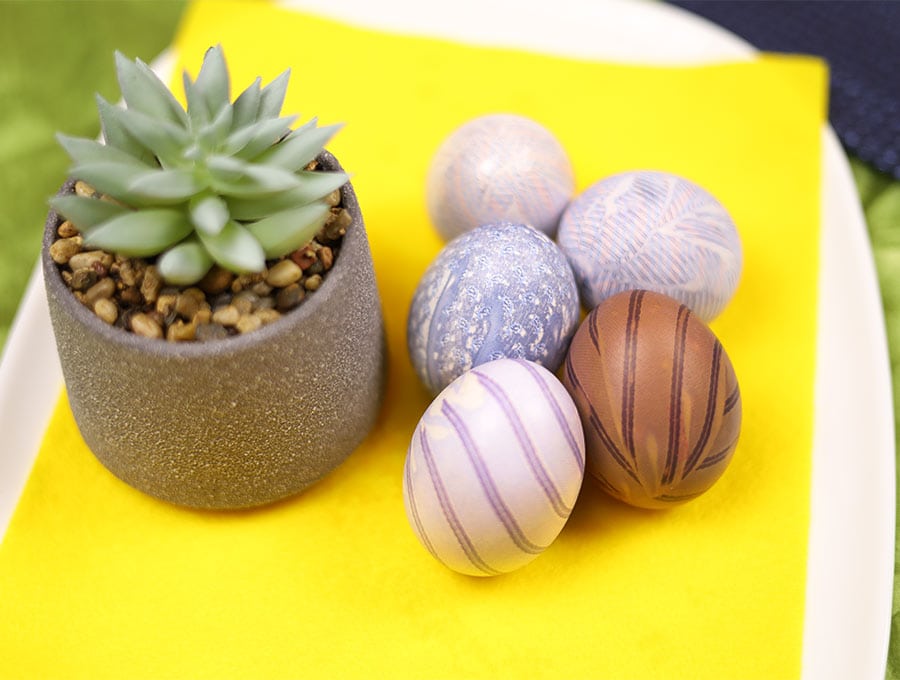
Once the eggs have cooled, unwrap the eggs and place them in an egg carton to dry off. Once completely dry you can gently rub a little vegetable oil on them – sunflower, coconut oil or Canola oil, to make them shiny.
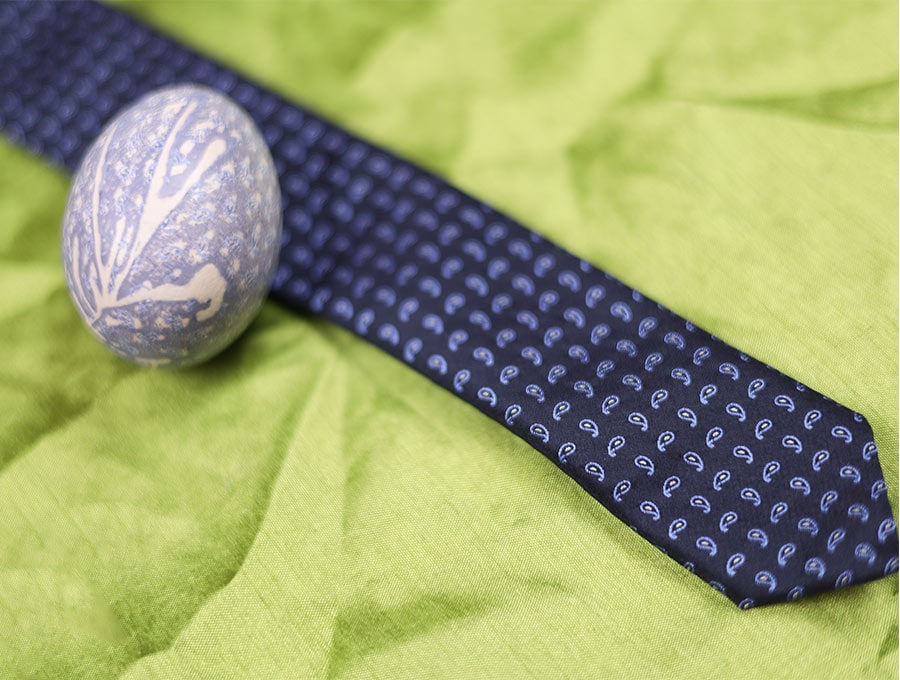
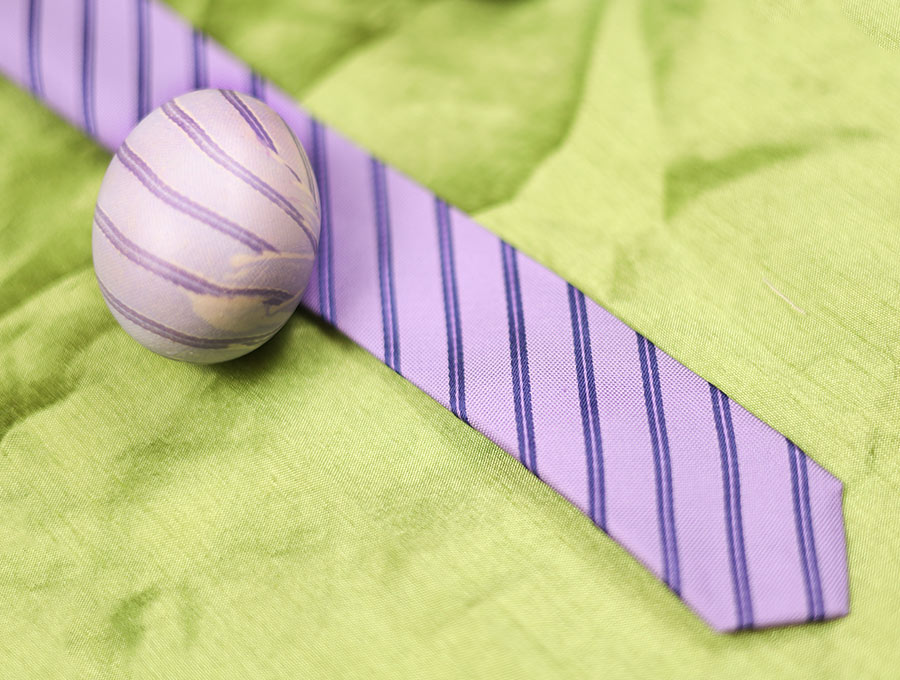
Purple pattern
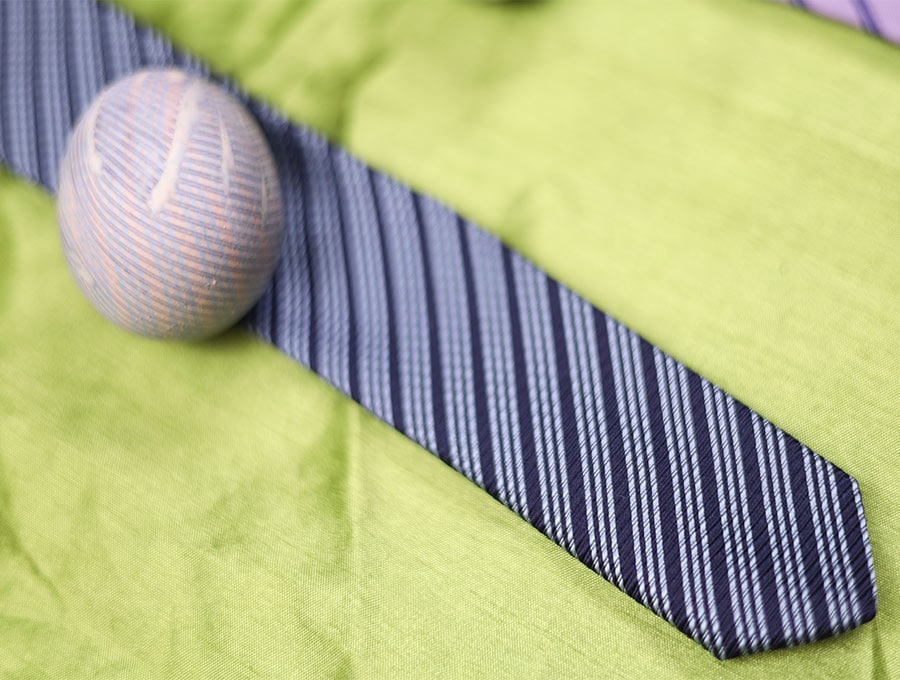
Blue stripes
Silk Dying Eggs FAQs and tips
Q: How do I blow an egg?
A:
- First you make a small hole in the pointed end of the egg using a one- or two-inch nail, simply wiggling it back and forth until it penetrates the surface, then carefully working the hole a little larger until it is around 1/8 inch (.35cm).
- Then you make a hole in the rounded base of the egg using the same method. Use a thin piece of wire inserted into one end of the egg to gently break up the yolk so it comes out easier.
- Either blow into the base of the egg and the white and yolk will dribble out into a bowl placed below where you are blowing, or, if you can’t bear the thought of your lips on the eggshell, position a short piece of straw over the hole and blow. (Have your phone ready to take some funny photos as people’s cheeks puff out with the effort of blowing.)
- Once the eggshell is empty rinse it out carefully with some warm soapy water and set aside to dry off.
- Blown eggs needs to be carefully handled as the egg shell will be brittle.
Q: Can you reuse the silk?
A: Yes, you can just once more, but considering the majority of the color will have been transferred with the first dyeing, expect the colors to be more muted.
Q: Where do I find silk ties?
A: the cheapest places are garage sales and charity shops. You may find some at flea markets, but they may cost a bit more. Ask grandparents if they have any silk ties lying around that are no longer in use.
Q: How do I make the silk tie dyed Easter eggs shiny?
A: Apply a thin coat of vegetable oil to make eggs shine.
Q: Are the silk dyed eggs edible?
A: No, they aren’t! As you can’t be sure what dyes were use to dye the silk and clothing dyes used in ties are not made to be safe for consumption, I don’t recommend eating the eggs.
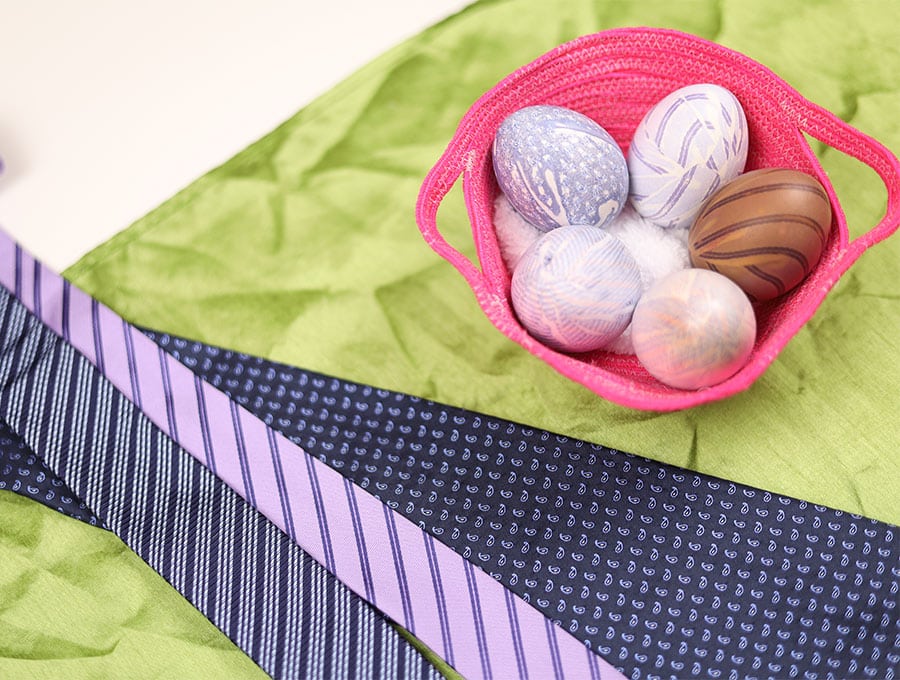
Have fun using the eggs in an Easter centerpiece or in other Easter decorations. If the eggs have been hardboiled they will need to be discarded after the Easter festivities, but if you have used blown eggs they can be kept for many years. If you enjoyed this Easter craft that uses up small pieces of fabric, then be sure to hit the subscribe button to have awesome projects that use up fabrics in your stash delivered straight to your inbox.
Do you like this? Pin for later:
Wanna be friends? Click HERE and follow me on Pinterest
RELATED:
Want to make a Fabric Egg (and use up some scraps!) – here’s how