
How to Add a Zipper to a Sleeve
Adding zippers to sleeve originated with motorbike jackets. When a person is riding the sleeve can be zippered closed, keeping icy cold air out and making it more streamlined. Fashion designers then adopted the idea to make street wear garments a little edgier. Use our free printable sleeve insert pattern to add interest to sleeves, and draw attention to the feature, plus there’s the functionality of being able to close the zipper when icy winds blow. On the practical side if a sleeve is a bit tight, adding a zipper can make it much more comfortable.
Below you will find my step by step written tutorial with VIDEO instructions for all the visual learners.
We occasionally link to goods offered by vendors to help the reader find relevant products. Some of the links may be affiliate meaning we earn a small commission if an item is purchased.
Table of Contents
How to Make a Zipper Sleeve
Supplies and tools
- Our printable sleeve insert pattern
- A contrasting or matching piece of fabric large enough to cut two sleeve inserts that are a triangular shape 8 ½ inch (21 cm) long and 3 inches (8 cm) at the base.
- 2 x zippers of 8 inches (20 cm) in length
- Quick unpick tool for existing garment sleeves you’re altering
- fabric – 2 pieces of 100% tightly woven cotton (one main, one lining)
- matching thread
- scissors (or rotary cutter and a cutting mat)
- ruler or measuring tape
- iron and ironing board
- sewing clips or pins
Follow us for free patterns & tutorials! [easy-profiles]
How to Add a Zipper to a Sleeve
Watch the diy Zipper Sleeve video first and then follow the written step by step instructions below.
Please enjoy and don’t forget to Like and SUBSCRIBE over on YouTube to be kept up to date with new videos as they come out.
How to Add a Zipper to a Sleeve VIDEO TUTORIAL
INSTRUCTIONS:
STEP 1:
Cut your 2 inserts according to the free pattern provided.
STEP 2:
Mark the hem area on both inserts, which will be a line drawn 1 1/8 of an inch (3 cm) up from the wide base of the insert.
STEP 3:
If adding to an existing garment you will need to unpick the seam on the sleeve then turn the garment inside out, lay flat on your worktop with the seam to the bottom and the fold at the top and mark 8 ½ inch (21 cm) up on the fold of the sleeve. If the garment is a new one you are making, there is no need to unpick as you will be putting in the insert before hemming, so simply fold the sleeve before marking.
STEP 4:
Measure 1 ½ inches (4 cm) across the bottom of the sleeve while it is folded with the seam at the bottom, or simply folded if you haven’t stitched the sleeve closed on a new garment, and make a mark on each side. Then join the base mark to the mark 8 ½ inch (21 cm) up the sleeve
STEP 5:
Cut out the triangular shape from the sleeve, curving into a gentle arc at the top rather than a sharp point – you can use the pattern template to guide you.
STEP 6:
Take the insert and mark the stitch line at 3/8 of an inch (1 cm) around the edge of the cut out on the sleeve and on the insert.
STEP 7:
With one insert piece right side up on your worktop and the zip right side up lay it over the marked stitch line and pin in position. Make sure the ends of the zipper ease off at the mark you drew 1 1/8 of an inch (3 cm) from the base, by bending the zipper ends upwards and outwards and pinning in position. Repeat with the other insert.
STEP 8:
Use your zipper foot and stitch as close to the edge of the zipper teeth as possible, going up one side, across the top and down the other side. Repeat with the other insert.
STEP 9:
Take the insert with zipper attached and with right sides facing each other, stitch to the sleeve on the wrong side of the fabric – go up one side, lift the pressure foot with the needle still down and swing at the top of the zipper. Lower the pressure foot and continue stitching across the top, backtacking on this short area, then stich down the other side. Attach the second insert to the other sleeve.
STEP 10:
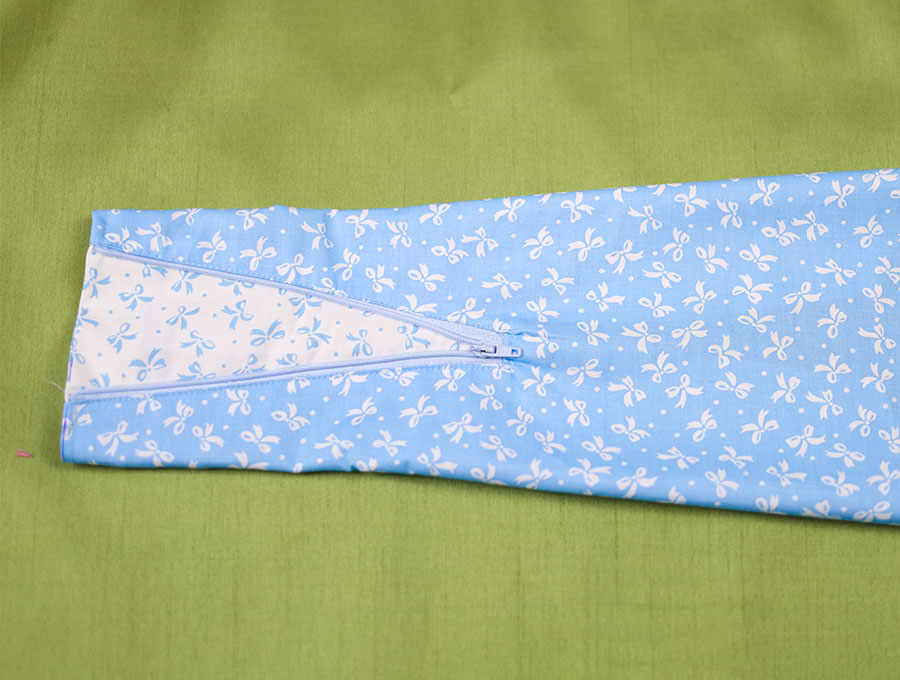
Turn to the right side and top stitch as close to the zipper as possible to finish off neatly on both sleeves.
STEP 11:
Serge (overlock) the end of the sleeve, then turn up 1 1/8 of an inch (3 cm) and stitch the sleeve edge with the zipper open. The line of stitching will meet with the ends of the zipper that you folded back. If you don’t have a serger you can turn over the end of the sleeve just one third, then make a slightly larger turn then stitch – as long as the line of stitching meets up with the ends of the zipper.
All that remains to do is to try on the garment and admire your handiwork in inserting a zipper into a sleeve. Test how it looks partially open or all the way open and find the sweet spot that suits both the look of the garment and which you find most comfortable.
Zippers on sleeves can be so useful, besides being a fashion statement, borrowed from the biking community. Bikers leather jackets come with zippers prevent icy winds going up the sleeves and enable the gloves to fasten snugly. We show you how to insert a zipper into a sleeve to either widen a too tight sleeve, enable you to close a looser sleeve when the icy winds chill your wrists, or simply to draw attention to a garment’s sleeve detail.
What next? Like and subscribe if you aren’t already part of the Hello Sewing family. And don’t forget to share with someone who is complaining about their sleeves being too tight on the forearm, or who feels they need to be able to adjust the width of the sleeve depending on the activity they are involved in.
Do you like this? Pin for later:
Wanna be friends? Click HERE and follow me on Pinterest
RELATED: