
DIY Crinkle Taggie Toy // Crinkle Sensory Toy for Babies // Baby Crinkle blanket sewing pattern
The crinkle taggie toy is a great sensory one for babies as they enjoy the sound, then examine each loop of colored ribbon. It’s an early way to start teaching color as you say the name of the color they are touching. The crinkle sound keeps them interested and the toy can also be used to play peek-a-boo. It’s a quick make and perfect for all those short pieces of ribbon you’ve probably been wondering how to use.
Babies love sound, color and texture and the crinkle taggie toy gives them all of these in one simple toy that will take you just minutes to make AND will use up those tiny bits of ribbon every sewist has because we can’t throw anything away. Keep baby entertained, teach colors, indulge in some sensory play as you crinkle the toy, play peek a boo with it and watch them hook their fingers into the ribbon tags and explore the textures of the fabric used. Oh, and they will probably want to suck the toy too – babies learn by testing everything in their mouths, so choose washable fabrics.
![]()
Below you will find my step by step written tutorial with VIDEO instructions for all the visual learners.
We occasionally link to goods offered by vendors to help the reader find relevant products. Some of the links may be affiliate meaning we earn a small commission if an item is purchased.
Table of Contents
How to make the crinkle Taggie Toy
Supplies and tools
- fabric – 2 pieces of 100% tightly woven cotton (one main, one lining)
- crinkle effect – crinkle paper or foil or use the liner from a box of cereal or biscuits
- matching thread
- scissors (or rotary cutter and a cutting mat)
- ruler or measuring tape
- iron and ironing board
- sewing clips or pins
- grossgrain ribbon – 10 different colors and widths of ribbon
Follow us for free patterns & tutorials! [easy-profiles]
How to Sew a Crinkle Sensory Toy for Babies
Watch the diy crinkle sensory toy video first and then follow the written step by step instructions below.
Please enjoy and don’t forget to Like and SUBSCRIBE over on YouTube to be kept up to date with new videos as they come out.
Crinkle Taggie Toy VIDEO TUTORIAL
INSTRUCTIONS:
There are two Methods to make this Crinkle Sensory Toy – Method 1 is for using a full piece of fabric for the front and Method 2 is explain how to create a four square patchwork piece for the front, then reverts to using Method 1 for the rest of the toy.
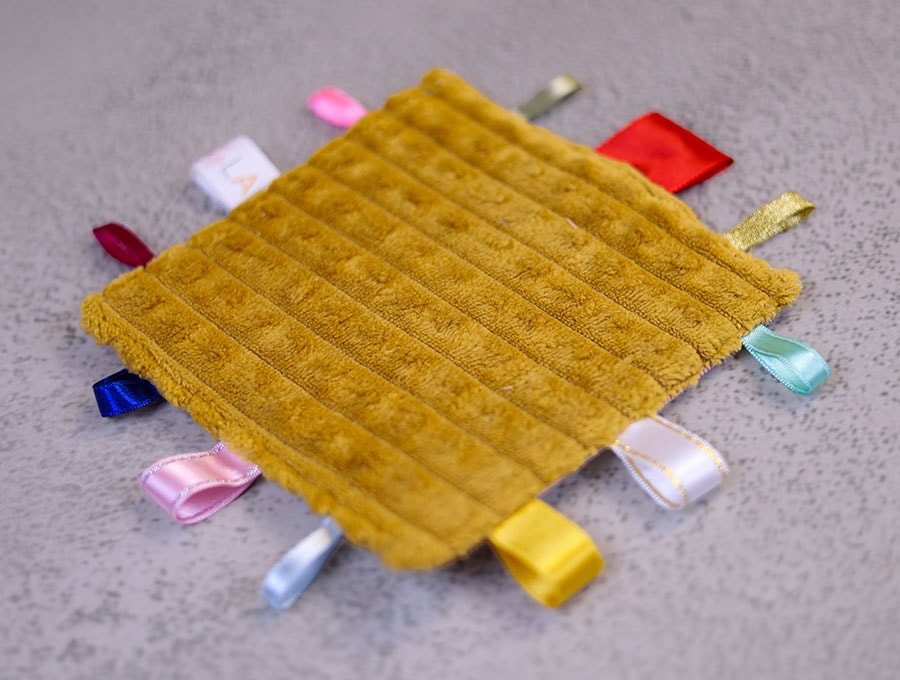
METHOD 1:
![]()
MATERIALS:
- fabric for the front – 7 x 7 inches (18 x 18 cm)
- fabric for the back – 7 x 7 inches (18 x 18 cm)
- Cut batting 1 of 7 x 7 inches (18 x 18 cm)
- Choose 10 different colors and widths of ribbon and cut each to 4 inches (10 cm) long.
- For the crinkle effect either buy crinkle foil or use the liner from a box of cereal or biscuits and cut to 7 x 7 inches (18 x 18 cm).
STEP 1:
Choose the fabric for the front and back of the toy, and cut 2 pieces of 7 x 7 inches (18 x 18 cm). They don’t need to be the same fabric – they can be different. I like to use something like velvet or minky for the back, and a print for the front. The textures add another sensory dimension to the toy.
STEP 2:
Fold each strip of ribbon in half and place on the right side of the fabric you chose for the back piece. You would usually have three ribbons on two sides and the other sides with two ribbons each. Pin with the folded edge of the ribbon facing in to the centre of the fabric and the raw edges of the ribbon lining up with the raw edges of the fabric. Feel free to adjust the position of the ribbons until you are happy with the placement.
STEP 3:
Stitch around the edge of the square with a ¼ of an inch (6mm) seam allowance.
Remove the pin when you stitch each piece of ribbon. It is possible to sew over pins but I would not advise risking a broken needle or damaging the timing of your machine.
TIP: For a neat corner, stitch to where you need to turn the corner then leave you needle down in the fabric, release the presser foot, swing the fabric 90 degrees, depress the presser foot and continue sewing. A perfect corner!
STEP 4:
Place the batting down on your worktop.
Over it place the crinkle foil.
Next goes the back piece with all the ribbons attached, right side up.
Last, place the front piece wrong side up.
Now, pin or clip all the layers together.
STEP 5:
On one side mark a gap of 3 inches (7.5cm) – this is to pull the fabric through to turn the crinkle taggie toy the right way out.
STEP 6:
Stitch around the edge with a 3/8 of an inch (1cm) seam allowance, starting on one side of the gap with a backtack and finishing on the other side of the gap, again with a backtack. Remember the TIP above when doing the corners.
STEP 7:
Trim a little triangle off each corner to reduce bulk when turning the right way out, then trim off any excess fabric along the sides, taking care not to get too close to the stitch line.
STEP 8:
Turn the crinkle taggie toy the right way out by pulling the fabric gently through the gap. Use a turning tool to press out the corners neatly, and make sure the side seams are turned out and lie flat.
STEP 9:
Turn in the raw edges of the gap in line with the seam and pin.
STEP 10:
Give the toy a press on the fabric square on the front and back but not over the ribbon – you don’t want to flatten the loops.
STEP 11:
Stitch around the edge of the square 1/8 of an inch (3mm) from the edge and backtack when you finish. Tri any excess threads and the toy is ready to gift.
METHOD 2:
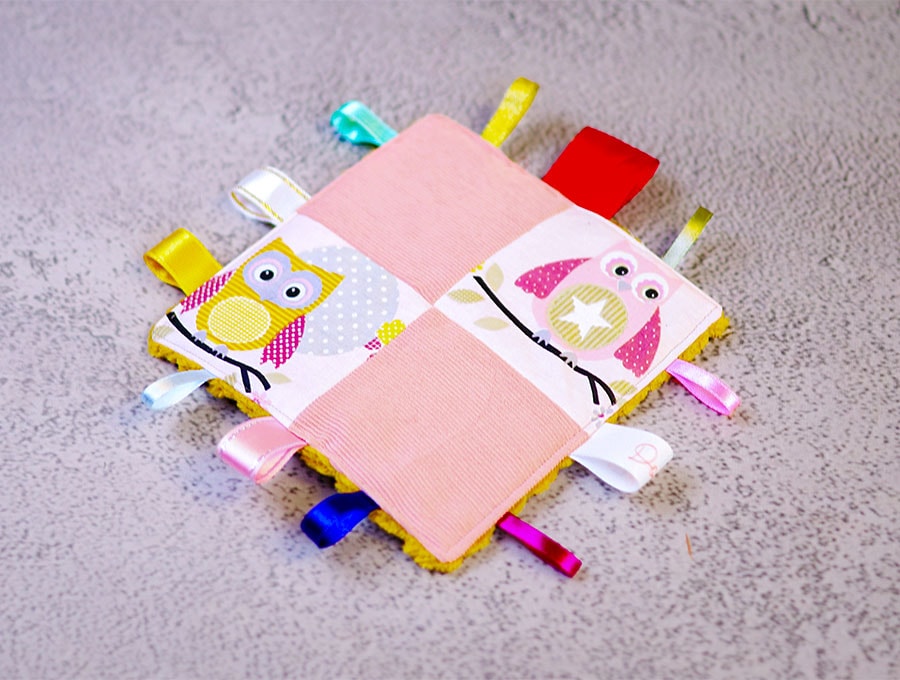
This is great for really small babies where you use 4 pieces of fabric for the patchwork front, some minky fabric for the back, but everything else in Method 1 stays the same.
- fabric for the PATCHWORK front – 2 squares from one fabric and 2 squares from contrastic fabric – all measuring 4 ½ x 4 ½ inches (11 x 11 cm)
- fabric for the back – 7 x 7 inches (18 x 18 cm)
- Cut batting 1 of 7 x 7 inches (18 x 18 cm)
- Choose 10 different colors and widths of ribbon and cut each to 4 inches (10 cm) long.
- For the crinkle effect either buy crinkle foil or use the liner from a box of cereal or biscuits and cut to 7 x 7 inches (18 x 18 cm).
I’ll explain how to create the patch work front:
STEP 1:
Cut 2 squares from one fabric of 4 ½ x 4 ½ inches (11 x 11 cm).
STEP 2:
Cut 2 squares from a contrasting fabric of 4 ½ x 4 ½ inches (11 x 11 cm).
In my example I used some fabric from kids pants that had hardly been worn and some motifs from a print I had as I thought the owls were rather cute. You can choose complementary prints or prints and plain or strip fabric.
STEP 3:
Lay the four squares on your worktop right side up and in the arrangement you want them to finally be stitched.
STEP 4:
Place the square on the top right over the square on the top left, right side facing right side, pin, and stitch ¼ of an inch (6mm) from the right edge.
STEP 5:
Place the square on the bottom right over the square on the bottom left, right side facing right side, pin, and stitch ¼ of an inch (6mm) from the right edge.
STEP 6:
Finger press the seams open.
STEP 7:
Place the pieces back in order right sides up as you want them to finally appear.
Now flip the bottom piece up right side to right side of the top piece, pin, making sure the seams line up, and stitch ¼ of an inch (6mm) from the bottom edge.
STEP 8:
Press the seams open using an iron. Now proceed from Step 1 of Method 1.
TIP: Make sure to trim the patch work piece to 7×7 (18 x 18 cm). Be careful here as you don’t want to trim all the fabric off one side otherwise you will no longer have squares – measure carefully and trim from all sides.
STEP 9:
Do you like this? Pin for later:
Wanna be friends? Click HERE and follow me on Pinterest
RELATED: