
DIY Folded flower table topper, mug rug, centerpiece or placemat
The folded fabric flower, which looks impressive, is a fairly easy project with some repetition, making it a lovely activity if you are teaching a child to sew. They get to practice each move. You can make folded fabric flowers as placemats or as a table centerpiece or even as a table topper is you make it larger. Personally, if using as a centerpiece I’d make it work by slipping in wrapped chocolates between each petal, making the petals stand up more. I can see this working well as a Christmas centerpiece, or for a birthday dinner finale. You can make these placemats in bright colors for a breakfast table, or in cream and gold, or black and silver, for a more sophisticated table.
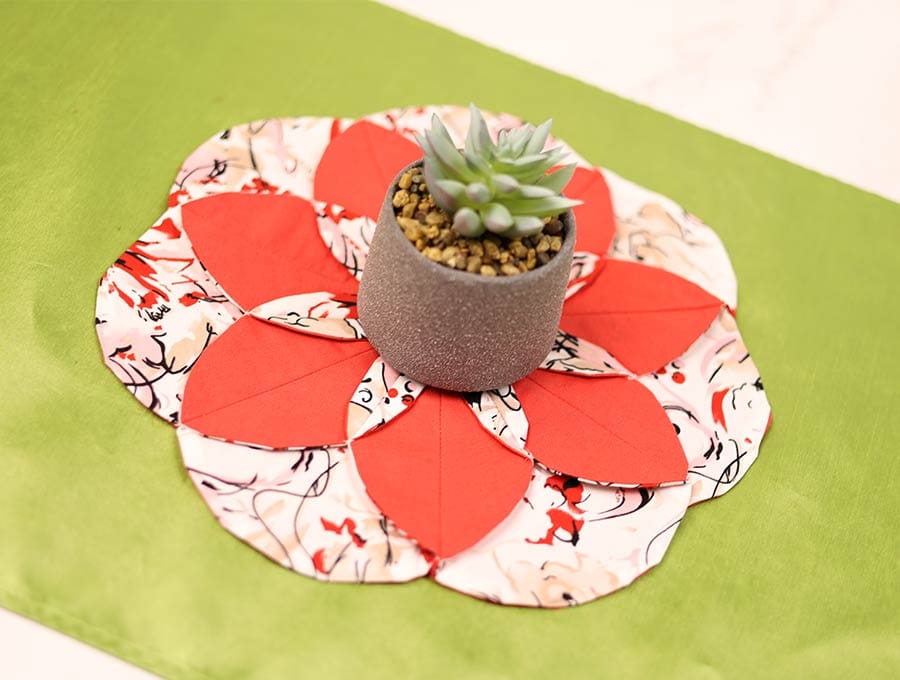
I absolutely love this centerpiece or tablemat – you can decide how you are going to use it. Follow the visuals and step-by-step instructions to learn how to make the folded fabric flower. Made in bright prints the tablemats are great for breakfast and casual lunches. Make them in more sophisticated color schemes and they will become a conversation piece at a formal dinner table. Christmas prints would make a gorgeous folded fabric flower – especially in the poinsettia colors of reds and greens, or go for white and gold. I love a little surprise, so if using this as a center-piece I’d elevate it onto a cake stand and slip beautifully wrapped chocolates or sugar cookie between the petals.
Below you will find my step by step written tutorial with VIDEO instructions for all the visual learners.
We occasionally link to goods offered by vendors to help the reader find relevant products. Some of the links may be affiliate meaning we earn a small commission if an item is purchased.
Table of Contents
- 1 How to make a flower centerpiece
- 2 DIY Table topper Supplies and tools
- 3 How to Sew a flower centerpiece
- 3.1 Folded flower table topper VIDEO TUTORIAL
- 3.2 INSTRUCTIONS:
- 3.3 STEP 1: Download the flower centerpiece pattern
- 3.4 STEP 2: Cut out the fabric
- 3.5 STEP 3: Pin the circles in pairs
- 3.6 Step 4: Trim the SA
- 3.7 Step 5: Draw stitch line
- 3.8 Step 6: Sew
- 3.9 Step 7: Clip the SA
- 3.10 Step 8: Turn around
- 3.11 Step 9: Stitch the gap
- 3.12 Step 10: Press
- 3.13 Step 11: Cut the template
- 3.14 Step 12: Prepare the pattern
- 3.15 Step 13: Draw the fold
- 3.16 Step 14: Mark midpoints
- 3.17 Step 15: Mark stitching line
- 3.18 Step 16: Join the circles
- 3.19 Step 17: Continue stitching
- 3.20 Step 18: Join last circle
- 3.21 Step 19: Press open the petals
- 3.22 Step 20: Mark stitch lines
- 3.23 Step 21: Stitch petals
- 3.24 Step 22: Final press
How to make a flower centerpiece
DIY Table topper Supplies and tools
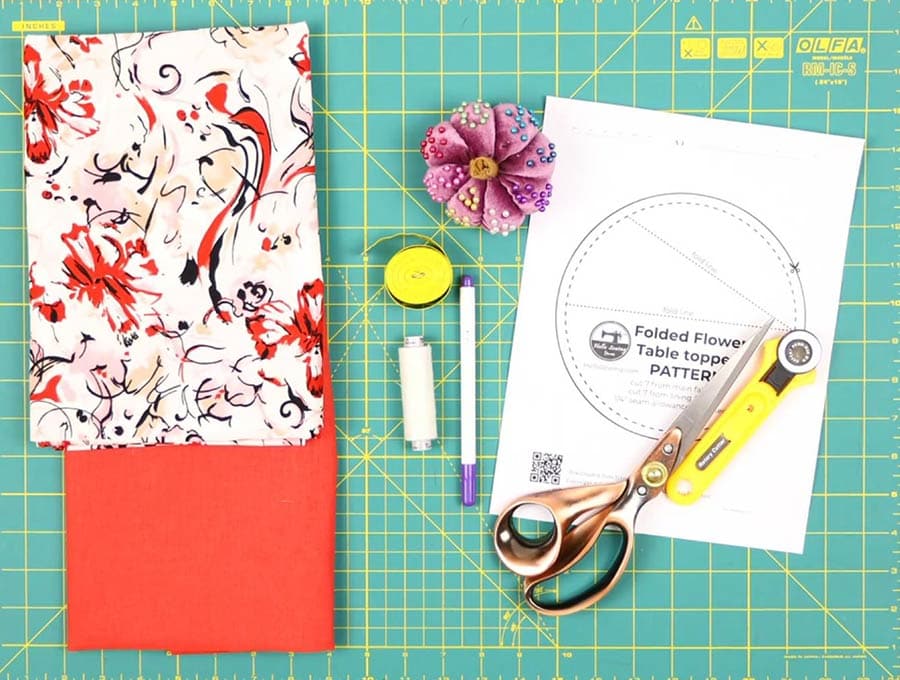
- fabric – 2 pieces of woven cotton (one main, one lining) 13 x 25″ (33 x 64cm) each
- matching thread
- scissors (or rotary cutter and a cutting mat)
- ruler or measuring tape
- iron and ironing board
- sewing clips or pins
DOWNLOAD: flower table topper pattern (FREE pdf)
Follow us for free patterns & tutorials! [easy-profiles]
How to Sew a flower centerpiece
Watch the diy table topper video first and then follow the written step by step instructions below.
Please enjoy and don’t forget to Like and SUBSCRIBE over on YouTube to be kept up to date with new videos as they come out.
Folded flower table topper VIDEO TUTORIAL
INSTRUCTIONS:
STEP 1: Download the flower centerpiece pattern
Get the free downloadable table topper pattern above and print at 100% (no scaling). The seam allowance is 1/4″ (6mm) and is already included.
Finished size: 30 x 30 cm (12 x 12″)
You can certainly enlarge the circles to make a bigger flower. The finished size will be double the size of a circle (seam allowance excluded)
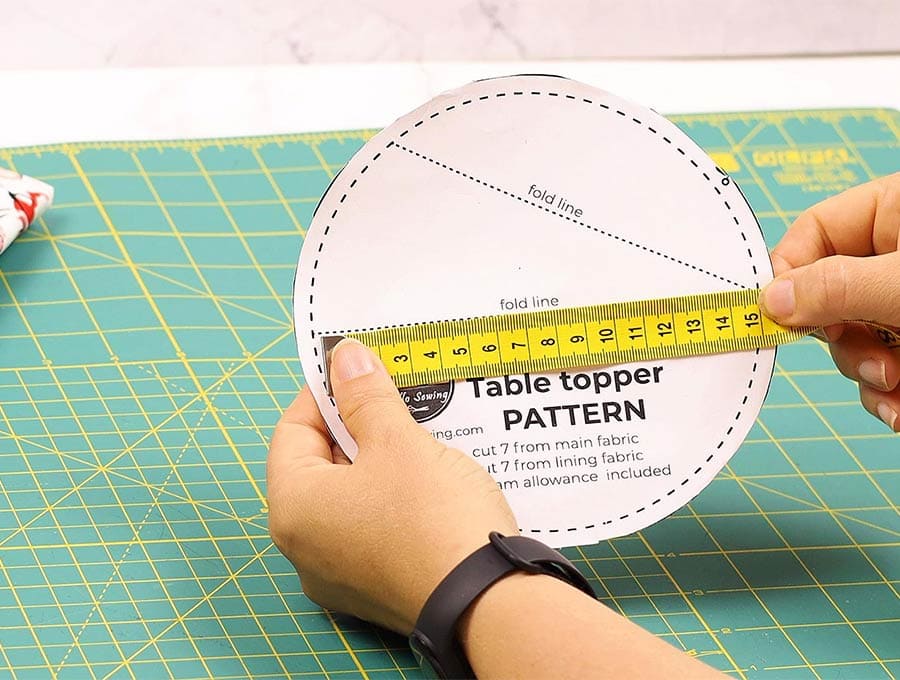
TIP: If you don’t have a printer at your disposal, you can make your own template simply by marking a circle with a 6-inch (15 cm) diameter on a piece of paper and adding a seam allowance.
STEP 2: Cut out the fabric
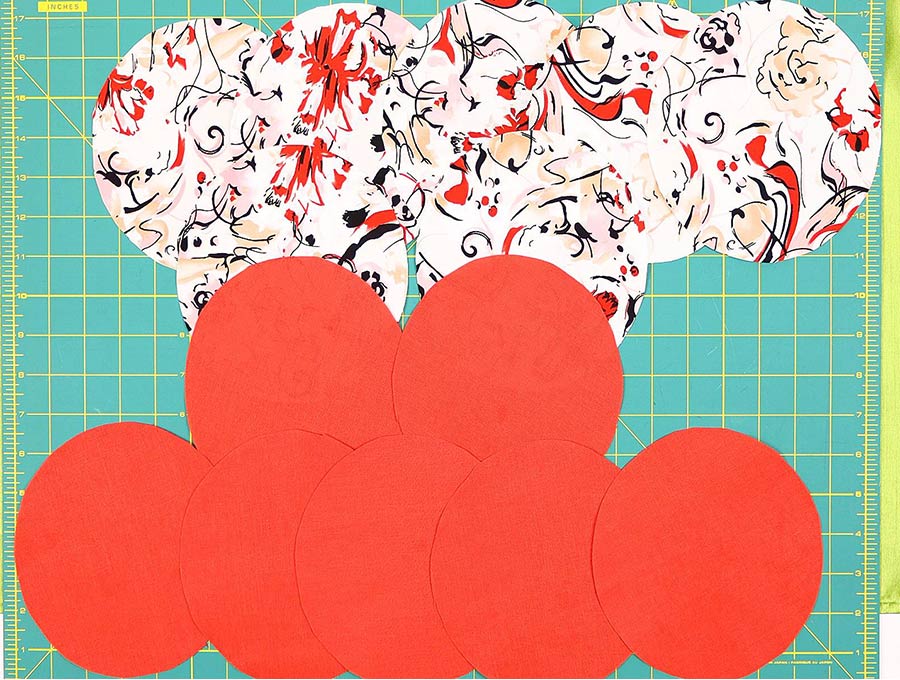
Cut 7 circles of plain fabric and 7 circles of out of the printed fabric according to the pattern.
STEP 3: Pin the circles in pairs
Take one piece of plain fabric and one piece of printed fabric. Place right side to right side and pin to hold in place.
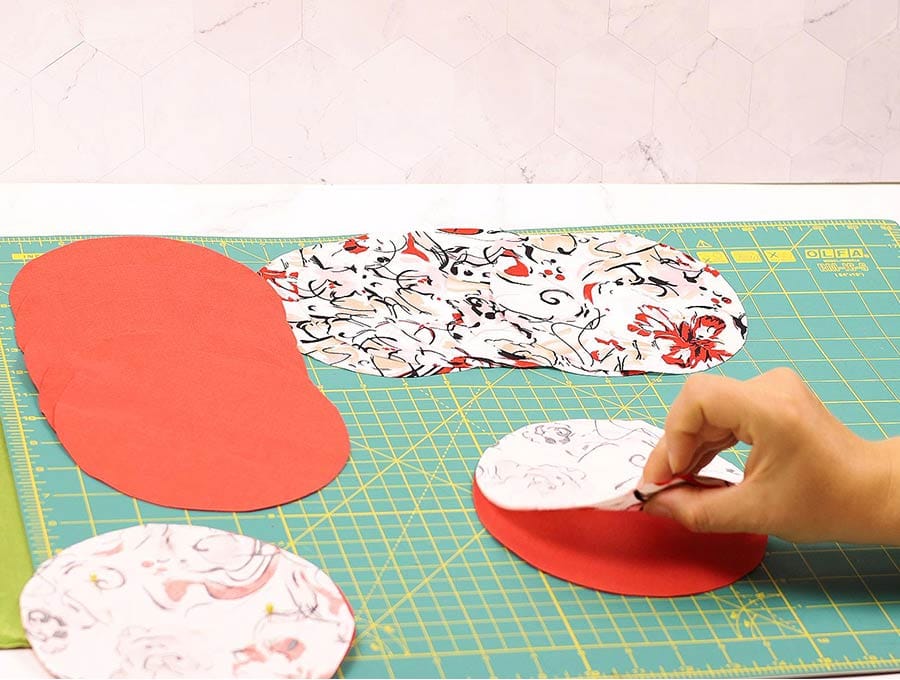
Repeat for all pieces.
Step 4: Trim the SA
Trim the seam allowance of the pattern (cut along the dashed line)
Step 5: Draw stitch line
Using a fabric pen mark all the circles on the wrong side, drawing around the 6-inch (15 cm) pattern circle so you know where to stitch the seam allowance. It is important to draw the circle in order to follow the lines and get a neat circle rather than guesstimating the seam allowance.
Step 6: Sew
Stitch right around the edge, leaving a 1-inch (2.5 cm) gap. Back tack at start and finish. Repeat until you have 7 sets of plain and printed fabric sewn together.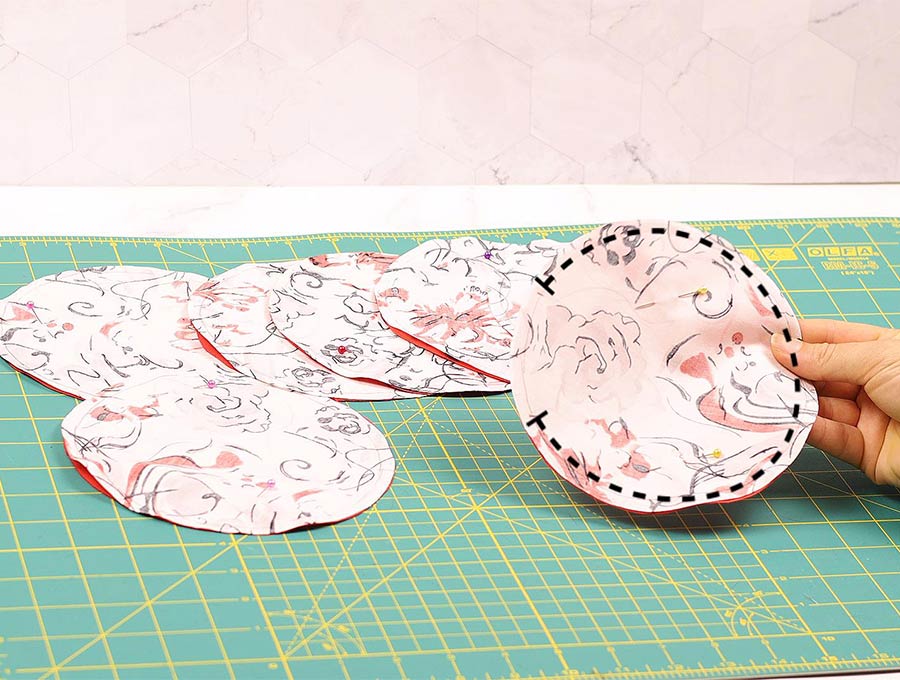
Step 7: Clip the SA
Clip the seam allowance every 3/8″ (1cm) leaving the original seam allowance intact around the gap you left in each one.
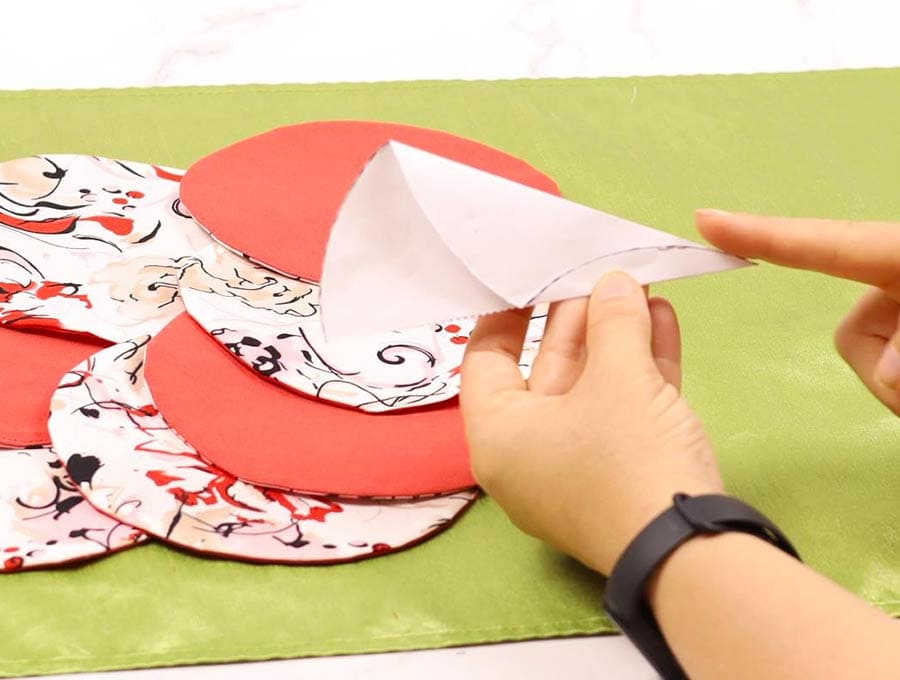
Step 8: Turn around
Turn the circles by pulling the fabric through the gap. Use a knitting needle to gently push out the seams so they lie flat.
Step 9: Stitch the gap
Turn the raw edges of the seam allowance inside the circles, ensure the edge is smooth and following the shape of the circle, then hand stitch closed using a slip stitch so the stitching isn’t visible.
TIP: If you are lazy like me, you can machine stitch the gap, making sure to use matching thread for each side of the circles.
Step 10: Press
Press all 7 circles flat.
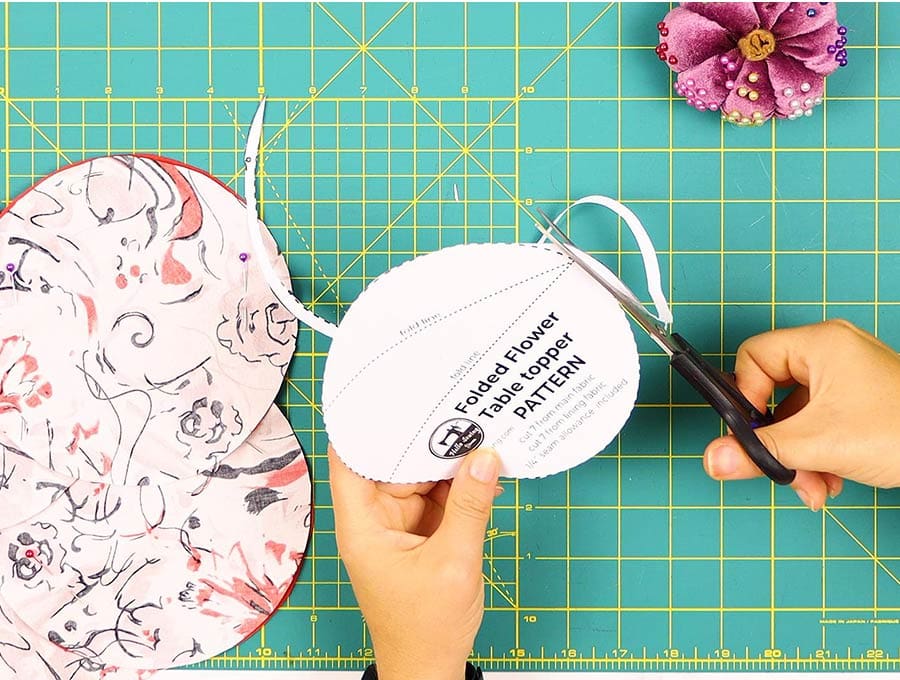
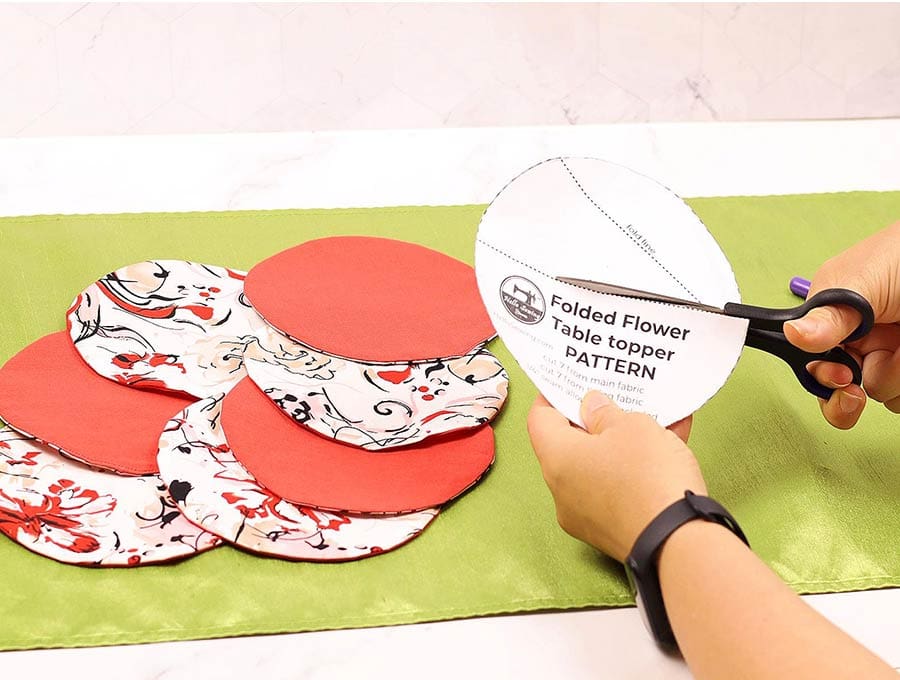
Step 11: Cut the template
To create the pattern for the fold take the paper pattern you used to cut the circles and fold it in half then cut so you have two semi-circles.
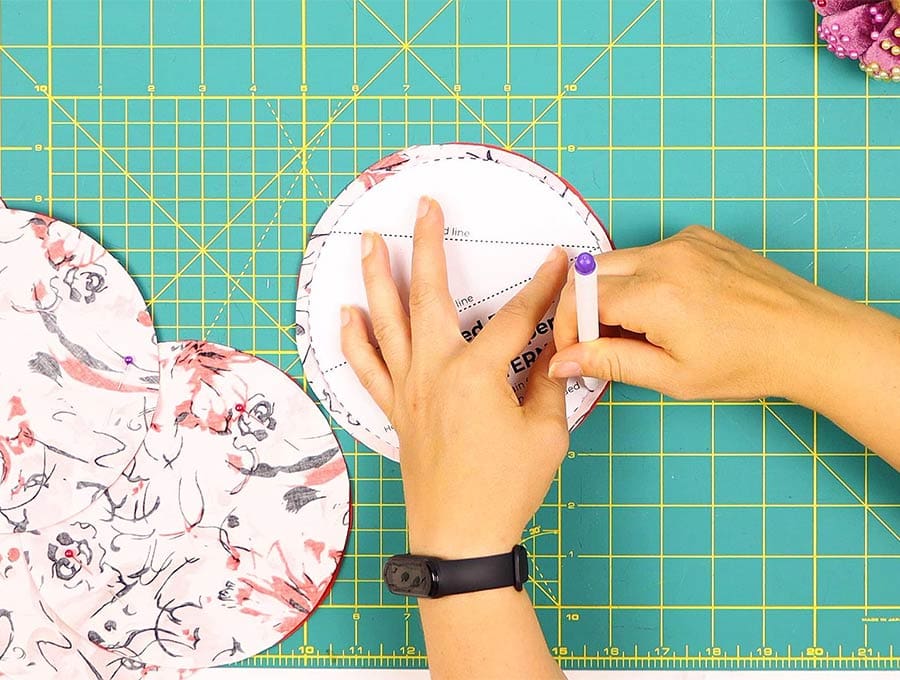
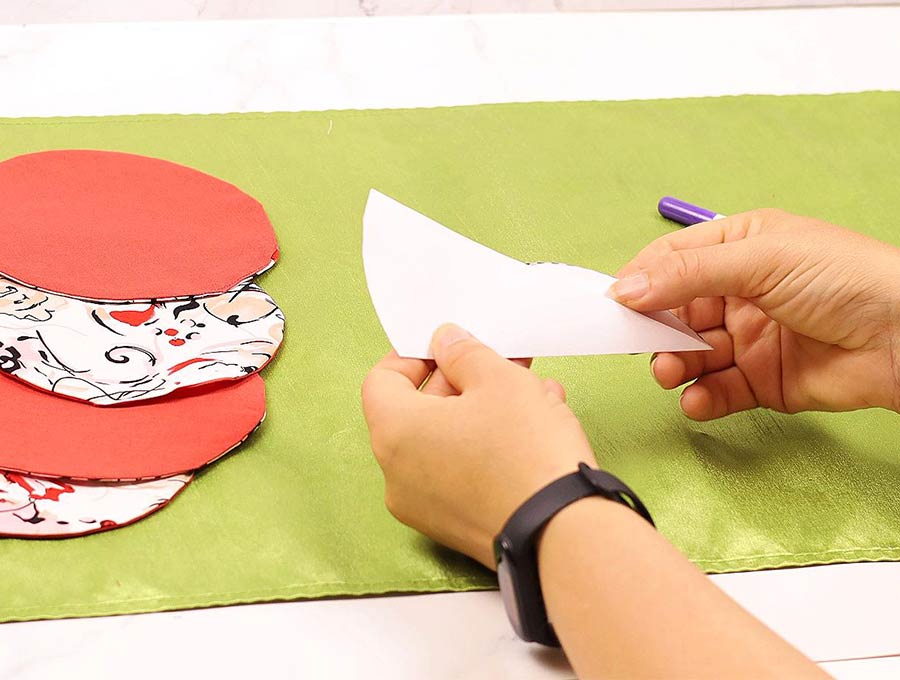
Step 12: Prepare the pattern
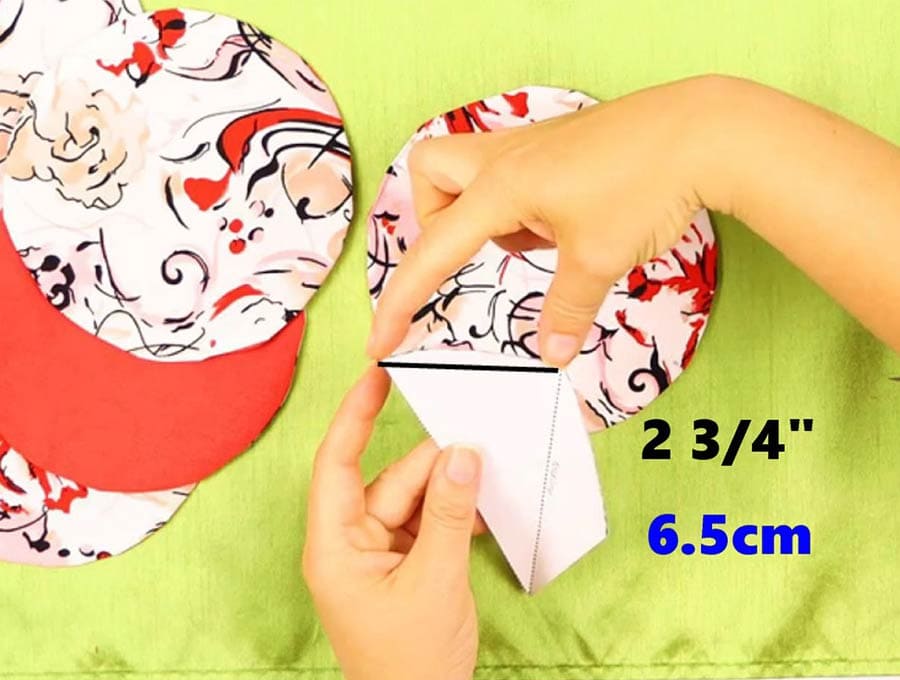
Put the one semi-circle aside and working with one semi-circle place it with the straight side closest to you on the worktop. Fold down the curved part across the second fold line on the pattern (the line you just drew if making your own pattern). It will extend beyond the straight part of the semi-circle, but that is ok.
TIP: If making your own pattern, measure from the left hand end point 2 3/4 inches (6.5cm) up across the curve of the circle to the edge of the paper and make a mark. Now place your ruler on the right-hand side end point and join with a straight line from there to the mark you made.
Step 13: Draw the fold
Flip over your pattern and draw a straight line along the section where the curved bit overlaps the straight section, and fold in back to the right side.
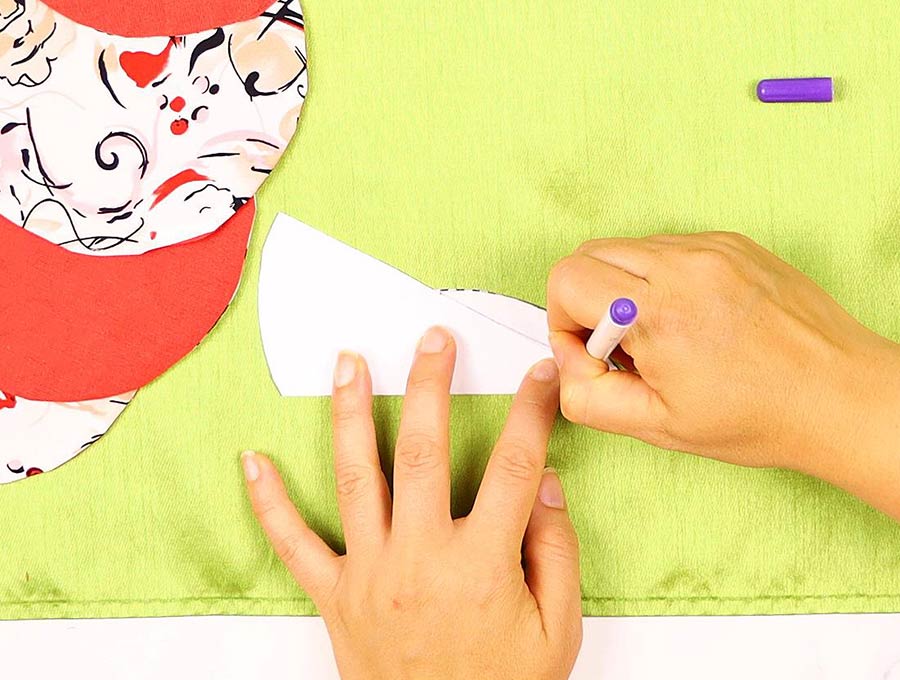
Make sure the folded curve aligns with the straight edge
Step 14: Mark midpoints
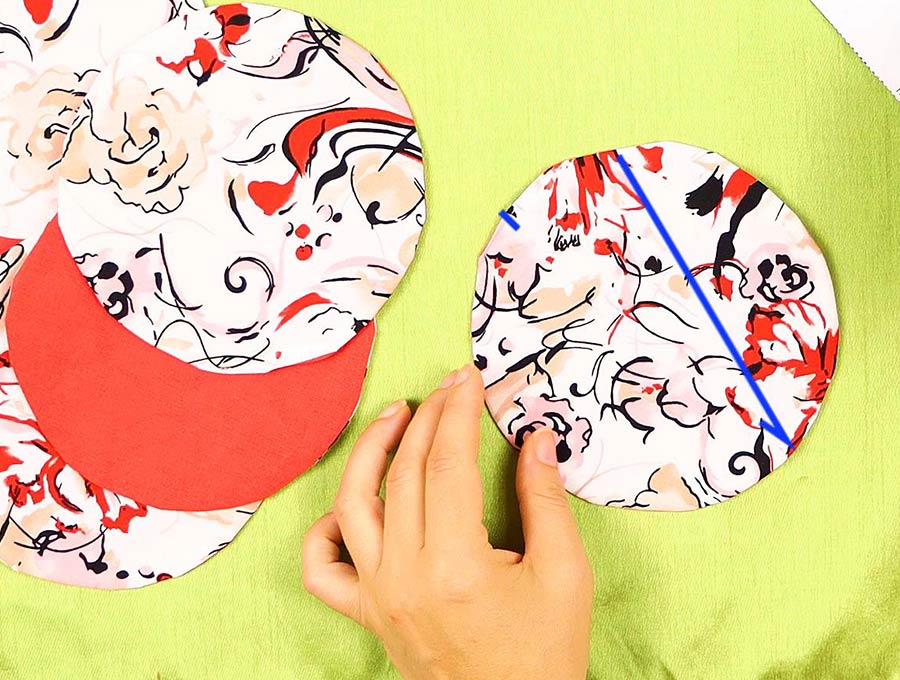
Fold each of the 7 fabric circles in half and mark the midpoint at the fold on each end.
Step 15: Mark stitching line
Take a fabric circle and place the folded three-fold pattern piece on the fold, so it lines up with the straight and the curved edge.
Now draw a line on the fabric to mark that section your pattern piece will guide you. Repeat with all the circles.
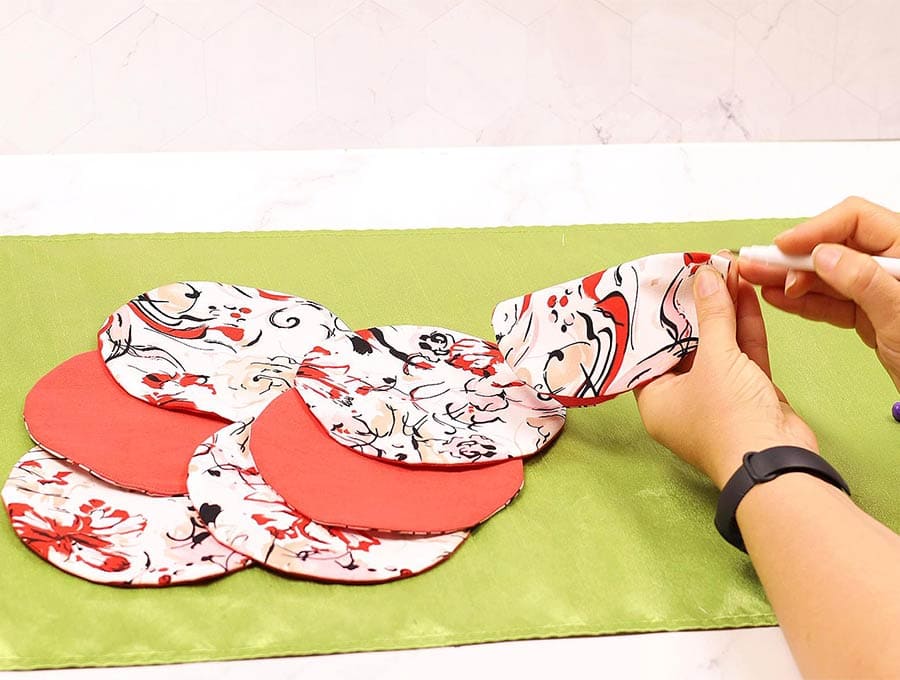
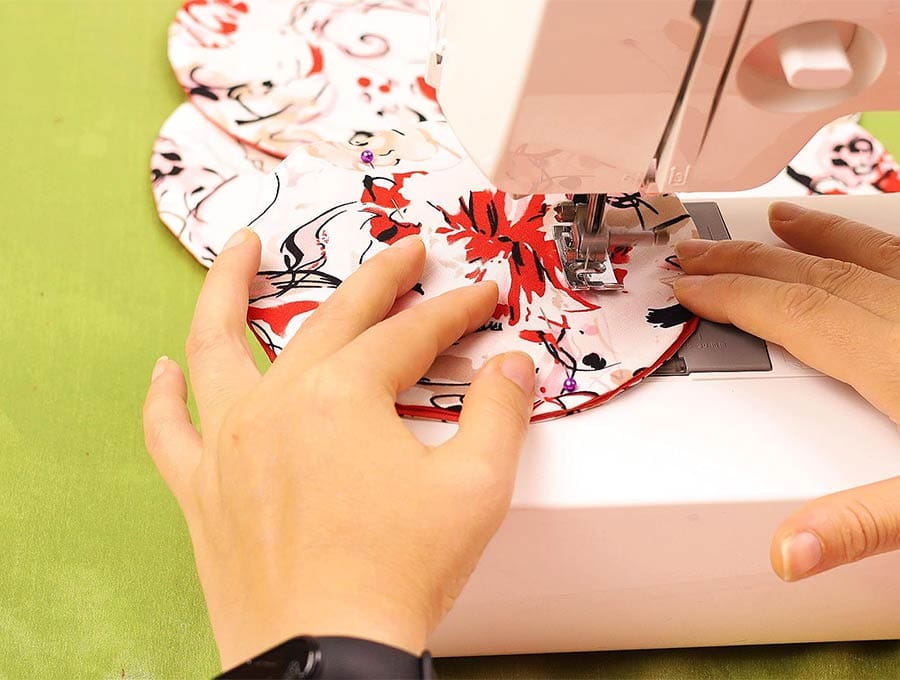
Step 16: Join the circles
Take one circle and place it on top of another circle with the plain sides facing each other. Pin together at the center points. Stitch down the diagonal line you drew, on the printed side of the fabric, back tacking at start and end.
Step 17: Continue stitching
Open out the two circles you joined and on the right-hand side circle place another circle, lining up the center marks and stitching down along the diagonal line you drew so the end of the line meets the first stitched line at the end. Continue in this way until you have used up all 7 circles and joined them to each other.
Step 18: Join last circle
To close the circle, join the first circle you stitched to the last one with the same diagonal stitch line.
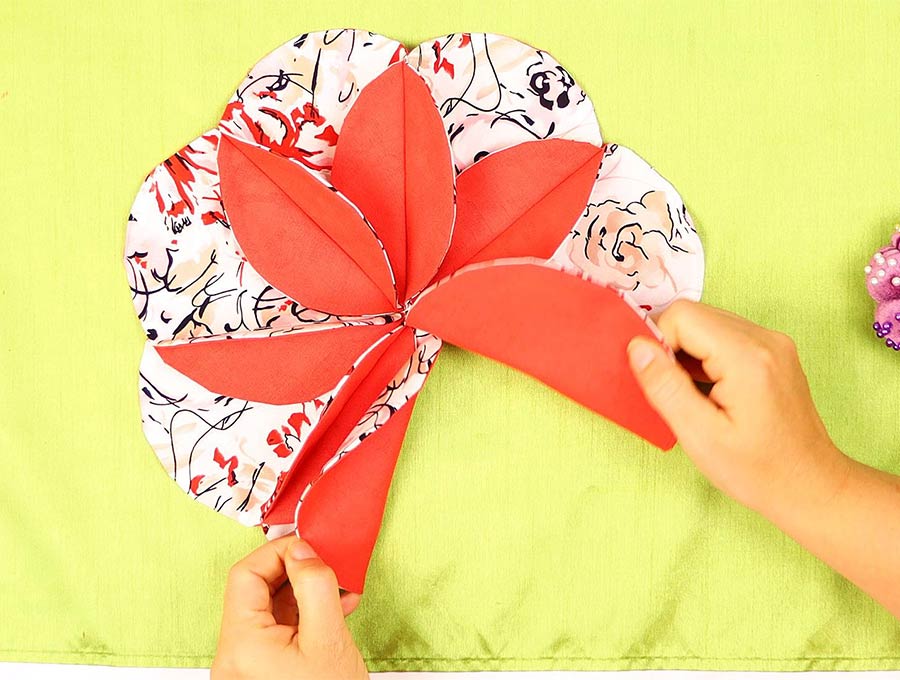
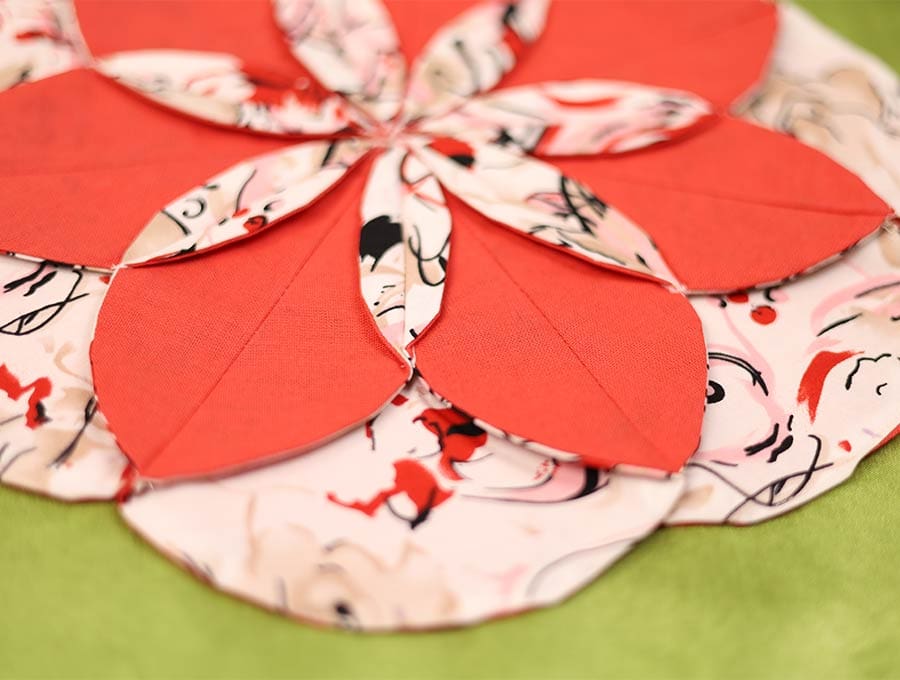
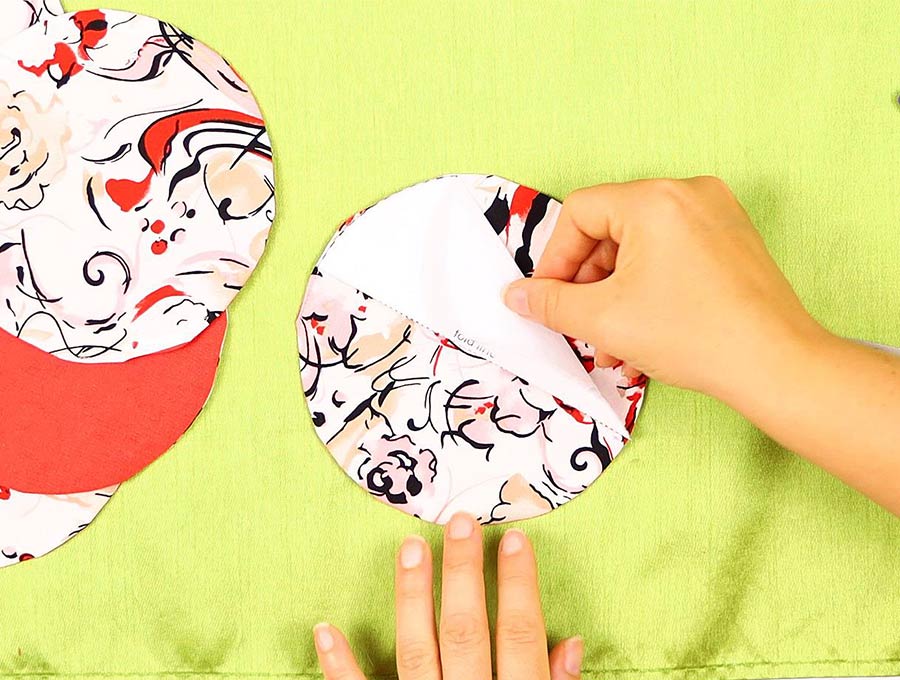
Step 19: Press open the petals
Lay the joined circles flat and open out the plain sides of the petals of the flowers and press each one flat, moving aside the other petal as you press the seams open.

Step 20: Mark stitch lines
From the center pick up a petal edge and pin it to the petal edge closest to it on the curve.
Then fold it down and draw a line with a fabric marker from the center to the end of the curve on the underside of the fold. Repeat for all the petal pieces.
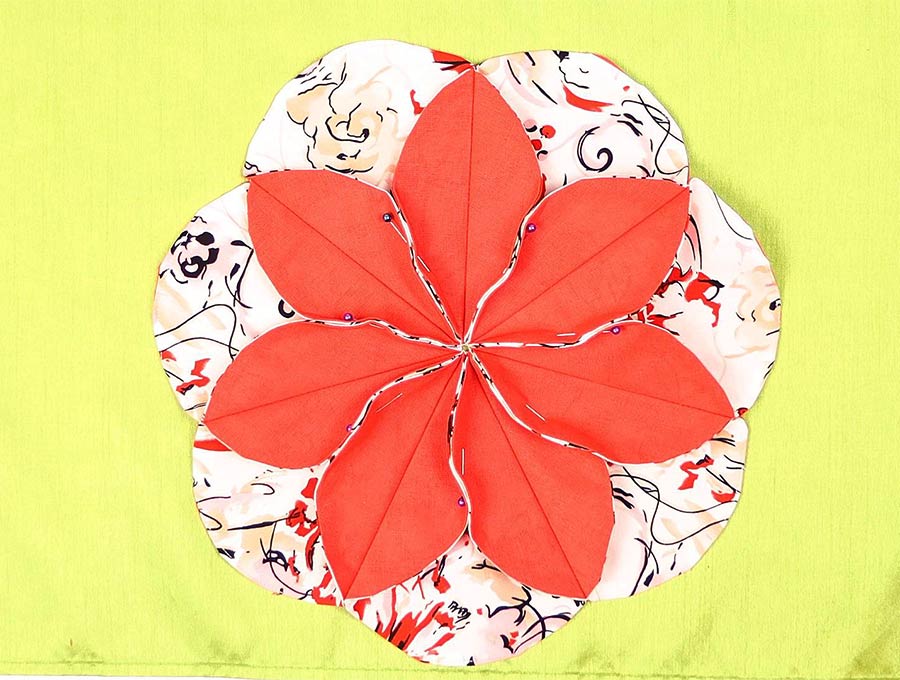
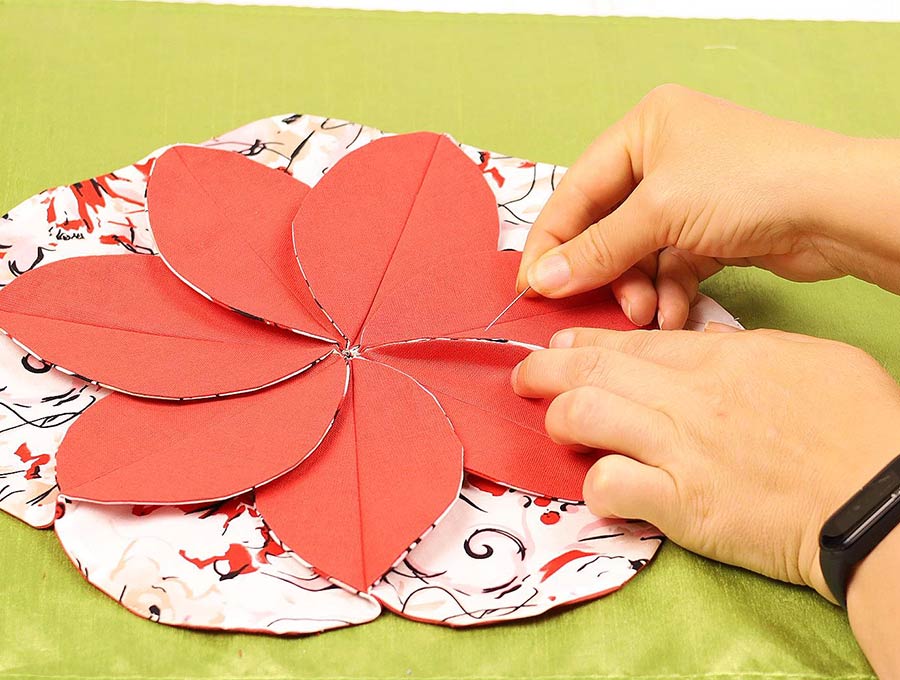
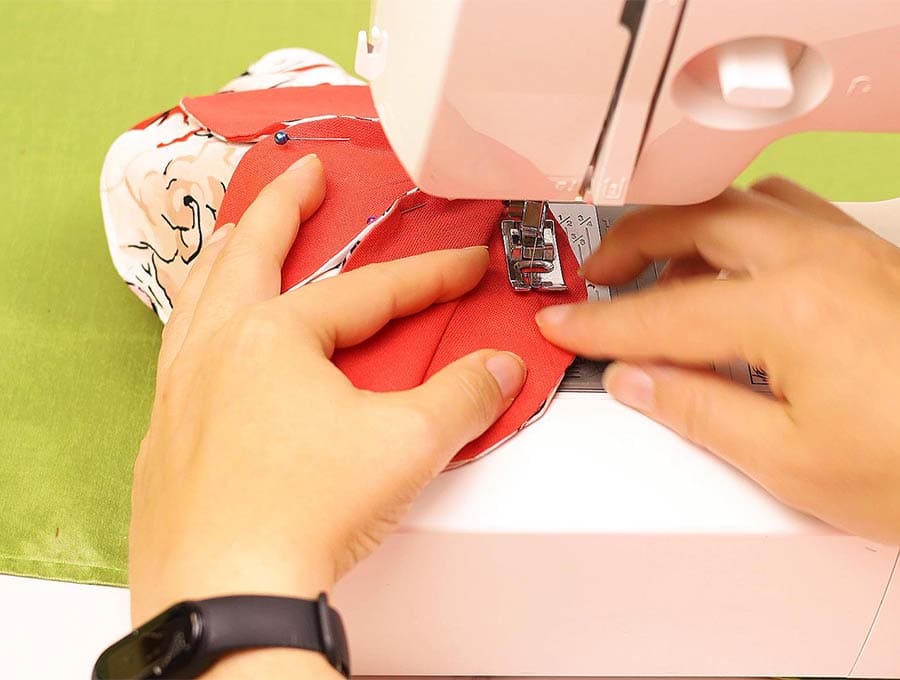
Step 21: Stitch petals
Stitch down the lines you have drawn to join the petal pieces on the plain side, back tacking at the start and finish.
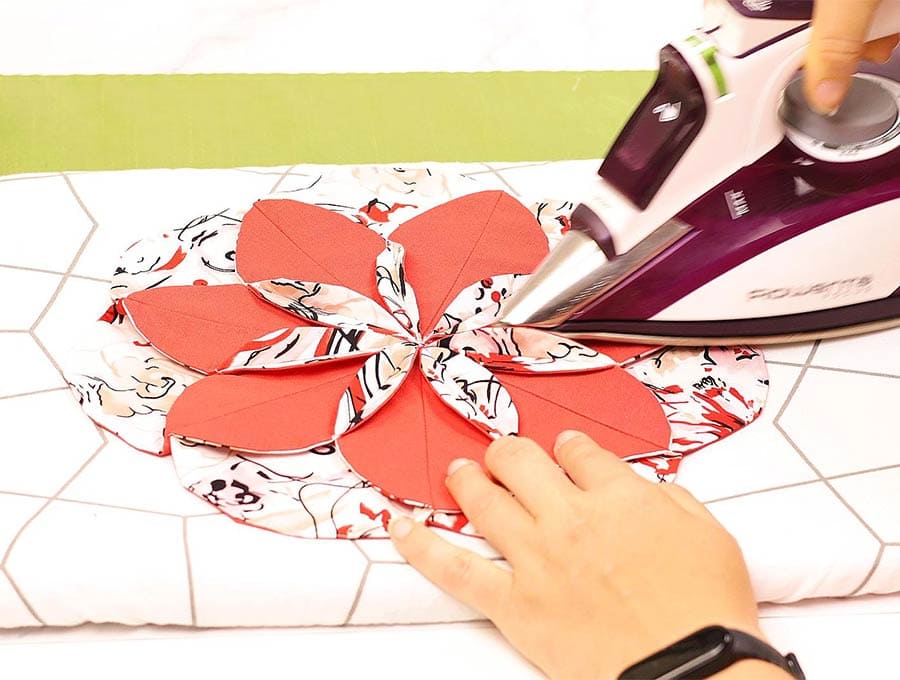
Step 22: Final press
Flip open the center-piece you have created and press open each new petal you have just stitched.
Your center-piece or placemat is now ready to use. The size given here is for a normal dinner plate but you can simply make the circles bigger on your initial pattern to make larger center pieces. You would then have to adjust the 2.5-inch (6 cm) measurement in Step 12 to a bit more depending on how much you enlarged the original pattern piece. Keep in mind that the measurement would be the diameter divided by 2.5. If you enjoyed making this then please subscribe to have more projects delivered straight to your inbox – never miss out on a project again!
Do you like this? Pin for later:
Wanna be friends? Click HERE and follow me on Pinterest
RELATED:
A beautiful set of placemats to instantly level up any table
Make a tea cozy to keep the tea warm longer
Easy coasters in green