
Free Tea Cozy Pattern – Teapot Cover to Keep the Tea Hot
Drinking tea is one of my favorite rituals, especially if I feel like I need to relax and get rid of built-up stress.
As luck would have it, I’m the only person in my household who loves drinking tea, so whenever I prepared some, I couldn’t manage to drink it all before it cooled down. Then I had to heat it back up because I don’t like cold tea, it was a real bother.
But I don’t have that problem anymore. How? Thanks to this neat tea cozy pattern!

With this cute DIY tea cozy on your teapot, your tea will stay nice and warm much longer and you’ll be able to enjoy hot tea without having to reheat it!
Here’s how to make a tea cozy for yourself, regardless of the size of your teapot.

Below you will find my step by step DIY tea cosy written tutorial with VIDEO instructions for all the visual learners.
We occasionally link to goods offered by vendors to help the reader find relevant products. Some of the links may be affiliate meaning we earn a small commission if an item is purchased.
Table of Contents
- 1 How to make a Tea Cozy
- 2 Supplies and tools
- 3 How to Sew a Teapot Cozy
- 3.1 DIY TEAPOT COZY VIDEO TUTORIAL
- 3.2 TEA COZY INSTRUCTIONS:
- 3.3 STEP 1: Prepare the tea cozy pattern
- 3.4 Alternative: Make your own teapot cozy pattern
- 3.5 STEP 2: Cut fabric and batting
- 3.6 STEP 3: (Optional) Make a hanging loop
- 3.7 STEP 4: Quilt the outer pieces
- 3.8 STEP 5: Start sewing the tea cozy
- 3.9 STEP 6: Pin around the tea cozy
- 3.10 STEP 7: Stitch
- 3.11 STEP 8: Turn around and stitch the gap
- 3.12 STEP 9: Topstitch
- 4 DIY TEA COSY OPTIONS:
How to make a Tea Cozy
Supplies and tools
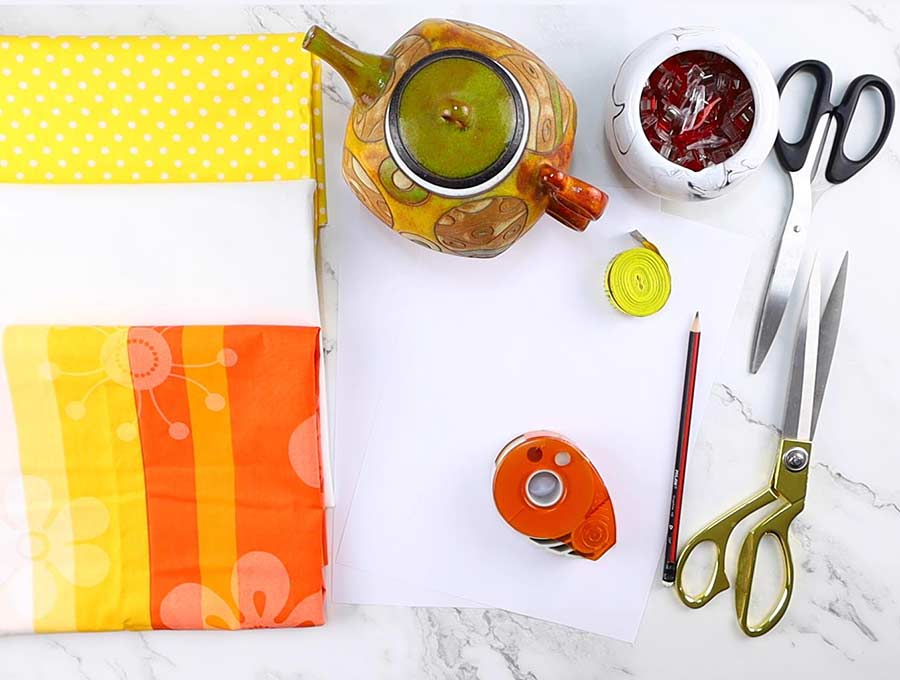
- fabric – 2 pieces of 100% tightly woven cotton (one main, one lining)
- matching thread
- batting / insulation
- scissors (or rotary cutter and a cutting mat)
- ruler or measuring tape
- iron and ironing board
- sewing clips or pins
- sewing machine
- walking foot (optional)
DOWNLOAD: tea cozy pattern (Free PDF file) *pattern will be added soon*
Follow us for free patterns & tutorials! [easy-profiles]
How to Sew a Teapot Cozy
Watch the diy tea cozy video first and then follow the written step by step instructions below.
Please enjoy and don’t forget to Like and SUBSCRIBE over on YouTube to be kept up to date with new videos as they come out.
DIY TEAPOT COZY VIDEO TUTORIAL
TEA COZY INSTRUCTIONS:
STEP 1: Prepare the tea cozy pattern
Before you can do any sewing, you’ll need a teapot cosy template first.
If the size of your teapot is similar to mine, you can just download my free tea cozy pattern and print it out in full size (no scaling). Cut out the excess paper and your pattern will be ready for use.

Alternative: Make your own teapot cozy pattern
If you don’t own a printer or your teapot isn’t in standard dimensions, I’ll show you how you can make your own tea cozy pattern. You can make the pattern for it pretty easily.
Take your measuring tape and measure the width and the height of your teapot.
- Measure the width around the widest point of your teapot. Mine is 20″
- Measure the height from base to base over the top. Mine is 14″
Now you’ll do some math to both of those numbers. Divide each one by two, and add two inches to that number.
- Pattern width = teapot width / 2 + 2″ = 20/2 +2 = 12″
- Pattern height = teapot height / 2 + 2 = 14/2+2 = 9″
Take one large piece of paper or join two papers with tape. Fold in half.
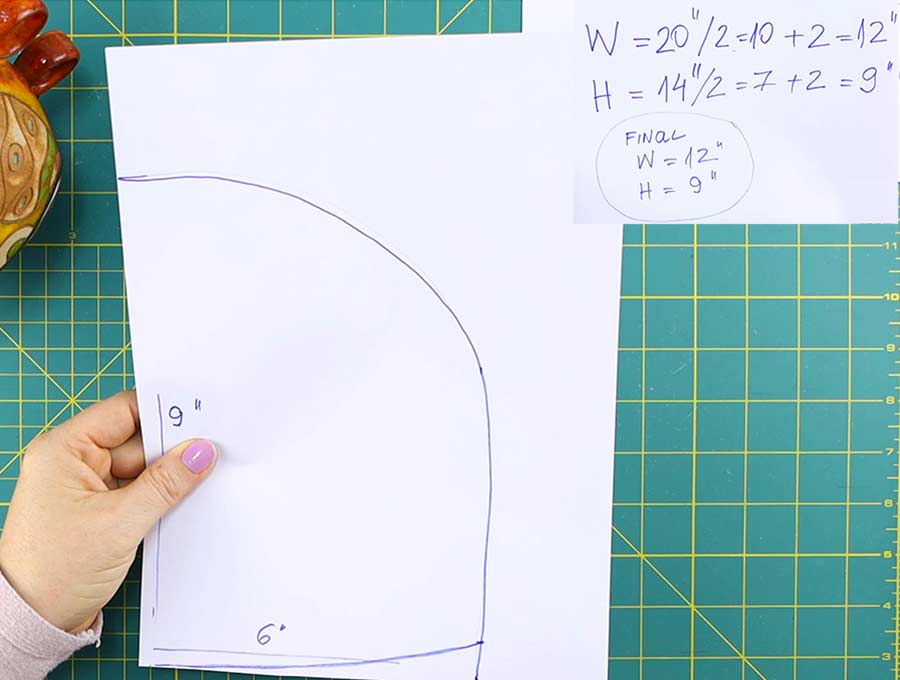
On the first sheet of paper mark the full height (9″) along the long side of the paper, and half the width (6″) along the short side of the paper. Draw a curve from one point to the other
Mark about three-quarters of an inch from the right corner. Then draw curve from this point to the center. The pattern is ready for action after that! Cut around the tea cozy pattern through both sheets of paper. Separate both sheets of paper and tape them together.
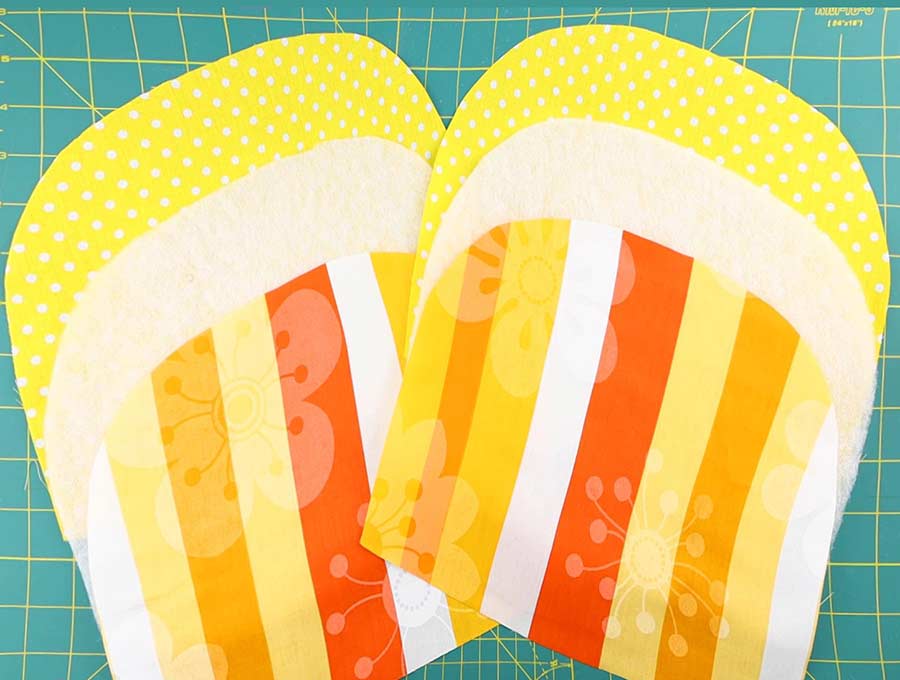
STEP 2: Cut fabric and batting
Using the tea cozy pattern as a guide and cut out two pieces out of each fabric. The main, the batting, and the lining fabric. You’ll end up with 6 identical pieces.
STEP 3: (Optional) Make a hanging loop
Cut a strip of fabric 4 inches long (10cm) and about 1 1/2 inches wide (3.5cm). Fold it in half lengthwise and finger press to create a crease. Unfold it and fold each long side vertically to the crease along the middle and fingerpress.
Fold the strip in half lengthwise along the original fold once again and do a final press. Stitch the long open edge and your hanging loop strip will be ready.
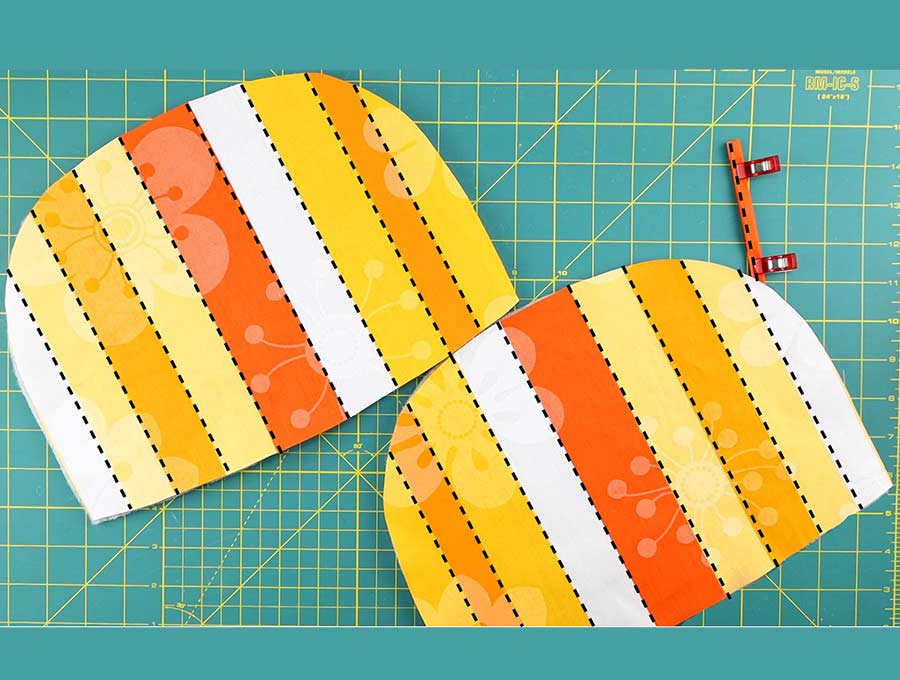
STEP 4: Quilt the outer pieces
Place the batting on top of the main fabric piece. Pin or around.
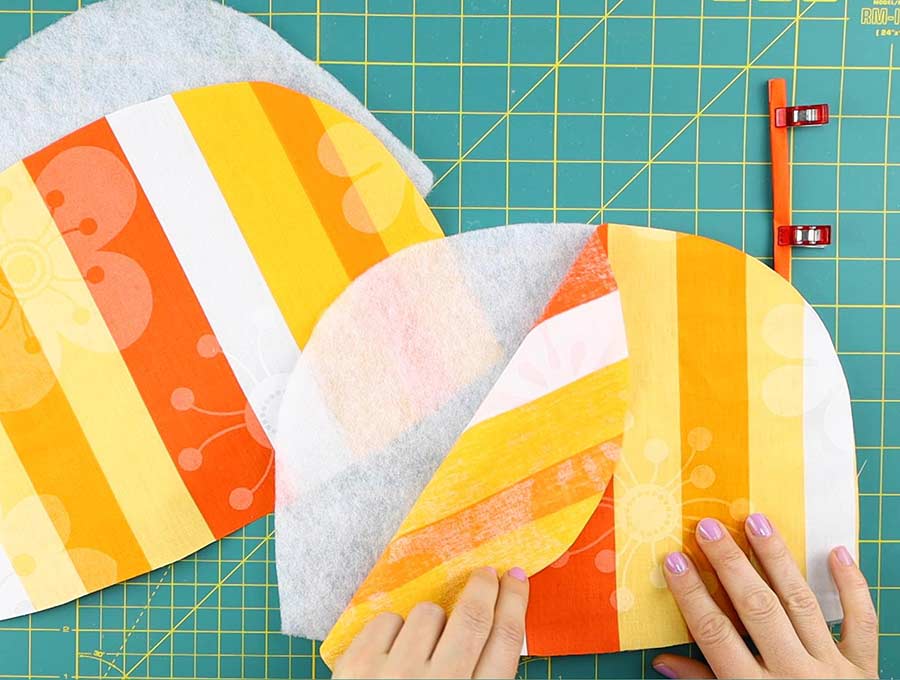
Quilt on top to join both pieces. I chose to do simple straight lines following the pattern of my fabric.
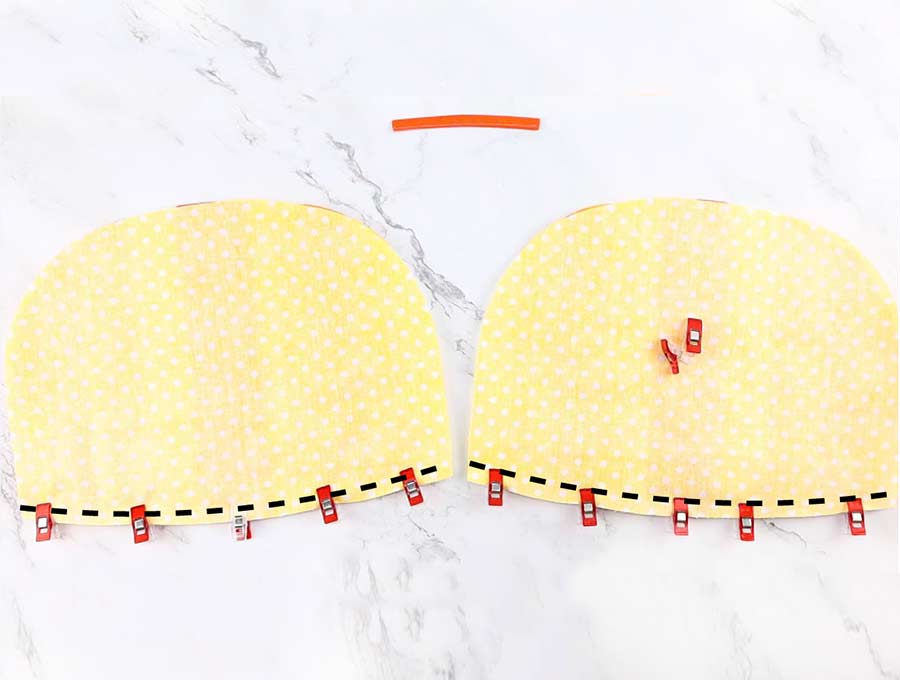
STEP 5: Start sewing the tea cozy
Put the lining fabric on top of the quilted outer set with their right sides facing inward. Stitch along the bottom edge and reinforce it with some backstitching.
Repeat the process with the other outer fabric piece and lining piece.
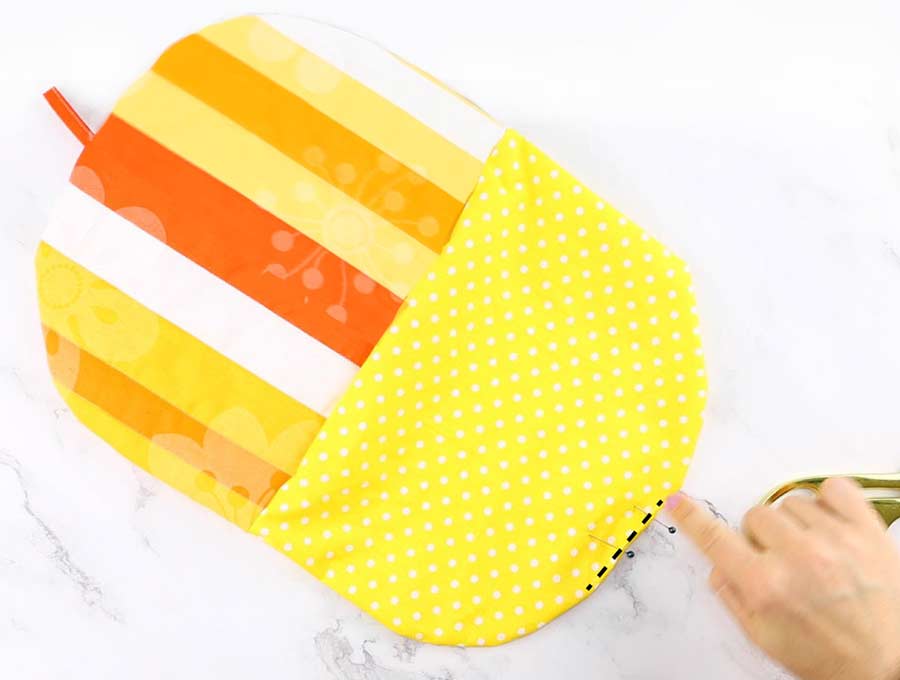
STEP 6: Pin around the tea cozy
Fold the main fabric in half vertically to find its center.
Take your loop hanger or a piece of four-inch ribbon and fold it in half. Place the raw edge of the ribbon onto the center of the top edge of the outer fabric piece. Pin it in place.
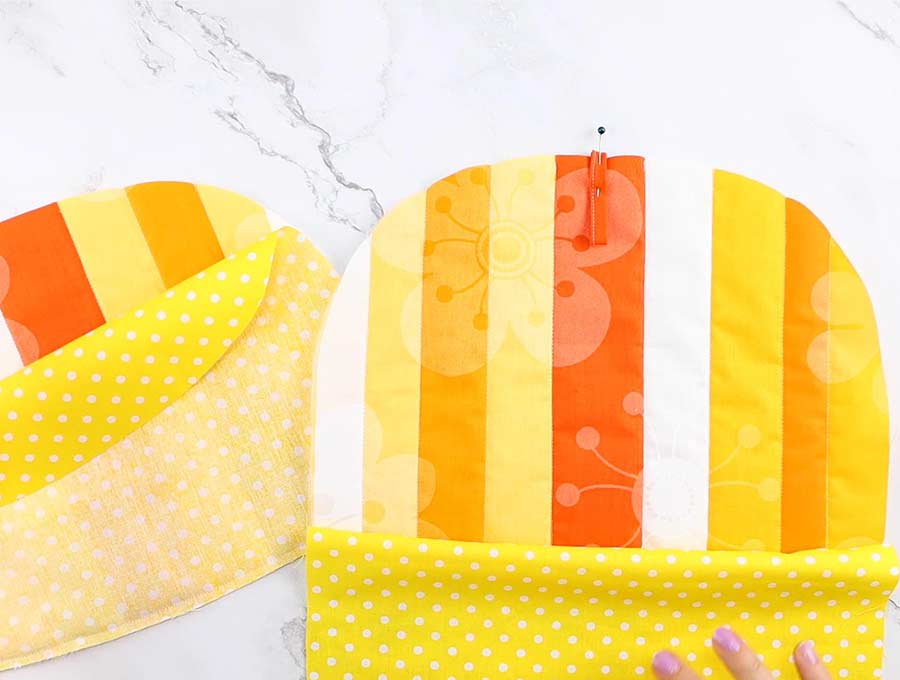
Open up both pieces of sandwiched fabrics so that the lining is on one side and the main fabric is on the other side. Stack the fabrics together so that the main fabrics are on each other and the lining fabric pieces are on each other. Pin in place.
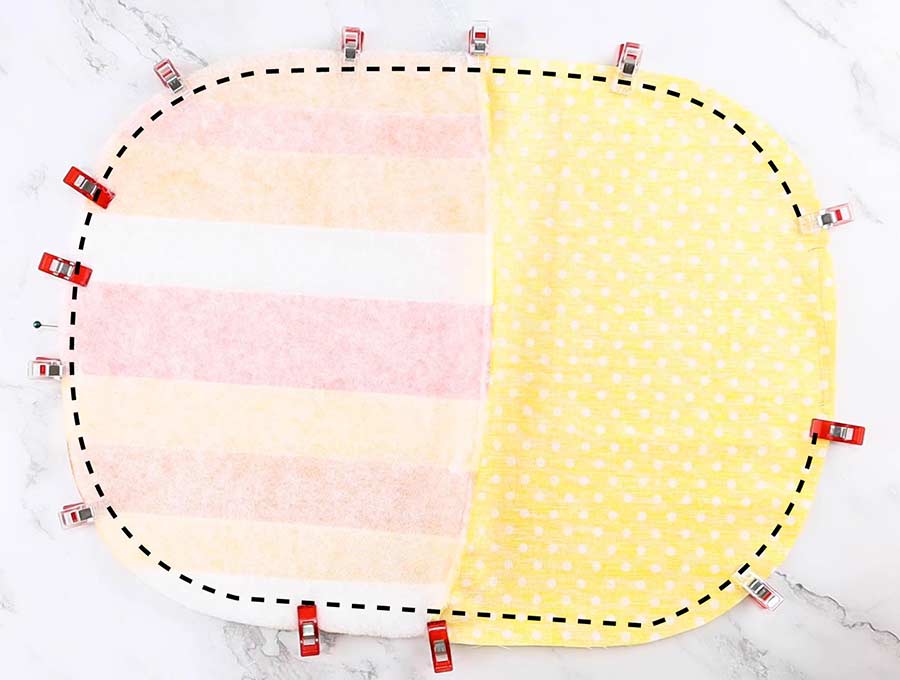
STEP 7: Stitch
Sew all around the fabrics, but leave a 3-inch opening unstitched on the lining for turning the whole thing inside-out.
STEP 8: Turn around and stitch the gap
Turn the cozy inside-out through the gap you left open. Tuck the seam allowance in and press the entire thing with your iron.
Sew the opening shut. You can either use a sewing machine and go as close to the edge as possible as you sew, or you can use a needle and a thread and sew the opening with a ladder stitch.
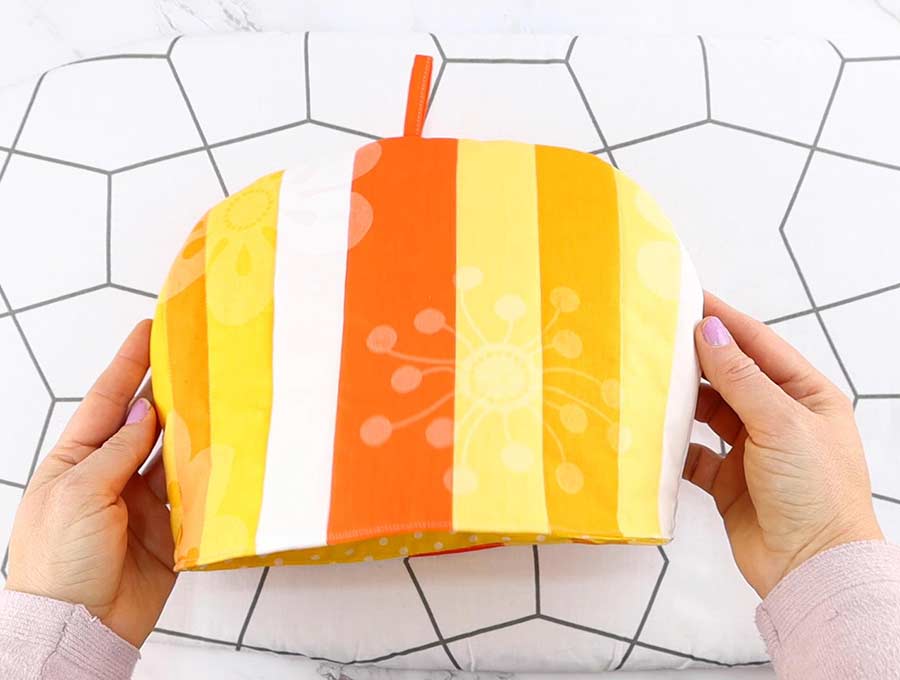
STEP 9: Topstitch
Push the lining into the tea cozy and press the opening seam so that the lining isn’t visible.

Topstitch around the top edge, about a quarter-inch away from the edge.
Your new teapot cozy is now ready to keep your tea hot for longer!
DIY TEA COSY OPTIONS:
If you want to, you can make some adjustments to the cozy and make it more according to your taste.

- USE CONTRASTING COLORS: For example, you can use contrasting lining and main fabric to give the cozy that special look. You can play around with this and pull the lining down half an inch before you topstich the tea cozy, so the lining is visible on the outside and serves as a trim.
- ADD APPLIQUE: You can also cut out a piece of colorful fabric in the shape of your favorite flower or animal and stitch it onto the exterior of the cozy.
- LEAVE BOTTOM FLAT: If you’re having trouble with making or sewing along the bottom curve, you can change the pattern a bit to take care of that. Just make the edge straight instead of curved. The cozy won’t fit as snuggly as it would if the bottom was curved, but it will do the job just fine and it sews up a bit faster, so don’t worry about it.
I hope you liked this tea cozy tutorial of ours! Go ahead and make a few of them so that you have one for each of your teapots. Then feel free to come back and tell us how they turned out in the comment section below! You can also make a few for your tea-loving friends and surprise them with thoughtful gifts! Now go and enjoy a hot cup of your favorite tea!
Do you like this? Pin for later:
[***pin img****]Wanna be friends? Click HERE and follow me on Pinterest
RELATED: