")
How to Make a Rag Doll (with FREE pattern for Boy or Girl)
Learning how to make a rag doll with mum or grandma is something kids will remember their whole lives. It’s fun on a cold or rainy day to sit together and create a doll from scratch choosing the color for the doll, and finishing off the details. The child has a say every step of the way in creating the soft fabric doll. With our free printable ragdoll sewing pattern and easy step-by-step tutorial you’ll soon have a cuddly toy for your youngster.
This is a skill that children will remember –for the quality time they spent with you, and for the product of their efforts that they can cuddle. A rag doll is different from a poseable plastic doll. It’s just so close to the heart. Working together on this easy project will form a bond with the child you are making the doll with, and they will be learning sewing skills that will help them when they get older, all in a fun way.
Below you will find my step by step written tutorial with VIDEO instructions for all the visual learners.
We occasionally link to goods offered by vendors to help the reader find relevant products. Some of the links may be affiliate meaning we earn a small commission if an item is purchased.
Table of Contents
- 1 How to Make a Rag Doll
- 2 Rag doll Supplies and tools
- 3 How to Sew a Rag Doll
- 3.1 DIY Rag doll VIDEO TUTORIAL
- 3.2 CLOTH DOLL MAKING INSTRUCTIONS:
- 3.3 STEP 1:
- 3.4 STEP 2:
- 3.5 STEP 3:
- 3.6 STEP 4:
- 3.7 Step 5: (OPTIONAL) – ONLY IF MAKING A BOY
- 3.8 STEP 6:
- 3.9 Step 7:
- 3.10 Step 8:
- 3.11 Step 9:
- 3.12 Step 10 (OPTIONAL – if making a GIRL) Make and add hair
- 3.13 Step 11: Embroider the facial features
- 4 Rag Doll FAQs:
How to Make a Rag Doll
Rag doll Supplies and tools
- main fabric – 13 x 15″ (28 x 33cm) medium weight cotton fabric in a flesh tone
- lining fabric – 13 x 15″ (28 x 33cm) white cotton or flannel for a double layer for the doll
- (optional) – printed cotton fabric for the clothing
- our free printable cloth doll template (link below)
- polyester stuffing
- matching thread
- scissors (or rotary cutter and a cutting mat)
- ruler or measuring tape
- iron and ironing board
- sewing clips or pins
- needle and embroidery thread in different colors for the facial features
- A little knitting yarn for the hair
- (optional) pinking shears
DOWNLOAD: free rag doll pattern [Free pdf file]
Follow us for free patterns & tutorials! [easy-profiles]
How to Sew a Rag Doll
Watch the diy rag doll video first and then follow the written step by step instructions below.
Please enjoy and don’t forget to Like and SUBSCRIBE over on YouTube to be kept up to date with new videos as they come out.
DIY Rag doll VIDEO TUTORIAL
CLOTH DOLL MAKING INSTRUCTIONS:
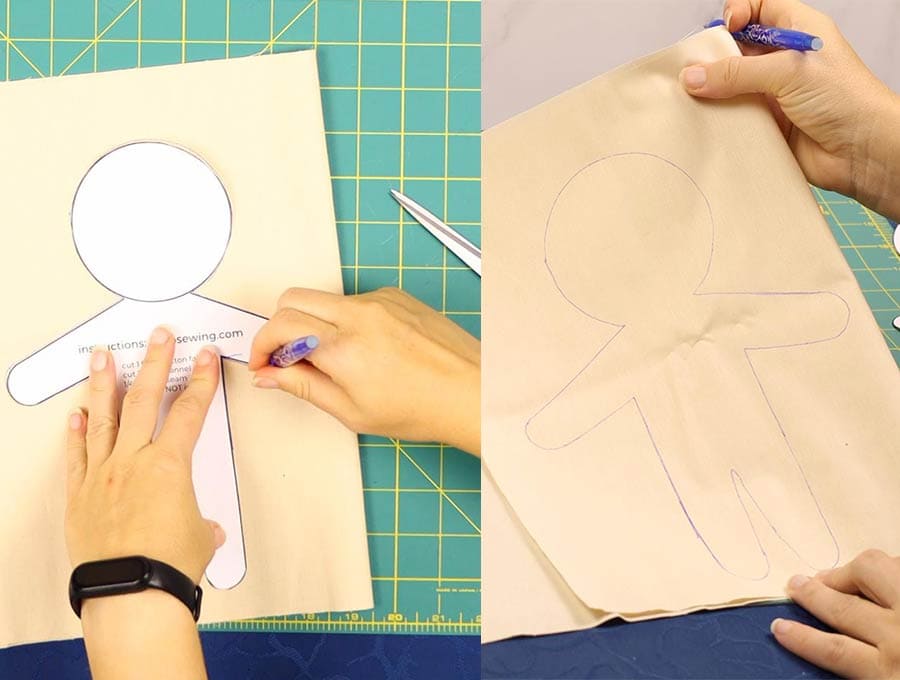
STEP 1:
Print out the pattern at the correct scale – there is a test piece that when its printed should measure 1 inch by 1 inch (2.54 cm. x 2.54 cm) at 100% scale. Then cut out the pieces.
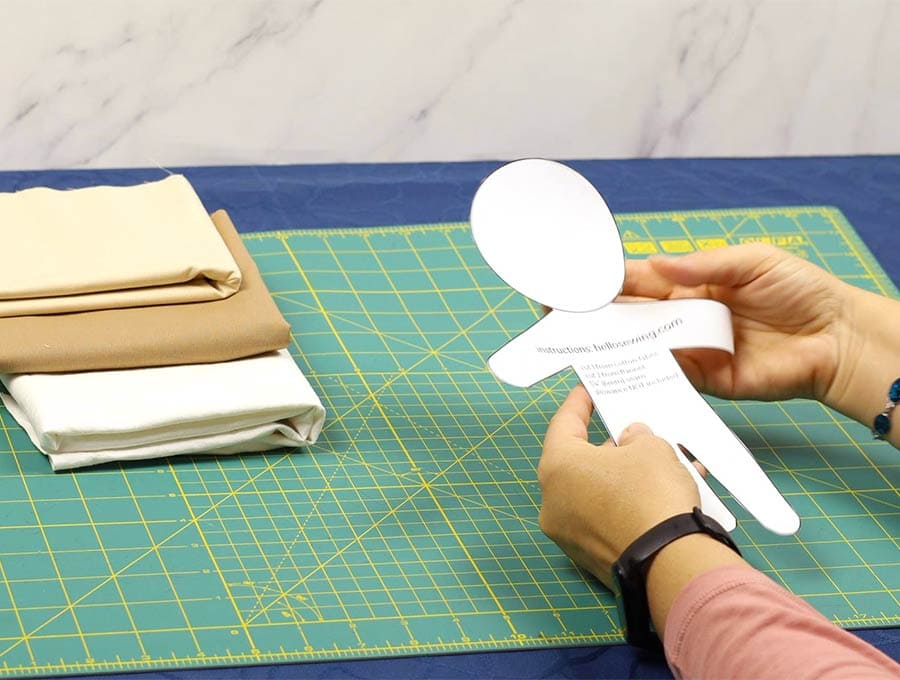
The front and back of the doll are the same, so you will have only one pattern piece which you can will use for the doll body and for the flannelette inner, which will make the doll firmer and not allow the stuffing to show lumps through the fabric.
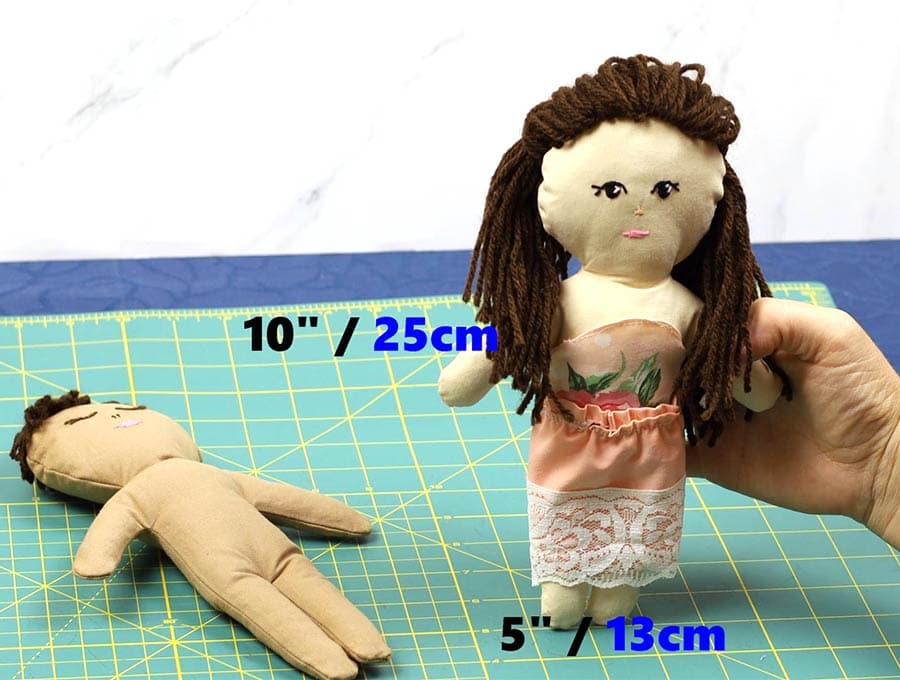
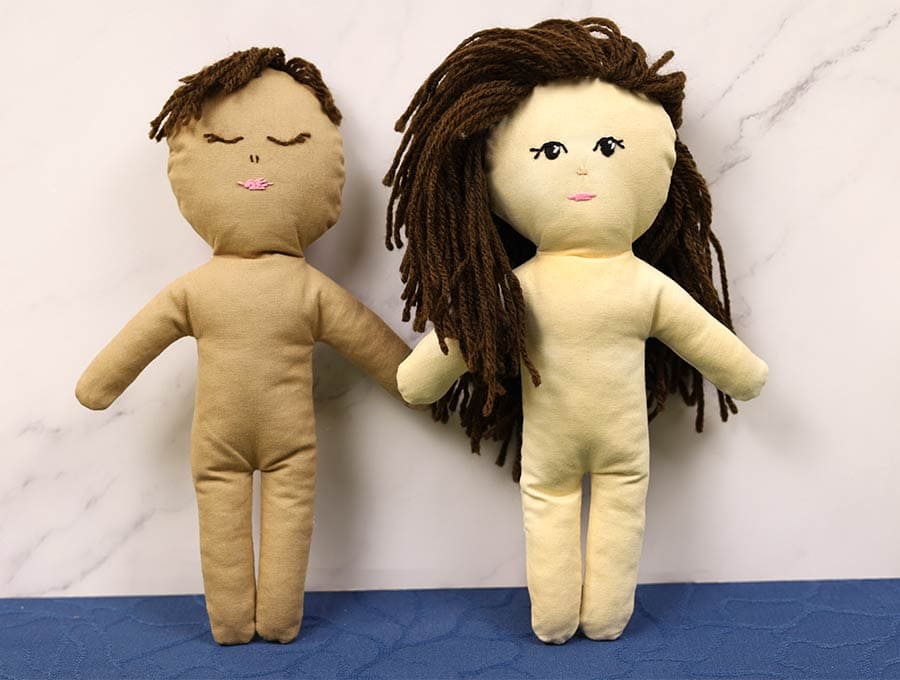
Finished cloth doll size: H x W x D – 10″ x 6″ x 2″ (25 x 15 x 5cm)
STEP 2:
Iron the fabric you are going to use for the flesh tone – it could vary from a pale cream to a tan or light to mid brown. Iron the flannelette. The color of the flannelette isn’t important as it won’t be seen – a grey, white or cream are fine.
STEP 3:
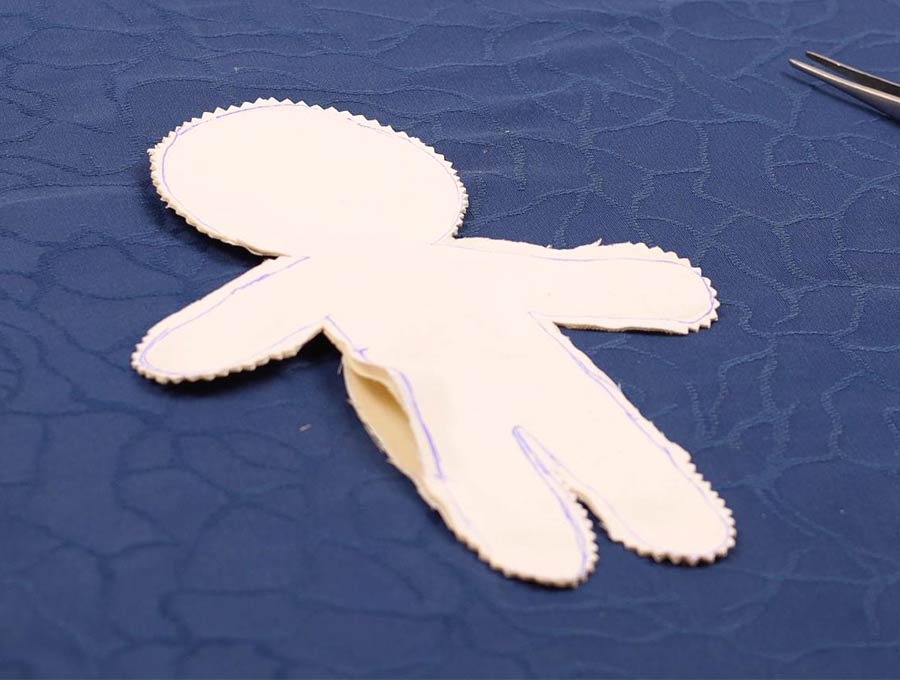
Pin the pattern to the flannelette, making sure it is doubled over so you have two pieces – one for the front and one for the back. Then mark around it.
Cut it out 1/4″ (6mm) away from the pattern (this is for seam allowance). Repeat for the other fabric
If you are using a rotary cutter you can speed up the cutting by place the folded flesh tone fabric under the flanelette and cutting them all at once.
STEP 4:
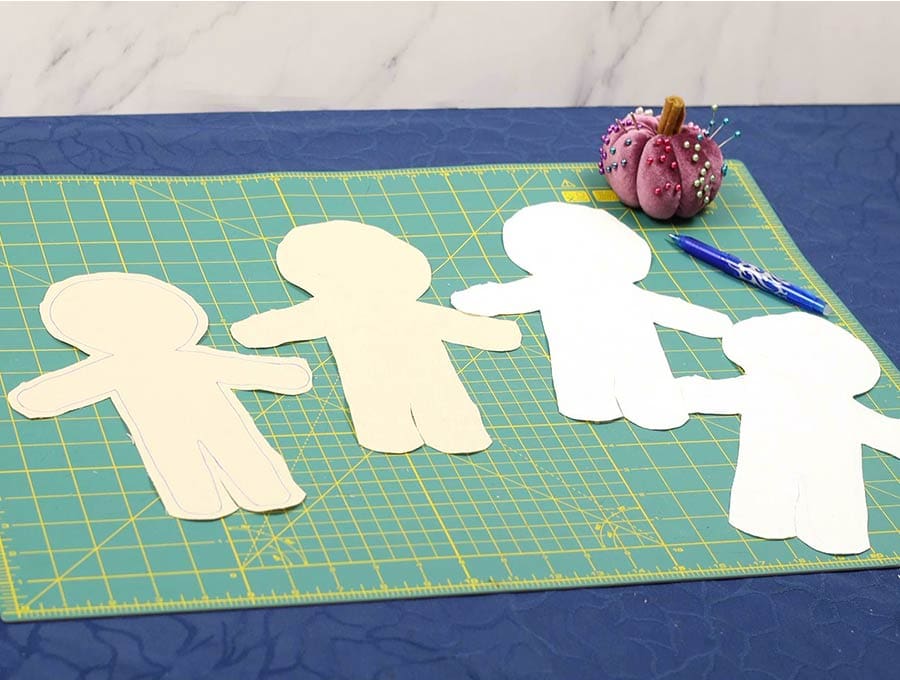
Unpin the pattern from the fabric and separate the layers (you will have 4 pieces). Layer the fabrics: flannelette, 2 flesh colored fabrics with right sides facing each other, another layer of flannelette. Pin in place.
Step 5: (OPTIONAL) – ONLY IF MAKING A BOY
Take some chunky yarn for the hair and loop it back and forth, four times around your index and middle finger, then cut off the extra yarn and slide off the fingers keeping the loops together and pin them to the top of the head on the face piece your embroidered. The loops will be facing down towards the eyes.
Stitch over the ends of the yard loops at the edge of the head around 1/8 of an inch (3 mm) in from the edge. This will keep the loops in place for when you want to attach the front to the back of the doll later.
STEP 6:
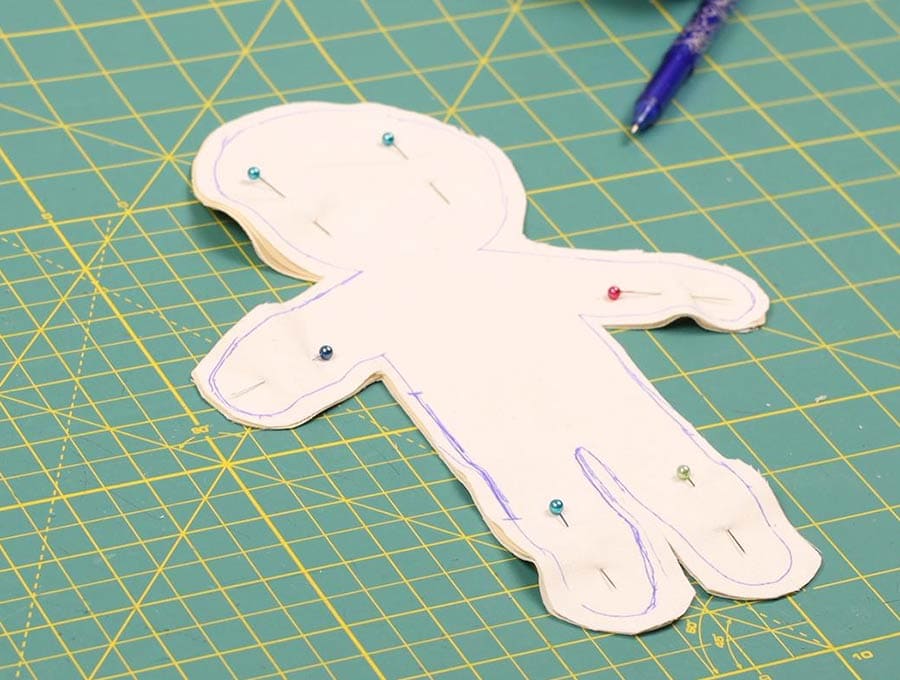
Sew right round the edges 1/4 of an inch (4 mm) from the edge, on the right side of the flesh fabric. On one side between the armpit and the hip leave at least a 2 inch (5cm) opening. Place your pins so you don’t sew over this gap by accident. Back stitch at the start and finish. A tip for the tight curves is to sew with a shorter stitch than usual – 2 mm and keep lifting the presser foot with the needle in the thread as you turn the curves.
Step 7:
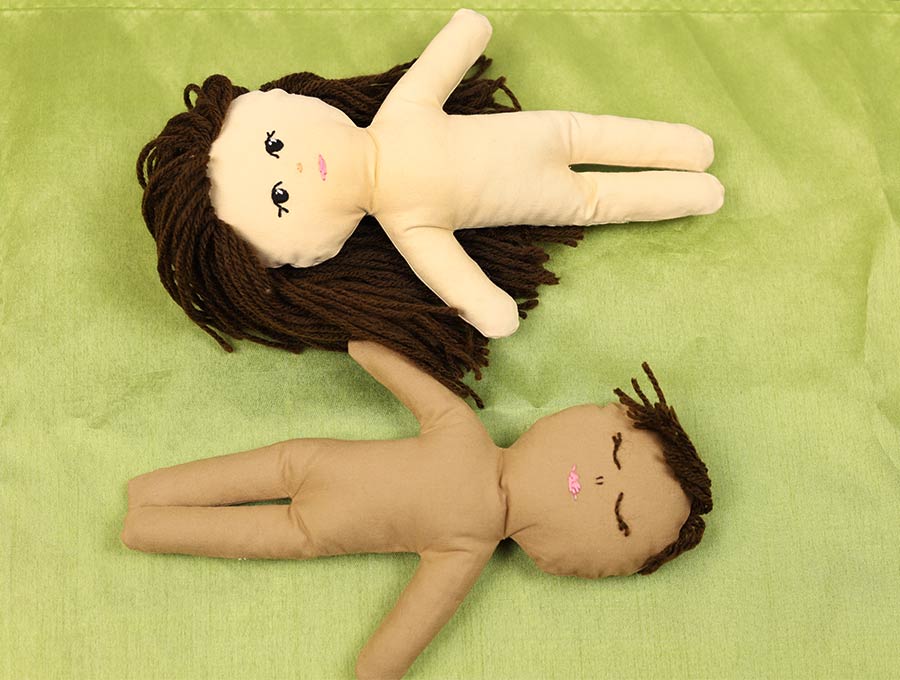
Snip off the excess fabric so there is around 1/8 of an inch (3mm) beyond the stitching, and around the curves snip vertical notches but not too close to the seam. Carefully turn the doll the right way out by pulling the fabric through the gap. It can be fiddly. Make sure the arms and legs are pressed out with a chopstick or a knitting needle carefully.
Step 8:
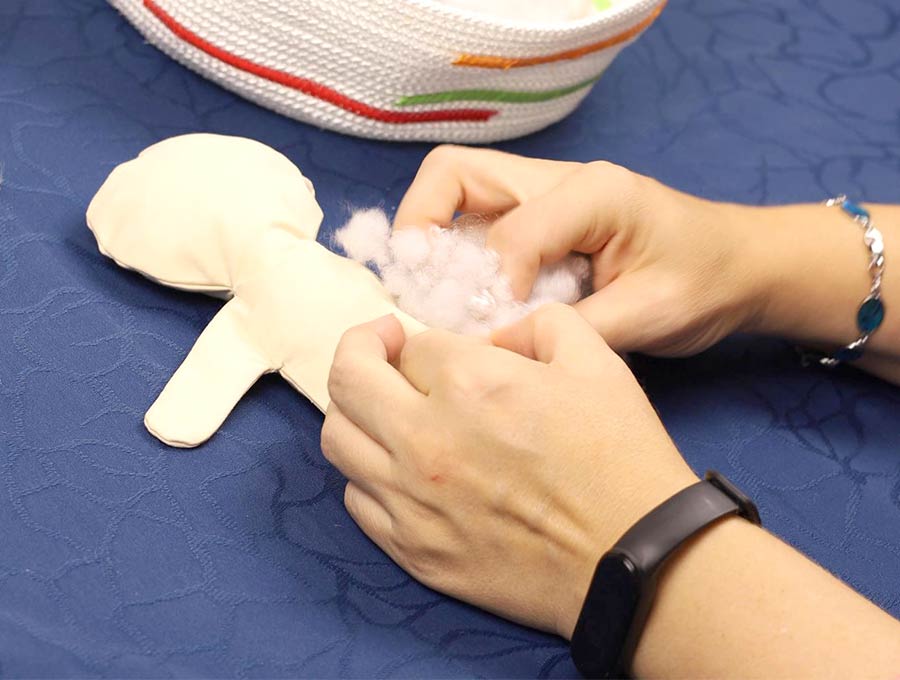
Use small bits of the polyfil fiber to stuff the doll, working it down into the arms and legs so they are quite firm, then filling the head and lastly the body. The doll should be very firmly stuffed otherwise within a few days it could be limp. So when you think it is stuffed sufficiently, stuff it some more!
Step 9:

Once the doll is all stuffed and firm, turn the raw edges of the opening inwards ¼ inch (6mm). With the needle and matching thread slip-stitch the opening closed, making sure the thread is firmly knotted when you have finished.
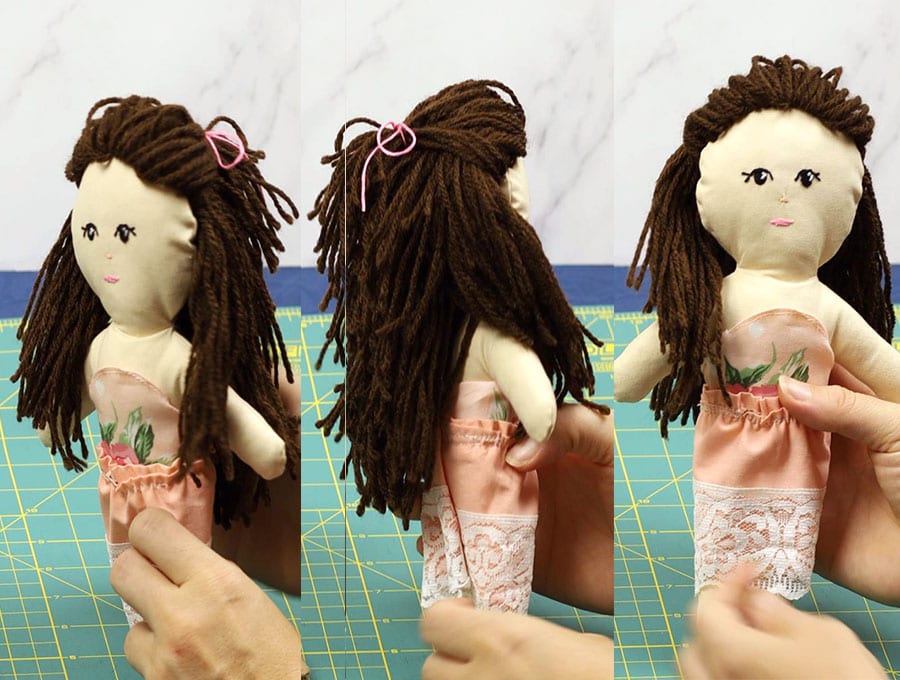
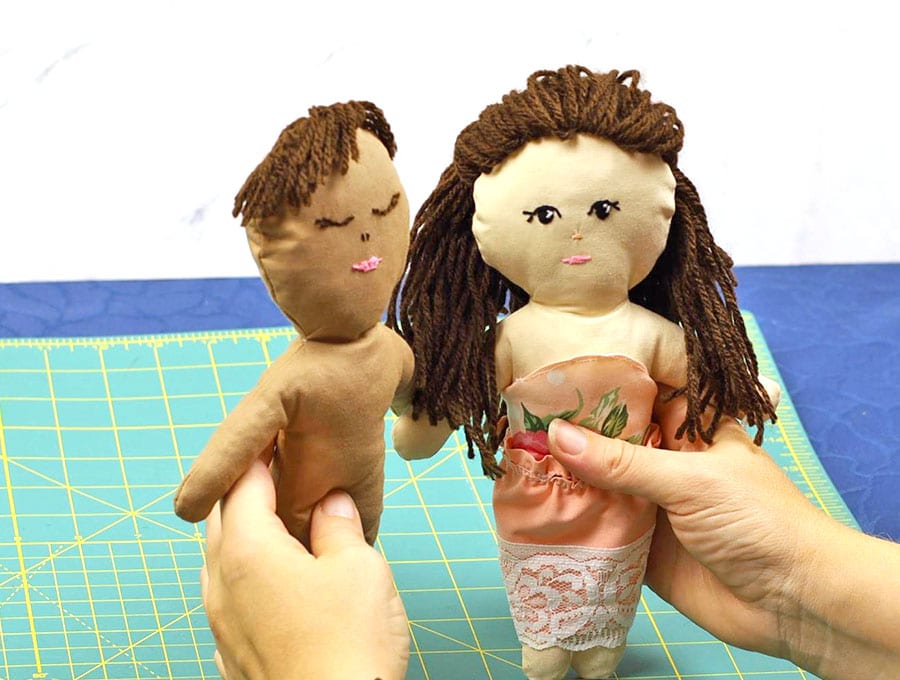
Step 10 (OPTIONAL – if making a GIRL) Make and add hair
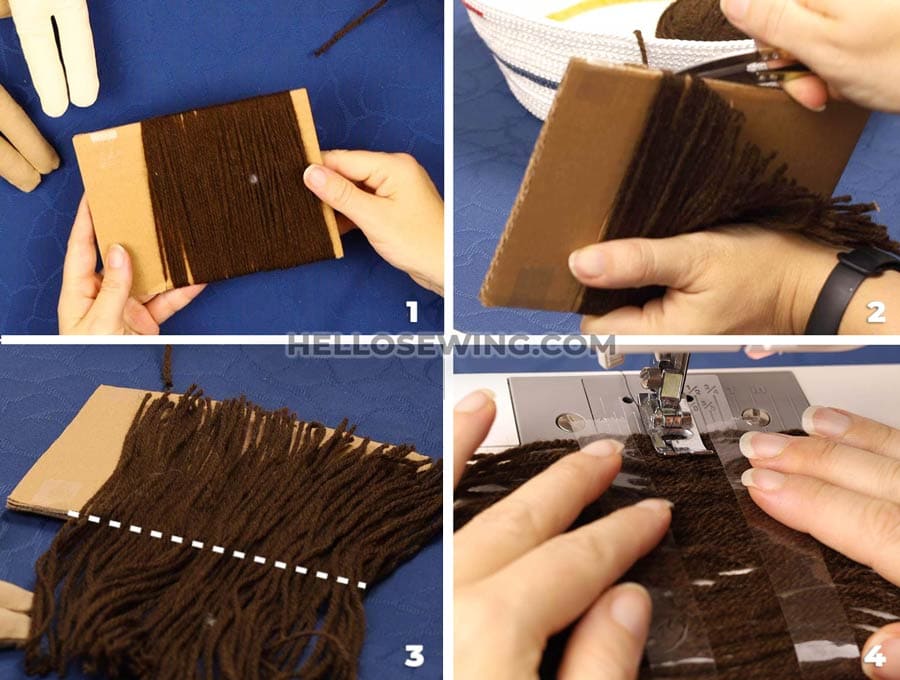
Take a piece of cardboard as wide as you want the hair length. Wind the yarn around it about 40-50 times. Cut the yarn.
Take the cardboard and cut the yarn on the bottom side of the cardboard, being careful not to shuffle the yarn.
Tape clear tape around on both sides of the middle and use your sewing machine with a straight stitch to stitch the yarn together. Remove the clear tape CAREFULLY
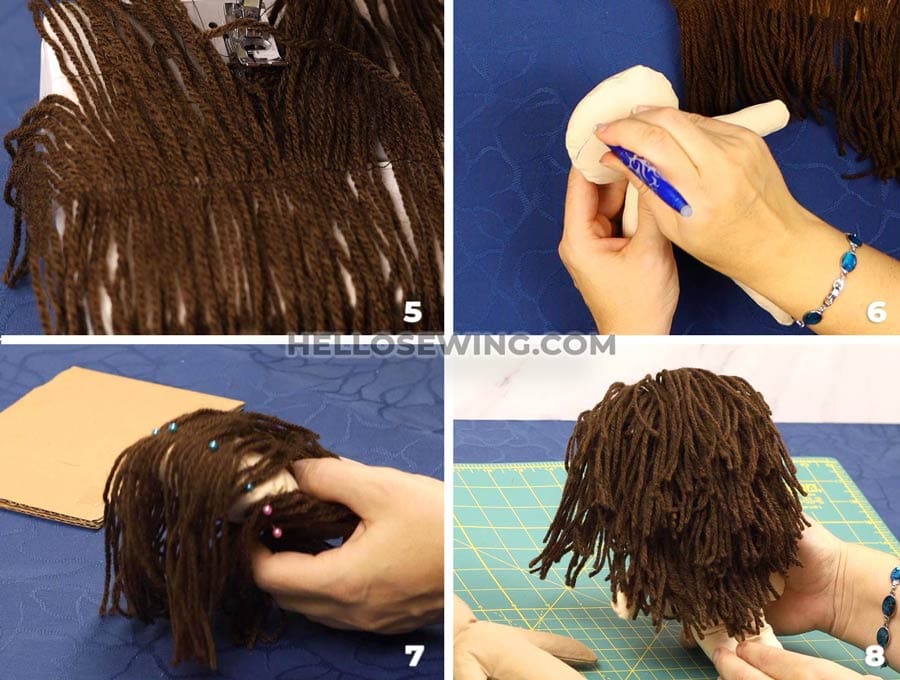
Use a marker to draw a hairline around the face and the back of the head of the doll. Carefully pin the hair to the head of the doll. Use a handsewing needle with matching thread to sew the hair to the head. You may need to repeat this process to make a head full of hair.
The final touch is to tie a tiny bow in the hair of the doll at the top of the head, with small piece of ribbon, and it is all set to be dressed.
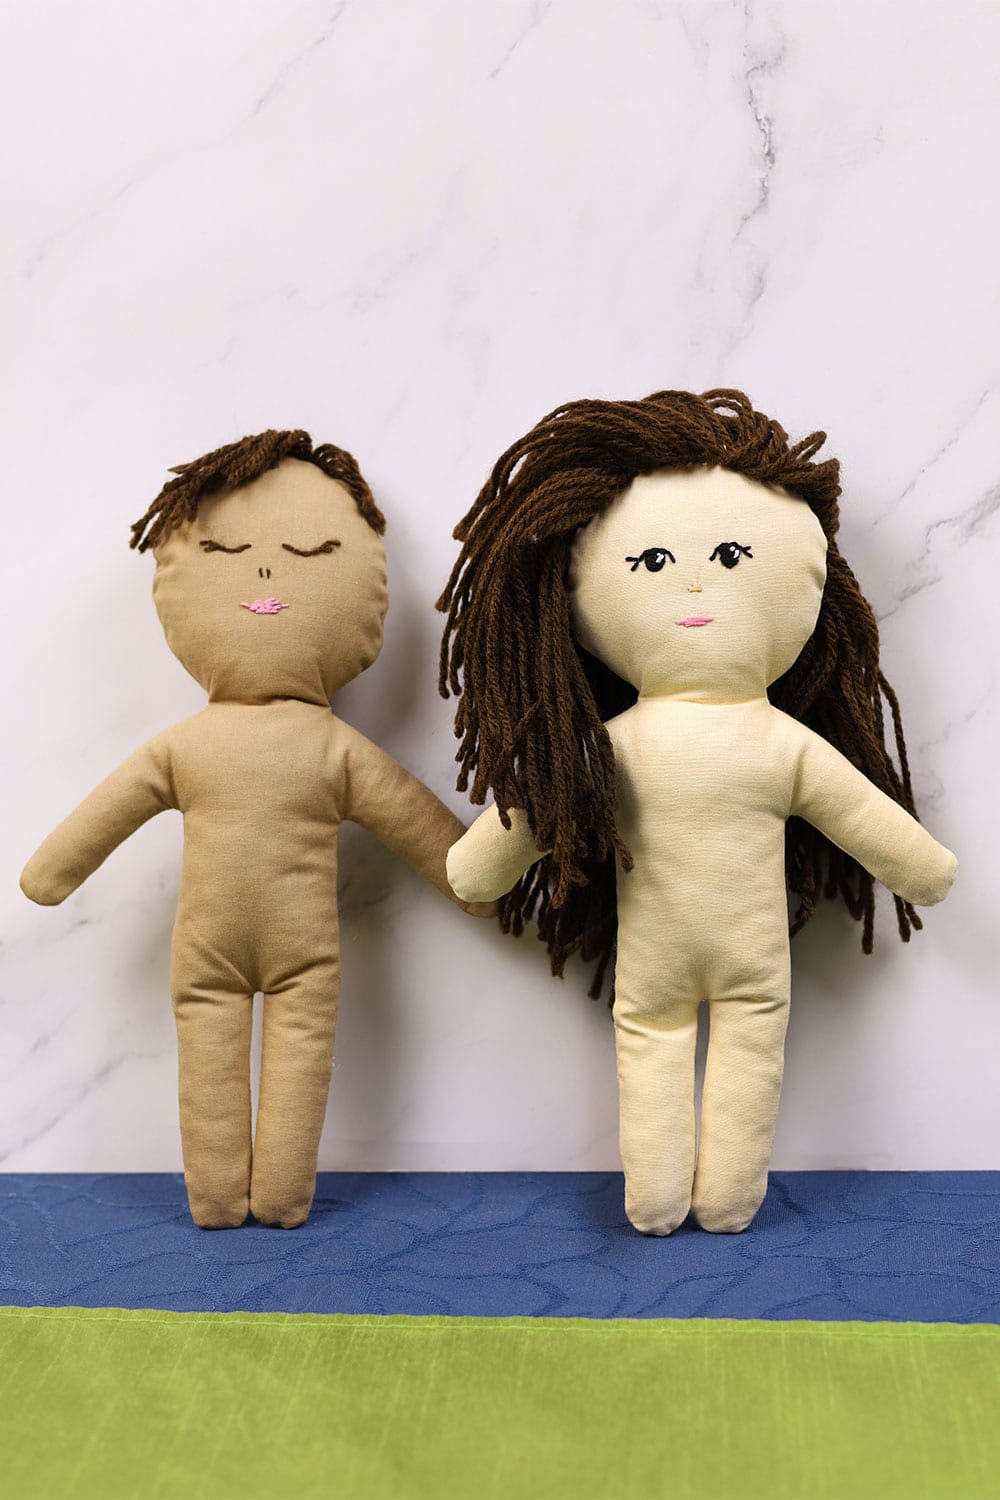
Step 11: Embroider the facial features
Now roughly mark where the eyes, mouth and nose will be.
Now all that is left is to take a needle and embroidery thread and fill them in. Use black thread for the eyes and a bit of white thread for the sparkles, use pink for mouth and flesh tone thread for the nose.

PRO TIP: Embroidering can be done by children if they are around 7 years or older. They can use as simple back stitch for the eyes and eyebrows and a running stitch around the nose, then fill in the nose with vertical stitches, called a satin stitch. The mouth can also be back-stitched. If the child is younger you will have to do the embroidery. It goes quite quickly and the child can be involved in selecting the colors for the features.
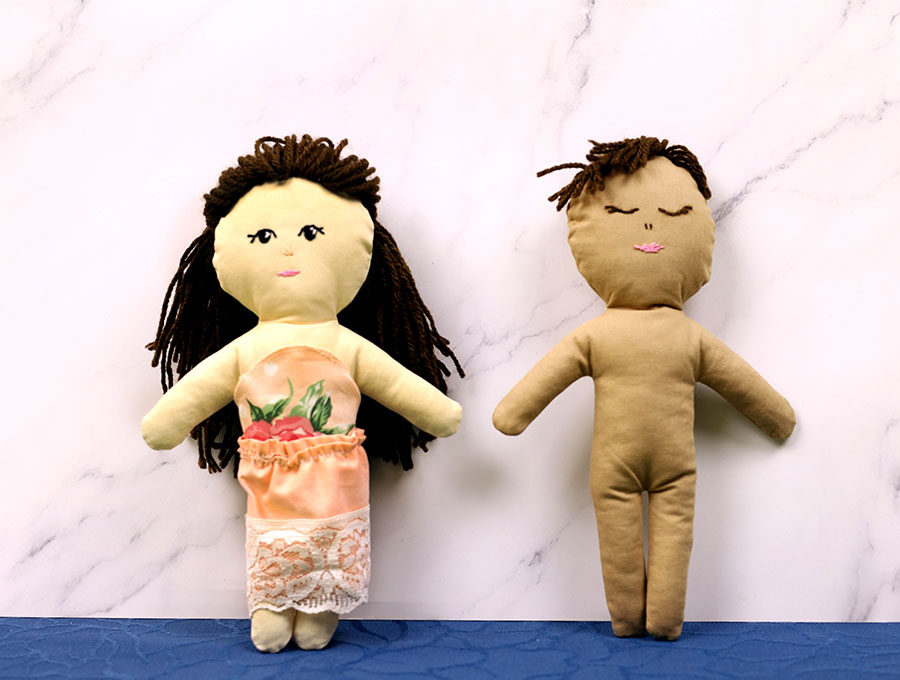
Please let us know how you enjoyed making the ragdoll from our free printable pattern and be sure to share a photo of the rag doll project. If you have sewn any clothes for the doll do let us see a photo of what you made.
Watch our visuals and follow the step-by-step instructions to get the soft rag doll made today and snuggled into bed with your youngster.
We have some special little tips for creating the best looking rag doll. If you like you can click on our subscribe button so you don’t miss out on any of our easy projects.
Rag Doll FAQs:
Q: Can I make a diaper for my cloth doll?
A: Sure you can! You’ll need to cut a diaper from a triangle of flannelette (see the pattern piece) and can pin or stitch it in place by hand once folded. There is no need for hemming it.
Q: Can I add ears to my cloth doll?
A: Yes, you can. Do this after step 5
Step A:
To make the ears, fold over the same color fabric you used for the doll body with right sides facing, and mark out two sets of ears with your erasable fabric pen. Because these are small pieces it is easier to sew around the curved edge, leaving the straight edge open before cutting them out of the fabric. To ensure an even curve lift the presser foot slightly leaving the needle in the fabric and turn – do this often as you sew around the curve. Once both sets of ears are stitched you can cut them out 1/8 of an inch (3 mm) beyond the sewing line.
Step B:
Turn the ears the right way out gently using a chopstick or knitting needle. Press them flat.
Step C:
Attach the ears on either side of the face with the curved pieces facing inward toward the face. Attach them at the level of the eyes – the top of the ear should be in line with the eyebrow. Pin in place. If you prefer you can attach them with a quick stitch on your machine so you don’t have to worry about them moving and avoiding pins when you later stitch the front to the back of the doll.
Q: Can I embroider the face of my rag doll before it’s complete?
A: Sure, you can. You can choose to embroider the facial features before the dog is complete. I find it easier to embroider after, but it’s personal preference. Do this after step 5
To transfer the face features to the doll, have one half of the doll right side up and pin the face to the doll using pins to indicate the middle of the mouth, the nose, the mid-point of the eye and the mid-point of the eyebrow. Now using an erasable fabric pencil, lift the pattern and where the pin for the mouth is mark the mouth, remove the pin, then fold the paper pattern a little higher and mark the nose, remove the pin, then fold the paper pattern higher to reach and mark the eyes, then lastly the eyebrows.
With the paper pattern next to you for reference, fill in the details for the face with the fabric pen as you now have the correct position for the features. You are then ready to embroider the eyes and eyebrows using black embroidery thread, or you can use a permanent marker pen if you are not into embroidery. The mouth and nose can be done in black marker, embroidering the mouth and nose are done in a pinkish color.
Do you like this? Pin for later:
Wanna be friends? Click HERE and follow me on Pinterest
RELATED:
Stuffed animal patterns – super cute!
Felt animal patterns – Got some scrap felt and some free time? Make one of these felt toys