
DIY Travel Bag or Compact Folding Shopping That Fits in Your Purse
These days, to avoid the impacts of climate change, we are encouraged to carry travel bags with us rather than buying more plastic to choke up the oceans or the earth. While fabric shopping or travel bags are significant, we really want fabric ones that fold into almost nothing to save storage space. Enter the compact foldable travel bag that can easily slip into a purse and be whipped out when you need it. You can use it for carrying shopping items, packing up the kids’ toys for a playdate with a friend, or snacks for an afternoon in the park. Follow our easy step-by-step travel bag tutorial, and you’ll have a bag ready to whip out and use in a few minutes.
Create a gift for yourself or a friend, reduce your fabric stash and save the planet all in one with our foldable DIY travel bag. These are three great goals as we near the end of the year. Follow the step-by-step shopping or travel bag tutorials with great visuals to help you make these foldable DIY travel bags in a hurry. Instead of mountains of bags taking up space, these travel bags fold away to virtually nothing and can be hauled out to transport groceries, gifts, snacks, or toys. They can even be used for visits to the markets or the beach when you go on holiday and don’t want to fill your bag with bulky beach bags. Instead, leave space for that beautiful resort wear!

Below you will find my step by step written tutorial how to make a travel bag with VIDEO instructions for all the visual learners.
We occasionally link to goods offered by vendors to help the reader find relevant products. Some of the links may be affiliate meaning we earn a small commission if an item is purchased.
How to Make a Travel Bag
Travel Bag Supplies and Tools
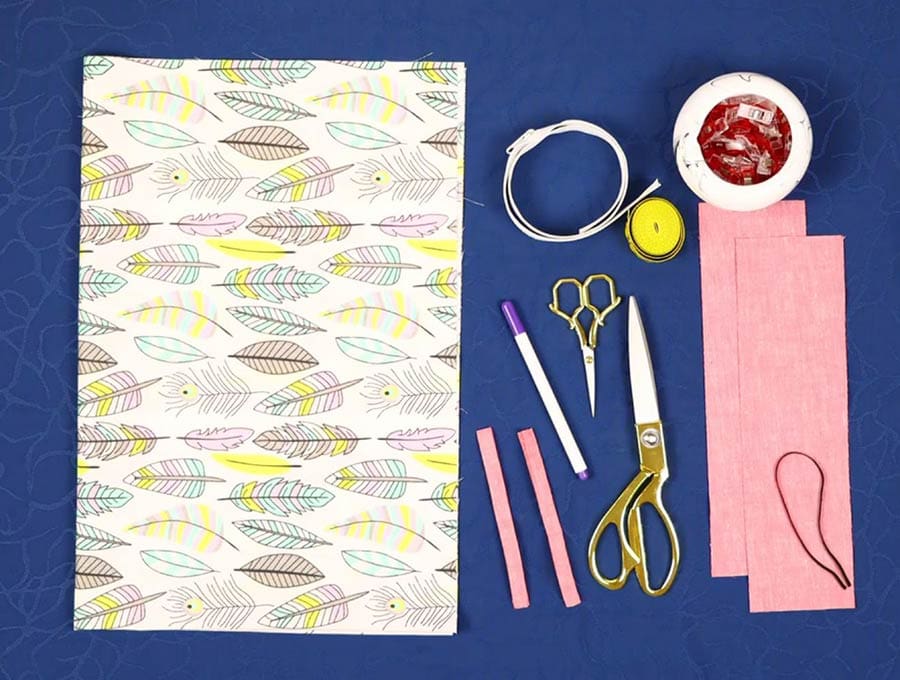
- Fabric:
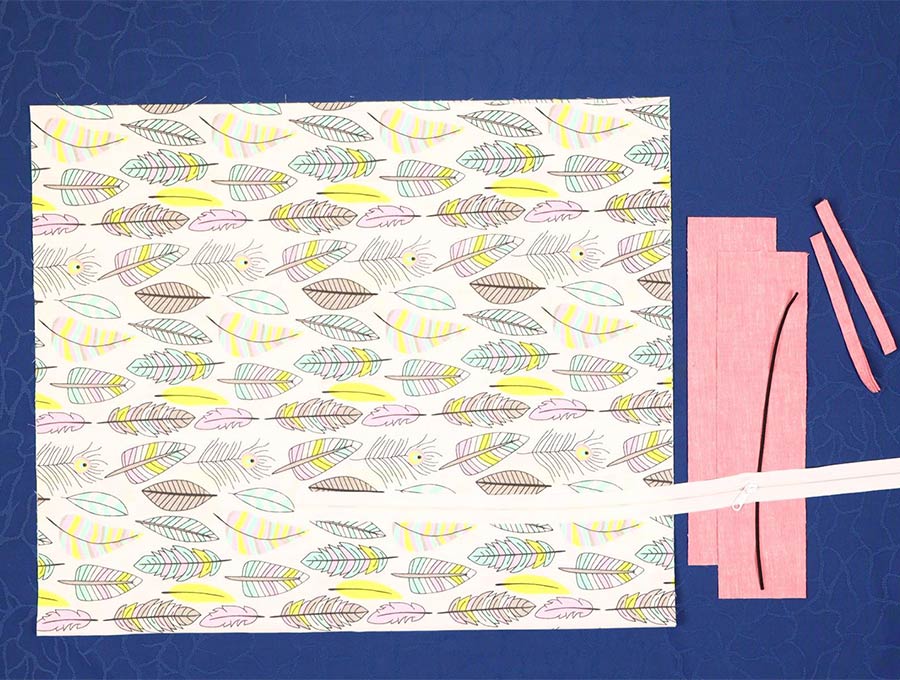
(1) 23 ¾ inch (60 cm) x 35 ½ inches (90 cm) piece of cotton fabric
(2) 3 ¼ inches (8 cm) x 11 ½ inches (29 cm) for the handles
(2) 4 3/8 inches (11 cm) x 2 inches (5 cm) for the seam covers
-
(1) 10-inch (25 cm) piece of elastic string.
- 24″ (61cm) zipper
- matching thread
- scissors (or rotary cutter and a cutting mat)
- ruler or measuring tape
- iron and ironing board
- sewing clips or pins
- a sewing machine
- erasable fabric marker
Follow us for free patterns & tutorials! [easy-profiles]
How to Sew a Travel Bag
Watch the diy travel bag video first and then follow the written step by step instructions below.
Please enjoy and don’t forget to Like and SUBSCRIBE over on YouTube to be kept up to date with new videos as they come out.
DIY Folding Compact Travel Bag VIDEO TUTORIAL
Travel Bag INSTRUCTIONS:
STEP 1:
Cut your fabrics:
- (1) 23 ¾ inch by 35 ½ inches (60 cm x 90 cm) piece of cotton fabric
- (2) 3 ¼ inches x 11 ½ inches (8 cm x 29 cm) for the handles
- (2) 4 3/8 inches x 2 inches (11 cm x 5 cm) for the seam covers
- (1) 10-inch (25 cm) piece of elastic string
- 24″ (61cm) zipper
Place your 23 ¾ inches x 35 ½ inches (60 cm x 90 cm) piece of light cotton fabric on the worktop, folded in half on the 35 ½ inch side (90cm), so you have a piece that measures 23 ¾ x 17 ¾ (60 x 90cm).
STEP 2:
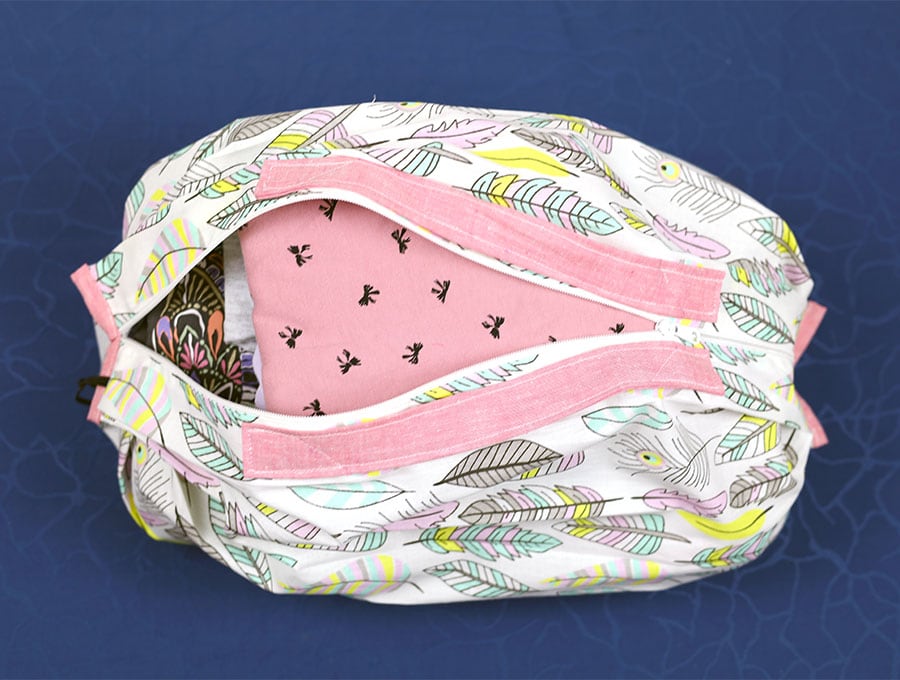
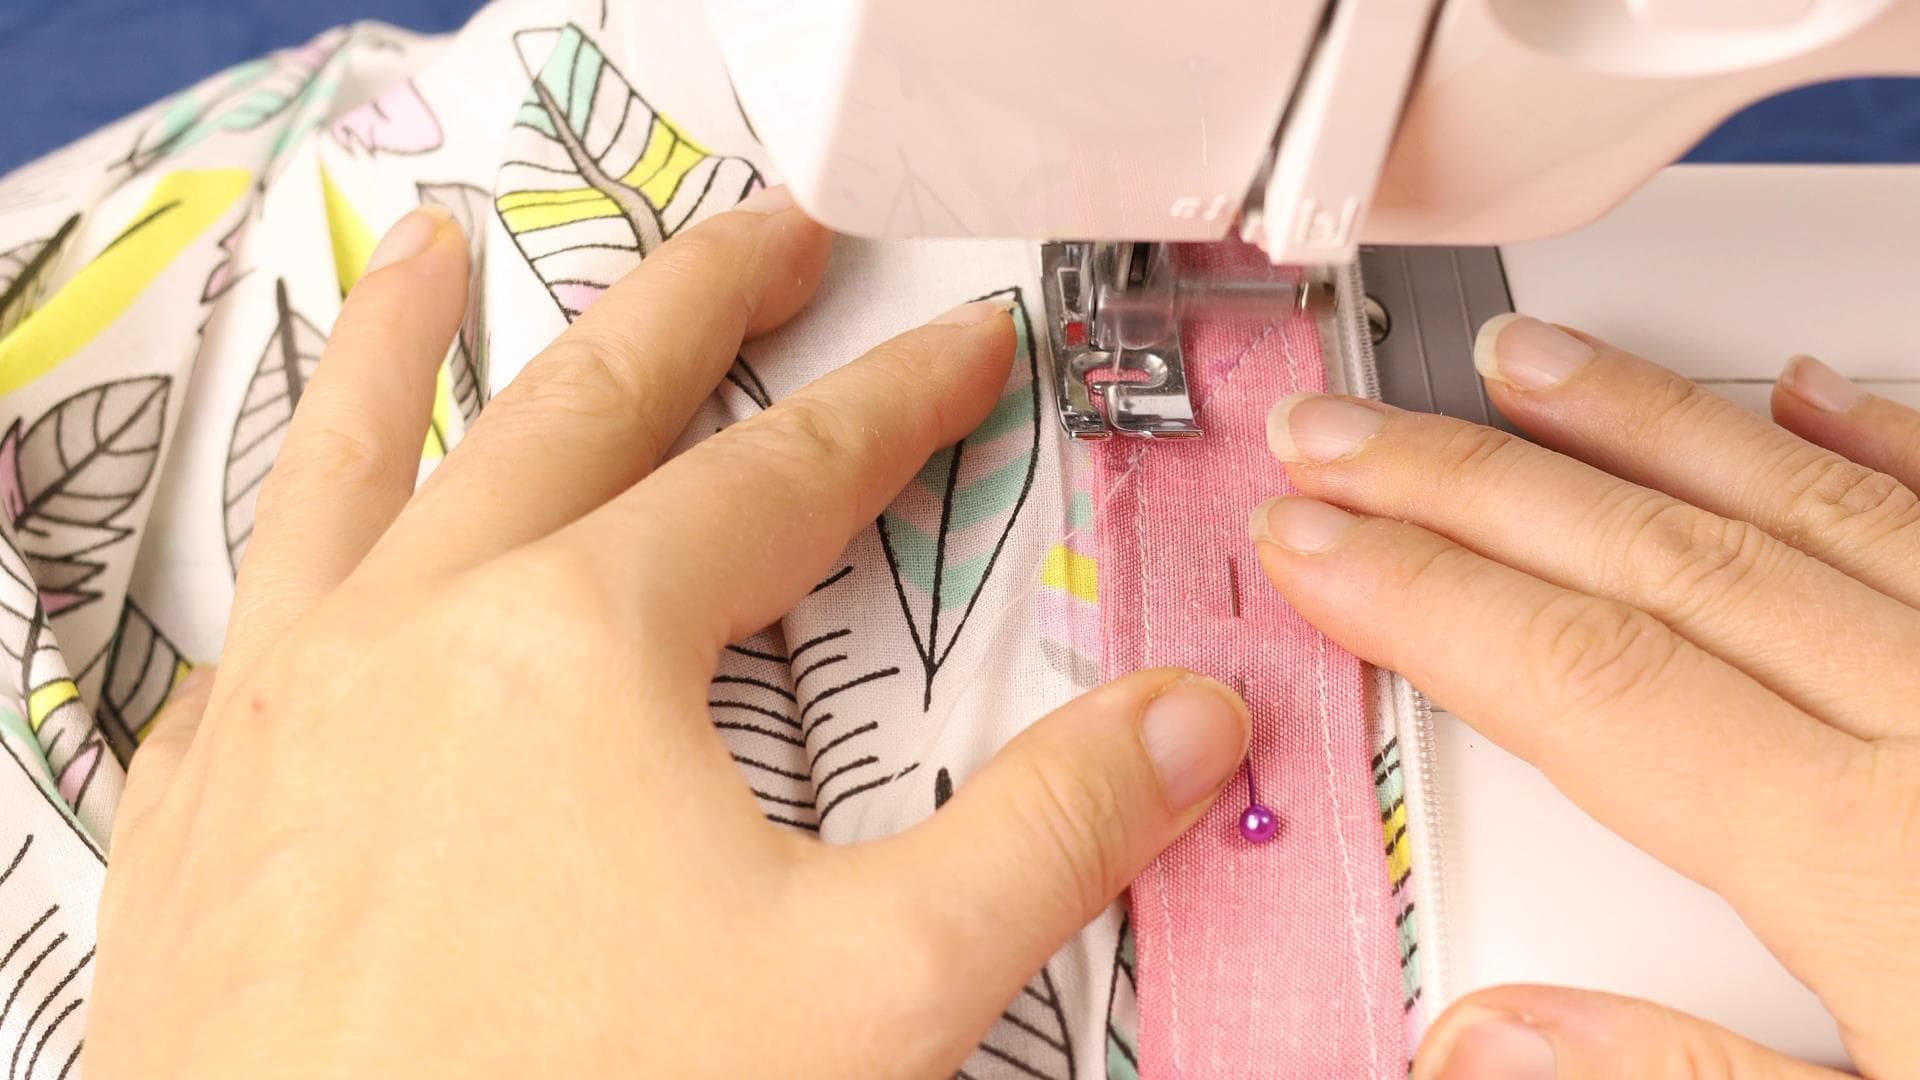
Attach the zipper. First remove the zipper pull, then pin the right side of the zipper to right side of the fabric. Sew using a zipper foot
Flip the fabric and topstitch right next to the zipper
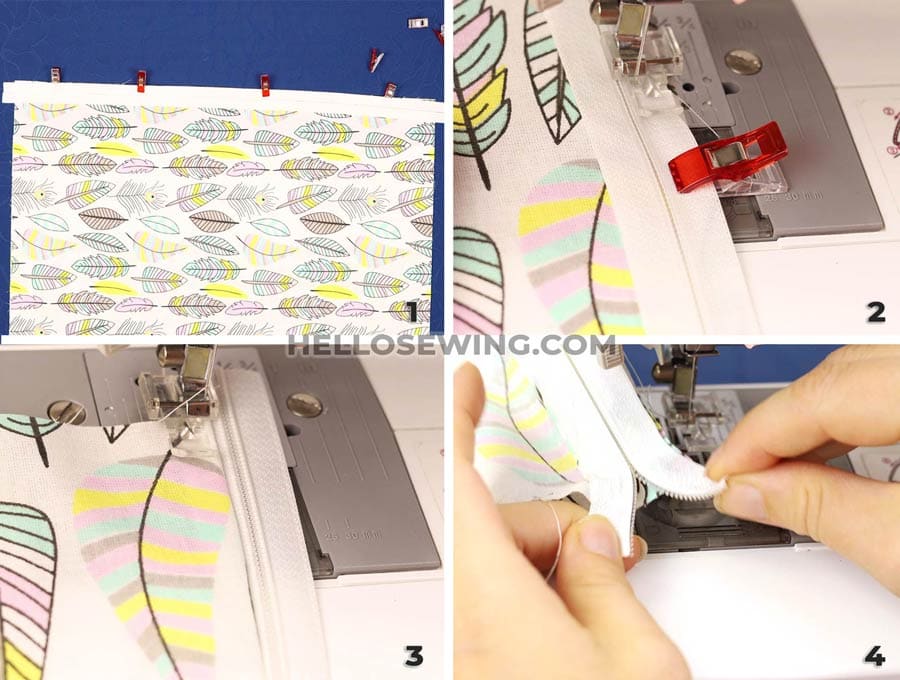
STEP 3:
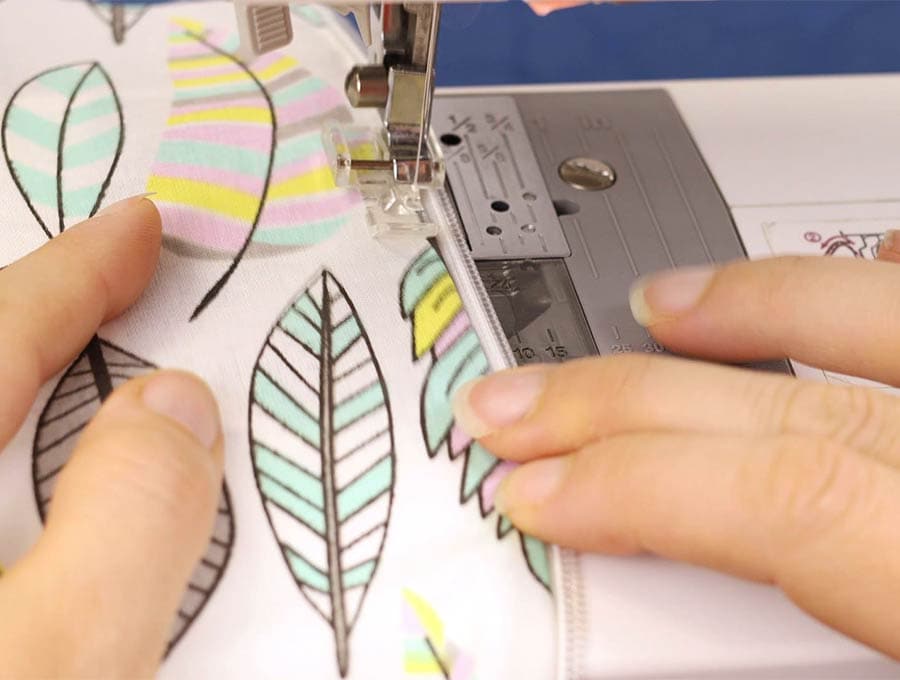
Separate the zipper and attach the other part of the zipper tape to the fabric. Flip the fabric and topstitch along the zipper
Step 4:
The next step is to create the pleats that allow the shopping bag to fold easily. Take one edge where a handle is attached. With the right side of the fabric facing the worktop, fold over the seam with the handle 2 inches (5cm) towards the middle of the fabric and press in place. Clip the ends, flip the fabric, so the wrong side of the fabric faces the worktop and make another fold 2 1/8 inches (5.5 cm) and press in place. Clip the two folds together, then flip again and create another fold by measuring 2 3/8 inches (6 cm). Press and clip, then flip to complete the last fold on the side by measuring 2 3/8 inches (6 cm), folding and clipping and then pressing.
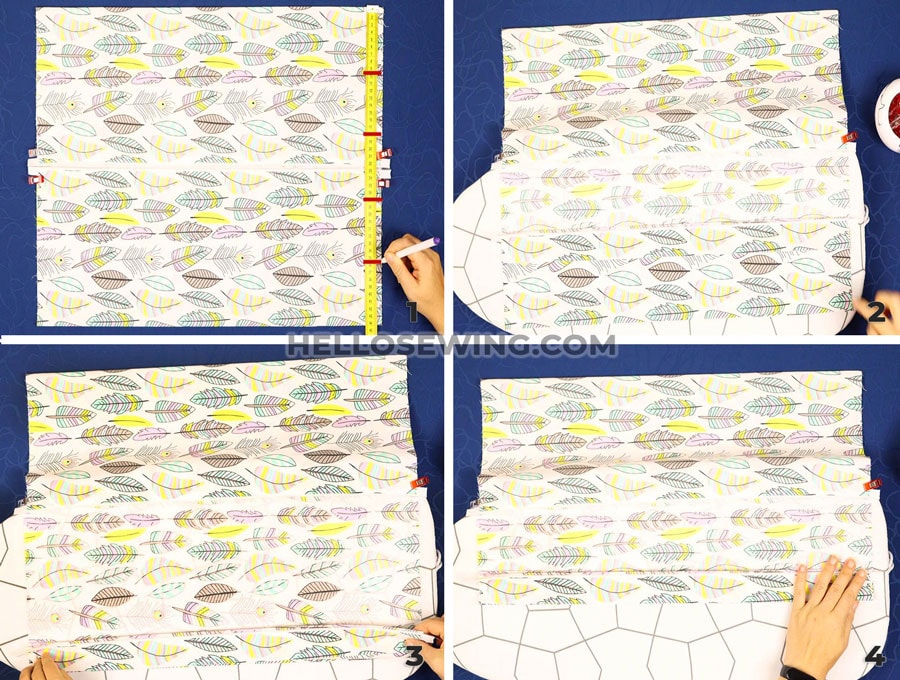
Step 5:
Repeat the previous step on the other side of the fabric, so you have two sets of folds. Place the handles parallel to the top of the worktop and with the right side of the fabric face down on the tabletop.
Step 6:
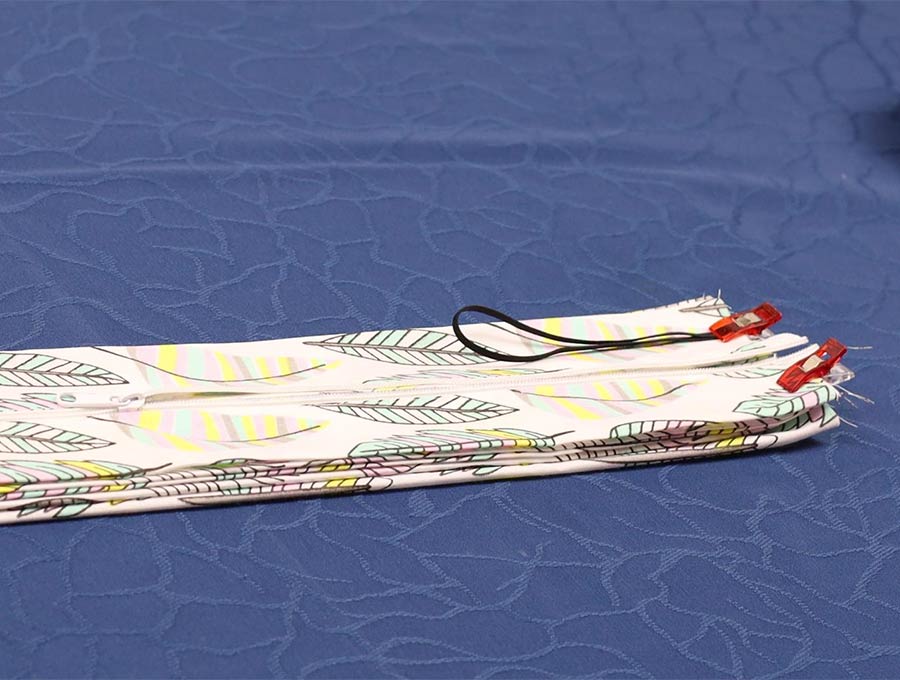
Fold the elastic in half and carefully clip the ends into place on the right-hand side, 1 inch (2.5cm) down from the corner, with the loop you created facing towards the left. Stitch over the ends of the elastic through the layers of the fold at the edge of the fabric four times, going forward and backward, to ensure the elastic string does not pull loose with use.
Step 7:
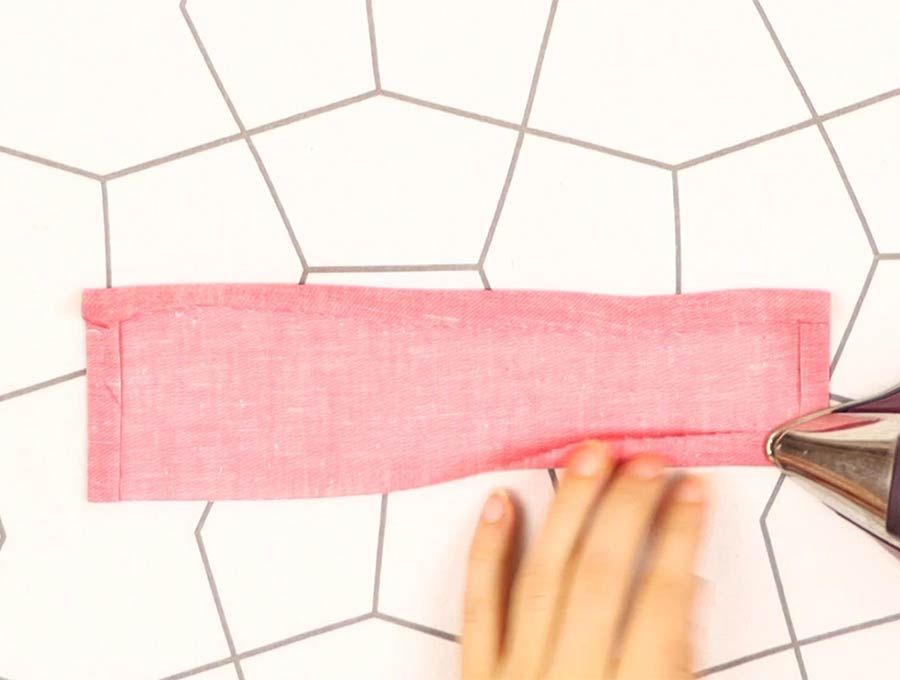
Take the two small pieces of contrasting fabric that measure 4 3/8 inches x 2 inches (11 cm x 5 cm) and press a 3/8-inch (1cm) seam on either side of the 4 3/8-inch (11 cm) side.
Step 8:
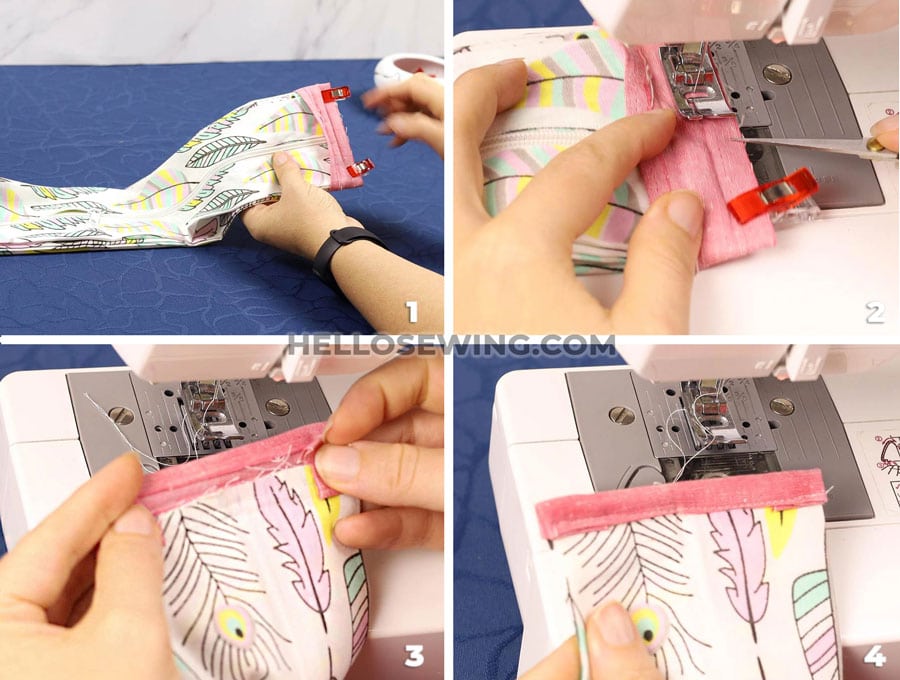
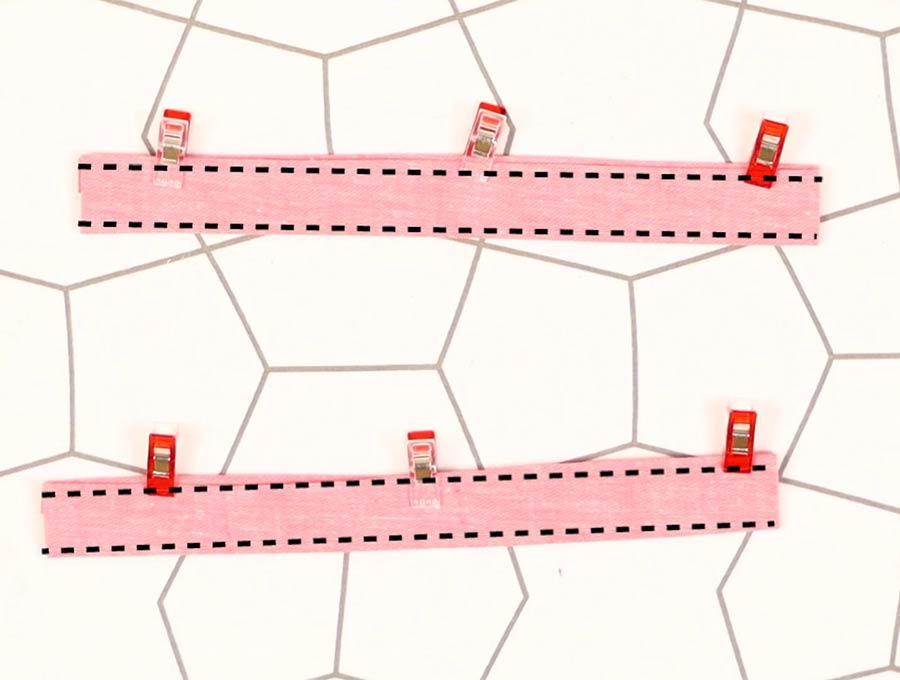
- Now, it seems wrong, but fold each piece along the middle of the length so the seams you pressed into the fabric face OUTWARDS. We usually fold over so the raw edges are hidden but not in this case. Fold both pieces as described and clip the short ends.
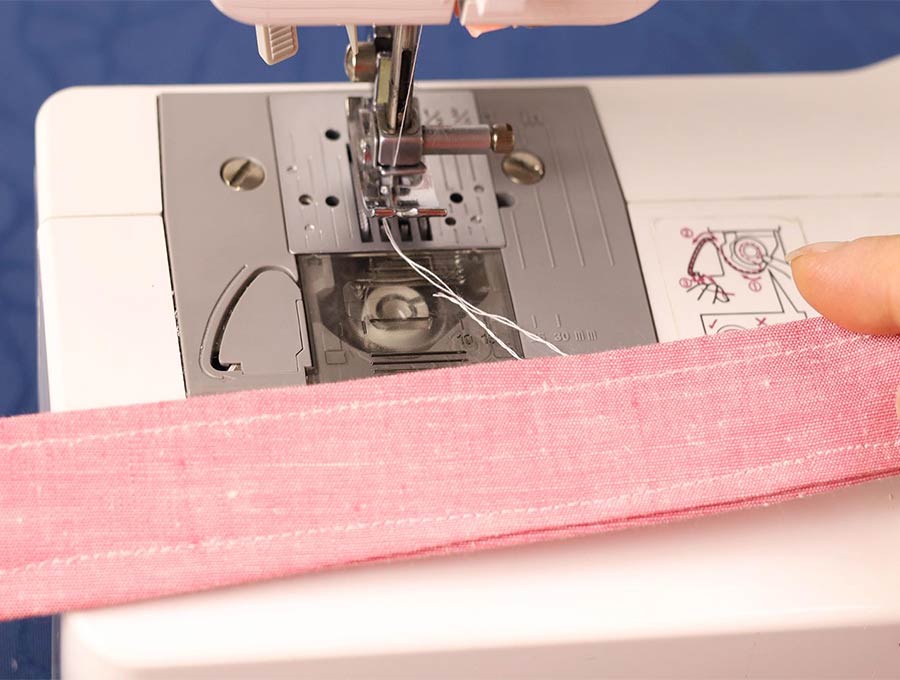
- Stitch along the short edges 3/8 inch (1 cm) from the edge, back-tacking at the start and finish.
- Turn the little pockets you created the right way out, so the raw edges are hidden. See how neat they are!
- Slip a pocket over the end of the folded bag, clip in place and stitch 1/8 inch (3mm) from the edge. Repeat with the other side of the bag. Don’t forget to back tack at the start and finish of the lines of stitching.
Step 12:
Take the two big strips of fabric and fold 3/8 inch (1 cm) over on each of the four short ends and iron in place
Step 13:
Fold each of the two handles in half along the length of fabric and press the center, then open out and fold each of the sides toward the center and press. Fold over the fabric along its length so you have four layers. Clip into place, ready for sewing.
Step 14:
Stitch along each side of the handles 1/8 inch (3mm) from the edge, back-tacking at the start and finish of each seam. Do not stitch across the short end pieces.
Step 15:

We will now work on attaching the bag handles in the correct position. Take the large piece of fabric and place it right side up on the worktop, with one of the two seams at the top. Find the center by folding it in half and marking it with a pin or an erasable fabric pen on the right side. Now find the center of one of the handles. Pin the center of the handle piece to the center of the fabric, in line with the top edge of the seam. Repeat for the other side of the fabric.
Step 16:
At the end of the handle, where it is nearest to the top of the bag, make a dot with an erasable fabric pen 1 inch (2.5cm) in from the end of the handle on each end. Repeat with the other side of the fabric where the handle is pinned in place.
Step 17:
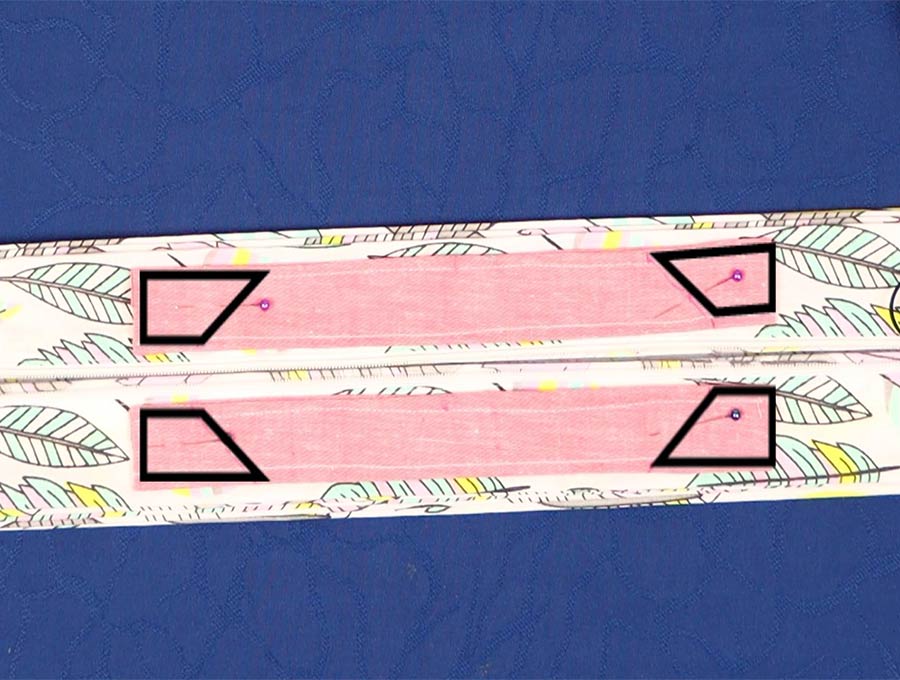
Now at the bottom of the handle on each end, make a mark 2 inches (5cm) from the edge. Use a ruler to join the mark at 1 inch (2.5cm) to the mark at 2 inches (5cm) with a diagonal line.
Step 18:
Stitch the end of the handle going from the diagonal line to the outer edges all around the handle. It will look like a rectangle with one side sloping. Repeat until both ends of the handles are joined to the fabric. When you sew the box shape, remember, for a neat finish, to leave the needle in the fabric when you want to turn the corner, lift the presser foot, swing the fabric around, then depress the presser foot and keep on sewing. Now that the handles are attached, you can remove the pins in the center that kept them in position before sewing.
Step 19:
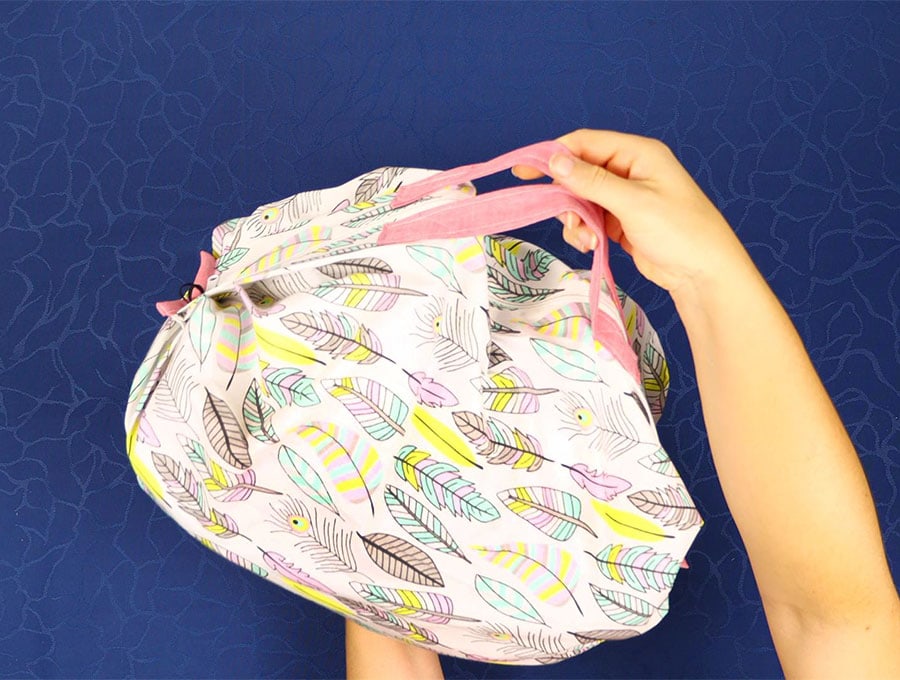
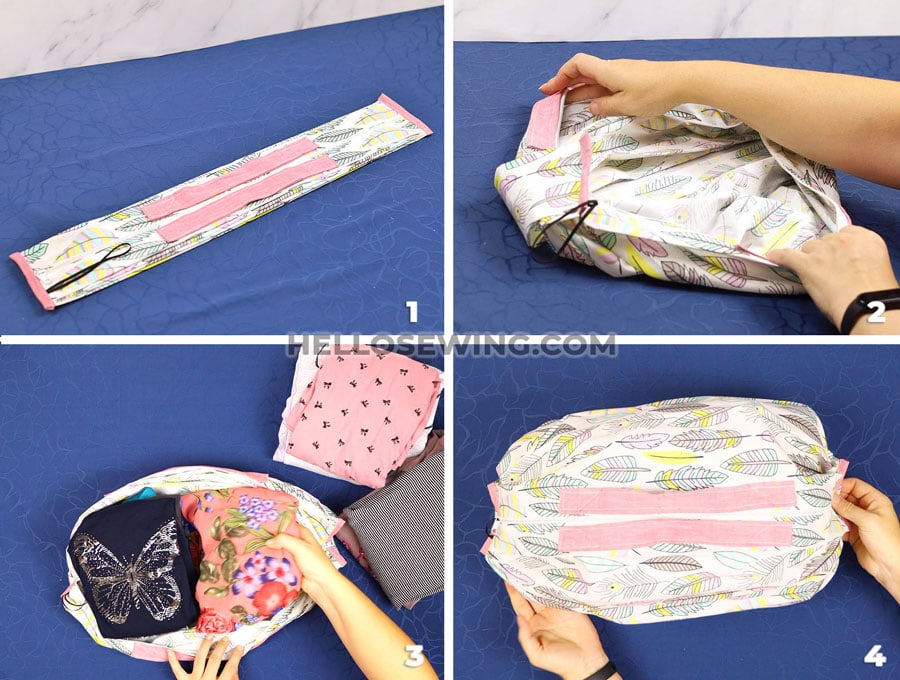
The magic happens now. Grab the handles and shake out the bag – it unfolds to a roomy size to store your shopping. When you are done, pull the ends, which will fold back into shape. Fold in half along the length, then fold over twice more, pull the elastic string out and wrap it around the shopping bag, and you have a tiny little bundle ready to store until you need it.
If you loved creating this awesome little shopping bag, hit our subscribe button. You don’t want to miss out on the valuable ideas we have coming up. These shopping bags make adorable gifts. Best of all, you will know you are doing your bit to reduce single-use plastics by creating these DIY foldable shopping bags.
Do you like this? Pin for later:
Wanna be friends? Click HERE and follow me on Pinterest
RELATED:
Handy, durable market bag – durable enough to become your go-to bag for your daily errands, but fashionable enough to take with you on lunch dates or to a night on the town.