
Easy Fillable Fabric Eggs – Pattern in 10 Sizes / Easter Decor
Our fillable fabric eggs are just what you need for Easter, or more to the point what the kids need! These can be made in 10 different sizes, in a number of fabric combinations, and have free printable patterns in all the sizes. So, whether the kids are filling a large one with their loot from the Easter egg hunt, or whether you are placing a few eggs in a smaller one to place on a pillow, or taking Easter gifts to the homes of relatives and friends, there’s a size for suit everyone.
These fillable fabric eggs are the perfect way to use up those smaller pieces in your stash, and if made from organic cotton are sustainable. They will last for years and can be reused each Easter, and when they are done simply cut up the cotton into strips and return it to the earth to break down and improve the soil.
The easiest way to sew fillable fabric eggs. It’s super quick sew – I made all 10 eggs in less than an hour! They are perfect for some small toys and gifts, but you can also use them as cutlery holders, table toppers, placemats, mugrugs, garlands, and what not!

These reusable eggs are so simple to sew that you can even sew them by hand. The small ones have a single seam and the bigger sizes – just 2 seams. One of the easiest things you can make. Just grab some fabric scraps and my fillable eggs sewing pattern and let’s get sewingMake the little ones happy this Easter!
Below you will find my step by step written tutorial with VIDEO instructions for all the visual learners.
We occasionally link to goods offered by vendors to help the reader find relevant products. Some of the links may be affiliate meaning we earn a small commission if an item is purchased.
Table of Contents
How to make the easy fillable fabric eggs
Supplies and tools
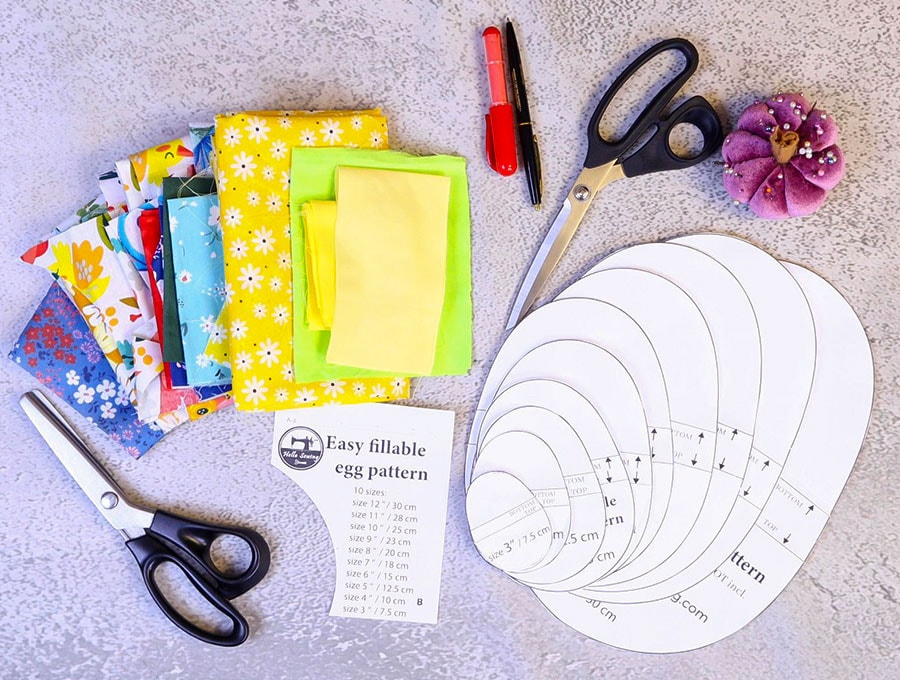
- fabric – mix and match fabric scraps
- matching thread
- scissors (or rotary cutter and a cutting mat)
- ruler or measuring tape
- iron and ironing board
- sewing clips or pins
DOWNLOAD: Easy fillable fabric eggs in 10 sizes pattern [Free pdf file]
Follow us for free patterns & tutorials! [easy-profiles]
How to Sew an Easy fillable fabric egg
Watch the diy easy fillable fabric eggs video first and then follow the written step by step instructions below.
Please enjoy and don’t forget to Like and SUBSCRIBE over on YouTube to be kept up to date with new videos as they come out.
Easy fillable fabric eggs VIDEO TUTORIAL
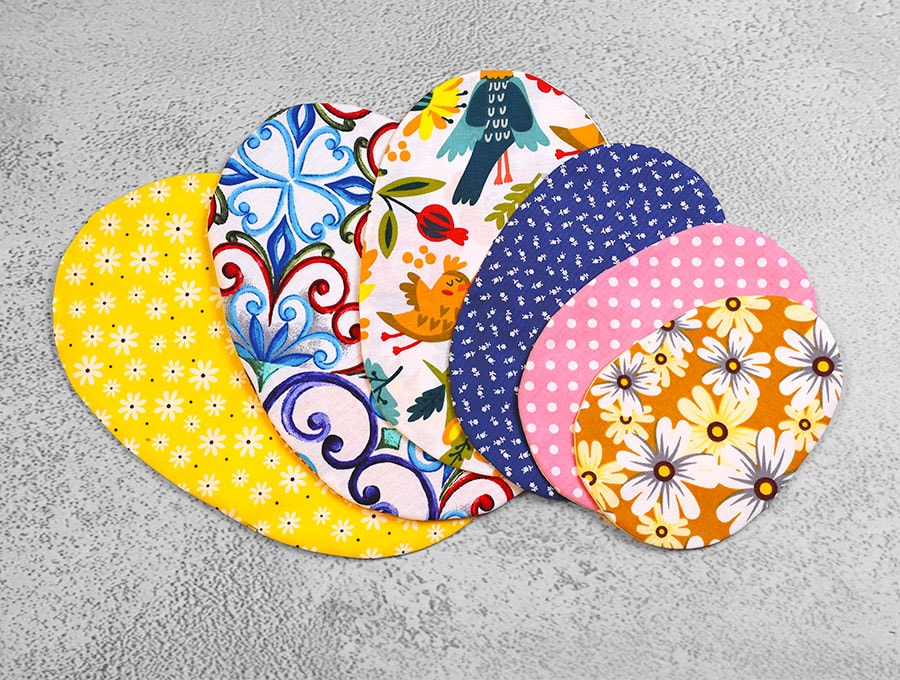
Finished size:
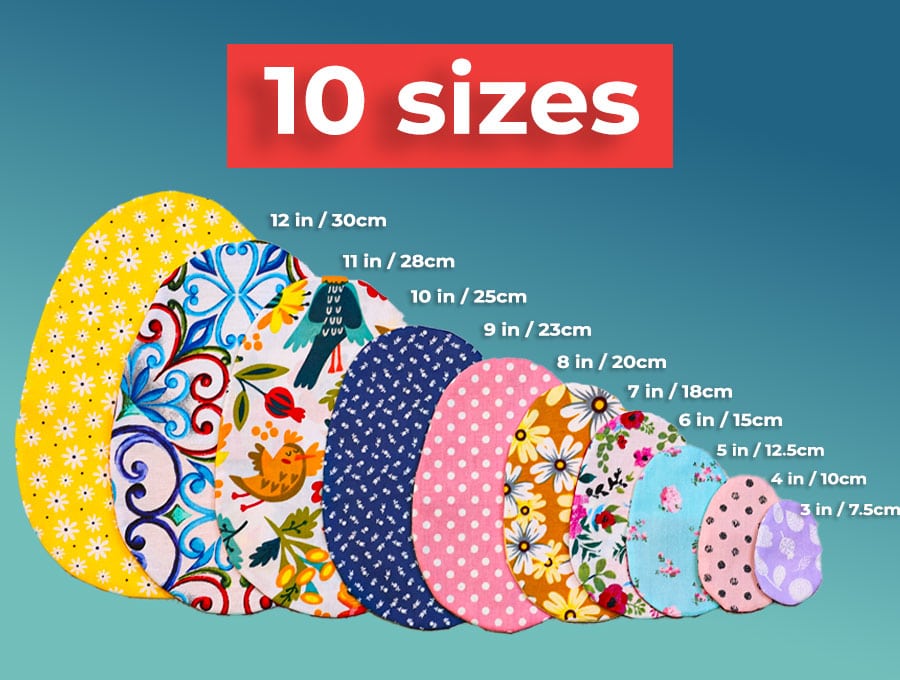
- size 12′′ / 30 cm
- size 11′′ / 28 cm
- size 10′′ / 25 cm
- size 9′′ / 23 cm
- size 8′′ / 20 cm
- size 7′′ / 18 cm
- size 6 ′′ / 15 cm
- size 5′′ / 12.5 cm
- size 4′′ / 10 cm
- size 3′′ / 7.5 cm
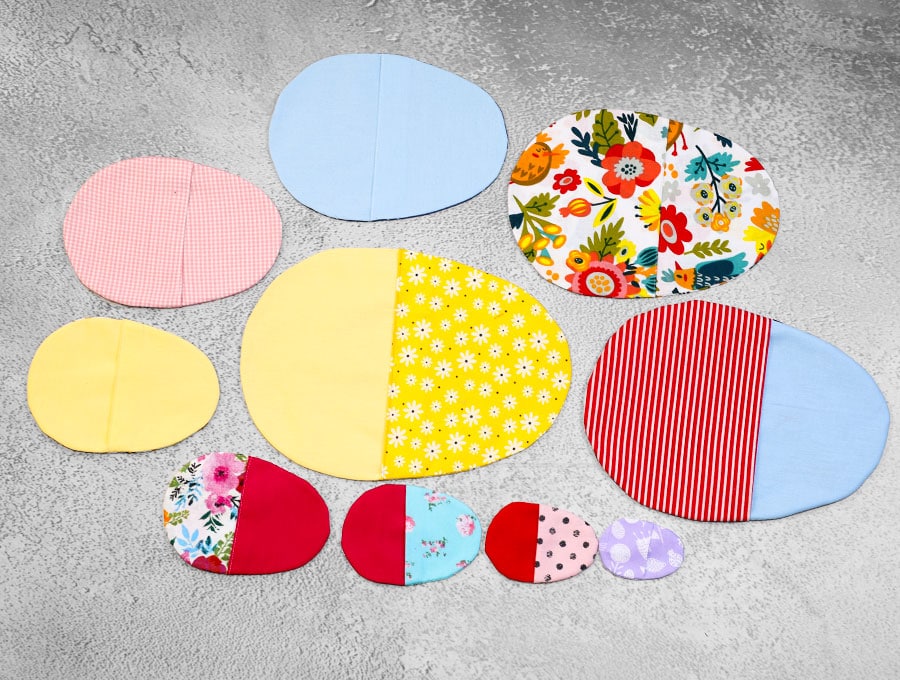
Colour options:
- Make the whole egg from a single color.
- Make the top and pocket different from the front.
- Make the top different, but front and bottom from the same color.
- Make the pocket different.
- If you are short on fabric you could even stitch a couple of pieces together for the top, pocket and front, creating a patchwork egg
Trimming options to reduce bulk when turning the right way out:
- Trim around the edges with pinking shears.
- Cut v-notches into the ¼ inch (6 mm) seam allowance.
- Trim close to the seam with regular scissors.
Topstitching the fabrics on the top and bottom of the egg is optional but I do recommend it for sizes larger than 5 inches (12.5 cm)
INSTRUCTIONS:
STEP 1:
Print out the free Fillable Easter Egg pattern from HelloSewing.com and select the sizes you want to make, then cut these out. You will see the pattern has a fold in the middle of the egg with two lines marked. For the top piece fold on the second line down from the curved end. For the bottom piece fold on the second line up from the curved end.
STEP 2:
Assemble your fabrics, wrong side up, then make sure you can fold one piece of fabric in half to accommodate the size of the top pattern piece. Line the patterns straight edge once you have folded it as described in Step 1, then make sure you have 3/8 of an inch (1 cm) available on each side and around the top of the curve. Do the same with the bottom pattern piece.
STEP 3:
Before cutting, stitch a line 1/8 of an inch (3 mm) from the edge of the fold on both the top and bottom pieces.
STEP 4:
Take a piece of fabric that will accommodate the size of the whole egg pattern with no folding and place it right side up on your worktop. Over it place the bottom pattern piece folded to the second line up, allowing for the 3/8 of an inch (1 cm) seam allowance and mark the ends of the line.
STEP 5:
Place the bottom piece you stitched in Step 3 over the bottom of the whole piece, lining up the fold with the marks you made in the previous step.
STEP 6:
Place the bottom paper pattern piece over the layers, then over that the top piece you stitched, fold towards the middle of the egg and line up with the lower line, then pin on each side, before using a fabric marking pen to draw around the curve of the lower egg.
STEP 7:
Remove the pattern piece and place on top and draw around the edge for the top piece, making sure the upper line is in line with the fold of the top half of the egg.
STEP 8:
Pin the fabric together on the inside of the egg shape, then stitch around the edge, backtacking where the top and bottom pieces overlap as these will take strain as the eggs are inserted and removed.
OPTION: It is recommended you place the bottom pocket down first, as shown in the image above, to prevent any eggs from falling out. Our instruction show the top pocket going over the bottom pocket to hold the items in place, but you could also place the top piece first and then the bottom piece so the top tucks under the bottom piece – it’s a matter of personal preference. All you would do is to place the bottom piece over the top piece where they overlap and pin.
STEP 9:
Use one of the trim options mentioned at the start of the tutorial. Personally, I prefer to use the pinking shears for the zigzag edge, cutting fairly close to the stitch line.
STEP 10:
Turn the egg the right way out by pulling the fabric through the overlapping opening at the front, pushing out the curves with a blunt turning tool or chopstick, then give the whole egg a press.
STEP 11:
If the fabric egg is the 5 inch (12.5 cm) size or larger I strongly suggest topstitching all around the edge of the egg 1/8 of an inch (3 mm) from the edge to give it a neat finish, and to keep it firm.
All that remains now is to load your fillable Easter egg with the real chocolate eggs and treats, or small toys, for a sweet Easter surprize. If you are going to be making a few of these I suggest batch producing instead of doing one at a time – just follow the steps given, but make a few sizes at each step.
Easter is almost here and whether you want to load our fillable fabric Easter eggs with sweet surprises, tiny toys, or chocolate eggs, you need to start sewing. These are quick to make – honestly, explaining the steps takes longer than sewing them. The bonus is you don’t need anything special, just the fabric scraps from your stash, to create some fun Easter memories.
The Easy fillable easter eggs pattern comes in 10 sizes, from 3 inches (7.5 cm), to maybe accommodate a gift of jewellery, and one Easter egg, to a whopping 12 inches (30 cm) to stash all the Easter egg hunt treats, plus a cute stuffed bunny or chick. This season, forget the plastic derived from petrochemicals, and go for sustainable cotton.
Remember, give us a like and subscribe to join our happy band of almost 100,000 keen sewists who love getting their updates straight to their inboxes so they don’t miss out on our projects. Remember we have in excess of 780 video tutorials to choose from. You are bound to find a whole lot of inspiration!
Do you like this? Pin for later:
Wanna be friends? Click HERE and follow me on Pinterest
RELATED: