
How to Make a Unicorn | Free Unicorn Pattern & Tutorial
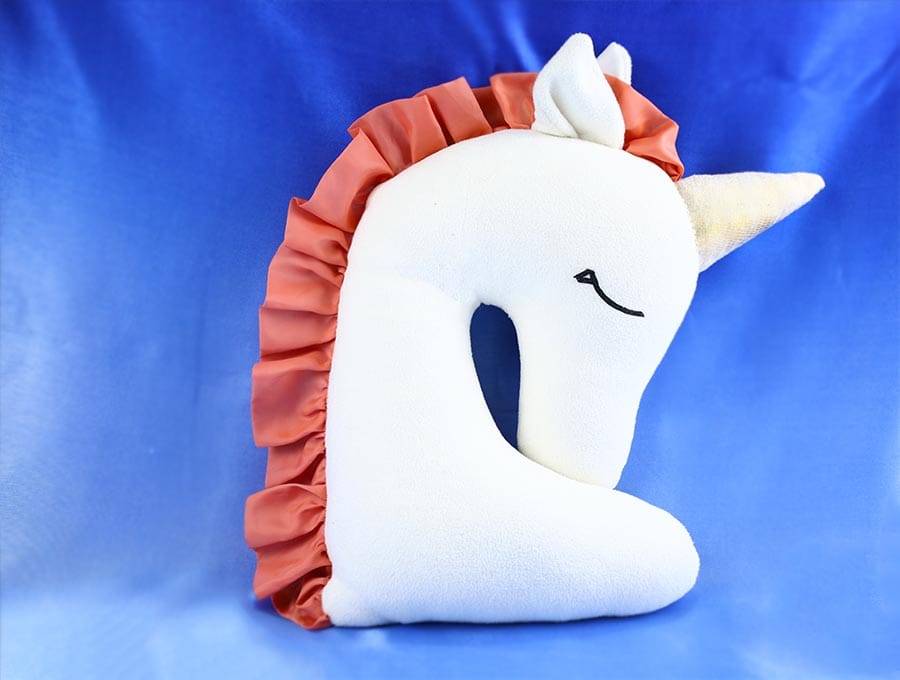
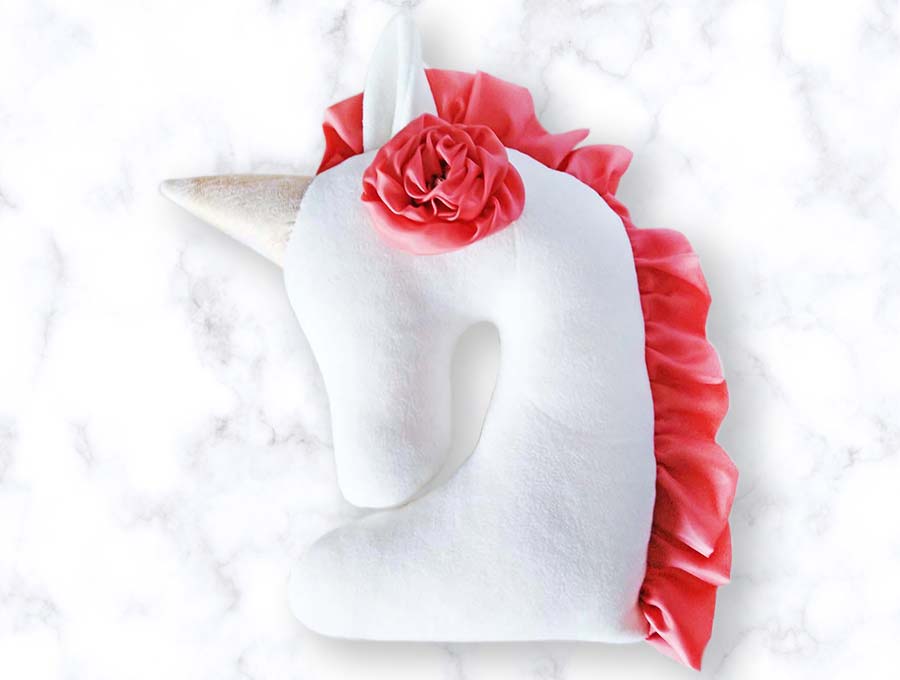
This unicorn sewing pattern will make a plush toy that small kids can comfortably hold, or it can sit on a bed as an extra small cushion. It doesn’t have fiddly legs or gussets, so it is super easy to make, with its satin mane and golden horn. The Unicorn plush patterns could be made in pairs so when a child has a friend over they can play imaginative games, talking through their unicorn pals. Our step-by-step tutorial with photos will guide you through how to make a unicorn. Download and print the unicorn pattern, assemble a pretty piece of satin for the mane and a piece of thin black satin ribbon for the eyes and some plush material and you’re ready to go.
I would suggest making two pieces of the pattern for the head, simply because it is a bit difficult to cut through two layers of plush accurately when you fold it. When you place the pattern pieces make sure the two noses of the unicorn pattern pieces face each other so you can place right side to right side for sewing. It’s a rookie error most people make at some time when starting out with sewing of cutting two pieces facing the same way. Imagine you have two left sides for a top you are making – oops! It is a mistake a beginner sewist only makes once.

The unicorn illustrated is in white but you can make it in any pastel color to suit the choices of a youngster, or to match the theme of a party. The mane can be pink, blue, sea green, orange or red – heaver color takes the fancy of the child it is intended for, and the inside of the ears can be given the same color satin lining as the mane to give a cohesive look to the toy. You’ll see for this pattern we have 2 pieces for the ears – the outer for the two ears cut from plush. If you rather want to do the inner ear from satin to match the mane that is fine, only cut two outer ear pieces from plush and cut two smaller pieces from the satin.
Let’s get started with this unicorn plush toy, which, depending on how fast you work, should not take more than 40 minutes from start to finish.
Below you will find my step by step written tutorial with VIDEO instructions for all the visual learners.
We occasionally link to goods offered by vendors to help the reader find relevant products. Some of the links may be affiliate meaning we earn a small commission if an item is purchased.
Table of Contents
- 1 How to Make a Unicorn
- 2 Supplies and tools
- 3 How to Sew a Unicorn
- 3.1 Unicorn Plush Toy INSTRUCTIONS:
- 3.2 STEP 1: Prepare the unicorn sewing pattern
- 3.3 STEP 2: Cut the fabrics
- 3.4 STEP 3: Pin the ears
- 3.5 STEP 4: Stitch the ears
- 3.6 STEP 5: Turn the ears around
- 3.7 STEP 6: Make the mane
- 3.8 STEP 7: Layer the head pieces
- 3.9 STEP 8: Stitch the head
- 3.10 STEP 9: Finish making the head
- 3.11 STEP 10: Prepare the horn
- 3.12 STEP 11: Turn the unicorn pillow around
- 3.13 STEP 12: Stuff the unicorn pillow
- 3.14 STEP 13: Stuff and attach the horn
- 3.15 STEP 14: Add eyes and eyelashes
- 4 Unicorn Plush Toy OPTIONS:
How to Make a Unicorn
Supplies and tools
- fabric – plush for the body and ears
- fabric – satin (you can also use silk or chiffon) for the mane
- fabric – golden accent fabric for the horn
- 1/8″ (3mm) black satin ribbon for the eyes
- free unicorn plush pattern (below)
- matching thread
- scissors (or rotary cutter and a cutting mat)
- ruler or measuring tape
- iron and ironing board
- sewing clips or pins
- sewing machine
DOWNLOAD: Unicorn sewing pattern (Free PDF file)
Follow us for free patterns & tutorials! [easy-profiles]
How to Sew a Unicorn
Unicorn Plush Toy INSTRUCTIONS:
STEP 1: Prepare the unicorn sewing pattern
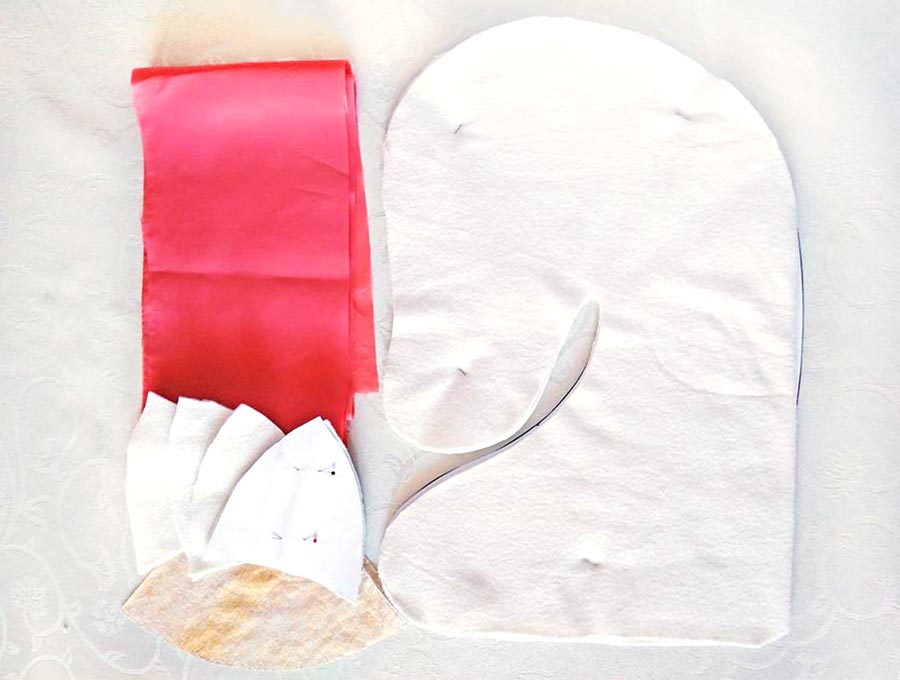
Download the unicorn plush pattern on your computer and print at 100% (no scaling) using Adobe Reader or similar program. The unicorn pattern consists of 5 pages. Assemble them according to the pattern assembly instructions on page 2. DO NOT print the unicorn sewing pattern directly from the browser as this will skew it.
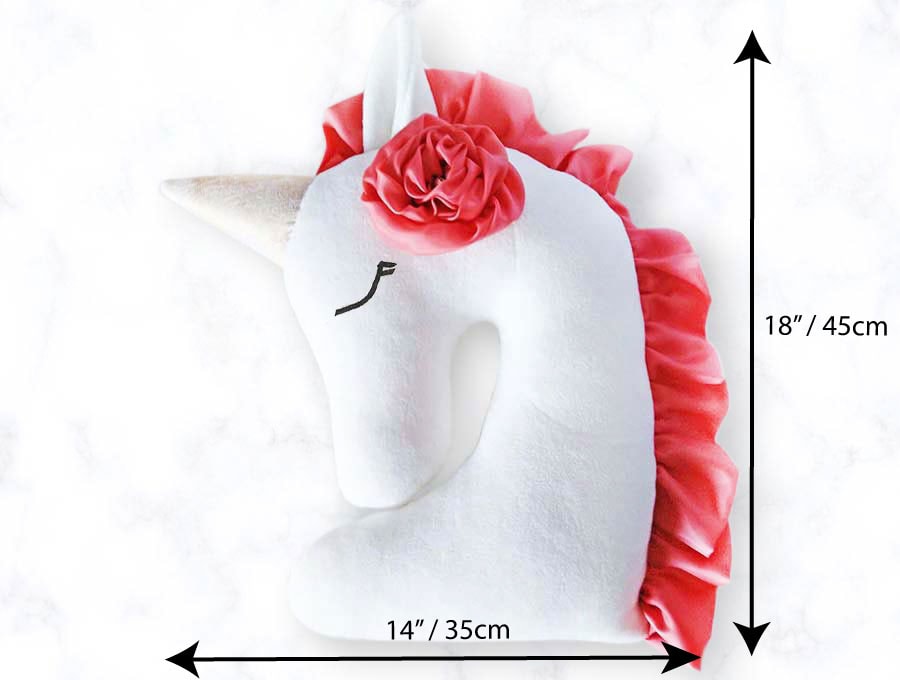
Finished size of the unicorn plush pillow toy: appx: 18 x 14 inches / 45 x 35cm (including horn, mane and ears)
You can slightly enlarge or shrink the pattern to make the unicorn larger or smaller
STEP 2: Cut the fabrics
Lay out the pattern pieces on the plush material, utilizing your fabric economically and making sure you have a left and right side for the main head piece. Cut out the pattern pieces after having pinned them in place so they don’t move when cutting.
STEP 3: Pin the ears
Lay the plush fabric for the ears right side to right side and pin in position.
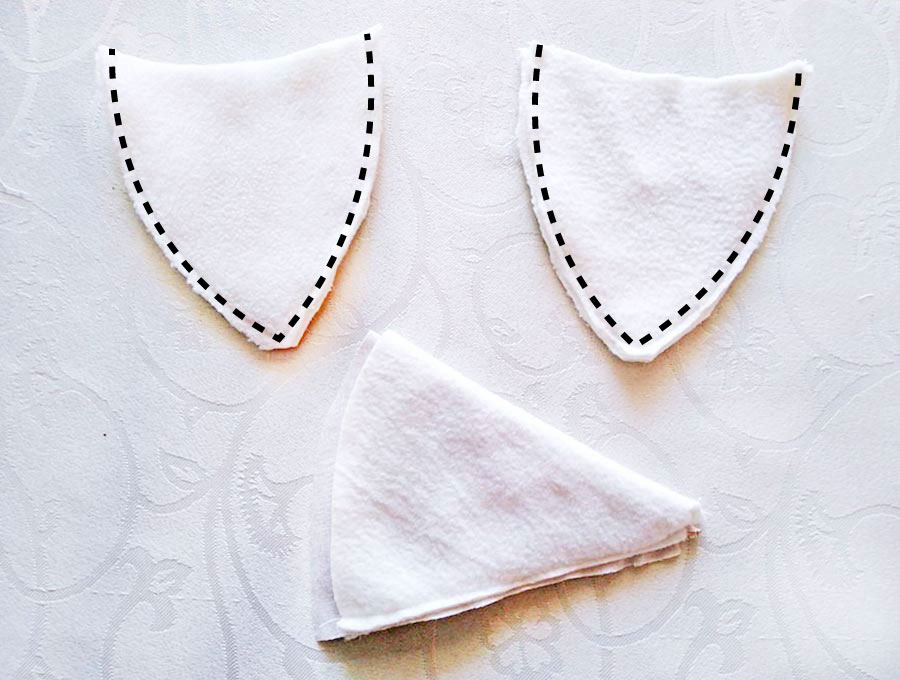
STEP 4: Stitch the ears
Stitch around the edge of both of the ears, leaving the bottom edge unstitched as shown on the image above.
STEP 5: Turn the ears around
Cut across the corner at the point of the ear – not too close to the stitch line. This is to reduce bulk when you turn the ear. Now turn both ears, carefully poking out the ends with a knitting needle or a chopstick. Fold the ear in half once it is turned right way out and pin, then set the ears aside as you will be attaching them later.
STEP 6: Make the mane
Cut a 44 inch x 5 inch (112 x 13cm) piece of satin for the mane, fold it right way out along the length of the fabric and set your machine stitch to its longest length. Stitch two lines parallel to each other ¼ inch (6mm) from the edge, leaving the thread where you started and ended fairly long. Now use those ends to gently pull the satin into an even gather along its length so it ends up at around 22 inches (66cm).
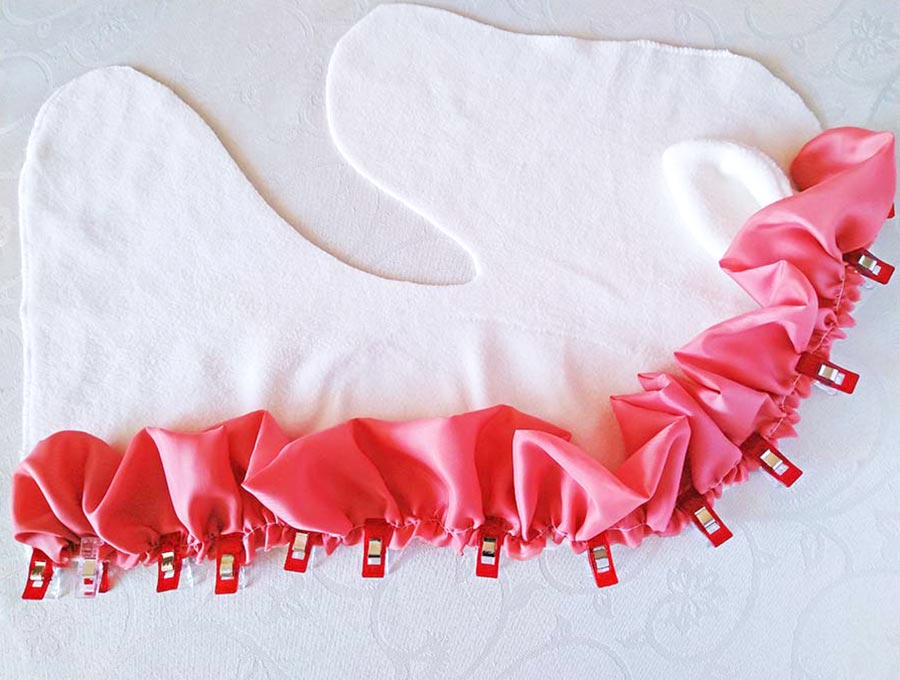
STEP 7: Layer the head pieces
Lay one piece of the unicorn head on your table right side up. Place one of the ears in the position on the head as indicated on the main pattern piece and pin in place. The folded edge should be facing the top of the head and the raw edges of the ear facing the raw edge of the plush fabric. Now pin or clip the mane to the edge of the plush fabric with the raw edges facing the edge of the pattern piece. Starting just before the ear placement and ending at the bottom of the curve of the neck.
Now pin the other ear over the mane in line with the first ear you pinned in position.
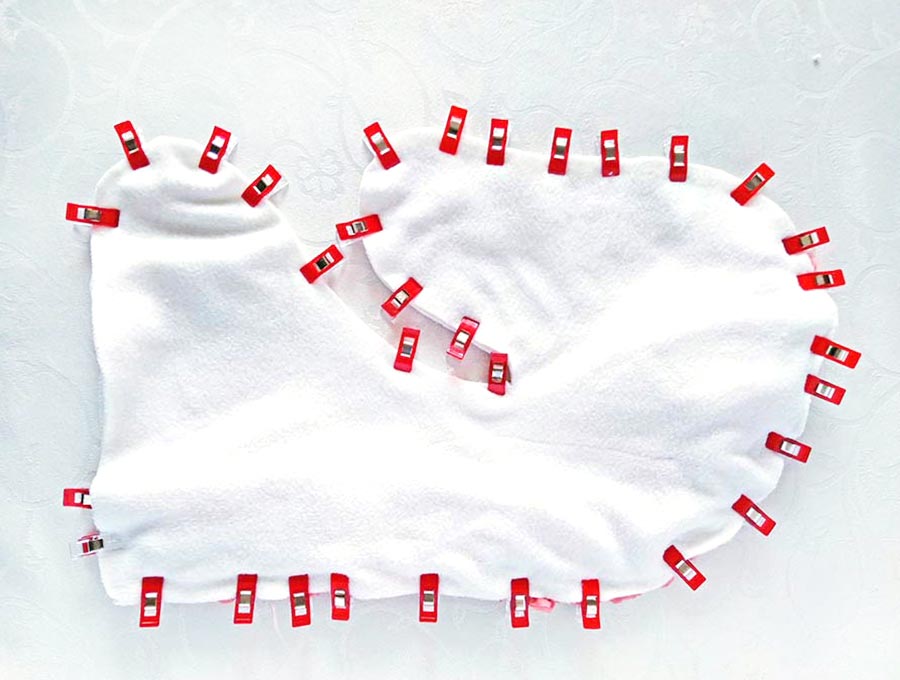
STEP 8: Stitch the head
Stich over the ears and mane, removing pins as you go, and going over the ears twice as there are a lot of layers of fabric there.
STEP 9: Finish making the head
Once all the pins are removed, lay the second side of the head over the first side, wrong side up and line up neatly, then pin in position, before sewing right around the head, leaving a 3 inch (8cm) area at the middle of the base open, so you can turn the unicorn pillow toy.
STEP 10: Prepare the horn
Take the triangular piece for the horn and fold over with the right side inside and stitch along the straight edge. Clip the top and turn it right way out so you have the horn ready to stuff.
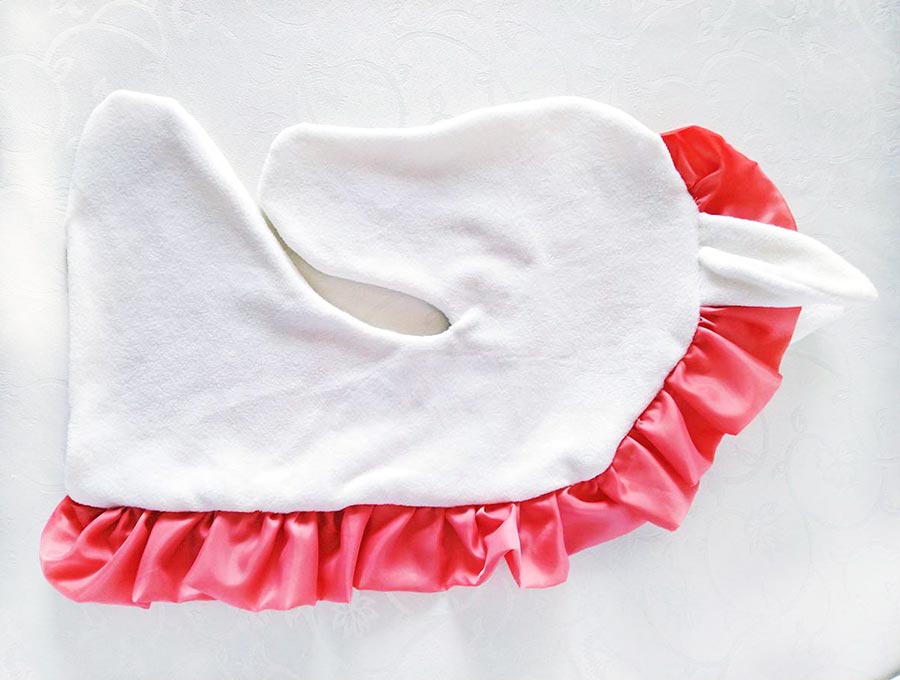
STEP 11: Turn the unicorn pillow around
Clip all curves of the unicorn head being careful not to cut through your stitching. Turn the main head piece out, making sure you have not missed stitching any section of the mane or ears. (If you did miss a section then, turn to the wrong side again and go back and restitch over that area.)
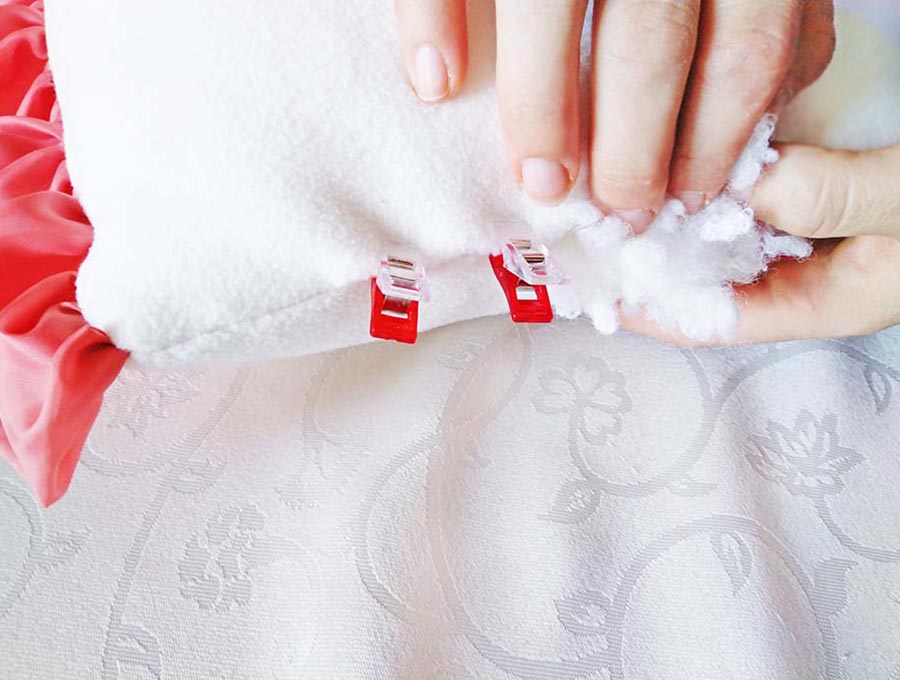
STEP 12: Stuff the unicorn pillow
Now the unicorn pillow is ready to stuff – make sure you push the stuffing to the edges so it is nice and even and firmly stuffed. Once that is done, hand stitch the edges of the 3 inch (8cm) opening closed using an invisible stitch – it’s not so much ‘invisible’ but a way of making very small stitches that will be hidden in the plush, and pushing the needle along inside the fabric before making the next tiny stitch. If you’re not sure how to do this, simply take a look at the back of a man’s tie to see how it’s done.
STEP 13: Stuff and attach the horn
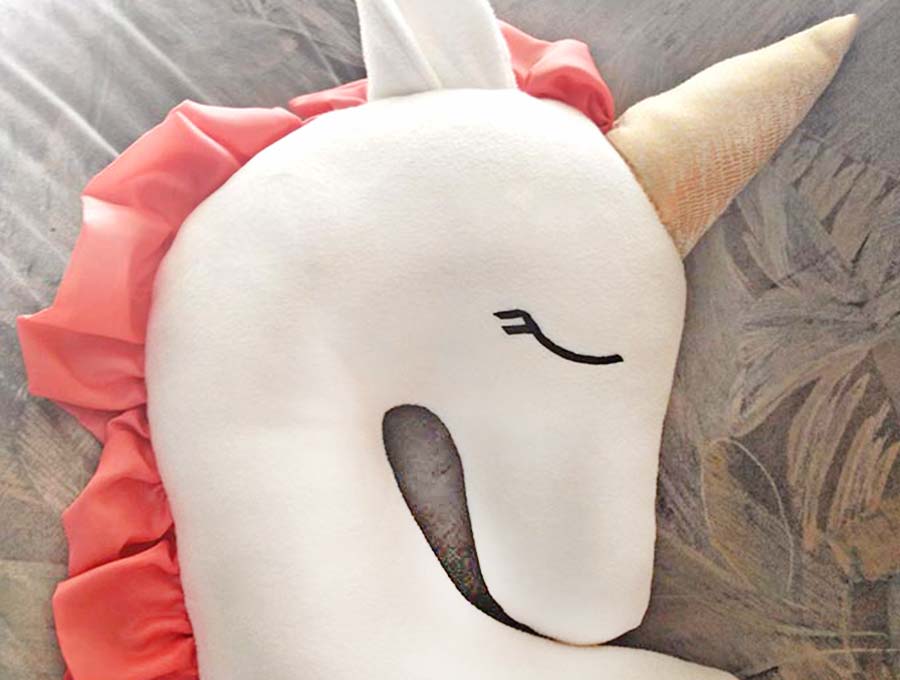
Time to stuff the horn now, making sure the filling reaches right to the tip of the horn and that it is firm and conical in shape. To add the horn to the head fold over a ¼ inch section at the base of the horn and pin in place on the head. Using the same invisible stitches attach to the head, as indicated in the photo.
STEP 14: Add eyes and eyelashes
Finishing touches – all you need to do now is add the little pieces of ribbon for the eyes of the sleeping unicorn. Cut a 2 1/4 inch
(5.5cm) piece of black ribbon and place in a curved position on the head – move the piece a little up or down until you have the perfect position for the eye, then use fabric glue to glue it in position, or stitch in place with the same invisible stitches you used to attach the horn. Remember to use black cotton for this. Add a couple of eyelashes in position cut from smaller strips of ribbon and either glue or stitch the one end down, closest to the bar of ribbon, leaving the other end loose and ‘fluttery’ for the eyelash. Repeat for the other side of the head.
Unicorns are a huge theme for parties, and you will create a memorable event if you give out goodie bags with a unicorn pillow toy to each child to take home, and reduce the amount of candy, for a healthier overall take-home treat bag. Once you have made the first one you can churn these unicorn pillow toys out fairly quickly.
Unicorn Plush Toy OPTIONS:
Add a rose: There is an optional rose you can place on the neck of the unicorn. The tutorial for that is available here https://hellosewing.com/diy-fabric-rose/ however, I would suggest substituting the pearl beads in the center of the rose with a couple of twists of thin 3mm yellow ribbon. This is to avoid toddlers removing and accidentally swallowing the beads! For older children beads are fine to use.
Do you like this? Pin for later:
Wanna be friends? Click HERE and follow me on Pinterest
RELATED: