
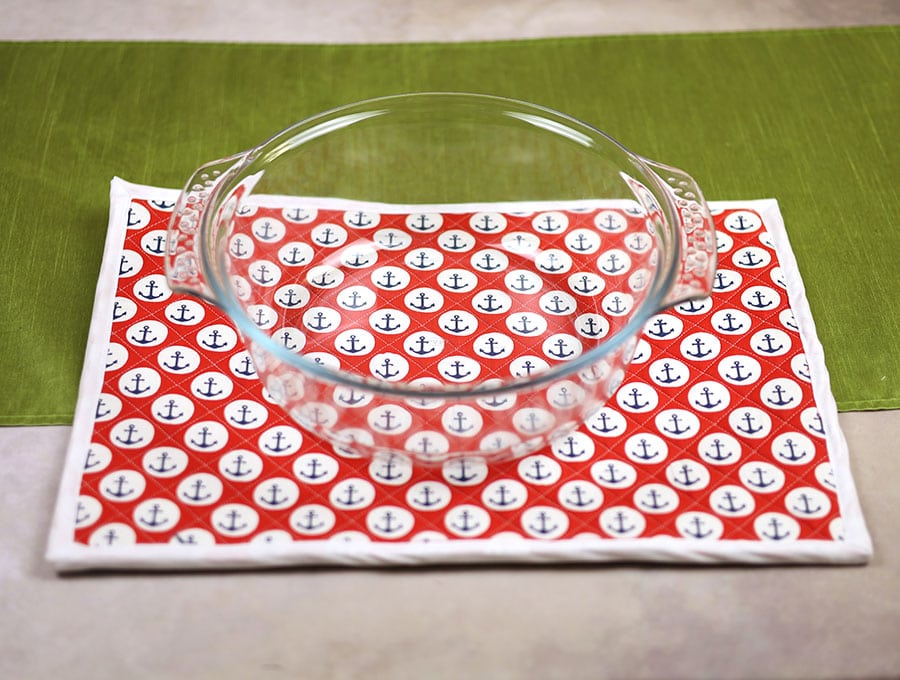
Large Casserole Hot Pad
Start sewing this large casserole hot pad as a welcome gift for many occasions. Sewists know that in order to get everything ready for the big occasions you need to start early as there is never enough time. This large casserole hot pad is perfect for protecting your table, is reusable, washable and sustainable. I can’t count how many metal casserole holders I have had to ditch when the metal started looking tacky – such a waste. If you make this all from cotton fabric and cotton batting then it is also compostable at the end of its very long life too. We have step by step instructions to guide you through the making of this casserole hot pad that is large enough for a big casserole dish or two smaller ones.

Sew our large casserole hot pad for your home and as a welcome gift for many occasions, but especially for housewarmings. We supply the visuals along with step-by-step instructions so you don’t have to keep pausing the video! This large casserole hot pad is perfect for protecting your table, is reusable, machine washable and at the end of its very long life, if its made from cotton fabric and cotton batting, it can go into the compost and help nourish the soil. The hot pad is large enough for a big casserole dish or two smaller ones. What a winner!
Below you will find my step by step written tutorial with VIDEO instructions for all the visual learners.
We occasionally link to goods offered by vendors to help the reader find relevant products. Some of the links may be affiliate meaning we earn a small commission if an item is purchased.
Table of Contents
How to make a casserole hot pad
Supplies and tools
- 2 pieces of fabric cut to 13 x 18 inches (33 x 46cm)
- 2 pieces of cotton batting fabric cut to 1 inch larger all around 15 x 20 inches (38 x 50cm)
- Sewing machine with walking foot – this helps when sewing knit or stretchy fabrics as well as thicker fabrics when doing quilting
- Binding fabric of around 83 inches – if you don’t have one long piece, don’t worry we show you how to create the length from shorter pieces below
- matching thread
- scissors (or rotary cutter and a cutting mat)
- ruler or measuring tape
- iron and ironing board
- sewing clips or pins
Follow us for free patterns & tutorials! [easy-profiles]
How to Sew a Casserole Hot pad
Watch the diy casserole hot pad video first and then follow the written step by step instructions below.
Please enjoy and don’t forget to Like and SUBSCRIBE over on YouTube to be kept up to date with new videos as they come out.
Casserole hot pad VIDEO TUTORIAL
INSTRUCTIONS:
STEP 1:
Cut your two pieces of fabric for the front and back of the casserole pad to 13 x 18 inches (33 x 45.7cm) and set aside. Press to make sure they are smooth -this helps with the quilting.
STEP 2:
Cut your 2 pieces of 1/8″(3mm) batting and set aside.
NOTE: The batting I use in the video is 6mm thicker – that is why I am only using one piece
STEP 3:
Place the two batting pieces on your worktop then place the front of the casserole fabric right side up on top of this. Measure to make sure it is equidistant on all sides by 1 inch (2.5cm) from the edges of the batting. Pin in place, not just at the edges but at various spots in the center to ensure the fabric does not move during quilting.
Step 4
Flip over your piece so the batting side is right way up and place the backing piece over the batting, making sure it is equidistant from all sides. Pin in place, as you did in Step 3.
Step 5
Flip over to the right side and transfer the front side pins so they go all the way through the four layers, then remove the extra pins from the back, as you will be stitching from the front. Make sure there are no ‘bubbles’ where the fabric is not lying flat.
Step 6
Use a quilting ruler and fabric marking pen to make a grid of horizontal lines 1 inch apart on the front side.
Step 7
Set your machine to a stitch length of 3.5 and starting just a little into the batting above the fabric, from the middle of the long 18-inch (45.7 cm) side, stitch a line down to the other side, ending just off the fabric. Remember to backtack at the start and finish.
Step 8
Once done, check the back to see the fabric hasn’t got bubbles – if it has you may need to adjust the pins for the next row of stitching.
Step 9
Proceed to stitch all the horizontal rows on either side of the central row, removing the pins in the path of your stitching as you go. Keep checking the back to ensure there aren’t any bubbles of fabric and adjust pins accordingly if there are.
Step 10
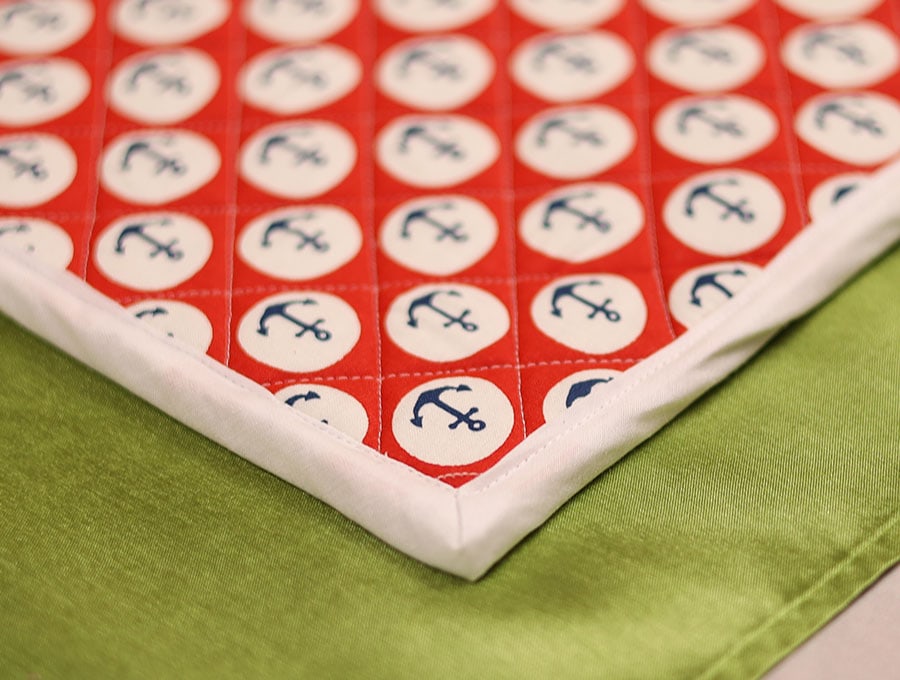
Once the quilting is done, trim the extra batting from the edges. Use your quilting ruler to ensure you have a perfect rectangle – you may find that you need to trim a little extra off the fabric to get the rectangle perfectly straight, but this is fine – it’s a one-off casserole pad, not a matching set, so a slight variation from the original size isn’t going to be the end of the world.
Step 11
Time to add the binding. Cut your binding pieces 2 ¼ inches wide from the material you have. You are lucky if you have a piece long enough – but, not to worry if you have shorter pieces they can be joined in a particular way.
Step 12
This is how to join the binding pieces. Place your binding pieces to join at right angles to each other with right sides facing. Overlap the ends by ¼ of an inch. Pin in place. Then sew at an angle from one corner to the other. Trim off the excess and you have a neat angled join which reduces bulk. Keep going in this way until you have sufficient length.
Step 13
Fold over your binding on the 2 ½ inch side with the wrong side inside, and press the whole length ensuring the raw edges are lined up. At one end open out the fabric and turn over a triangle towards the wrong side at 45 degrees and press, then refold where you opened out. This creates a little sleeve that you can tuck in the end of the binding into to finish off neatly when you have gone right around the casserole pad.
Step 14
Place your casserole pad with the back fabric uppermost on the worktop. Then around the middle of the long side place your binding with the little folded over triangle end sticking out, and pin about 2 ½ inches away from the end. Pin towards the corner. When you get to the corner put a pin in ¼ inch from the corner.
Step 15
Stitch from the first pin to the second pin ¼ inch (6mm) from the edge, back stitching at the start and finish. Remove from the machine.
Step 16
Fold your binding up at a 45-degree angle from where you ended your stitching, finger press, then fold it back down on itself, lining the top fold up with the edge you just stitched and pin.
Step 17
Stitch ¼ inch (6mm) from the folded corner down the side until you get to the next corner, backstitching at the start and finishing ¼ inch (6mm) from the end
Step 18
Repeat Steps 16 and 17 until you have completed the fourth corner.
Step 19
To complete the binding cut off the excess at the same 45-degree angle as the start of your binding so that you have just an inch (2.54cm) that you can tuck neatly into the triangle at the start. Smooth it into place and finish stitching down that side, back tacking at the start and finish when you meet up with the stitching where you began.
Step 20
This step is optional. Because you have two layers of batting and two layers of fabric you may want to hold it all nice and firm to reduce bulk, so, before completing the binding run a zigzag stitch all around the edges taking care not to cross into the stich line where you attached the binding.
Step 21
Almost done – turn the casserole pad the right side up and fold up the binding to the right side. You can use pins or clips to keep it in place. At the corners, fold to a neat 45-degree mitred corner. When you stitch at the folded over edge make sure your needle gets right to the corner, leave the needle down, lift the pressure foot and swing 90 degrees, depress the pressure foot and continue stitching. Continue in this was until it is all done. Trim and enjoy!
Making DIY projects gives a person such a sense of achievement. It also allows you to create items in the perfect colours and prints you ant rather than having to hunt through stores for what you have in mind. Making a casserole pad and matching napkins is a great way to coordinate a table setting for a special occasion be it Thanksgiving, Christmas, Halloween, Easter, a special birthday or an anniversary or any other religious or family festival. Hit the like and subscribe button to make sure you don’t miss out on our delightful projects. And remember to share with other sewists who might enjoy this project – or even someone just getting into sewing.
*** FAQs and tips:
Do you like this? Pin for later:
Wanna be friends? Click HERE and follow me on Pinterest
RELATED: