
DIY Spiral Zipper Pouch – Organization That Opens Up
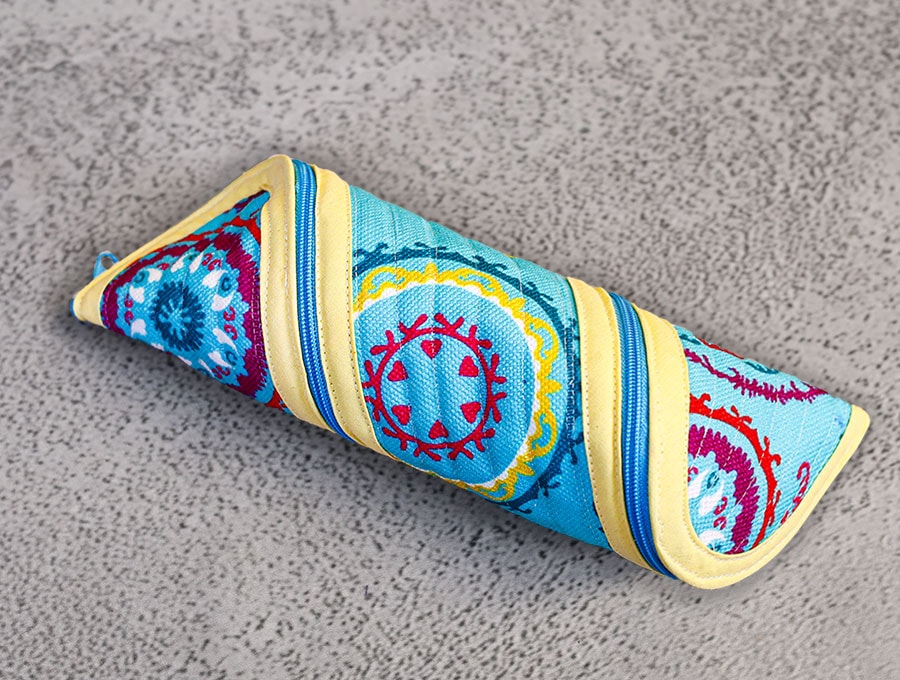
Let me show you how to sew this cleverly designed spiral zipper pouch transforms the way you store and access your supplies and can be made up quickly using offcuts of fabric in your stash.
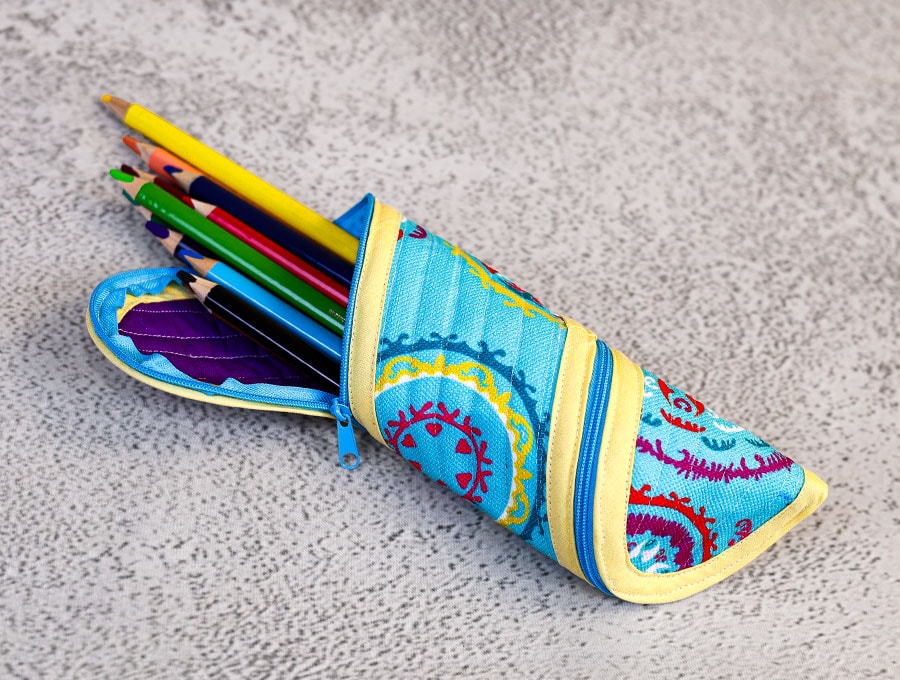
The real magic happens when you unzip it. Rather than a simple flap or lid, the spiral zip winds its way around the entire pouch, allowing it to open out completely flat — turning your case into a neat, organised workspace where every pen, brush, or lip liner is visible and within easy reach.

When you’re done, simply gather everything back in, roll it up, and zip it closed. In seconds, your supplies are neatly packed and ready to go — whether that’s into a school bag, handbag, travel kit, or desk drawer.
Perfect as a pencil case, cosmetic bag, art supply roll, or everyday carry organiser, this pouch will change how you keep your essentials. Once you’ve used one, you’ll wonder how you ever managed without it.
Below you will find my step by step written tutorial with VIDEO instructions for all the visual learners.
We occasionally link to goods offered by vendors to help the reader find relevant products. Some of the links may be affiliate meaning we earn a small commission if an item is purchased.
Table of Contents
How to make the spiral zipper pouch
Supplies and tools
- fabric – 2 pieces of 100% tightly woven cotton (one main, one lining)
- bias tape – 116cm (46 inches)
- zipper with slider – 120 cm (47 inches)
- batting
- matching thread
- scissors (or rotary cutter and a cutting mat)
- ruler or measuring tape
- iron and ironing board
- sewing clips or pins
DOWNLOAD: Spiral Zip Pouch pattern [Free pdf file]
Follow us for free patterns & tutorials! [easy-profiles]
How to Sew a Spiral Zip Pencil Pouch
Watch the diy spiral zipper case video first and then follow the written step by step instructions below.
Please enjoy and don’t forget to Like and SUBSCRIBE over on YouTube to be kept up to date with new videos as they come out.
Spiral Zip Pouch VIDEO TUTORIAL
INSTRUCTIONS:
STEP 1:
Print out the PDF pattern for the Spiral Zipper Pouch from HelloSewing.com (linked above) onto A4 paper and tape the three pattern pieces together according to the markings on the pattern. Trim the excess paper and place aside.
STEP 2:
Prepare your fabric and notions:
- Cut 1 x lining to 20 x 3 ¼ inches (50 x 8 cm)
- Cut 1 x batting to 20 x 3 ¼ inches (50 x 8 cm)
- Cut 1 x main fabric to 20 x 3 ¼ inches (50 x 8 cm)
- Zipper tape 47 inches (120 cm)
- Cut your 1 ½ inch (2 cm) bias tape to 46 inches (117 cm)
STEP 3:
Take the outer fabric, place right side up on your worktop and carefully measure 3/8″ (1 cm) gaps, with your quilting ruler. Join the lines along the length of the fabric using an erasable fabric marking pen.
STEP 4:
Place the lining on your worktop wrong side up.
Over it place the batting.
On top place the outer fabric right side up.
Clip all the pieces together at the edges.
STEP 5:
Stitch along the lines drawn on the outer fabric starting from the middle and working your way out to the lines near the edge.
STEP 6:
Place the completed quilted piece right side up on your worktop and over it line up the spiral zipper pouch paper pattern, and pin in place. Transfer the markings for the gap from the pattern to the quilted piece.
STEP 7:
Remove the paper template and flip the piece over so the lining is uppermost. Take the bias binding and open out the sides and fold over a small section of around ¼” (6 mm), at the end. Place it around the middle on the uppermost side, and pin the folded end, wrong side uppermost.
STEP 8:
Opening out the binding side nearest the raw edge, clip the raw edge of the binding to the raw edge of the quilted piece working your way right around the piece until you meet up with where you started. Do not cut the binding – you may need a tiny bit extra as you sew and adjust around the curves. (There’s nothing worse than coming up short near the end!)
STEP 9:
Stitch around the edge, stitching in the crease of the folded-out piece. When you get near to the end, cut the binding so about ½” (1.3 cm) overlaps the start of the binding. Backtack over a small section where the bias binding overlaps the folded piece at the start.
STEP 10:
Turn the quilted piece over so the outer fabric is uppermost and turn the binding over so it covers the raw edges. Clip the folded side of the binding to the quilted piece, all the way around the edge. Where the binding overlaps, fold over neatly and clip.
STEP 11:
Stitch all the way round the edge of the binding, as close to the edge as possible
STEP 12:
Take the zipper and separate it – you only need half of the zipper. Then starting from the gap you marked in STEP 6, start pinning so the teeth of the zipper stick out from the edge of the outer- the tape of the zipper is pinned to the lining side. Work your way around the edge to the other side of the marked gap, leaving a small tail on each end of the gap.
STEP 13:
Stitch around the piece as close to the edge as possible. When you get to where the zipper start and finishes trim off the ends of the zipper so they are equal in length and singe with a lighter so the tape does not fray.
STEP 14:
Add the zipper pull:
Method 1: Add the zipper pull to the ends, making sure the front side of the zipper pull is placed onto the front sides of the zipper tape.
Method 2: There is an alternate method where you use a fork to help pull the zipper slide onto the zipper ends. Place a fork into a cup, the back of the fork facing the middle of the cup, and use a small piece of masking or sticky tape to secure the handle of the fork to the edge of the cup. You slip the zipper slide between two tines of the fork, back part of the slide to the back of the fork, then holding your ends of the zipper, wrong side facing you, pull them into the grooves on each side of the zipper slide. Slip the zipper slide off the fork and you’re ready to put the zipper into action. Trim the ends of the zipper, and give them a quick singe with a lighter to prevent them from fraying.
STEP 15:
Make a tab to cover the zipper end by cutting a 1-inch (2.5 cm) piece of bias binding.
Open up one end and fold over then place under the zipper end, fold the edges in, and lastly fold the extra fabric up on the front into a small fold that you line up with the fold on the back. Pin in place then stitch across the end and down the sides to create the pull tab.
STEP 16:
Pull up to close the pouch.
When you need to see everything in your stationery or make up container at a glance this spiral zipper pouch is the answer – unzip it to expose a flat layer where you can pick and choose your items, whether it’s the correct make up brush, or the right color pencil or marker. Zip it up and you have a quilted pouch to protect your items.
Now that the zipper pouch is finished you can add pencils, pens and markers. If making this for an artist it is possible to make the pouch longer by extending the length of the pattern piece to accommodate the longer brushes. You will need to adjust the length of bias binding and the zipper accordingly.
Like and subscribe for more of our easy tutorials that incorporate both visual and step-by-step instructions. These are designed to make use of extra fabric in your stash and turn them into items that can serve as attractive, economical and practical gifts.
Do you like this? Pin for later:
Wanna be friends? Click HERE and follow me on Pinterest
RELATED: