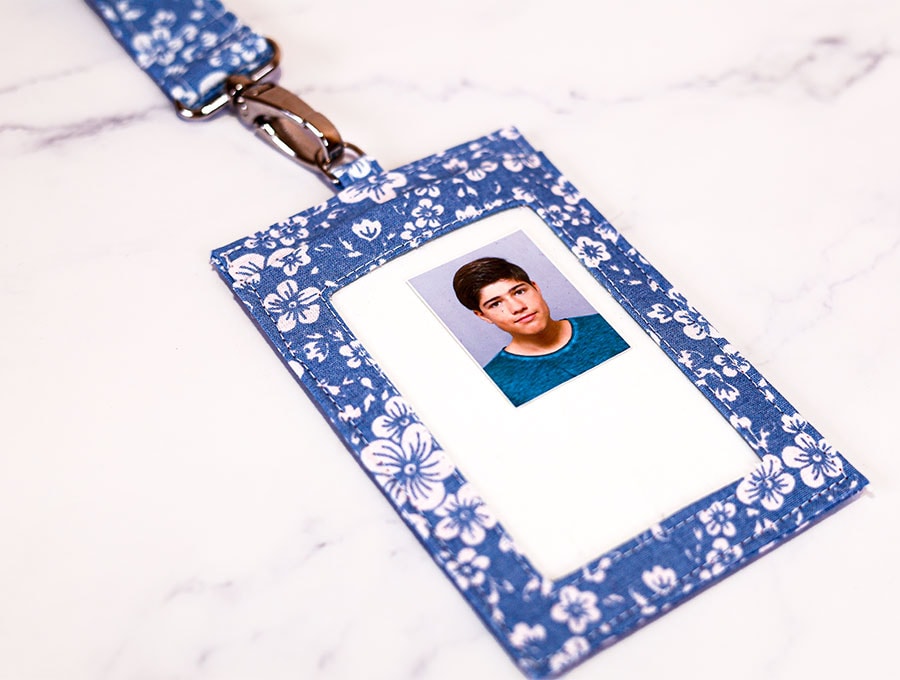
Lanyard Badge ID holder – Sew Lanyard with ID Window & Secret Cash Pocket
Whether you’re heading to a trade show, a craft fair, or a multi-day industry conference, our DIY lanyard is what you need. This beginner-friendly sewing project gives you everything you need in one tidy, neck-worn organiser: a clear vinyl window on the front to keep your ID or event badge on display, and a slim hidden pocket on the back just big enough for a folded bill or two — enough for that mid-morning flat white without hauling your whole wallet to the coffee cart.
![]()
Best of all, it comes together in under an hour with just a few fabric scraps and basic supplies you probably already have in your stash.
Learn how to make a Badge or ID holder on a lanyard today! The easiest way to sew a badge holder. We’ve included a printable pattern available at so you can get started straight away.
Below you will find my step by step written tutorial with VIDEO instructions for all the visual learners.
We occasionally link to goods offered by vendors to help the reader find relevant products. Some of the links may be affiliate meaning we earn a small commission if an item is purchased.
Table of Contents
- 1 How to make the Badge / ID holder
- 2 Supplies and tools
- 3 How to Sew a Badge / ID holder
- 3.1 Badge holder VIDEO TUTORIAL
- 3.2 INSTRUCTIONS:
- 3.3 STEP 1:
- 3.4 STEP 2:
- 3.5 STEP 3:
- 3.6 STEP 4:
- 3.7 STEP 5:
- 3.8 STEP 6:
- 3.9 STEP 7:
- 3.10 STEP 8:
- 3.11 STEP 9:
- 3.12 STEP 10:
- 3.13 STEP 11:
- 3.14 STEP 12:
- 3.15 STEP 13:
- 3.16 STEP 14:
- 3.17 STEP 15:
- 3.18 STEP 16:
- 3.19 STEP 17:
- 3.20 STEP 18:
- 3.21 STEP 19:
- 3.22 STEP 20:
- 3.23 STEP 21:
- 3.24 STEP 22:
- 3.25 STEP 23:
- 3.26 STEP 24:
- 3.27 STEP 25:
- 3.28 STEP 26:
- 3.29 STEP 27:
- 3.30 STEP 28:
- 3.31 STEP 29:
- 3.32 STEP 30:
How to make the Badge / ID holder
![]()
Supplies and tools
![]()
- fabric – quilting cotton
- cardstock
- vinyl
- fusible interfacing for the lanyard
- matching thread
- scissors (or rotary cutter and a cutting mat)
- ruler or measuring tape
- iron and ironing board
- sewing clips or pins
- small D-ring
- Lobster clasp 1″ (2.5cm)
DOWNLOAD: Badge ID Holder pattern [Free pdf file]
Link above not working? Try this ALTERNATIVE LINK instead
Follow us for free patterns & tutorials! [easy-profiles]
How to Sew a Badge / ID holder
Watch the diy ID holder video first and then follow the written step by step instructions below.
Please enjoy and don’t forget to Like and SUBSCRIBE over on YouTube to be kept up to date with new videos as they come out.
Badge holder VIDEO TUTORIAL
MATERIALS:
- 1 x lanyard 40 x 4” (100 x 10 cm) from fabric of choice
- 1 x lanyard 40 x 1” (100 x 2.5 cm) from fusible interfacing
- 1 x tab 1 1/2 x 2 3/8” (4 x 6 cm) from fabric of choice
- 2 x back pocket 3 1/4 x 4 1/2” (8.5 x 11.5 cm)
- 1 x frame fabric 4 1/2 x 5 1/2” (11 x 14 cm)
- 1 x back base 4 1/4 x 11” (11 x 28 cm)
INSTRUCTIONS:
STEP 1:
Download the badge ID holder pattern, print it out at 100% (no scaling), then cut out the 5 pattern pieces along the solid line – the dashed line is the seam allowance line.
STEP 2:
Cut your fabrics according to the pattern or the materials cut list
STEP 3:
Trim pattern piece 5 (the back base) to the dashed line and cut your cardstock for the back base to the trimmed down pattern piece.
STEP 4:
Cut the cardstock for the trimmed down pattern piece 1 and leave pattern clipped to the cardstock.
STEP 5:
Cut the clear vinyl for the badge ID window to the trimmed down pattern piece 3.
STEP 6:
To create the back pocket first place the fabric wrong side up on your worktop, then fold down 3/8” (1 cm) from the top short side and finger press. Be careful if you are using a directional print that the print is the right way up.
Place the two pieces of fabric right sides facing and fold down the other half to match, then clip the folds together, and down the sides.
STEP 7:
To create the tab fold in half along the length, wrong sides facing, finger press, then open out and place right side down on your worktop. Fold each length in to meet the center fold and press, then fold again so folded edge meets folded edge and press with an iron.
STEP 8:
Stitch down each side of the length of the tab as close to the edge as possible. Then, stitch around the three sides of the pocket, starting from the folded edge, backtacking, working your way around the pocket, then backtacking to finish.
STEP 9:
Turn the pocket the right way out after trimming off the corners at the base, and trimming the sides slightly where the fold is. Turn out the corners neatly and press with an iron.
STEP 10:
Stich the folded edge of the pocket closed stitching 1/8” (3 mm) from the edge.
STEP 11:
Grab pattern piece 1 that’s clipped to the cardstock, and using an Exacto (precision cutting) knife, cut out the center panel marked on the pattern, through the cardstock underneath – you now have the cardstock frame for the ID badge.
STEP 12:
Take the cardstock that you cut in STEP 3 for the back of the ID badge holder and the fabric. Place the fabric right side down on the worktop, put fabric glue on the cardstock, place the cardstock glue side down so that it is equidistant from the edges. Place glue along the edges of the fabric and fold each corner over first, then along the edges, so it is all smooth.
STEP 13:
Fold the card in half so the cardstock is inside and the edges line up. Clip in place.
STEP 14:
Take the frame fabric and the cardstock frame you cut in STEP 11 and place the fabric right side down on your worktop. Place glue on the cardstock then put it glue side down on the fabric equidistant form the edges. Fold each corner up then along the sides to create a neat edge.
STEP 15:
Cut a window out of the frame, leaving enough fabric to turn over to hide the cardstock.
Cut the fabric at an angle towards the corners of the frame. Place fabric and frame right side down on your worktop and apply glue then turn the fabric back to glue it neatly to the back of the frame.
STEP 16:
Place the vinyl behind the right side of the frame and clip in place.
Stitch around the inner edge of the frame 1/8” (3 mm) from the edge, backtacking at the start and finish. TIP: to obtain neat corners stitch to the corner, leave the needle down in the fabric, lift the presser foot, swing the fabric 90 degrees, lower the presser foot and continue sewing.
STEP 17:
Take the back base card you clipped in STEP 13 and open it up. Just above the fold line on the right side of the fabric clip the back pocket piece, stitched side to the top, ensuring it is equidistant from the sides and bottom.
STEP 18:
Stitch around the pocket piece 1/8” (3 mm) from the sides and bottom, backtacking at the start and finish, to attach the pocket.
STEP 19:
Fold the back base and place the frame equidistant from the bottom, near the fold, and sides. Clip in place.
STEP 20:
Stitch around the edge of the frame 1/8” (3 mm) from the outer edge, leaving the top open to slide in the ID badge.
STEP 21:
Slide the D ring onto your tab piece and insert the raw edges of the tab into the open end at the top middle of the back base, ensuring the flat bar of the D ring is in the fold of the tab fabric and the curved part faces up. Clip in place.
STEP 22:
Stitch along all four sides of the back base, securing the tab in position by backtacking over the area where it is inserted.
STEP 23:
Create the lanyard by folding the lanyard fabric in half along the length, wrong sides facing, and press with an iron. Open out and place the fabric right side down on your worktop. Fold each length in to meet the center fold and press, then fold again so folded edge meets folded edge and press with an iron.
STEP 24:
Open out and insert the fusible interfacing sticky side down on the wrong side of the fabric, lining up one edge with the center fold and the edge of the first fold at the bottom. Fold the bottom fold up then press to fuse the interfacing to the fabric. Press folded edges together and clip.
STEP 25:
Stitch down each side of the length of the lanyard 1/8” (3 mm) from the edges.
STEP 26:
Lay the lanyard fabric on your worktop and arrange so the one end is on top of the other and it will sit on the neck comfortably.
STEP 27:
Take the clip and pull the bottom layer of fabric through the bar, clip facing to the middle fold of the lanyard and pulled up a couple of inches, on the front of the fabric. Lay the other end of the lanyard, over the first end, then stitch across both ends, backtacking to keep the fabric secure.
STEP 28:
Fold the stitched end so the seam you made in the previous step is inside the fabric. Slide the bar and clip down so the bar is nestled next to the seam, and pin the fabric to keep the bar I place.
STEP 29:
Stitch a rectangle about ¾ of an inch (1 cm) from the bar across both layers of the lanyard. Or simply stitch two parallel lines across the lanyard to keep the clip in place. Backtack at the start and finish of each line.
STEP 30:
Time to clip the ID badge holder to the lanyard, slip a note or two in the back for coffee on the go and the lanyard is ready for action.
![]()
A lanyard that holds your ID badge, and has a back pocket to slip a bank note in it will keep your hands free at any conferences or trade fairs you may attend, and enable you to buy a coffee or treat without having to lug a purse along with you. The free printable pattern from HelloSewing.com will enable you to whip up a personalized lanyard and badge holder in next to no time and at minimal cost.
![]()
Please give us a like and subscribe so we can keep delivering the latest content to you and keep you in the sewing loop.
Do you like this? Pin for later:
Wanna be friends? Click HERE and follow me on Pinterest
RELATED: