Skip to content
151

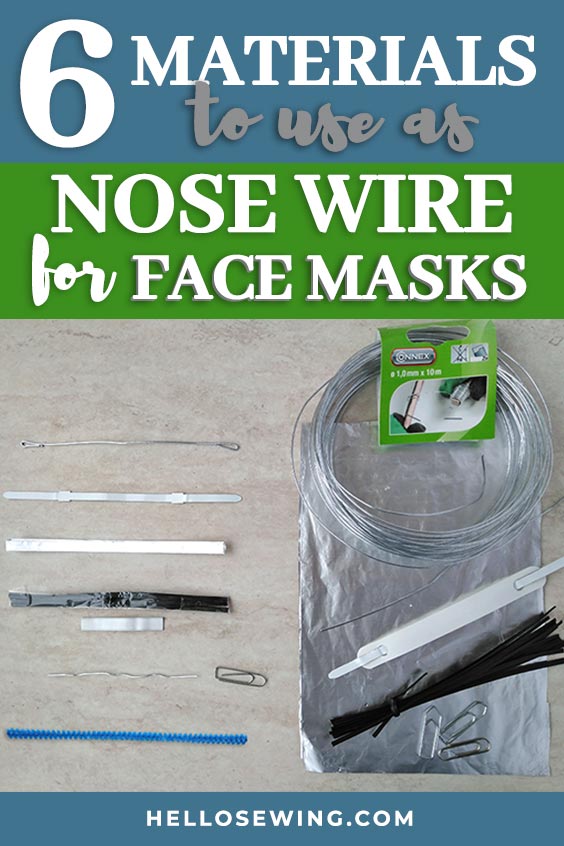
Flexible Nose Wire Piece Materials for a DIY Face Mask

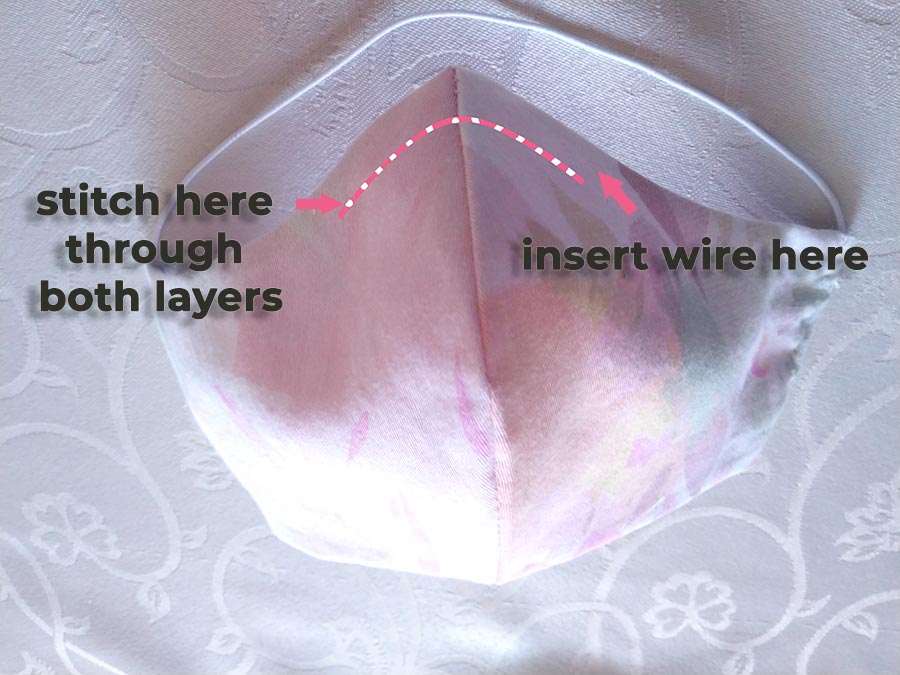
You can improve your face mask seal by adding bendable nose wire to your fabric face mask. You can fit a small metal strip/wire at the top — so that the metal can be molded over the nose and fit individual face shape better. The nose wire material should be both durable and flexible, and we found a number of options you can use no matter which face mask you are making. So far I’ve seen three distinct variations of face masks:
1. regular face masks with elastic ear loop;
2. face masks with adjustable fabric ties (can fit over N95 respirators)
3. contoured/fitted masks with pockets for removable filters
Our free fitted face mask pattern allows for an easy fitting of a nose wire and many of our readers asked what they can use as a bendable nose wire for their face masks, so I wanted to quickly cover the options.

We occasionally link to goods offered by vendors to help the reader find relevant products. Some of the links may be affiliate in nature meaning we earn a small commission if an item is purchased. Read full disclosure here

Nose Wire for Face mask Ideas – VIDEO

Check out our selection of the top nose wire piece materials in this short video, then read below to find more about each of the options.

If you enjoyed the video, subscribe over at Youtube for our weekly sewing videos

How to make a Flexible Nose Wire for Face Mask

There are a number of ways to make the bendable nose wire piece for the face mask. Let’s cover the best ones:

materials you can use to make nose wire for face mask

Why use a nose bridge wire? Using a thin and flexible metal strip is critical to custom-fit the top of a mask to a your face, to make them more effective, less likely to slip off, less likely to fog your glasses, and more comfortable to wear.

1. Crafting wire

Using a wire cutter cut 7 inches of  thin crafting wire or  floral wire. Curl in the ends of the wire to prevent the edges from piercing through your fabric. Curl either side about half an inch inwards.

2. Aluminum can

Cut into strips and folded over, so that there are no sharp pieces that can rip through fabric. To get a 3/4″ wide nose piece cut a piece of the aluminum can 4″ long and 1 1/2″ wide. Fold both ends to the middle, then fold in half.  Your aluminum nose wire is ready.

Now we all crafters have the perfect excuse to order more beer and soda, don’t we 🙂

3. Folder fastener

Prong fasteners such as those from office files are just the right length.

TIP: If there any sharp parts, you might want to cut them and / or curl them inwards. I prefer using mini wire cutters and bent nose pliers over larger multi-purpose pliers, but according to my husband you can and should use whatever you already have at home. 

4. Aluminum foil

Cut a piece of No products found. 8″ long  x 6″ wide. Fold over in half width-wise 5 times. You can even sew through it with the sewing machine. No aluminum foil? Use thick tin foil from a baking dish or a disposable cookie sheet instead.

5. Twist ties

Use twist ties from bread loafs, gift bags, or trash bags. While you can use a single twist tie, it won’t be durable enough and won’t mold very well over your nose. I suggest two or three twist ties together. The resulting nose piece is both flexible and durable.
You can either sew the ties in the mask, or make a removable nose piece and slide it through a channel 3/8 inch away from the top stitch of the mask.

TIPS:

  • If you are taping your twist ties together, slide them through a channel and don’t sew them in as clear tape won’t withstand washing.
  • Don’t use paper twist ties, as the paper washes away during hot water washing and the sharp ends of the tie will show.

6. Paper clip

Unfold the paper clip and straighten it. It doesn’t have to be perfectly straight.

The resulting nose wire measures about 3.5 inches in length if you use a small/regular paper clip, and almost twice as long if you use a jumbo paper clip. Curl the edges just a little bit so it does not stick through the fabric.

TIP: While you can use the regular sized paper clip, the resulting nose piece is rather small (about 2.5-3 inches) and I recommend only using it for a child sized mask or if the other options are not available.

7. Pipe cleaner

Use a 12 inch pipe cleaner, fold it in half and twist together. The resulting nose wire measures about 6 inches in length.

TIP: Only use pipe cleaner if your nose piece is removable, as face masks are to be washed in higher temperatures and pipe cleaner wire may rust.


8. Aluminum nose bridge strips

I recently saw that some aluminum nose bridge strips such as these pop over on amazon and they look like a good option.

OTHERS:

Promising ideas from our readers:

9. Metal zip ties

You can easily trim these metal zip ties to length with wire cutters. Each one is ~12″ long and you can make two or three nose wires out of a single zip tire. 

8. Aluminum cups from tea lights

Cut the outer rim straight down to the circular bottom of the cup and then cut straight across the bottom. Cut around the circular bottom of the cut until you just have the rim left. Then, fold into thirds so there are no rough edges and trim to the length you need

10. Coffee bag closures

These seem to be a popular option to use as nose wire for diy face masks. One coffee tie makes two nose wire pieces

11. Christmas ornament hanger

12. Heavy-duty waxed thread

How Long Should the Flexible Nose Piece Be?

After testing a lot of nose bridge wire options, we found that the nose bridge made of 6″ long craft wire was the most comfortable to wear and provided the best fit for an adult sized mask. Of course, depending on the mask of your choice and your personal preference, you may want to make it a bit shorter.

Not sure which face mask is the right fit for you?
Check out our FREE face mask tutorials:

how to sew a surgical face mask

New to sewing? Check out few tools/supplies that can help make sewing easier and faster


Pin for later

nose bridge wire for face masks pin

TELL US: What did you use to make a flexible nose bridge? Do you have any other ideas for the nose stay?
Do you have an idea for an improvement? Leave a comment below – we’d love to hear what you used as nose bridge wire!

Sharing is caring! If you find our nose wire for face mask article useful please share with your friends on social media

Click Here to Leave a Comment Below 151 comments
Face Mask Pattern (FREE) - How To Make Diy Mouth Mask - March 25, 2020

[…] daily! Due to popular demand we designed a diy face shield from household materials, found the most suitable flexible nose wire materials, added a printable pdf of the instructions and a comprehensive list of hospitals in dire need of […]

Reply
    Linda - April 17, 2020

    While reading a instruction page on utube I found a mask for men with beards, which my husband has. Home used soldering wire for the metal for the nose. It’s something I had not heard of and can be used in any mask. I know that most people do not have this at home but for those that do, try it out. Joyful sewing. Keep smiling, we will all get through this. Blessings to all.

    Reply
      Helen - April 17, 2020

      Sounds like a good option. Thanks for sharing!
      Blessings for you and your family

      Reply
      Arshan - April 27, 2020

      Just wanted to chime in for those unfamiliar with solder – some solder (eg. most common electronics solder) contains a large amount of lead. This would mean at least that you should wash your hands thoroughly after handling and I’m not sure if it may also leech out if you wash the mask. So erring on the safe side, I wouldn’t want it right near my face.

      There also exist lead-free solders (eg. one’s made for plumbing or jewelry).

      So if anyone is considering this, be sure to check carefully what’s in the solder you’re using!

      All the best!

      Reply
        Jenn - May 1, 2020

        Some soldering wire is lead free, so just check yours. Thanks for the idea!

        Reply
    Eliana - April 30, 2020

    Is there a way to make a little pocket for the nose strip. I’m worried it’ll rip the fabric or bend when it is washed.

    Reply
      Helen - April 30, 2020

      you can use a piece of bias tape to make a channel or if your mask has side openings just topstitch through both layers to make a channel for the removable nose piece.
      I have no problem with sewn-in nose wires, as I curl the edges inwards

      Reply
Peggy Mauro - March 26, 2020

Thanks so very much for all your detail.

The hepa vacuum filter has many layers when cut apart.

How do I keep the layers together?

Does the filter have to go up high into the nose curve? Or is it mostly a rectangle?
My biggest concern is how to keep the filter layer edges sealed?

Sincere thanks , peggy

Reply
    Lora - April 6, 2020

    Peggy, please becareful using those filters, most have fiberglass in them which are harmful to breathe.

    Reply
      marilyn - April 7, 2020

      the vac bags do not have fiberglass in them. It is unfortunate that this rumor got started online, it is not true!

      Reply
    LeighS - April 11, 2020

    I know nothing about sewing except hand-stitching, but I know a lot about filters bc of my trade in Aerospace & Machining. I’m used to being exposed to dangerous chemicals & particulate matter.

    If you’re sewing basic, cloth masks, it’s honestly cheaper to buy bulk “PM2.5” refill filters. They’re still easy to find, cheap, and require nothing other than a pouch to slip them into.

    This means they filer.03 micron/2.5 particulate matter (which is similar to the 95% filtration of N95 masks).

    If you’re already crafty enough to sew the masks themselves…you can but 50 or 100 refills for $10 to $30 (right now, normally they’re much less).

    But you can wear one PM2.5 filter more than once. If the mask itself is clean, you can use the same filter for one week of “constant use” (ie: you’re out & breathing through it 9 to 5).

    So offering 1 filter with your masks or building one right in with an extra is effective & won’t drive up your costs of making them truly filtered compared to fumbling with old HEPA.

    Most people don’t know what PM2.5 refills are nor where to find them.

    They’re on Amazon (but overpriced). Wish.com has them in bulk amounts (usually 30/50/100/150).

    At least then you can claim an exact filtration amount without much worry. They’re shaped like rounded rectangles and should be placed in a pouch that covers the nose & mouth, if possible in your design.

    They come shaped for that, though. They’ll say “PM2.5” stamped on each one so you/others can quickly verify exactly what can & cannot be filtered.

    They can also be “cleaned” with UV Light Disinfectors 1 or 2 times. Like the “phone soap” boxes or handheld lights.

    Reply
      Helen - April 12, 2020

      That’s very helpful for all of us sewists. Thank you so much for taking the time to comment.

      Reply
      Jill - May 5, 2020

      Hi LeighS, do you know the dimensions of these filters please? I have ordered some and would like to get on and make the masks ready but concerned in case the don’t fit. Can you trim them to size? Thank you, Jill

      Reply
      Susan - May 11, 2020

      Another option: Buy a large high-end pleated furnace filter, I’m talking about a #9 FMR, strip it of its cardboard and metal webbing (use gloves) and you have a large piece of filter material that isn’t very expensive and can filter out virus particles (so it says on the box). It must be the pleated kind, as that contains no fiberglass.

      Reply
    TRacy - April 12, 2020

    I just sewed a basting stitch around the edges.

    Reply
Kyle - March 27, 2020

I just read that some people were using an aluminum can that they cut into strips and fold over so that there are no sharp edges.

Reply
    Helen - March 27, 2020

    What a great idea. Thanks for sharing, Kyle

    Reply
Madeline-Keys - March 27, 2020

I found the pattern too small. I added 1/2 inch all around for myself and had to add an inch top and bottom and 3/4 inch on the face and ear side to fit my 6’ 4 “ bearded husband. Used elastic to go around head and neck instead of ears, adjusting elastic to about double the ear length. Good directions! Nice close face fit. Thank you!

Reply
    Karen - April 6, 2020

    I agree with you! I was so very disappointed with how small the mask was. When I made the size medium, according to the directions, it ended up so small I’m not sure it will even fit my 7 yr. old granddaughter! ALSO, I think you should add that extra inch, to the pattern, instead of just in the directions!
    I do love the simplicity of the pattern and that you can add another filter in it. But I will definitely have to tweak this pattern, which makes me upset since I have cut out six others to make.

    Reply
      Helen - April 6, 2020

      All right, I’ll split the pattern and will add that extra inch to the outer layer. By the way I’ve just added a VIDEO tutorial to this article – hope you’ll find it useful.
      As for the mask – have you trimmed the seam allowance down? If not, try it – it will help to reduce the bulk. Also, for the pieces you’ve already cut – why don’t you try 1/4″ seam allowance on the next mask instead of the 1/2″ and see if you like it better? Just a suggestion

      Reply
        Karen - April 7, 2020

        Yes I did do that, and it’s a little better. The large size actually fits the best with 1/4” seam. No way will that fit the men in my life, but I will adjust it, because I like how it fits. I’ll send the other pieces to my 7yr old grand kids and they can have a sewing class and make masks for their friends!

        Reply
    Sarah K - April 6, 2020

    Something that you stated caught my eye and I felt the need to share this just in case you or anyone else with a “bearded husband” or anyone with facial hair really, needs to know in regards to wearing a mask–this link is the infographic from the CDC that shows which facial hair styles are “ok” to retain and still maintain good seal with face mask. Facial hair can prevent the mask from “sealing” around your face completely (i.e. gaps between the mask material and your skin), akin to the idea of “poking holes in the bottom of a paddle boat kinda thing,” –like yeah, it’s still afloat…yeah, you’re still not sinking at tremendous rate…but those holes are not helping things and if not addressed they could really become a problem. And second link is from CDC regarding their own versions of facial masks (mostly no sew options, which prob don’t apply to most of the people here, since you likely have sewing skills, lol.) And if you don’t feel comfortable clicking the links provided, then from Chrome, type in “CDC mask guidelines with facial hair” in search bar and infographic should be 1st result. (*sharing to help try and keep ppl safe! (;0)

    https://www.cdc.gov/niosh/npptl/images/infographics/FacialHairWmaskLG.jpg

    https://www.cdc.gov/coronavirus/2019-ncov/prevent-getting-sick/cloth-face-cover.html

    Reply
Kellie Boehm - March 28, 2020

I found some aluminum duct tape ( used to seal duct work). I cut a. 6 1/4” strip, cut it in half lengthwise, then folded a pipe cleaner inside of that.

Reply
    Barbara Jester - April 18, 2020

    Thanks for the suggestion of using duct tape to protect the pipe cleaner from rusting, I was going to try pipe cleaners then I read the rust potential comment and changed my mind, now I think I will try it using this process. Thank you.

    Reply
      Debra Lowrance - May 18, 2020

      I have been using coffee ties. You can cut one tie in half and use for two mask. They are coated so no metal sticks out, are easy to adjust, and washable. The hard part is finding the ties.

      Reply
    Janet - June 15, 2020

    Thanks Kellie for the suggestion. I have a lot of pipe cleaners and discovered
    some Nashua foil tape in my closet. Has this continued to work well for you?
    Appreciate your help.

    Reply
Liz Campbell - March 28, 2020

how do I share this info please

Reply
    Helen - March 28, 2020

    Hi Liz,
    We are adding the option to share with you social media friends. In the meantime you can simply share the link to this article on Facebook or Twitter

    Reply
Teresa - March 28, 2020

How do I add the wire to the mask?

Reply
    Helen - March 28, 2020

    There are few different ways to achieve that, depending on the mask model and your preference.
    1. Use zig-zag stitch
    2. Slid it inside the top middle of the bias tape (for masks with adjustable fabric ties such as this one)
    3. Make a channel 1/2 inch from the top (for masks with filter opening such as this one). Like so:

    Reply
Anna in Illinois - March 30, 2020

I have found a new product to use for the nose piece and I found it at my Dollar Tree store. It is called Flexible Tie and is meant to be used to tie up plants. It comes 16.5 feet in a package and I find that when I cut it, the plastic outside shifts to cover the wire inside. Best part right now is that it costs $1.00 a pack and I can get more than 30 from a pack. (actually I’m cutting 4-5 inch pieces and I’m getting about 45 from a pack). https://www.dollartree.com/garden-collection-flexible-twist-tie-165ft-spools/192099

Reply
    Helen - March 30, 2020

    Great tip and awesome value per nose piece. Thank you, Anna

    Reply
    Margie in California - April 2, 2020

    Wow thank you! I sure hope my local Dollar Tree has some in stock. I am going to make these masks as gifts for family members.

    Reply
    Sandi - May 18, 2020

    That is exactly what I have been using, it is FANTASTIC. However, I take another step.

    After cutting your piece to length, pull the rubber jacket over the cut end about 1/4 inch, and then grasp where the wire actually ends through the rubber with a needle nose pliers (to prevent the rubber jacket from contracting back over the wire, and to protect your fingers for the next step). So now just about 1/4 inch of rubber jacket is outside the needle nose pliers, hold that bit over a flame. Just for a second, it doesn’t have to actually catch on fire or get black. Remove from the flame and pinch the rubber together tightly to close up the pocket where the wire was. At first I was then dunking it in ice water, but I don’t think that is necessary because it cools very quickly. Repeat on the other end.

    So now the wire should be totally encased by the rubber jacket. I LOVE it, and it is so comfortable. Many of the recipients of my masks have commented on how nice that is. I don’t know that it will last forever without the wire poking back through, but so far so good. My mask instructions tell people that they can wash it in a machine, but suggest to air dry or machine dry on a low temp, but to be absolutely sure that they do NOT iron over or near that nose piece because the rubber jacket *will* melt…you will see green bleed through the fabric.

    I hope that makes sense!

    Reply
Kelly - April 1, 2020

If you are a rural person and familiar with farm supply stores, you could use electric fence wire.

Reply
    Lorene - April 28, 2020

    That’s what I use. Be sure to get aluminum and not steel or galvanized. The wire won’t rust when it’s washed. I’m using 17 gauge.

    Reply
      Helen - April 29, 2020

      17 gauge wire is too stiff for my liking. For best results use 20-22 gauge wire

      Reply
Russ - April 3, 2020

Have you tried rebar ties? They are 4” long and have a loop on both ends. They are annealed which means they are very flexible. You can get them at any Home Depot in the concrete area.

Reply
    Helen - April 3, 2020

    Good tip, Russ, thanks for sharing.
    We haven’t tried rebar ties but it looks like they might work. Let us know whether they do if you decide to try them.

    Reply
    Ann Potter - April 5, 2020

    I located 6 inch ties at Home Depot, but they come in packages of 1,000. Unless you know a lot of people making masks, I wouldn’t invest in them. I only need about 50 of them. On the upside, they’re under 20 bucks for the package.

    Reply
Judy - April 3, 2020

Flat heater wire for heating elements. I found it on Amazon and ordered it before I found this website. I haven’t tried it yet. Some of the options listed above are more readily available, cheaper, and might work better.

uxcell 10M 32.8Ft 0.2x6mm Nichrome Flat Heater Wire for Heating Elements https://www.amazon.com/dp/B01E5RBB3I/ref=cm_sw_r_sms_c_api_i_3s5HEbTGVKZZP

Reply
    Helen - April 3, 2020

    That’s an interesting find. Drop by to say how it works as a nose piece
    The edges look sharp – maybe you can fold the edges inwards or wrap the whole thing in aluminum foil so that it won’t prick the fabric

    Reply
Jill - April 3, 2020

Before cutting into HEPA filters, please check what they are made out of. Many (if not most), are made of fiberglass or glass strands that can break when cut into. This can be dangerous for the lungs in that the micro pieces can be breathed in from the mask.

It is smart to research this before creating a mask using a HEPA filter insert.

Reply
    Helen - April 4, 2020

    Absolutely! Great reminder, Jill

    Reply
Sue - April 4, 2020

Thanks for the ideas for the nose “wires”

I want to ditto your suggestion to make pipe cleaners removable for washing. I use pipe cleaners to mold the ears of solft sculpture troll dolls. I learned the hard way after dying one head that the pipe cleaners started to rust immediately, and then broke into many pieces.

Perhaps they could be cased in masking tape, and then still put into a casing that allows removal for washing. This might make a very available nose piece wire last a little longer.

At any rate, I’d let anyone I was giving a pipe cleaner mask to know how to make a new one if it starts to break. Or provide an extra pipe cleaner.

Reply
Wendy - April 5, 2020

Cut up the heavy foil baking pans.

Reply
KB - April 5, 2020

I found speaker wire to be an excellent option for the moldable nose piece. I cut it to size and sew it between the layers of the mask. It’s amazing what one can find when scavenging for options in the basement and garage. ?

Reply
    Char - May 3, 2020

    Can it be washed without removing the nose wire?

    Reply
    Isabella - May 17, 2020

    May I ask what gauge is the speaker wire you use? Do you find it just the right thickness? Thank you~

    Reply
Carolyn Giancursio - April 5, 2020

I used the closures from bags of coffee. They are strong and work well. The only disadvantage is the number of coffee bags you need to buy!!!

Reply
    Helen - April 5, 2020

    Now I have a good reason to buy more coffee. Ha! 🙂

    Reply
    Heidi Heard - April 6, 2020

    What a great idea!! Firm enough, yet with some flexibility, coated and no sharp edges.

    Reply
    Susan - April 9, 2020

    They come on doughnut bags. too.

    Reply
      beth digi - April 26, 2020

      the closure for coffee and donuts is called tin ties, can buy in box of 1000, still cheaper than most things, make sure you get 2 wire, advantage is to sew right on, still bend edges

      Reply
    Ruth Stone - April 9, 2020

    I also have been using the coffee bag closures. For some unknown reason I had saved a few so I had a good start but now I need another idea or I need to drink more coffee and donuts.

    Reply
Diane Douglas - April 5, 2020

I have been cutting up my used tea lights.
Been using a lot these days and I never knew what to do with empty ones ? works a treat.. just make sure they are well folded over to cover sharp edges

Reply
    Helen - April 5, 2020

    That’s genius. I love such ‘zero’ waste ideas. Thanks for sharing

    Reply
    Patty - April 8, 2020

    How do you cut the metal?

    Reply
CG - April 5, 2020

Speaker wire is great. Use a dot from a glue gun to seal off the end. You can get speaker wire by the foot for about $0.39 at most hardware stores, and there still seems to be plenty of it. No rough edges, no rusting.

Reply
    Isabella - May 17, 2020

    May I ask what gauge is the speaker wire you use? Do you find it just the right thickness? Thank you~

    Reply
Zach - April 5, 2020

Copper wire from old electrical wall cord, thicker. Also many wires used for wisecracking could work depending on diameter(determine how many lengths together).
The wall wire will either need to be caped, turned, or use tool from craft store in wire wrapping section for rounding wire(mine from joann’s). Also possible to flatten the thicker gauge wire and harbor freight sells a rubber coat dipe one could coat copper in to reduce oxidati0.

Reply
Joyce Beechly - April 6, 2020

I bought a card of plant ties from the nursery to use. It is wire covered with a poly coating. Can be cut to any length.

Reply
Donna Morgan - April 6, 2020

Hi all! I just discovered a great material for a nose clip while I was gathering up the aluminum cups from used tea lights. They are the perfect size to creat an insertable nose clip. Do this: cut the outer rim straight down to the circular bottom of the cup and then cut straight across the bottom. Cut around the circular bottom of the cut until you just have the rim left. Then, fold into thirds so there are no rough edges and Trim to the length you need! They really work and will not rust if sewn inside the lining of the mask. Hope they work for you too!

Reply
    Patty - April 8, 2020

    Donna Morgan, great idea! How do you sew the metal strip into the mask? I could use a little step-by-step tutorial! Thank you so much!

    Reply
Lil - April 7, 2020

Which part of the folder fastener do you use?

Reply
David M Riaubia - April 9, 2020

Has anyone tried using solid copper electrical wire? I would expect it to oxidize/stain less than the steel pipe cleaner. I’m thinking 14 gauge (Coated or uncoated, but coated would be preferred) should do the trick. Widely available in hundreds of feet at hardware stores (still open during economy shutdown). This is the most common kind of electrical wiring in your walls.

It’s important that this be solid wire, not stranded like you would find on on a small appliance cord.

Reply
    Lori - April 19, 2020

    Lol, my husband just brought some up fro the basement. Stiff to start but is totally washable and won’t rust.

    Reply
    Toby - April 27, 2020

    My husband is a builder and he took apart some 11 and 14 gauge electrical wire to try. The ends are sharp and would need to be wrapped and even the 14 I found too stiff. But he did find some low voltage wire which is more flexible and rubber wrapped. I’ll try that and see how it works. The coffee bag closures sound like they’d work well.

    Reply
      Helen - April 29, 2020

      Hi Toby, indeed 11 and 14 gauge wires are too stiff for the nose piece. I like 20-22 gauge best

      Reply
Karen - April 9, 2020

I am using garden plant twist tie on a roll – I am twisting the ends to prevent poking through. I have used electrical tape to secure the ends. I am concerned the electical tape will not withstand washing and drying – any comments?

Reply
    Helen - April 9, 2020

    It won’t withstand regular washing. I would suggest to make the nose wire stay removable. Depending on which mask you are making you can 1) just make a channel 1/8 to 1/4 inch from the top and insert in from the side openings or 2) stitch a short piece of ribbon at the top inner side of the mask to make a channel

    Reply
Fast And Easy No Elastic Face Mask [with Filter Pocket And Nose Stay] ⋆ Hello Sewing - April 9, 2020

[…] or floral wire for the nose stay (you can use other nose wire materials […]

Reply
KAREN - April 10, 2020

Will take your advice and not use electrical tape on ends of plant twist tie. I will use 24 gauge floral wire that I have , and twist together to make thicker . I was trying to close off the channel so my family members could wash without removing as I doubt that they would . I wonder if the floral wire will hold up to washing, again trying to make easier for family members, if not will leave open, tell them to remove. Wash with or without wire?

Reply
YML - April 10, 2020

Has anyone tried bra underwire for the nose bridge?

Reply
Cathy - April 10, 2020

What size should the filter insert be? I have some heavier duty iron-on pellon and thought of ironing it onto a piece of white cotton, but not sure of size. Would it be a good filter? It could be washed at the same time as the mask. I plan on using light weight iron-on pellon on inside layer of those that I do not create a pocket for.

Reply
Mary Farrell - April 12, 2020

Thanks very much for the ideas on the flexible nose piece– very helpful.

Reply
    Helen - April 12, 2020

    Thank you! Glad you find them helpful.

    Reply
GARY COOPER - April 14, 2020

I want to reach out to you and let you know we are currently making the nose bar for the medical mask. This is the aluminum bar that is fitted to the person nose while wearing the mask. These nose bar are sewn into the mask (no Adhesive)
We are custom machine builder in North Mississippi and make custom machines for many manufactures We were recently contacted by a local company that is making medical mask for several hospitals in the area. So our team built a simple machine to produce the aluminum nose bar for these mask. We are now producing these parts in high volume. We built a second machine and brought it on line yesterday. We now have the capabilities of producing 1000s of these nose bars per day.

Reply
Karen L - April 15, 2020

I have several spools of plastic-coated computer wire (left over from a computer tech degree). Seems to work fine for a mask that will be laundered at home. I would be worried that the plastic would melt when laundered in a hospital.

Reply
Tayla Rogers - April 16, 2020

I had a BUNCH of fake flowers that I bought on sale a year ago. I just slid the flowers off of the fake stems and used the wires from that. I left the green plastic covering on the wire.

Reply
    Helen - April 17, 2020

    that’s clever! Thanks for sharing. Stay safe and healthy

    Reply
a - April 16, 2020

It’s amazing what people are coming up with! Tea lights! I tried metal snap hair clips like these https://www.amazon.com/dp/B00119VKEE and did not have much success.

Can aluminum foil be put through the washer and dryer? I would rather not mess with removable bits.

Reply
    Helen - April 17, 2020

    Other people reported no issues with the washer and dryer.

    Reply
    Kathy - May 16, 2020

    I took an aluminum disposable turkey roasting pan that was rectangle and flatter bottom. I would not recommend the cheaper ones from the dollar store they are crap. But, if the cheaper is all you have access to you’ll have to alter it a bit the below dimensions a bit.

    I cut the aluminum in about 3/4 in x 5 in strips. I fold the long sides into 1/3’s. after having about 1/3 x 5 inch strips I tap them with a hammer on a solid surface just to condense them a bit more. I do it on the back porch that is concrete. (it game my older grandson something to do and got him out of the house). If you only have cheapy pans from the dollar store just double the width of the aluminum and double the folds. (1.5 in x 5 in) It should work.

    Reply
      Helen - May 16, 2020

      Very creative. Thanks for sharing

      Reply
Deb - April 17, 2020

U have been trying to think of something for the wires and you have a lot of great ideas. Thank you!

Reply
Deb - April 17, 2020

I have been trying to think of something to use for the nose piece in masks and you have a lot of great ideas. I have most of this at my house. Thank you!

Reply
    Helen - April 17, 2020

    You’re welcome. Glad to have been of help! Happy sewing

    Reply
sp - April 18, 2020

I’d like to include a nose bridge wire of some sort but am concerned it might rust after I put it through the wash. Anyone have any experience with this/has anyone washed their mask a few times to report back?

Reply
    Helen - April 18, 2020

    I washed masks with craft wire inside multiple times and there is no rust

    Reply
Von Q - April 21, 2020

18 Gauge Aluminum wire
(Home depot link for one brand, I have found others https://www.homedepot.com/p/OOK-50-ft-10-lb-18-Gauge-Aluminum-Hobby-Wire-50176/100192917)
It’s in the picture hanging supplies in most hardware stores which are open.

Reply
Elizabeth - April 21, 2020

Would coffee cup filters be okay to add into the mask?

Reply
Brian Hughes - April 26, 2020

Thank you for the great blog post! I used the aluminum foil method and it worked perfectly.

Reply
    Helen - April 29, 2020

    I’m glad you find it helpful! Stay safe and healthy

    Reply
Jayne Gallagher - April 30, 2020

You can also use electrical wire. Fairly easy to bend and it is rubber coated so it is less likely to poke through fabric.

Reply
    Helen - May 1, 2020

    Good tip. Thank you

    Reply
Kathy Rouleau - May 4, 2020

I’ve used a breathe right strip on the inside of the mask as a temporary nose bridge. I found it worked better than wire, but it comes off when washed, of course. It holds it’s shape when pinched (these are pricey, but I had old stash on hand).

Have also sewn a blousy area at the top, under the eyes, so it will fill the gap next to the cheek.

Reply
    Helen - May 4, 2020

    Interesting find! thanks for sharing, Kathy

    Reply
Beverly Morlock - May 6, 2020

A mask that fits well at the nose offers more protection and prevents eyeglasses from fogging up while a mask is being worn. We have flexible aluminum nose pieces available on our website. They can either be sewn into the mask at the nose or slid into a channel and removed for washing. We also offer handmade masks at a reasonable price. https://www.masks.prairiewestdesign.com/

Reply
Barbara - May 6, 2020

My husband has got electric copper wire all encased and so he stripped it down and the 7 thin wires separated and it’s good as I had nothing else

Reply
Jane - May 7, 2020

I am using flexible soft garden ties cut into 5”- 6” lengths for my nose wires. I prefer the smaller tie – 2.5mm. Anything over 3mm is bulky. I push back the soft rubber coating on each end of the nose wire to clip off any wire that might poke through my fabric.

Reply
    Helen - May 7, 2020

    Great tip! Thank you for sharing your experience, Jane

    Reply
Pamela - May 13, 2020

I have used lead-free solder wire for the nose piece. I cut if at 6inches and fold back to ends and squeeze hard with pliers so there is no sharp bits.

Reply
    Helen - May 13, 2020

    Sounds good! Thanks for commenting

    Reply
fullerAnne - May 14, 2020

Where can I buy on internet this crafting wire for the nose of a face mask. It has to go inside of a pocket at top of mask,It has to be flexible and thin.

Reply
Amy Mills - May 14, 2020

I used the wire tie that comes on your bag of coffee. 1 tie makes 2 nose pieces.

Reply
    Helen - May 14, 2020

    Looks like coffee bag ties are a popular choice. Thanks for sharing, Amy

    Reply
    Mariannette - May 23, 2020

    I was not able to remove the tacky adhesive from coffee bag fasteners–using a variety of website-suggested commercial products & DIY concoctions; none
    cleaned the fasteners. Any suggestions beyond what you’ll find via an internet search?

    Reply
      Helen - May 24, 2020

      Hi Mariannette, have you tried wd-40? It works wonders! Simply spray it on the advesive, wait a minute or two to allow it to penetrate the adhesive, and either scrape it off or wipe the residue away with a soft cloth

      Reply
Sally Morgan - May 15, 2020

YOI CAN AL USE PLASTIC TIES FOR TYING UP VEGETABLE PLANT. I ORDER MINE FROM ACE HARDWARE. WHO WOULD HAVE THOUGHT? GREAT OTHERS IDEAS! THANKS!

Reply
RM - May 21, 2020

Olsen Mask was suggesting wax coated thread. I found Wikki Stix on Amazon. Probably good for removable nose piece design.

Reply
Kim - May 24, 2020

I have tried most of these and found the one I like best is aluminum from baking pans. The cans would be fine too, but I don’t like canned drinks, so pans it is. Thanks for the posts, there’s a lot of great info in them!

Reply

Leave a Reply:

Send this to a friend