 with FREE DIY Hooded Cloak Pattern")
How to Make a Cloak (VIDEO) with FREE DIY Hooded Cloak Pattern
Do you know what superheroes, princesses, witches, kings, and a whole lot of medieval characters have in common? Cloaks!
From Superman and Batman, over Little Red Riding Hood and Snow White, to Wonder Woman and Thor, everyone wears some sort of a cape. It’s their trademark! So, if you plan on putting together a cool costume, you will need a DIY hooded cape without a doubt.
Now get ready for a fun and easy Halloween project because you are about to learn how to make a cloak with the help of this hooded cloak pattern and video tutorial!
Since we enjoy sewing so much, buying a finished cape is a no-go. Making one from scratch is the real deal. It will save you money and the result will turn out way better than the store-bought alternative.

Below you will find my step by step DIY hooded cloak written tutorial with VIDEO instructions for all the visual learners.
We occasionally link to goods offered by vendors to help the reader find relevant products. Some of the links may be affiliate meaning we earn a small commission if an item is purchased.
Table of Contents
- 1 How to make a cloak
- 2 DIY Cloak Supplies and tools
- 3 How to Sew a Cape
- 3.1 Hooded Cloak VIDEO TUTORIAL
- 3.2 INSTRUCTIONS HOW TO SEW A CLOAK:
- 3.3 STEP 1: Prepare the hooded cloak pattern and fabric
- 3.4 STEP 2: Cut out the fabric
- 3.5 STEP 3: Finish the raw edges of the hood and hood lining
- 3.6 STEP 4: Assemble the hood
- 3.7 STEP 5: Turn the hood inside out
- 3.8 STEP 6: Hem the cloak fabric
- 3.9 STEP 7: Gather the top of the diy cloak
- 3.10 STEP 8: Assemble the hooded cloak
- 3.11 STEP 9: Finish the seam with ribbon
Introduction to hoods and capes
Before we dive in, let’s quickly cover the different capes and hoods that exist. The difference between them is in the amount of fabric needed and the complexity of making them.
There are five types of hoods:
- Square, the simplest one
- Slightly curved, like the ones on sweatshirts
- Curved, this is the one we will be making and it’s the most common kind used for costumes
- Grand, just like the one Gandalf wears
- Pointy, like the character from the Scream movie has
Capes also come in five types:
- Rectangle, the easiest to make, stays behind your back. This is the one we will be making
- Curved, similar to the previous type but wider at the bottom, gives a superhero kind of look
- Semicircle, the most common one, covers your shoulders but mostly stays behind you
- Fitted semicircle, upgraded version of the previous one, covers your front and back
- Circle, covers you all around, this one is used for fancy costumes of kings or something similar
Now that you have some basic knowledge about hoods and capes, you are ready to learn how to sew a cloak!
How to make a cloak
DIY Cloak Supplies and tools
The first thing you need to do before you can start making a DIY cape with hood is to gather the following tools and supplies:
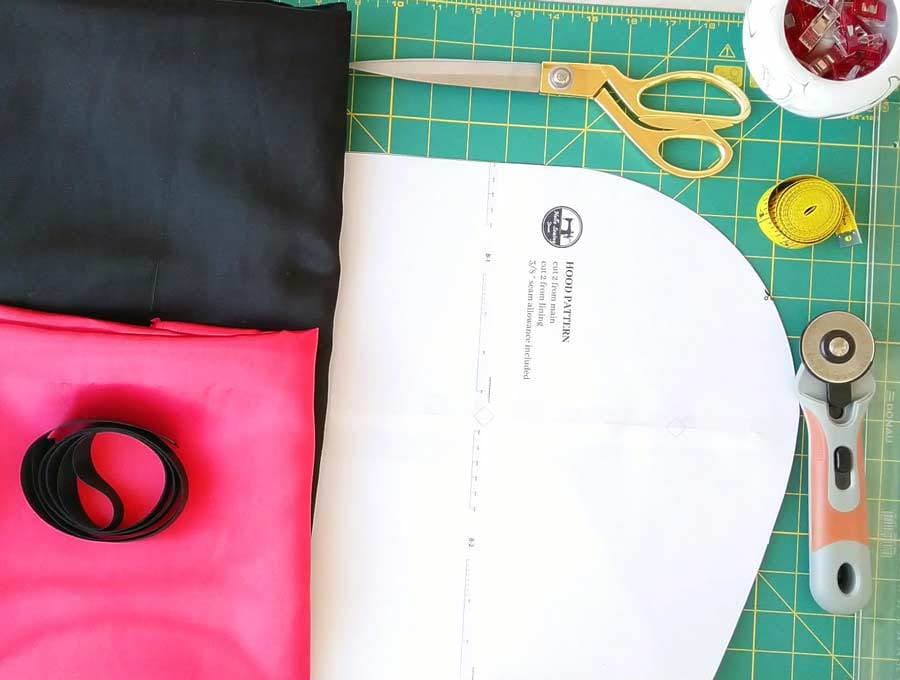
- fabric (main) – 2-3 yards of black satin or velvet
- fabric (hood lining) – 1/2 yard of red satin
- black grosgrain ribbon – 60 inches
- matching thread
- scissors (or rotary cutter and a cutting mat)
- ruler or measuring tape
- iron and ironing board
- sewing clips or pins
- sewing machine (it’s an easy sew, even a child sewing machine or a mini stitching machine can handle this)
With all that ready for use, you can move on to the next step of the tutorial.
DOWNLOAD: hooded cloak pattern (Free PDF file)
Follow us for free patterns & tutorials! [easy-profiles]
How to Sew a Cape
Watch the diy hooded cloak video first and then follow the written step by step instructions below.
Please enjoy and don’t forget to Like and SUBSCRIBE over on YouTube to be kept up to date with new videos as they come out.
Hooded Cloak VIDEO TUTORIAL
INSTRUCTIONS HOW TO SEW A CLOAK:
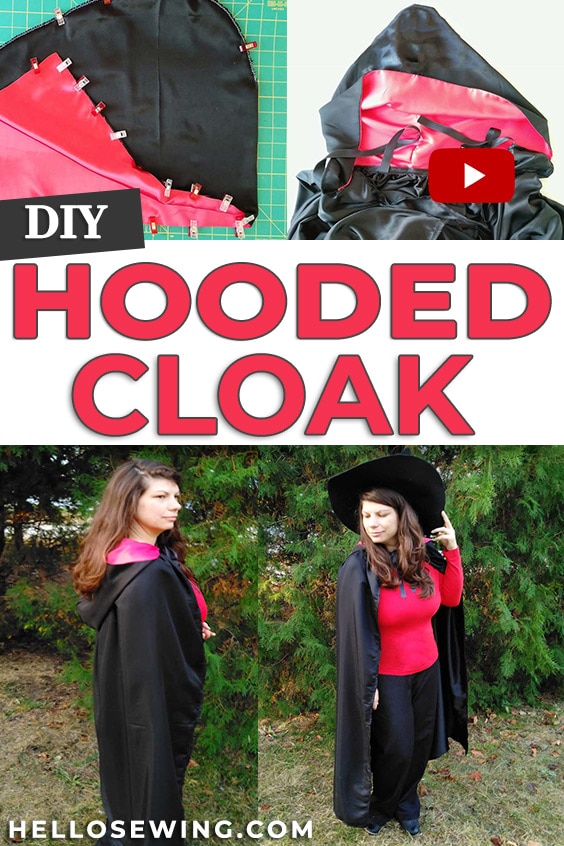
STEP 1: Prepare the hooded cloak pattern and fabric
Download the hood pattern and print it out at 100% (no scaling) on a US letter paper. If necessary, make the hooded cape pattern child-appropriate by adjusting the dimensions a bit. This one should work fine for kids that aren’t very small.
Cut out any excess paper and the hooded cloak template will be ready for you to use it.

TIP: Wash the fabric thoroughly to prevent it from deforming later on when the cape is complete.
STEP 2: Cut out the fabric
To make this DIY cloak, you will be cutting out the fabric for the hood first. Fold the main fabric in half, right sides together and then place your pattern on it. Make sure to have the upper edge of the hood on the fold. Use the pattern as a guide and cut the fabric.
Cut a second piece from the lining fabric, identical to the first piece.
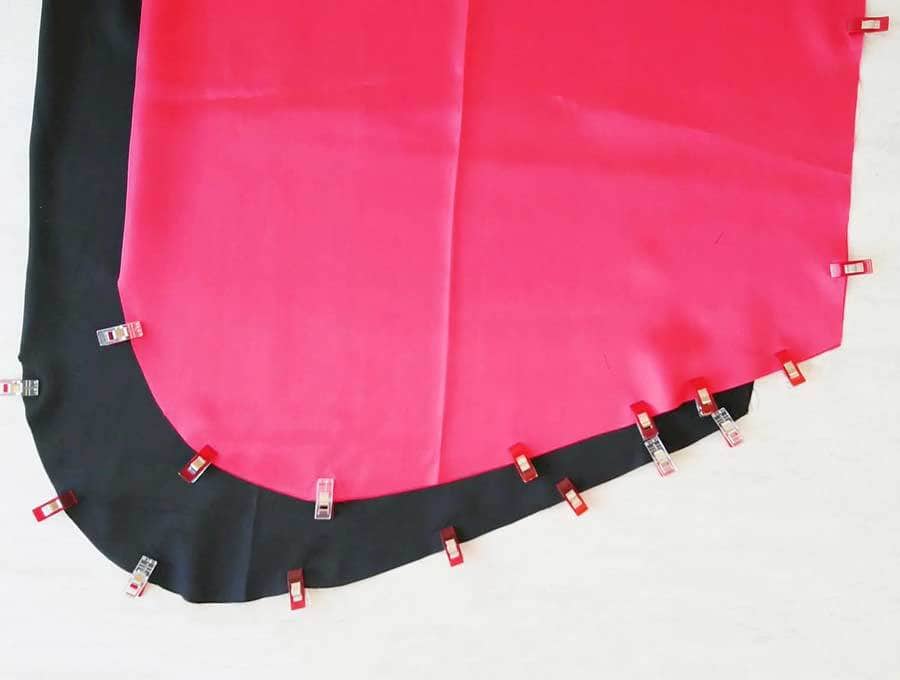
If your neckline is about 20 inches, the hood should be about 30 inches.
Decide how long you want your cloak to be and add about 5 inches to that for the shoulders and an inch for the seam allowance. Then cut out a piece that long and 60 inches wide. In my case, the dimensions of the cape were 60 x 57 inches.
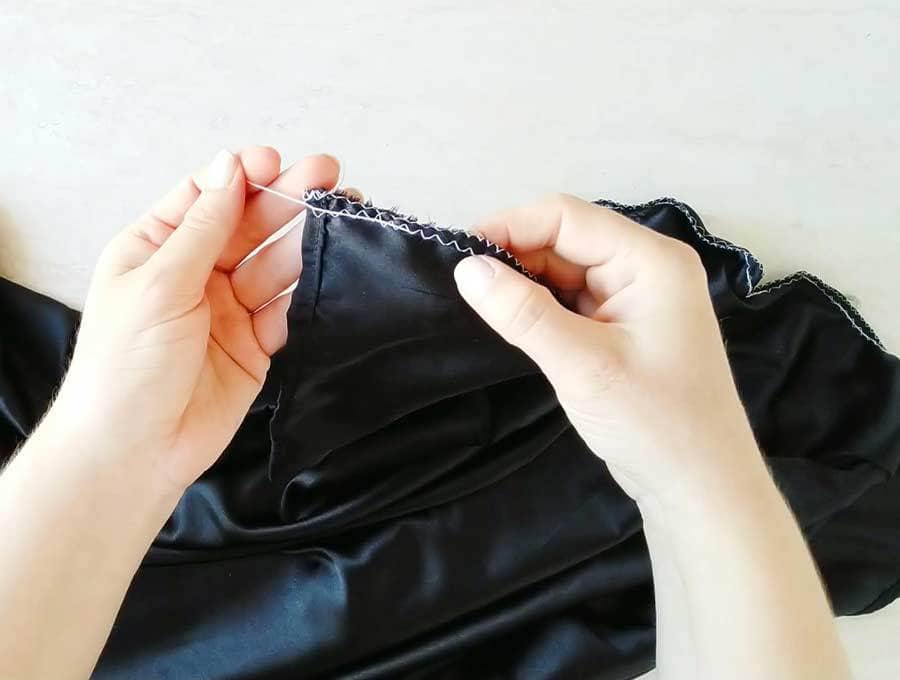
STEP 3: Finish the raw edges of the hood and hood lining
Pin the middle seam of the hood. Serge or finish these raw edges using the zig zag or the mock serger stitches on your machine, this will also join them. Repeat with lining.
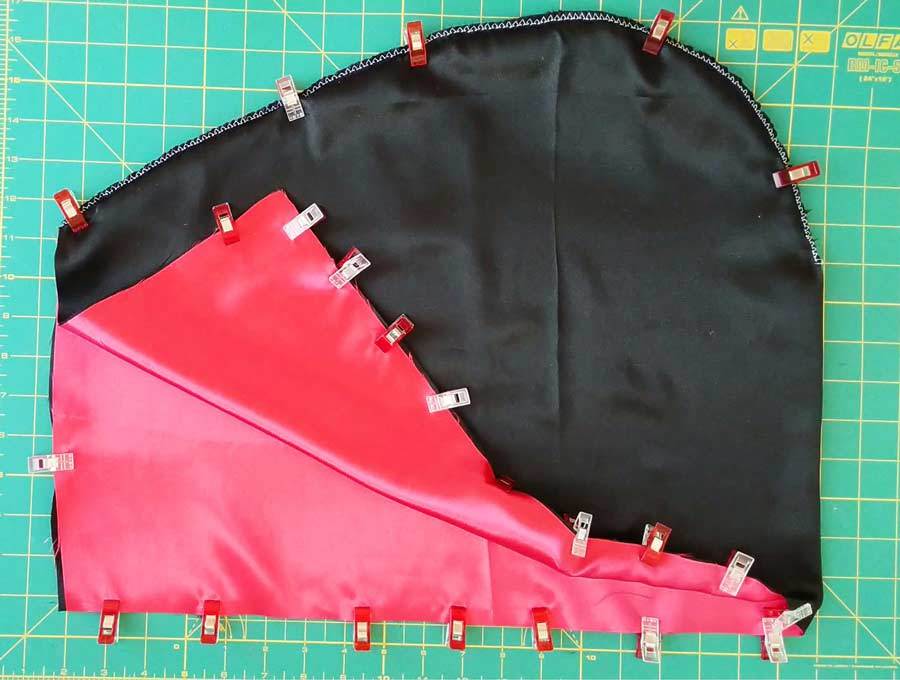
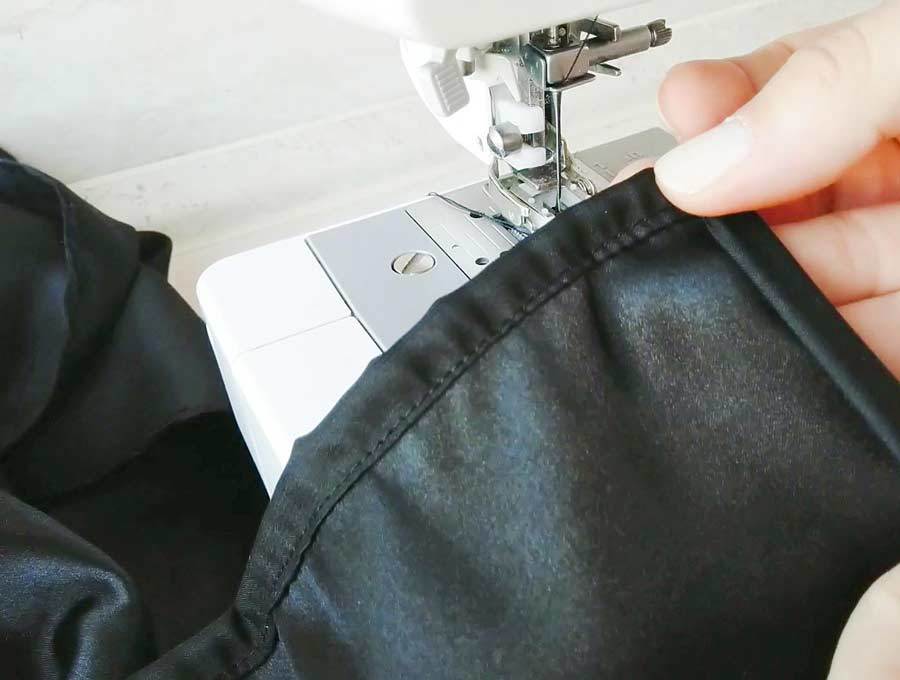
STEP 4: Assemble the hood
Put the lining over the main fabric so that their right sides face each other. Align the edges and pin or clip everything in place. Sew the two together with a half-inch seam allowance. Leave the bottom part unsewn
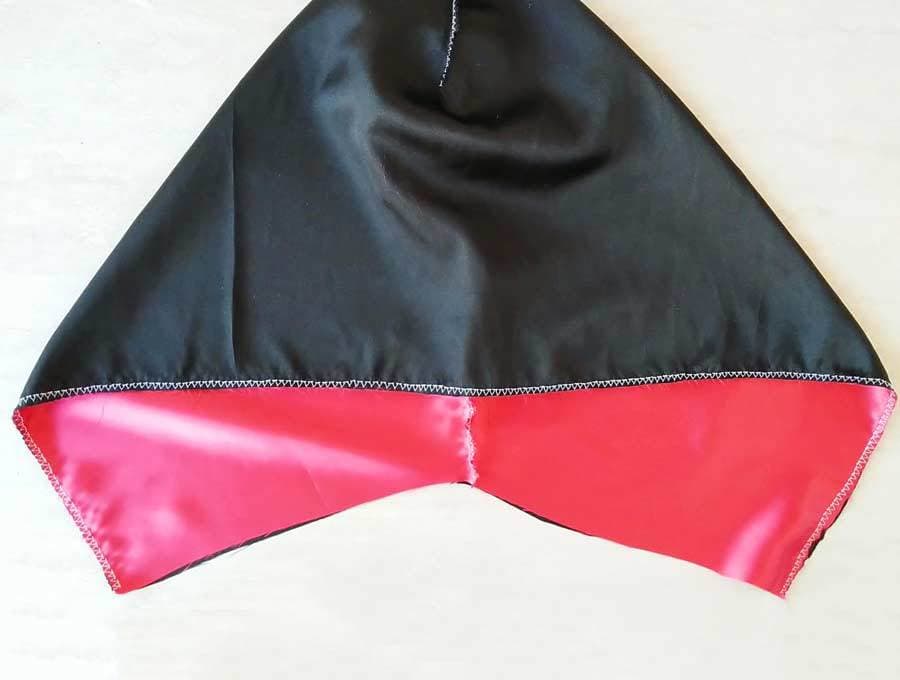
STEP 5: Turn the hood inside out
Turn the whole thing right side out and press the hood. Leave aside
STEP 6: Hem the cloak fabric
If you decided to use velvet, skip this step.
If you used satin then fold over the edges twice for about a quarter of an inch, press, and stitch all around. Hem the sides and the bottom edge. Leave the top unhemmed
STEP 7: Gather the top of the diy cloak
There are a few ways to do gathers, so you can use whichever you prefer, but I’m going to show you my favorite way to do gathers.
Cut a piece of strong thread, about 70 inches long and place it on top of the fabric, under the middle of the foot. Set your stitch to large zig zag and zig zag over the entire length of the cloak. Be careful not to catch the strong thread.
Pull up on each side of the thread until you gather the top of the cloak until it is approximately the same length as the bottom of your hood. Distribute the gathers evenly.
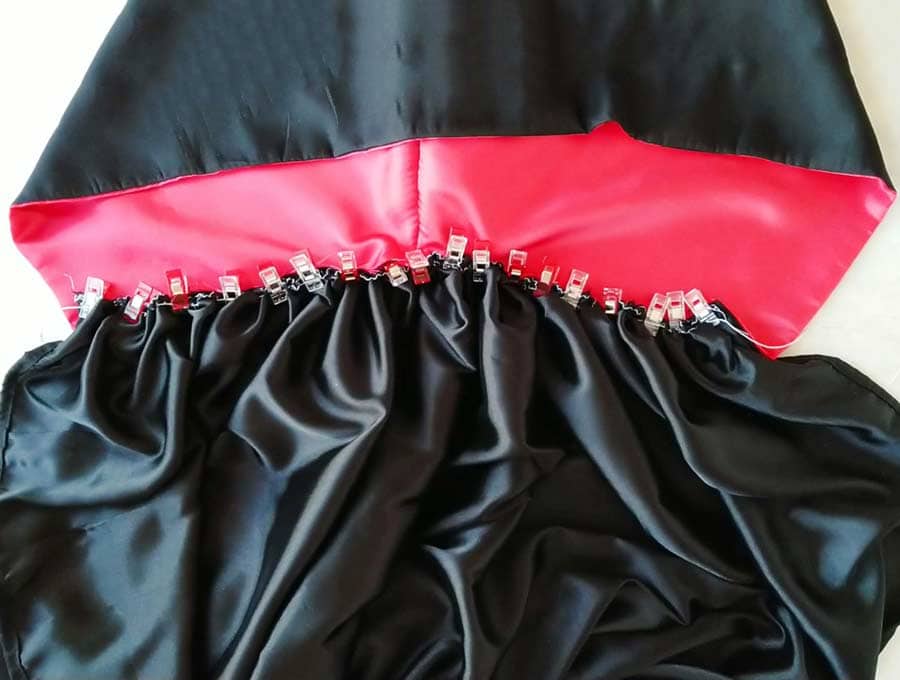
STEP 8: Assemble the hooded cloak
Align the bottom edge of the hood with the top of the cloak. Pin both together towards the inside of the cape. Sew using 1/2 inch seam allowance
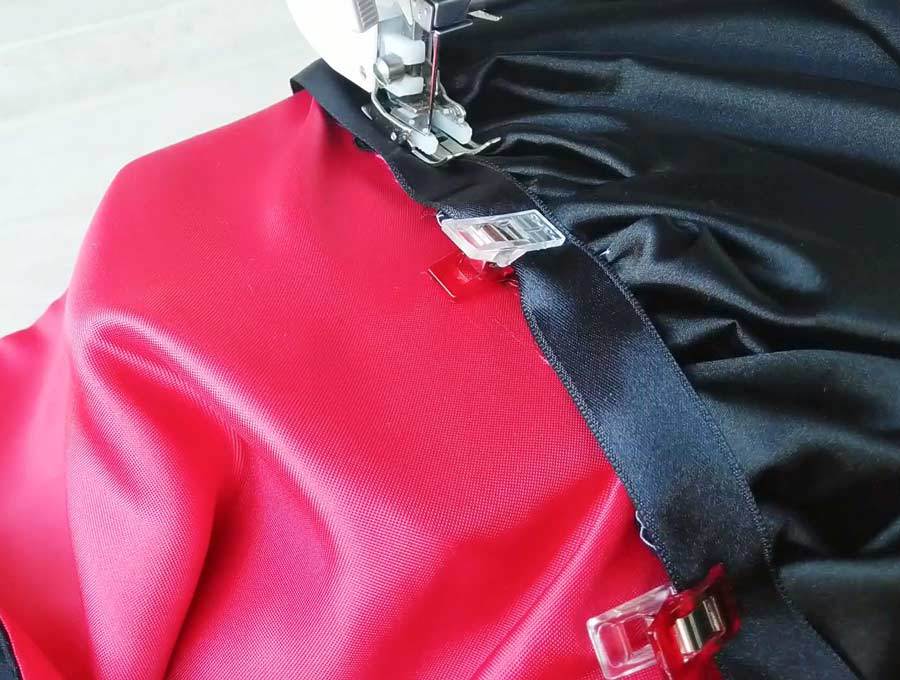
STEP 9: Finish the seam with ribbon
Put the ribbon over that place where the two join. Pin the three fabrics in place.
Make two parallel stitches over the section where the three fabrics overlap.
Done! Now you know how to make a hooded cape!
What do you think about this project? Did you try and make the hooded cloak? Was the hooded cloak pattern easy to sew? Let us know how it turned out, we appreciate your feedback! If you know how to make this costume even better, share your ideas with everyone in the comment section below. Have fun during Halloween!
Do you like my hooded cloak pattern and tutorial? Pin for later:
Wanna be friends? Click HERE and follow me on Pinterest
Wondering what to do with the gorgeous offcuts from making the cloak? I’ve made this DIY dice bag and my son loves it. It’s adorable and sews up quickly.
RELATED:
- DIY Witch Hat Tutorial
- Fabric pumpkins
- Hooded towel tutorial – the easiest way to make a sun hooded project for the kids. Makes a great gift