
3 Stripe Denim Tote Bag // Recycle Old Jeans // Denim Sewing project
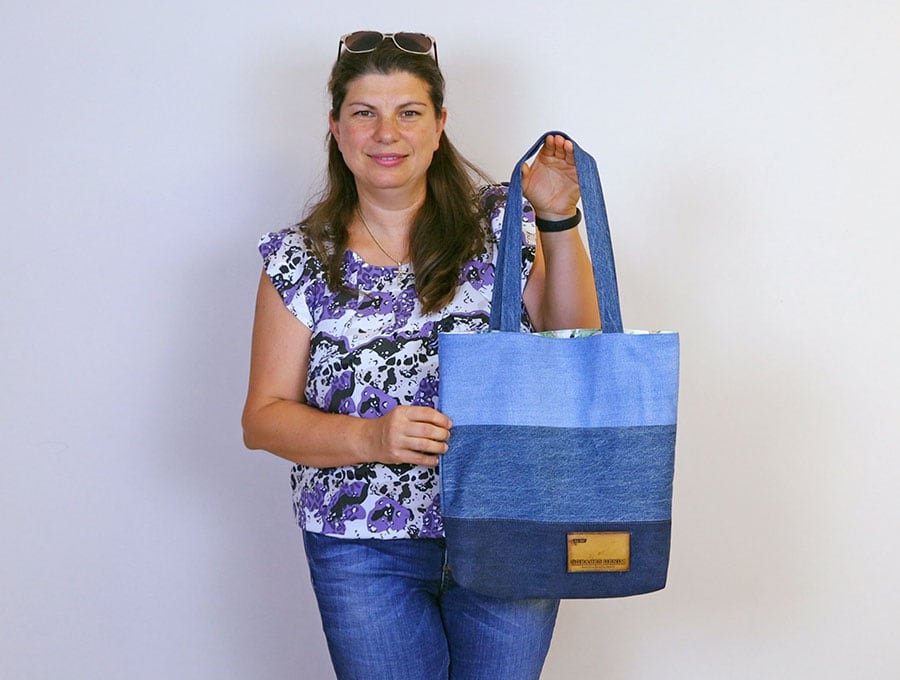
Made great memories in your blue jeans? Can’t bear to part with them even though they aren’t quite what the style you’re wearing now? Well, make them into a tote bag for beach, country or the city and keep those memories close. Less than an hour of your time and you’ll have a bag you can use for years if you’re the Forever in Blue Jeans type of girl.
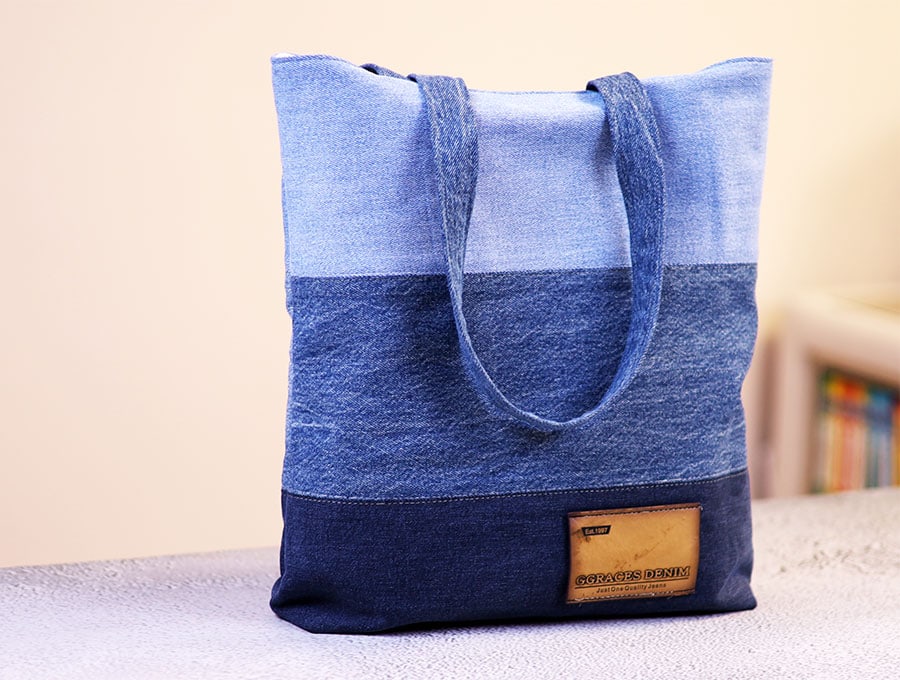
I love, love, love, upcycling projects and what better way to use the denim fabric from your old jeans than to create a tote bag that you can take everywhere from the beach, a picnic in the park, or for your shopping.
Below you will find my step by step written tutorial with VIDEO instructions for all the visual learners.
We occasionally link to goods offered by vendors to help the reader find relevant products. Some of the links may be affiliate meaning we earn a small commission if an item is purchased.
Table of Contents
- 1 How to make the 3 stripe denim tote bag
- 2 Supplies and tools
- 3 How to Sew a 3-color denim bag
- 3.1 3-stripe Denim Tote Bag VIDEO TUTORIAL
- 3.2 MEASUREMENTS:
- 3.3 INSTRUCTIONS:
- 3.4 STEP 1:
- 3.5 STEP 2:
- 3.6 STEP 3:
- 3.7 STEP 4:
- 3.8 STEP 5:
- 3.9 STEP 6:
- 3.10 STEP 7:
- 3.11 STEP 8:
- 3.12 STEP 9:
- 3.13 STEP 10:
- 3.14 STEP 11:
- 3.15 STEP 12:
- 3.16 STEP 13:
- 3.17 STEP 14:
- 3.18 STEP 15:
- 3.19 STEP 16:
- 3.20 STEP 17:
- 3.21 STEP 18:
- 3.22 STEP 19:
- 3.23 STEP 20:
- 3.24 STEP 21:
- 3.25 STEP 22:
- 3.26 STEP 23:
- 3.27 STEP 24:
- 3.28 STEP 25:
- 3.29 STEP 26:
- 3.30 STEP 27:
- 3.31 STEP 28:
- 3.32 STEP 29:
- 3.33 STEP 30:
- 3.34 STEP 31:
- 3.35 STEP 32:
- 3.36 STEP 33:
- 3.37 STEP 34:
- 3.38 STEP 35:
- 3.39 STEP 36:
- 3.40 STEP 37:
- 3.41 STEP 38:
- 3.42 STEP 39:
- 3.43 STEP 40:
- 3.44 STEP 41:
- 3.45 STEP 42:
- 3.46 STEP 43:
How to make the 3 stripe denim tote bag
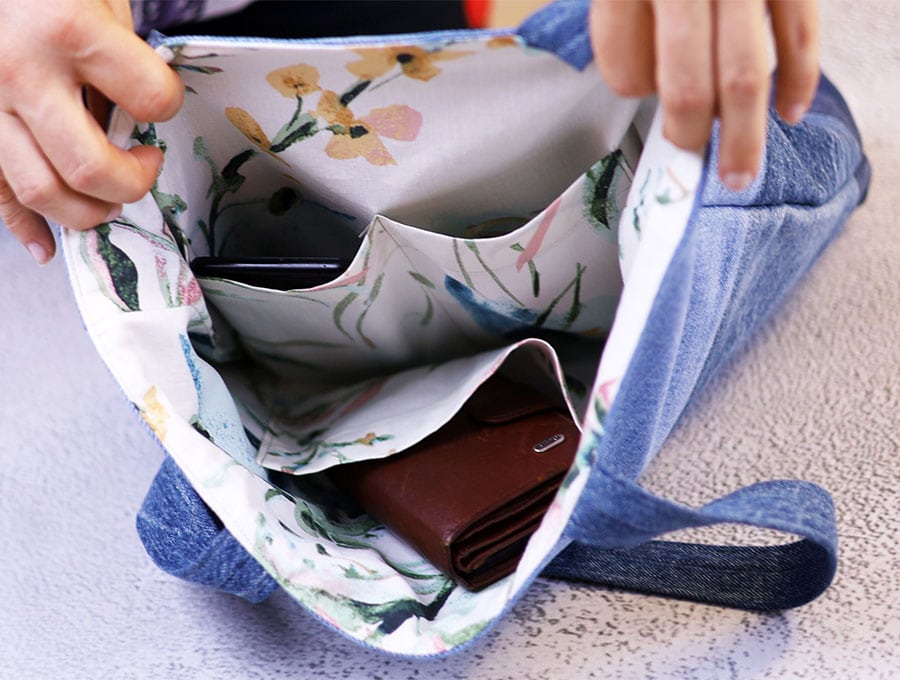
There are 3 pockets inside to fit your glasses and essentials
Supplies and tools
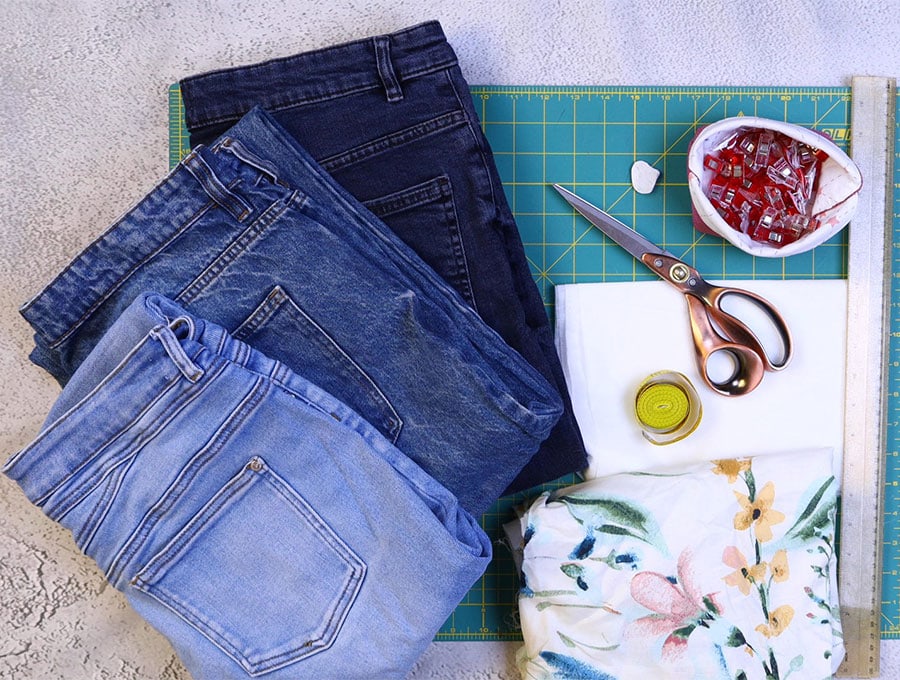
- fabric – three pairs of old jeans in 3 different shades
- fabric – 1 pieces of woven cotton (lining)
- fusible interfacing
- matching thread
- scissors (or rotary cutter and a cutting mat)
- ruler or measuring tape
- iron and ironing board
- sewing clips or pins
Follow us for free patterns & tutorials! [easy-profiles]
How to Sew a 3-color denim bag
Watch the diy 3-color denim tote bag video first and then follow the written step by step instructions below.
Please enjoy and don’t forget to Like and SUBSCRIBE over on YouTube to be kept up to date with new videos as they come out.
3-stripe Denim Tote Bag VIDEO TUTORIAL
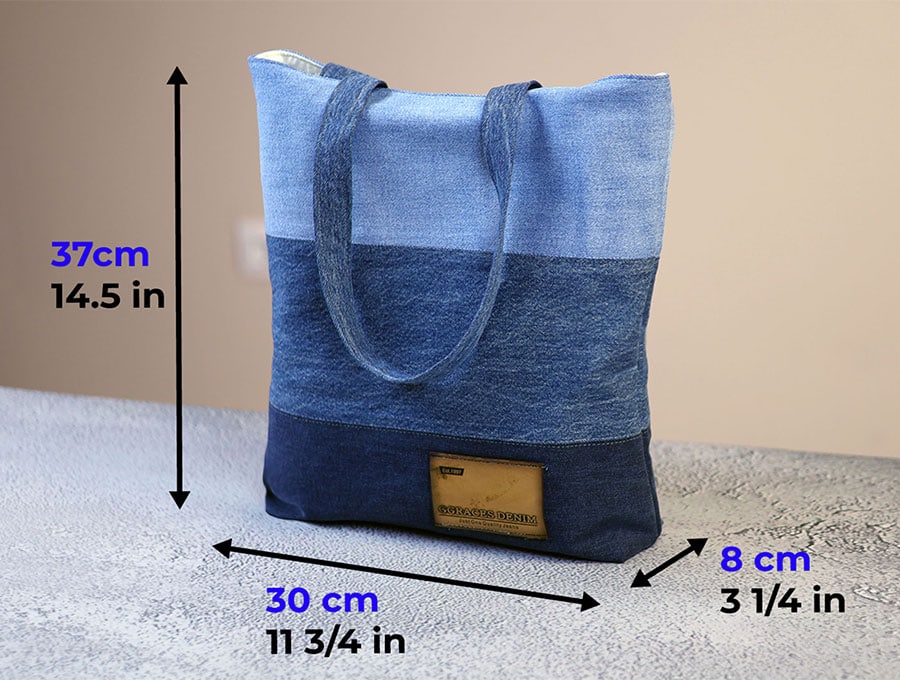
MEASUREMENTS:
Finished size of the bag is: (W x H x D):
30 x 37 x 8 cm (11 3/4″ x 14.5″ x 3 1/4″)
INSTRUCTIONS:
STEP 1:
Assemble the garments you want to upcycle. And cut out three strips 16 x 6 ¼ inches 40 x 16 cm) from the legs of some denim jeans. You’ll probably need a minimum of two pairs of jeans, with the lighter denim in the middle and the darker denim for the top and bottom. Keep the rest of the garment as there are loads of different uses for everything from pockets to the waist band and other bits and pieces – zero waste!
STEP 2:
Once you have the 6 pieces – 3 for the front and 3 for the back of the bag, lay them out right side up in the order you want them on your worktop. Make sure the left and right hand stripes of denim match up.
STEP 3:
Flip the bottom piece up, right side to right side and clip in place. Repeat with the other side of the bag.
STEP 4:
Stitch together the strips you pinned using a 3/8 of an inch (1 cm) seam allowance, backtacking at the start and finish.
STEP 5:
Open out the joined strips and place them back in position on your worktop, then flip the unjoined top piece down and clip in place to the middle piece. Repeat with the other side of the bag.
STEP 6:
Stitch together the strips you pinned using a 3/8 of an inch (1 cm) seam allowance, backtacking at the start and finish, so you have the 3 pieces joined.
STEP 7:
To make the handles open out the inner seam of one leg of denim jeans and cut two pieces of 23 ½ x 3 ¼ inches (60 x 8 cm), on the straight grain of the length of the leg.
STEP 8:
Turn the 2 pieces of handle fabric wrong side up and fold each of the long sides up 3/8 of an inch (1 cm). You can use an iron to press the folds in place.
STEP 9:
Fold the handles in half along the length so the two folds meet up and clip on pin in place. It is your choice if you want to press the new fold you just made.
STEP 10:
Stitch along both sides of the handles 1/8 of an inch (3 mm) from the edge.
STEP 11:
Take the front and back of the body of the bag and press the seams open.
STEP 12:
Optional: If you are going to be attaching a label then now is the time to pin it in place on the bag – usually lower left or right or on upper right.
STEP 13:
Take a template card you can make that is 1 ½ x 1 ½ inches (4 x 4 cm) square and position it on the lower left side of the bag corner and use a fabric pen to mark the two sides. Mark the right lower corner as well. Then repeat on the other side of the bag.
STEP 14:
Cut out the four corners you have marked.
STEP 15:
Place the fusible interfacing on the wrong sides of the bag body pieces, flip over and press on the right side with your iron to attach.
STEP 16:
Do a line of top stitching on either side of each of the stripe seams 1/8 of an inch (3mm) from the actual seam join on the right side of the bag body pieces.
STEP 17:
Optional: If you pinned a label onto your bag now is the time to top stitch around the edge of the label.
STEP 18:
Take the 2 pockets pieces that are cut to 8 ½ x 8 ½ inches (22 x 22 cm) and press around the edge of three sides, folding in 3/8 of an inch (1 cm).
STEP 19:
Use a ruler or tape measure to measure 1 ¼ inches (3 cm) and 2 3/8 of an inch (6 cm) from the top of the side that has no fold pressed into it, making marks at these points, repeat the marks on the other side of the pocket piece. Fold down to the first set of marks and press, then to the second set and press.
STEP 20:
Stitch along the double fold of the pocket to hold the fold in place.
STEP 21:
Fold each pocket piece in half along the top fold and finger press to mark the center.
STEP 22:
Take the lining pieces and fold each one in half to find the center of the top and finger press.
STEP 23:
Take a ruler and measure 4 inches (10 cm) down from the center fold and make a mark.
STEP 24:
Line up each pocket piece’s center finger pressed fold with the mark you made in the previous step – use a ruler to check the pocket is straight by measuring the distance from the top of the lining to the left and right top corners of the pockets, then pin the pocket pieces in place.
STEP 25:
Stitch around the edges of the pocket pieces starting from the top left hand side and going around the pocket to the top right hand side 1/8 of an inch (3 mm) from the edge. Backtack at the start and finish to strengthen the pocket corners.
STEP 26:
Choose one of the pocket pieces and make a division in the center, measuring an equal distance form each side at the bottom so it lines up with the finger pressed center at the top. Stitch down the center, backtacking at the start and finish.
STEP 27:
With the lining pieces right side up and the pocket openings facing the top of the worktop, use your card template of 1 ½ x 1 ½ inches (4 x 4 cm) square and mark out the left and right lower corners of the lining pieces, then cut out the pieces.
STEP 28:
Place the lining pieces right side to right side and pin together. Leave a gap of about 4 inches on the one side of the bag lining and mark this so you don’t accidentally stitch over it.
STEP 29:
Stitch the lining pieces together, right side to right side 3/8 of an inch (1 cm) from the raw edges, around three sides of the lining, avoiding the gap.
STEP 30:
Mark the position for the handles on the outer body pieces of the bag by measuring 4 inches (10 cm) in from each side at the top and making a mark.
STEP 31:
Place the raw edges of the end of one of the handles on the inner side of the mark, towards the center and do the same with the other end, lining up the raw edges of handle and bag. Repeat with the other side of the bag and the other handle.
STEP 32:
Stitch the handles in place with a ¼ inch (6 mm) seam allowance.
STEP 33:
With right sides facing each other line up the edges of the main bag – keep the handles up and out of the fabric, then clip the sides and base together. Stitch down the sides, then stitch along the bottom, backtacking at the start and finish of all seams.
STEP 34:
Press the side and bottom seams of the lining open, then join bottom to side seam and clip.
STEP 35:
Stitch across the corners of the base of the lining, 3/8 of an inch (1 cm) from the edge.
STEP 36:
Press the side and bottom seams of the main body of the bag open, then join bottom to side seam and clip.
STEP 37:
Stitch across the corners of the base of the bag, 3/8 of an inch (1 cm) from the edge.
STEP 38:
Turn the lining the right way out, pressing out the boxed corners with your turning tool.
STEP 39:
Place the lining inside the main body of the bag (which is still inside out) so the right sides face each other. Line up the raw edges of the top of the lining and bag and clip in place, making sure the seams line up with each other, and the handles face down into the fabric.
STEP 40:
Stitch around the top of the bag 3/8 of an inch (1 cm) from the raw edges, backtacking at the start and finish.
STEP 41:
Pull the pining out of the bag, reach in through the gap, locate the handles and pull them through the gap, followed by the body of the bag.
STEP 42:
Give the whole bag a press, then slipstitch the gap in the lining closed by hand after turning in the raw edges.
STEP 43:
Push the lining back in the bag and make sure it sits well before clipping the top edge and doing your final topstitch 1/8″ (3 mm) from the top edge.
Here i
The bag is now ready to use or gift! Like and subscribe for more great ideas from HelloSewing that puts fabric that may otherwise end up in landfill to good use.
Do you like this? Pin for later:
Wanna be friends? Click HERE and follow me on Pinterest
RELATED: