
Bow Shape Pillow in Three Sizes [VIDEO + Pattern]
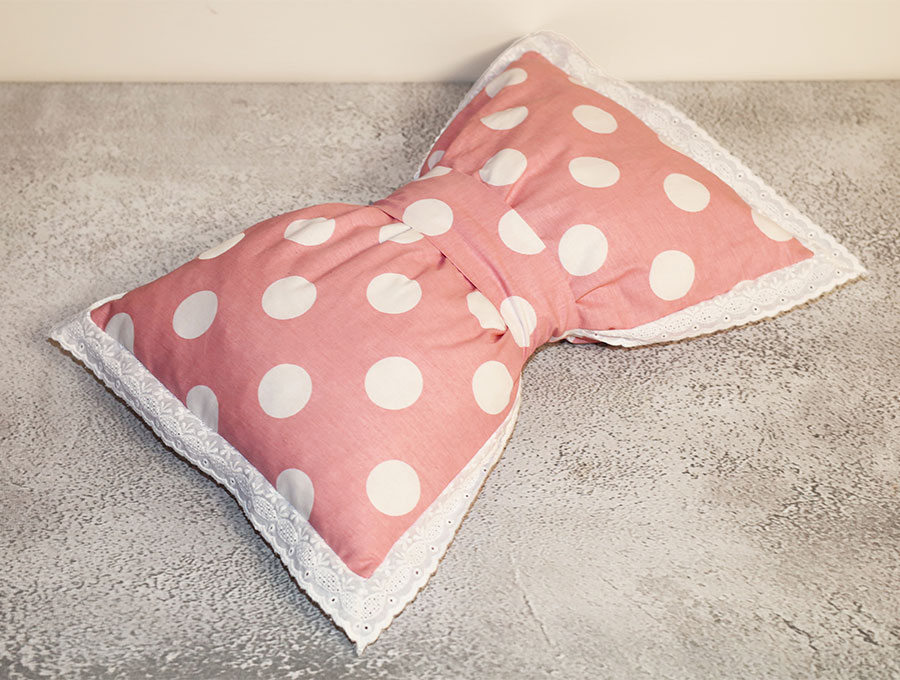
Create this pretty bow pillow that will add an individual touch to a room – whether it is in a pretty print or stripe for a baby’s nursery, a child’s room, or a more sophisticated velvet or boucle for a bedroom or lounge. The pillow can be made in three different sizes, depending on where it will be used, and can be either classically simple, or with a ruffle around the edges or a lace trim – the choice is yours.
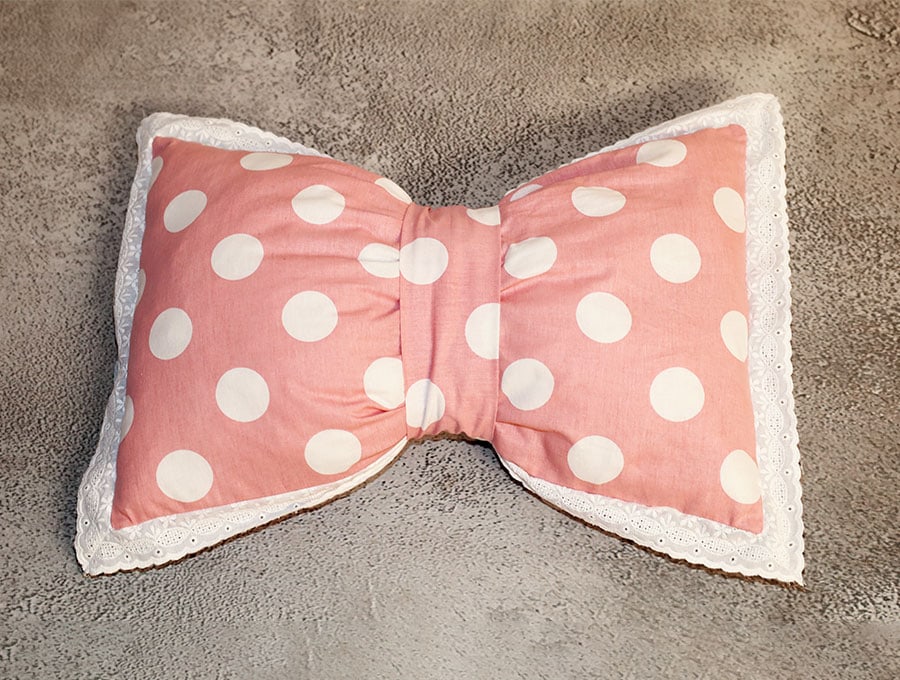
Want a feminine way to spruce up a bed or a couch? Then create this bow pillow that is bound to be a talking point. The pillow comes in three sizes – depending on whether you are decorating a room for an adult, a child, or a baby nursery.
Below you will find my step by step written tutorial with VIDEO instructions for all the visual learners.
We occasionally link to goods offered by vendors to help the reader find relevant products. Some of the links may be affiliate meaning we earn a small commission if an item is purchased.
Table of Contents
- 1 How to make the bow pillow
- 2 Supplies and tools
- 3 How to Sew a Bow shaped pillow
- 3.1 Bow Pillow VIDEO TUTORIAL
- 3.2 MATERIALS:
- 3.3 INSTRUCTIONS:
- 3.4 STEP 1:
- 3.5 STEP 2:
- 3.6 STEP 3:
- 3.7 STEP 4:
- 3.8 STEP 5:
- 3.9 STEP 6:
- 3.10 STEP 7:
- 3.11 Option 1 for the Classic Bow Pillow:
- 3.12 STEP 8:
- 3.13 STEP 9:
- 3.14 STEP 10:
- 3.15 Option 2: The ruffle bow pillow
- 3.16 STEP 8:
- 3.17 STEP 9:
- 3.18 STEP 10:
- 3.19 STEP 11:
- 3.20 STEP 12:
- 3.21 STEP 13:
- 3.22 STEP 14:
- 3.23 STEP 15:
- 3.24 STEP 16:
- 3.25 STEP 17:
- 3.26 STEP 18:
- 3.27 STEP 19:
- 3.28 STEP 20:
- 3.29 STEP 21:
- 3.30 STEP 22:
- 3.31 STEP 23:
- 3.32 STEP 24:
- 3.33 Option 3 for the main pillow with lace trim only
- 3.34 STEP 8:
- 3.35 STEP 9:
- 3.36 STEP 10:
- 3.37 STEP 11:
- 3.38 STEP 12:
- 3.39 STEP 13:
- 3.40 STEP 14:
- 3.41 STEP 15:
- 3.42 STEP 16:
- 3.43 STEP 17:
- 3.44 STEP 18:
- 3.45 STEP 19:
- 3.46 STEP 20:
- 3.47 STEP 21:
- 3.48
How to make the bow pillow
Supplies and tools
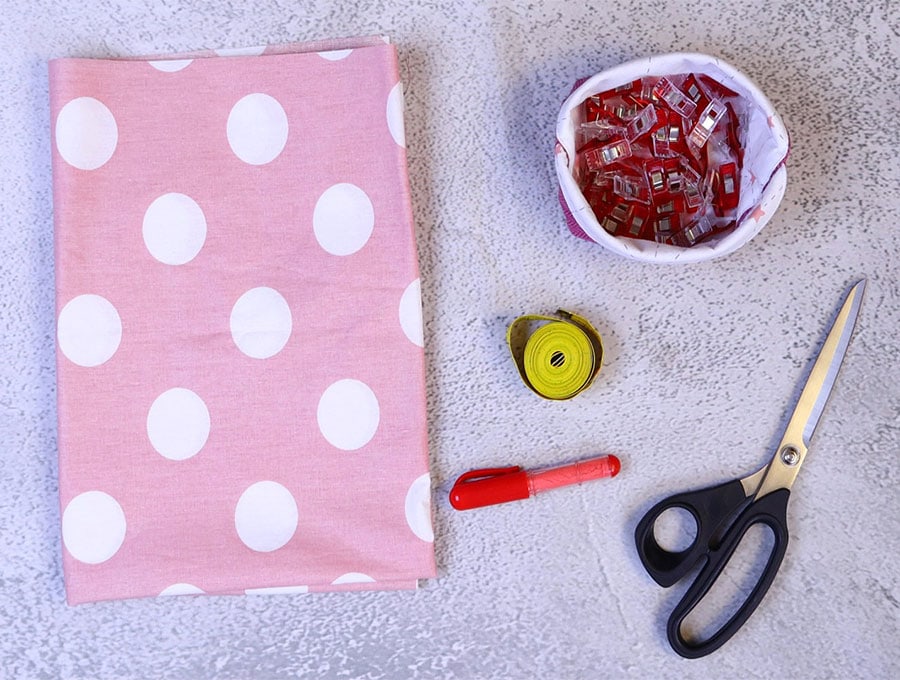
- fabric – 2 pieces of woven cotton (one main, one contrasting for the ruffle)
- optional fabric for the ruffle: lace, cotton fabric
- polyester stuffing
- matching thread
- scissors (or rotary cutter and a cutting mat)
- ruler or measuring tape
- iron and ironing board
- sewing clips or pins
Follow us for free patterns & tutorials! [easy-profiles]
How to Sew a Bow shaped pillow
Watch the diy Bow shaped pillow video first and then follow the written step by step instructions below.
Please enjoy and don’t forget to Like and SUBSCRIBE over on YouTube to be kept up to date with new videos as they come out.
Bow Pillow VIDEO TUTORIAL
MATERIALS:
Today I’m showing you three ways to make the bow pillow and in three sizes.
- Option 1: The classic bow pillow
- Option 2: The ruffle bow pillow – the ruffle will be 4 inches wide x 1.75 times the circumference of the pillow long. In our case that is 72 inches x 1.75 = 126 inches long. (final ruffle dimensions 320 x 10 cm or 126 x 4 inches).
- Option 3: Lace bow pillow
The bow pillow sizes are:
- Small – 21 x 14 inches (53.3 x 35.5 cm) finished. Cut ½ inch extra (1.27 cm)
- Medium – 24 x 16 inches (61 x 40.6 cm) finished. Cut ½ inch extra (1.27 cm)
- Large – 27 x 18 inches (68.6 x 45.7 cm) finished. Cut ½ inch extra (1.27 cm)
The bow center can be either slim or wide:
- slim: 6 x 19 inches (15 x 48 cm)
- wide 8.5 x 19 inches (21 x 48 cm)
The dimensions I give in the video tutorial are for a small pillow. Simply substitute the sizes given above to create a medium or large pillow. The medium and large pillows should have a wider center band.
Choosing your fabric:
The pillow fabric should be cotton, linen, or silk, as the vibrations are in harmony with those of the body and provide comfortable rest.
In holistic health and bioenergetics the concept of vibrations suggests that fabrics possess measurable, unique vibrational frequencies. These are measured in Hz or MHz, and can influence your energy levels and mood. Organic cotton has been measured at a vibration of 100 which perfectly matches the human body vibration of 100.The vibrations from polyester by contrast are quite low – around 5 and will not provide a restful experience. Silk and linen are reported at around 5000Hz and are considered exceptionally harmonious with our body vibrations. These figures can, however, vary depending on how the fibers for the fabric were processed – for example the use of pesticides and bleaching, among other factors.
INSTRUCTIONS:
STEP 1:
You need to cut:
- 2 x pieces of cotton fabric of 21 ½ x 14 ½ inches (55 x 37 cm) for the small pillow.
- 1 x piece of cotton fabric for the slim bow center of 19 x 6 inches ( 48 x 15 cm)
- Optional lace trim, can be a similar or a contrast color: 72 x 1 ½ to 2 ½ inches (183 x 4 to 6 cm)
STEP 2:
Take the bow piece and turn in one end ¼ of an inch (6 mm) and press, the fold the fabric along the length, right side to right side, lining up the raw edges and press again.
STEP 3:
Stitch along the length with a seam allowance of ¼ of an inch (6 mm), back tacking at the start and finish.
STEP 4:
Fold so the seam is in the middle of the fabric tube and press the seam open.
STEP 5:
Turn the tube the right way out, make sure the seam runs down the middle of the back of the tube and give the piece a press.
STEP 6:
Take the raw edge of the bow center and slip it inside the folded edge, about 3/8 an inch (1 cm) and pin in place.
STEP 7:
Stitch down 1/8 of an inch (3 mm) from the folded edge, backtacking at the start and finish.
Option 1 for the Classic Bow Pillow:
STEP 8:
Place the two main pieces of the pillow right side to right side and pin or clip together.
STEP 9:
Mark a gap of around 4 inches (10 cm) in one of the long sides near the middle, through which you will later pull the fabric to turn the pillow the right way out.
STEP 10:
Sew around the pillow ¼ of an inch (6 mm) from the edge, backtacking at the start and finish.
Option 2: The ruffle bow pillow
The ruffle will be 4 inches (10 cm) wide x 1.75 times the perimeter of the pillow long.
In our case that is 72 inches (183 cm) x 1.75 = 126 inches (320 m) long.
Final ruffle dimensions 126 x 4 inches (320 x 10 cm).
STEP 8:
If you do not have the length for the ruffle you can join a few pieces together. If possible I suggest joining them at 1.75 times the length and breadth of the pillow: Length: 2 pieces each of 38 ½ inches (21 ½ inches + ½ inch seam allowance x 1.75) or 97.8 cm
Width: 2 pieces each of 26 ¼ inches (14 ½ inches + ½ inch seam allowance x 1.75) or 66.7 cm
Lay the pieces one short side to one long side, right sides facing in and stitch ¼ of an inch from the edge. Repeat with the other two pieces, then join together so you alternate one long side with one short side.
STEP 9:
Open all the seams where you joined the fabric and press with an iron.
STEP 10:
Fold the ruffle in half on the length, wrong sides inside and press along the length.
STEP 11:
To create the ruffle, work from seam to seam. If you did not join fabric then measure the length and breadth according to the dimensions given in Step 8 – 38 ½ x 26 ¼ inches (97.8 x 66.7) alternating one short and one long length – mark with a pin or a fabric marking pen.
STEP 12:
Set your machine to a zigzag gathering stitch and lay dental floss or strong cotton about 4 inches (10 cm) longer than each side, overhanging equally at both ends, near the raw edges, just under ¼ of an inch (6 mm) from the edge.
STEP 13:
Zigzag over the dental floss or strong cotton. Repeat with the other three sides. It is much easier to do each side separately rather than trying to do the whole length of ruffle at once.
STEP 14:
Draw up the dental floss or thread on each side until the ruffle fits the pillow shape.
STEP 15:
Pin the raw edges of the ruffle to the raw edges of the right side of the pillow front.
STEP 16:
Ensure the gathers are even on each of the four sides, then pin or clip the ruffle to the pillow front.
STEP 17:
Stitch just under ¼ inch (6 mm) from the edge all the way around the four sides of the pillow to attach the ruffle.
STEP 18:
Place the two main pieces of the pillow right side to right side and pin or clip together.
STEP 19:
Mark a gap of around 4 inches (10 cm) in one of the long sides near the middle, through which you will later pull the fabric to turn the pillow the right way out.
STEP 20:
Stitch just inside the stitch line where you attached the ruffle, towards the center of the pillow, backtacking on either side of the gap.
STEP 21:
Trim off a small triangle at each corner of the pillowcase to allow for less bulk when turning the right way out, and fold the raw edge of the gap in line with the seam and finger press.
STEP 22:
Turn the pillowcase the right way out and press after turning out the corners.
STEP 23:
Start stuffing the pillowcase with fiberfill. Once the pillow is stuffed to the desired plumpness, then either hand sew or machine stitch the gap closed with matching thread.
STEP 24:
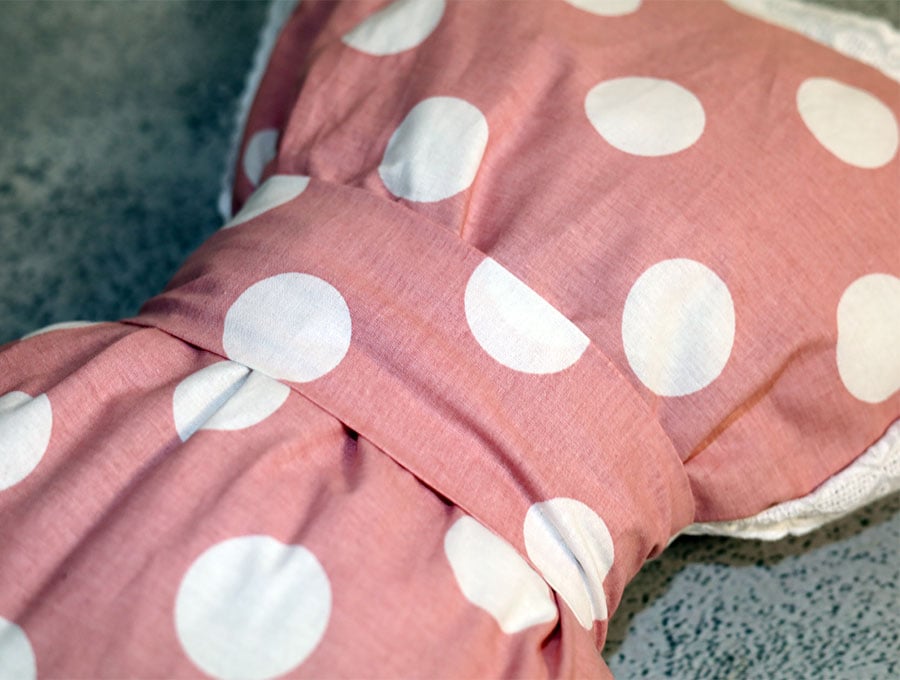
Slip the bow center over the pillow and position it in the middle of the pillow, making sure the seam where you joined the fabric to make the loop is in the middle at the back of the pillow.
Option 3 for the main pillow with lace trim only
STEP 8:
Cut 4 lengths of lace – 2 for the long sides that extend about 2 inches (5 cm) on either side of the fabric, and 2 for the short sides also extending 2 inches (5 cm) on either side of the fabric.
STEP 9:
Lay the lace with the scalloped edge towards the center of the pillow along the top and bottom first, and pin in place, with the overhang 2 inches (5 cm) on either side.
STEP 10:
Stitch along the one long edge starting ¼ inch (6 mm) from the corner and stitching with a ¼ inch (6 mm) seam allowance. When you get to the end stop ¼ of an inch (6 mm) from the end. Trim your thread then fold back the extra piece in line with the stitching.
STEP 11:
To add the side piece, lay the lace down with the 2 inch (5 cm) overhang and start stitching ¼ inch from the corner, again using a ¼ inch (6 mm) seam allowance, again stopping ¼ of an inch (6 mm) from the end. Trim your thread then fold back the extra piece in line with the stitching.
Repeat Steps 10 and 11 so all four sides of the pillow have the lace attached.
STEP 12:
Fold the pillow diagonally, right side facing each other, making sure the ends of the lace are lying flat on top of each other. Take a quilting ruler and extend the line from the fold onto the lace at a 45 degree angle, marking the line with a fabric marking pen. Repeat with the other three corners.
STEP 13:
Stitch along the marked lines, backtacking at the start and finish. When all four corners are finished trim off the excess lace ¼ inch ( 6 mm) from the stitch line.
It is optional whether you wish to serge or zigzag stitch across the raw edges of the lace corners.
STEP 14:
Fold the lace in towards the pillow center. Be careful around the corners as you will need to fold and tuck the lace, then pin it so it does not accidentally get caught up when you stitch the two sides of the pillowcase together.
STEP 15:
Place the two main pieces of the pillow right side to right side and pin or clip together.
STEP 16:
Mark a gap of around 4 inches (10 cm) in one of the long sides near the middle, through which you will later pull the fabric to turn the pillow the right way out.
STEP 17:
Stitch just inside the stitch line where you attached the lace, backtacking on either side of the gap.
STEP 18:
Trim off a small triangle at each corner of the pillowcase to allow for less bulk when turning the right way out, and fold the raw edge of the gap in line with the seam and finger press.
STEP 19:
Turn the pillowcase the right way out and press after turning out the corners.
STEP 20:
Start stuffing the pillowcase with fiberfill. Once the pillow is stuffed to the desired plumpness, then either hand sew or machine stitch the gap closed with matching thread.
STEP 21:
Slip the bow center over the pillow and position it in the middle of the pillow, making sure the seam where you joined the fabric to make the loop is in the middle at the back of the pillow.
All that remains is to place the pillow on a bed, couch, or wherever you plan on using it and enjoy the softness. Please like and subscribe to get more projects like this delivered straight to your inbox. Our specialty is in creating quick and easy projects that use the smaller pieces of fabric in your stash and turn them into useful items for home and personal use that can also be gifted or made for market stalls.
Do you like this? Pin for later:
Wanna be friends? Click HERE and follow me on Pinterest
RELATED: