 No pattern needed")
How to make a Kitchen Towel Scarf (Kitchen Boa) No pattern needed
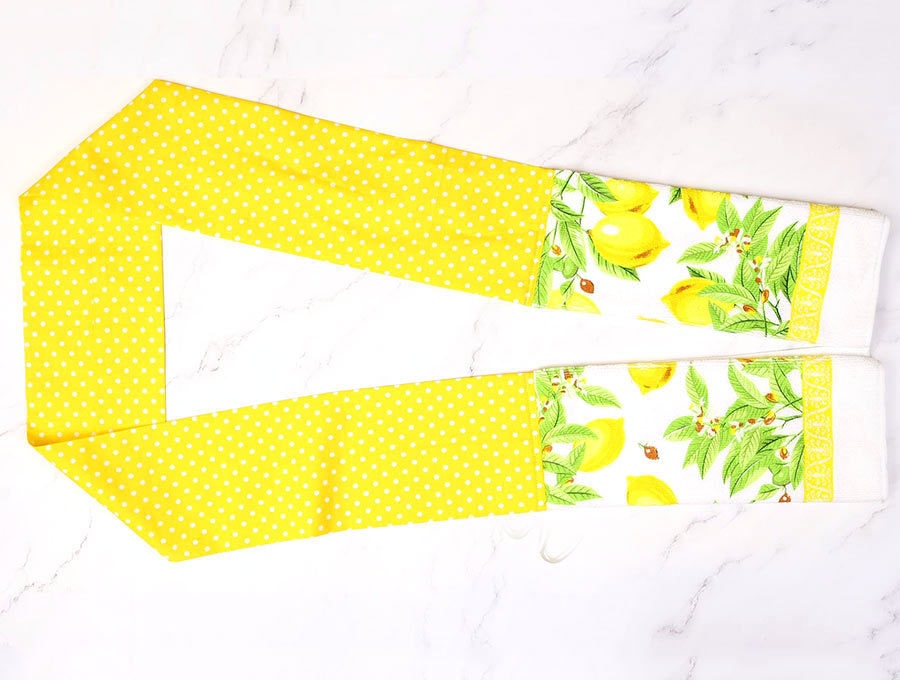
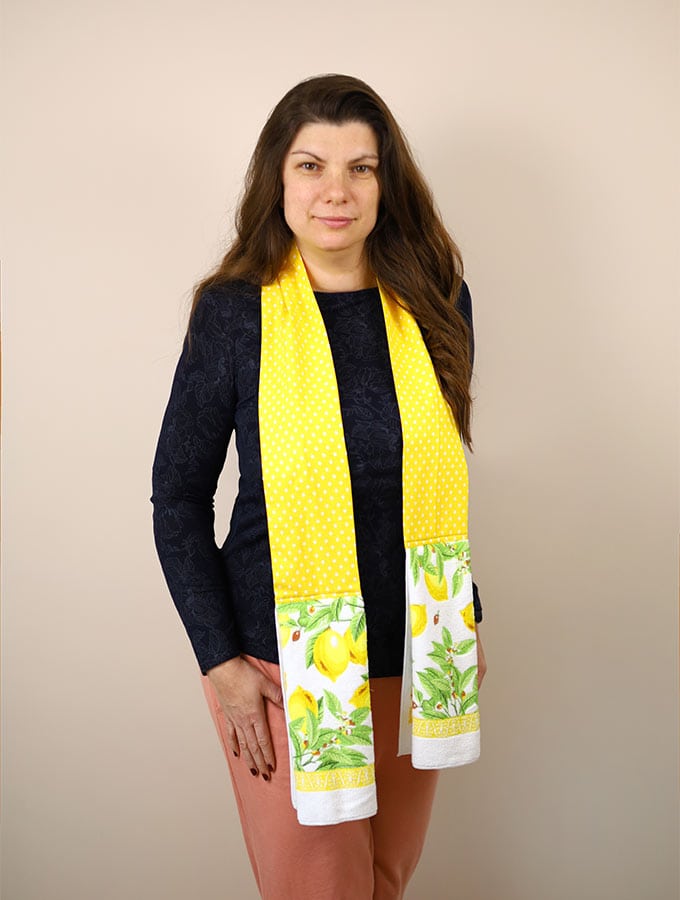
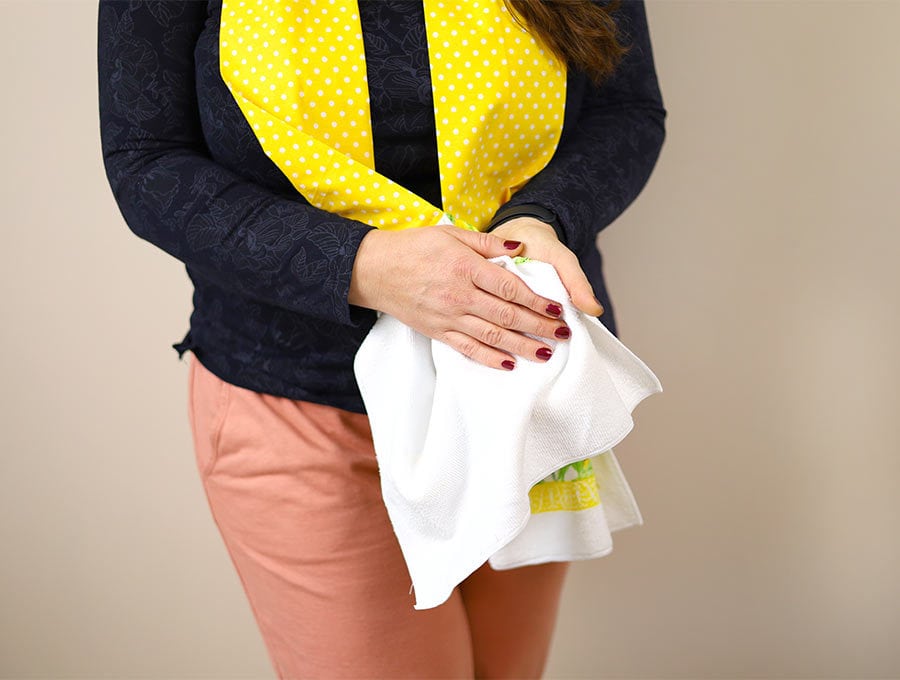
How often do have you had a soggy, dish towel on your shoulder while you’re cooking? Or you just couldn’t find a dishtowel when you needed one? The kitchen towel scarf, also known as a kitchen boa has kitchen towels at the ends to ensure you always have a dishcloth at the ready. We normally think of feather boas on showgirls but this DIY kitchen towel boa is quite different and so practical that both men and women will welcome wearing one because it’s a towel, a potholder, and a fashion statement all in one.
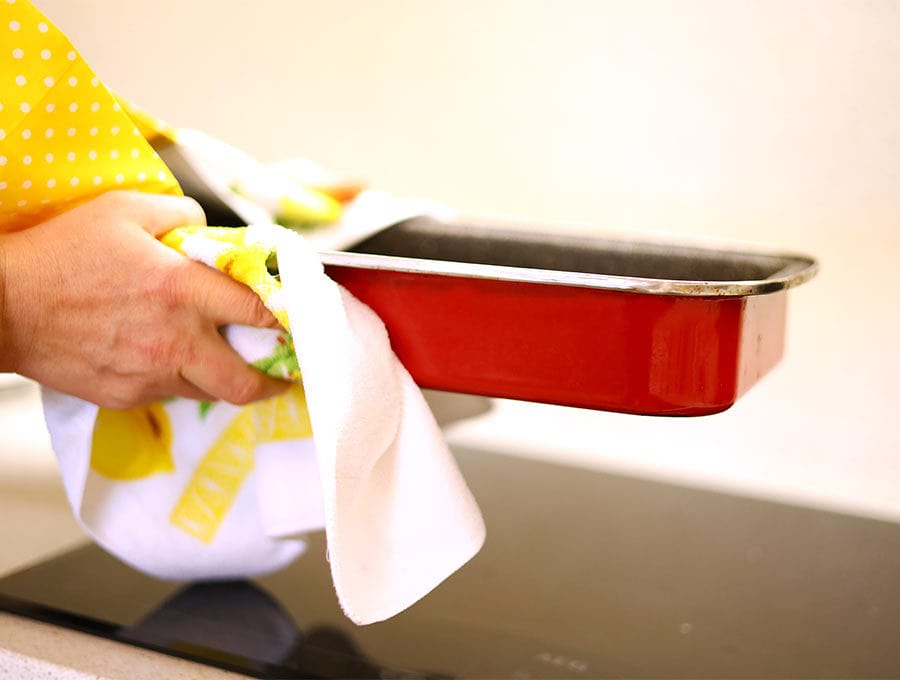
When you need to dry your hands, take a pot off the stove, or wipe out a bowl, the tea towel scarf draped around your neck is perfectly placed to use. By following our easy step-by-step tutorial, you can soon make your own kitchen towel scarf.
Make one for your partner to wear when doing a barbeque, make one (or two) for yourself, and make for your friends. They are guaranteed to become one of the most useful items you’ll make this year. The DIY kitchen towel boa has pleated tea towel pieces at the end making clean up a cinch, and a soft cotton piece that goes around the neck.
Below you will find my step by step written tutorial with VIDEO instructions for all the visual learners.
We occasionally link to goods offered by vendors to help the reader find relevant products. Some of the links may be affiliate meaning we earn a small commission if an item is purchased.
Table of Contents
- 1 How to make a Kitchen Boa / Scarf
- 2 Supplies and tools
- 3 How to Sew a Kitchen Scarf or Boa
- 3.1 DIY Kitchen Scarf VIDEO TUTORIAL
- 3.2 INSTRUCTIONS:
- 3.3 STEP 1: Choose a towel
- 3.4 STEP 2: Cut the printed fabric
- 3.5 STEP 3: Cut the towel
- 3.6 STEP 4: Fold the towel
- 3.7 STEP 5: Make pleats
- 3.8 STEP 6: Pin in place
- 3.9 STEP 7: Mark the printed fabric
- 3.10 STEP 8: Stitch towel to fabric
- 3.11 STEP 9: Stitch
- 3.12 STEP 10: Stitch the center seam
- 3.13 STEP 11:
- 3.14 STEP 12: Turn around
- 3.15 STEP 13: Stitch the gap closed
- 3.16 STEP 14: Topstitch to finish
- 4 Kitchen towel scarf FAQs, Tips and Troubleshooting:
How to make a Kitchen Boa / Scarf
Supplies and tools
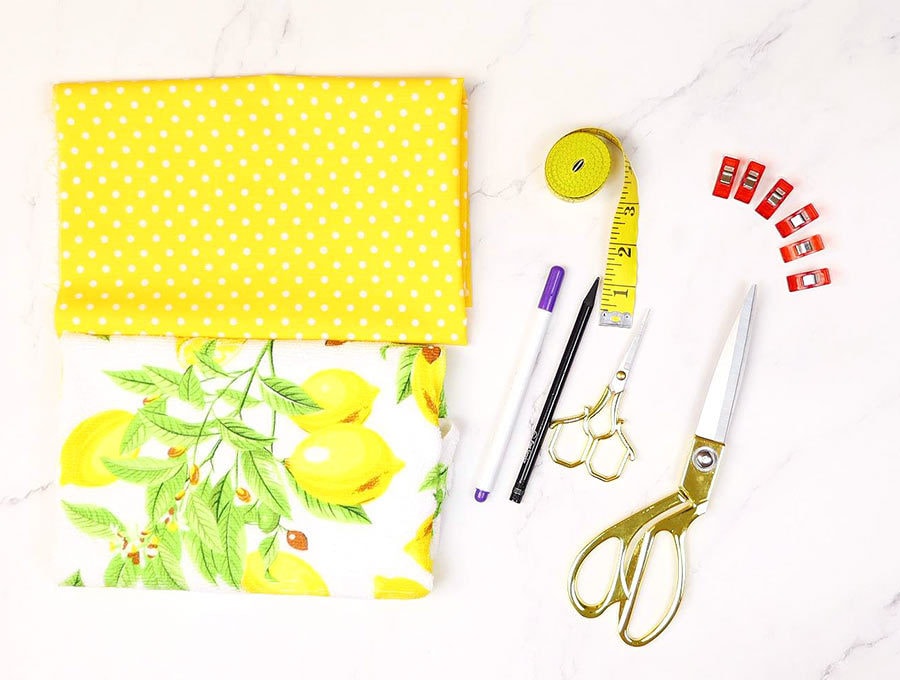
- fabric – 1/2 yard of tightly woven cotton
- hand towel
- matching thread
- scissors (or rotary cutter and a cutting mat)
- ruler or measuring tape
- iron and ironing board
- sewing clips or pins
- sewing machine
Follow us for free patterns & tutorials! [easy-profiles]
How to Sew a Kitchen Scarf or Boa
Watch the diy kitchen scarf video first and then follow the written step by step instructions below.
Please enjoy and don’t forget to Like and SUBSCRIBE over on YouTube to be kept up to date with new videos as they come out.
DIY Kitchen Scarf VIDEO TUTORIAL
How long should a kitchen boa be?
These will depend on the height of the person you are making it for, and the width of the tea towel you are using. For a non-directional print, and for an average person’s height cut a piece of fabric that is 40 inches wide x 11 inches in height and set it aside. For a tall person you can use a 48-inch fabric width and cut it to the length required. (You can find instructions for directional prints in our FAQ section.)
- The finished size of my kitchen towel scarf is 69″ (175cm)
INSTRUCTIONS:
STEP 1: Choose a towel
First off, you’ll need to choose a soft absorbent cotton kitchen towel in a fairly dark color.
We like darker colors as they do not show up every little mark like white or cream. A flat weave, waffle weave or light terrycloth towel are perfect rather than a proper hand towel which could get rather bulky when pleated. Once you have the tea towel you plan on using you can choose a fabric for the neck part with a print that picks up the color of the tea-towel or dishcloth.
STEP 2: Cut the printed fabric
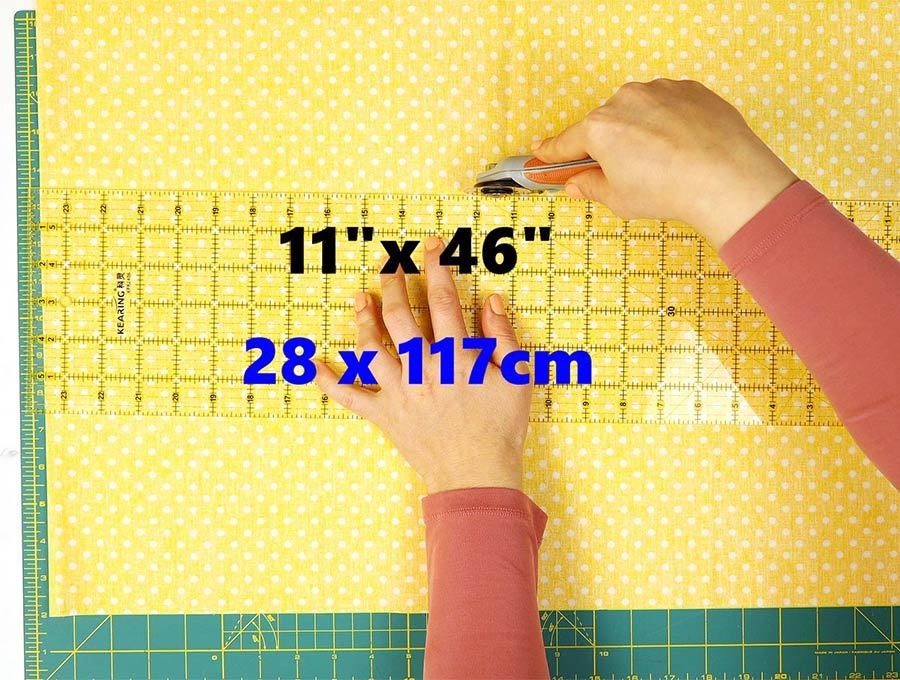
Cut the printed fabric to the length you require and if using a standard tea towel to a width of 11 inches (28 cm) and set aside.
STEP 3: Cut the towel
Fold the tea towel in half along its length and cut along the fold. Press both pieces flat with your iron.
STEP 4: Fold the towel
We are going to be folding the towel into thirds – for other variations see our FAQ section. Lay the half dish towel, right side down on your work top, with the cut edge towards the top of the worktop, then fold in three, once from the left and once from the right, and press the folds in place with an iron.
STEP 5: Make pleats
Open out the dishtowel and fold the right-hand side edge back to meet the pressed fold. Secure in place with a clip or pin. Fold the left-hand side so the edge meets the fold and the new folds meet up neatly in the middle.
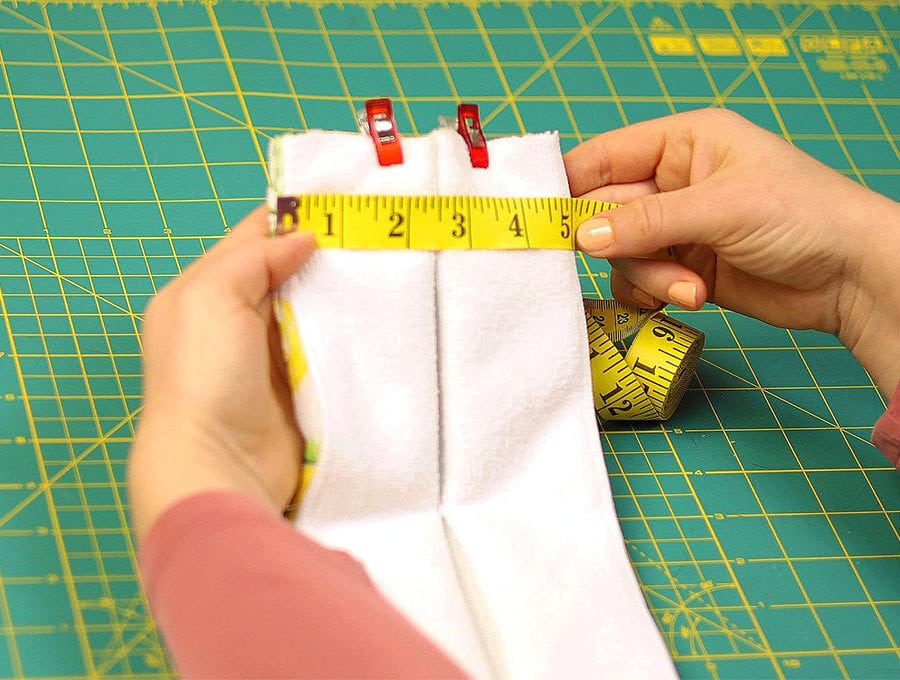
STEP 6: Pin in place
Clip in place then press the new folds.
STEP 7: Mark the printed fabric
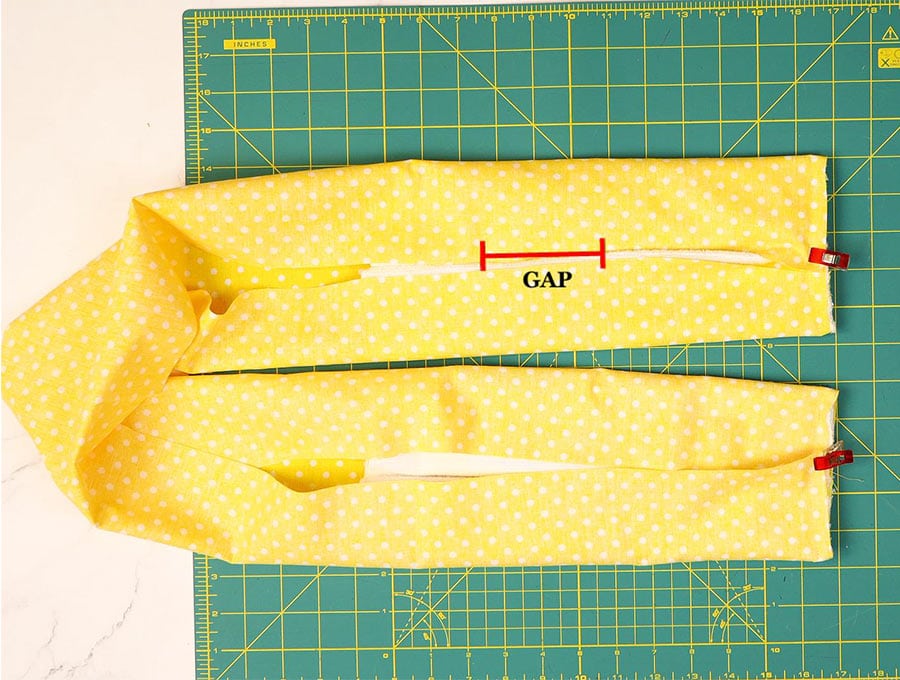
Take the piece of printed fabric you cut and mark the center along the 11-inch (28 cm) side at either end. You can do this with a pin, a fabric marking pen or by cutting out a small V in the fabric. Next, fold along the length of 36 inches(91cm), or 48inches (122cm) in half, then make two marks, or small notches, or place pins, two inches on either side of the center. This is to create a gap in the seam to allow you to turn the boa once you have finished stitching it together.
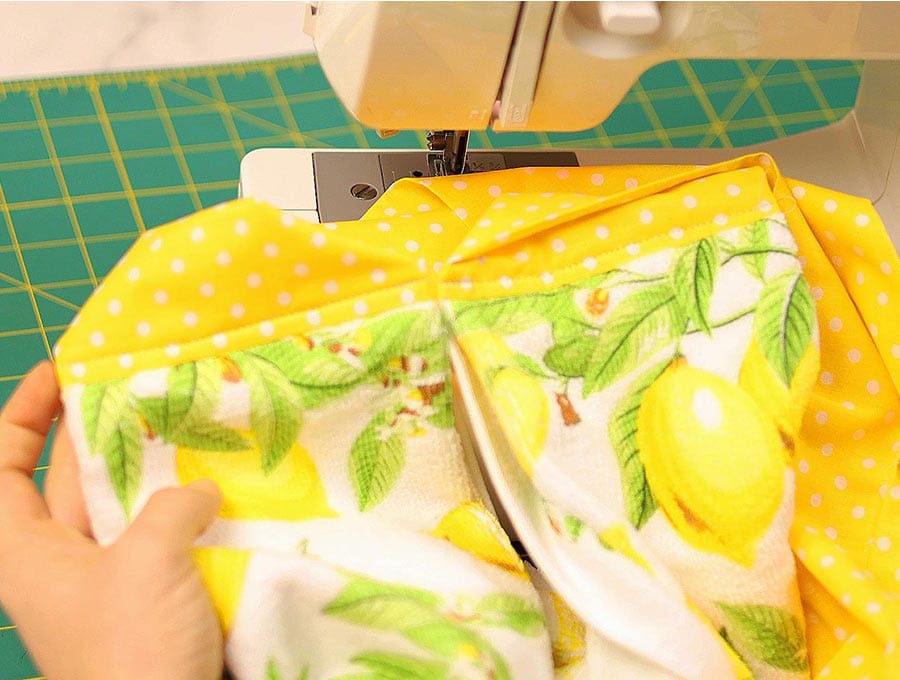
STEP 8: Stitch towel to fabric
Lay the long piece right side up on the worktop. Place the one-half towel that has been folded and stitched with the raw edge to the raw edge of the fabric, lining up the center of the towel with the center of the fabric, folded side uppermost.

Run a line of stitching from the end of the tea towel to the other end – 5 inches (12.7 cm), simply to hold the towel in place in the center of the fabric.
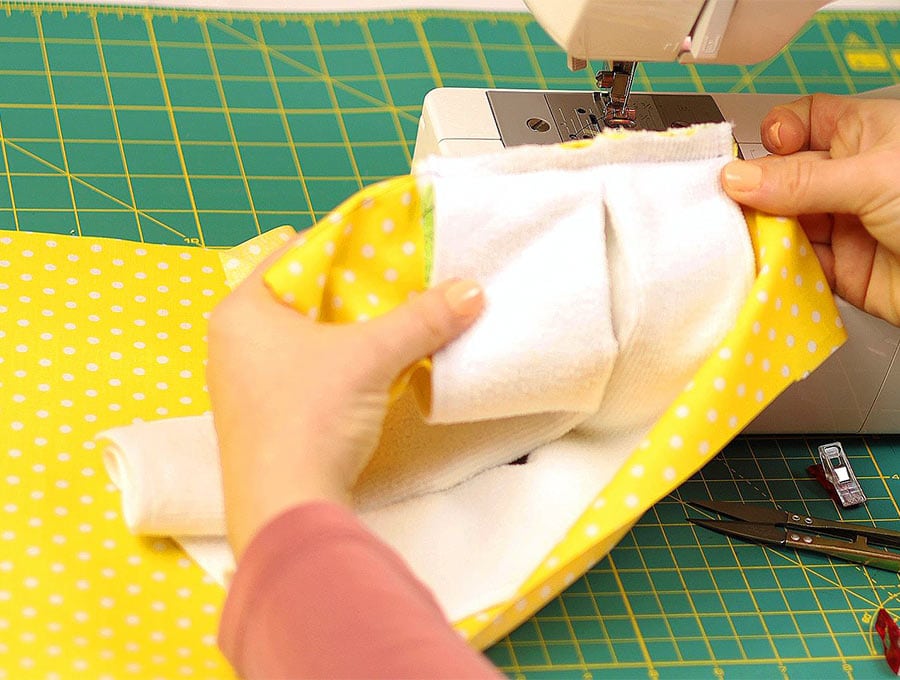
Repeat with the other end of the fabric and the other towel.
STEP 9: Stitch
Fold up the sides of the printed fabric. You made a ½ inch (12mm) seam allowance, when it was cut, but this may alter depending on the thickness of the dishcloth you are using, so, we wrap up the sides and use a pin to determine where the seam should be stitched, then pin or clip along the length to ensure the sides of the fabric lie flat and the seam is even.
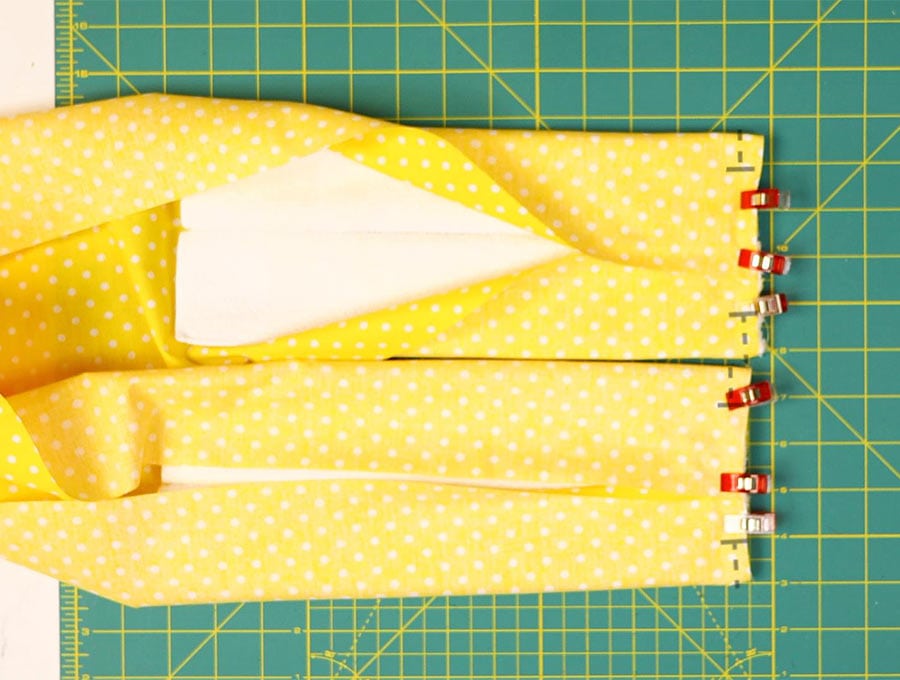
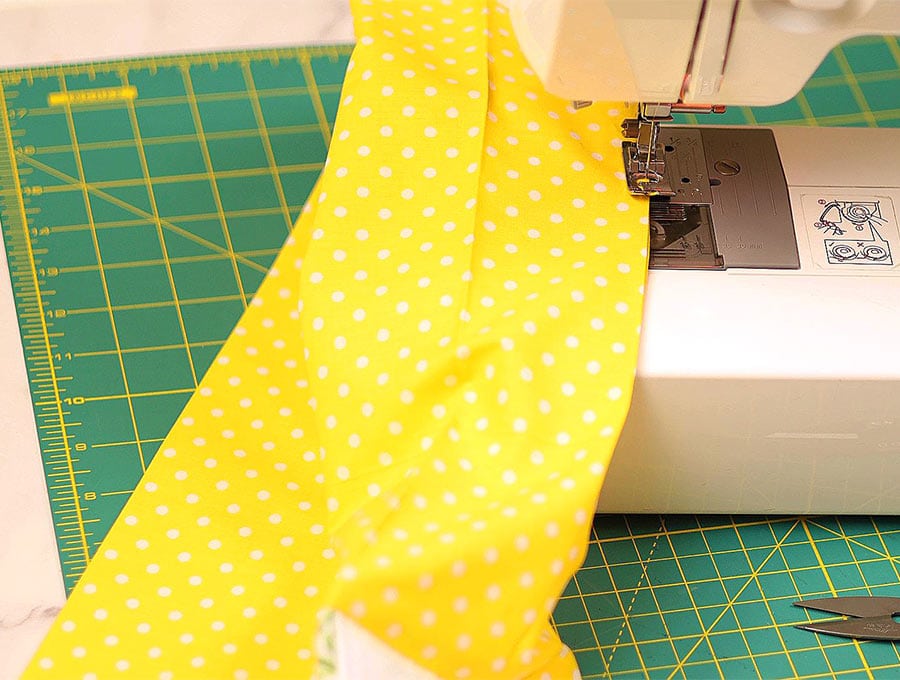
STEP 10: Stitch the center seam
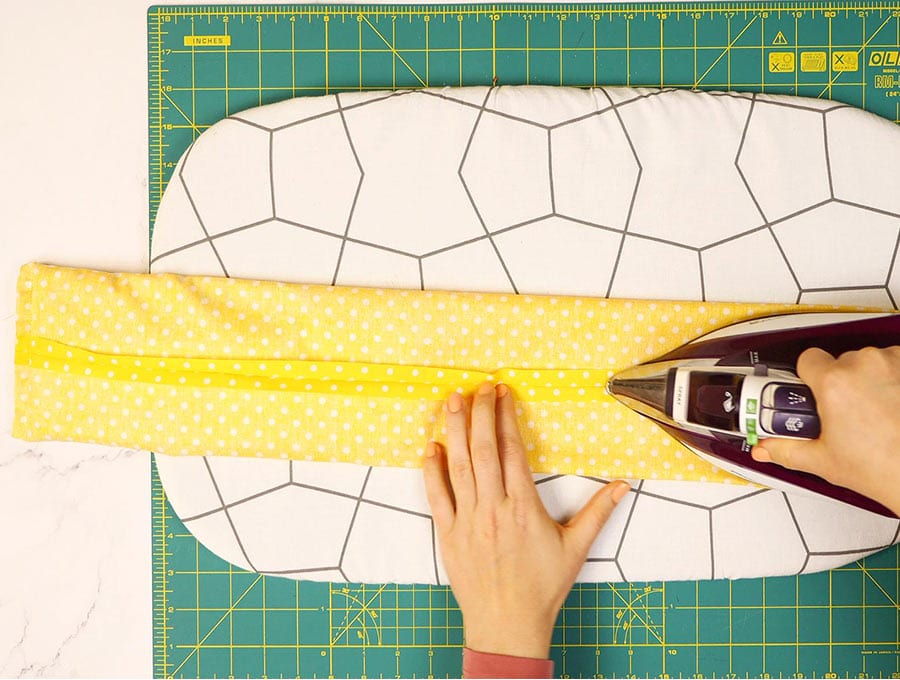
Ensure the dish towel pieces on either end are moved to the side when you stitch the seam all along the length leaving the gap you marked open, backtacking on either side of the gap and at the start and finish of the seam.
Press the seam open with your iron taking care not to press the sides of the fabric.
STEP 11:
Flatten your end pieces, taking care that no ends of the dish towel have flipped up and will get caught when you stitch across the end ½ inch (12mm) from the edge, to fasten the dishtowel to the printed fabric, back tacking at start and finish.
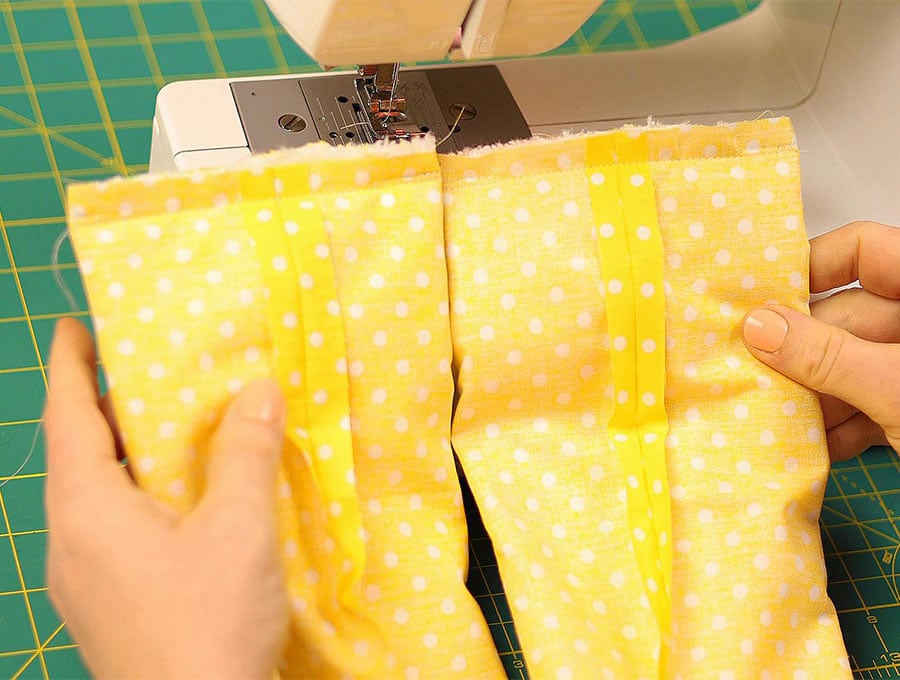
Repeat step 12 at the other end of the scarf.
STEP 12: Turn around
Turn the scarf the right way out by pulling the fabric through the gap.
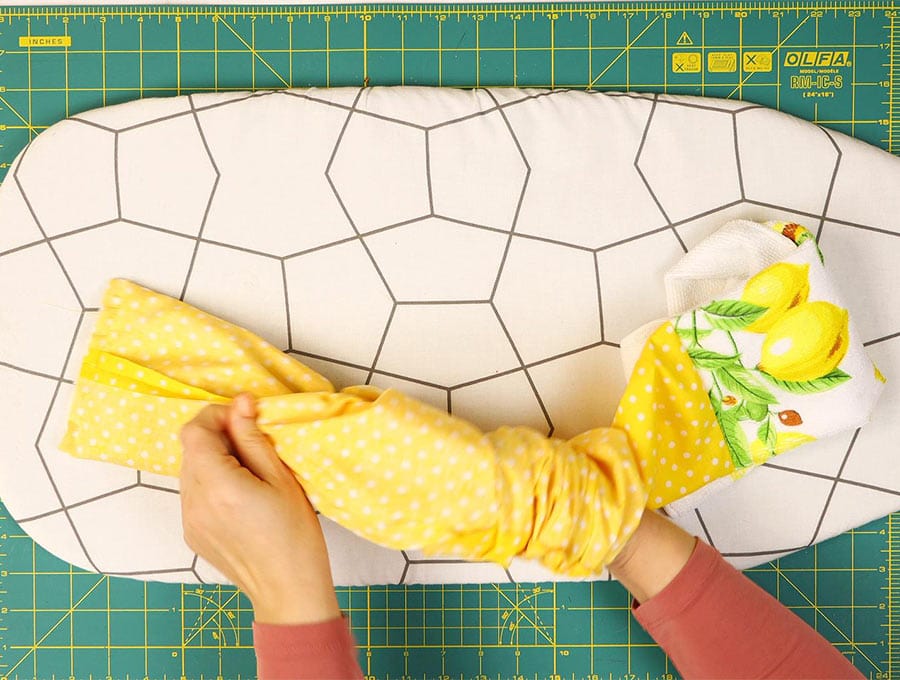
Press flat, tucking in the raw edges of the seam which runs through the middle on the underside of the scarf.
STEP 13: Stitch the gap closed
Slip stitch the gap closed, and the scarf is ready to use, or package as a gift.
If you don’t feel like handsewing, edgestitch the gap closed with your sewing machine.
STEP 14: Topstitch to finish
Topstitch 1/4″ (6mm) from the seam where you stitched the dishtowel to the scarf
That’s it your kitchen towel scarf is ready!

Kitchen towel scarf FAQs, Tips and Troubleshooting:
Q: Can I gather the dish towel rather than pleating it?
A: Yes.
When you have cut the dish towel in half simply run a basting stitch along the edge 3/8 inch from the edge. You can do this by hand, or set your machine to 4 – the longest stitch and then gently pull the threads to create an even gather that measures 5 inches across. Reset your machine to your average stitch length – 2 to 2 ½ and stitch to hold the gathers in place, then proceed from Step 9 to Step 14
Q Can I fold the towel in fourths rather than thirds?
A: Yes, you can, just substitute these step for Steps 4 to 6 in the tutorial above.
Step A
Lay the half tea towel right side down on your work top, with the cut edge towards the top of the worktop, then fold across the width and mark the central point with a pin or a fabric pen, before opening it out again. We are going to be folding the towel into 4
Step B
Fold the sides in toward the centre, lining up the edges and press in the folds with an iron.
Step C
Now open the fold on each side of the centre and fold back to the edge. Press the folds in place.
Step D
For the final fold, take the folded sides and fold the total piece in towards the centre, making sure they meet neatly in the middle, clip or pin, then press.
Step E
Stitch across the pleats simply to hold them in place 3/8 inch from the edge. If you used a standard 20 x 27-inch (51 x 68.5 cm) towel, after being folded it should be 5 inches (12.7cm). Repeat Steps A to E with the other half of the dish towel.
Q: Can I attach a hanging loop so I can hang up the scarf?
A: Yes. Follow this method.
- From a scrap of the printed fabric cut a piece that is 5 inches long and 1 inch wide.
- Fold in half along the length and press.
- Open out the fold and turn in each side to meet up at the center fold – press in place.
- Stitch along the both the long edges as close to the edge as possible.
- Fold the finished piece in half and pin inside the gap you left when you created the scarf, placing the folded loop with the pieces touching each other on either side of the central mark, with the raw edges to the raw edges and the loop facing inside the gap.
- Stitch with a machine ¼ inch from the edge to secure the loop ends to the edge of the seam, back tacking at start and finish.
- Turn in the raw edges, making sure the loop stays outside the seam. Slip stitch or machine stitch the gap closed, and you’ll have a loop to hang up the DIY kitchen scarf.
The DIY kitchen scarf had handy towels on either end – wear round you neck like a boa and never have to search for a kitchen towel again while you cook, bake or grill.
The kitchen scarf has multiple uses for wiping hands, using as a pot holder, wiping up the odd spill, or drying out a dish before using. They can be custom made to suit all tastes and besides being super useful for indoor cooks, they also make a perfect gift for the man who loves to barbeque – especially if you make the DIY kitchen boa in the colors of his favorite sport team. They are also super handy when you go camping.
If you loved making this kitchen boa that is a towel, a potholder, and a fashion statement! All in one then hit the subscribe button to have more clever step-by-step tutorials delivered straight to your inbox.
Do you like this? Pin for later:

Wanna be friends? Click HERE and follow me on Pinterest
RELATED: