
DIY Kids Crossback Apron // How to Sew a Japanese Pinafore Apron – Pattern in 5 sizes
Whether your kids love to help in the kitchen, get messy with arts and crafts, or dig around in the garden, a handmade apron is the perfect way to keep their clothes protected while sparking their creativity. This kids’ reversible crossback apron is one of those sewing projects you’ll want to make again and again — and with five sizes available, you can sew one for virtually any child, from busy toddlers of 2 all the way through to teens. Let me show you the quickest and easiest way to sew this lovely Cross Back Apron for kids.
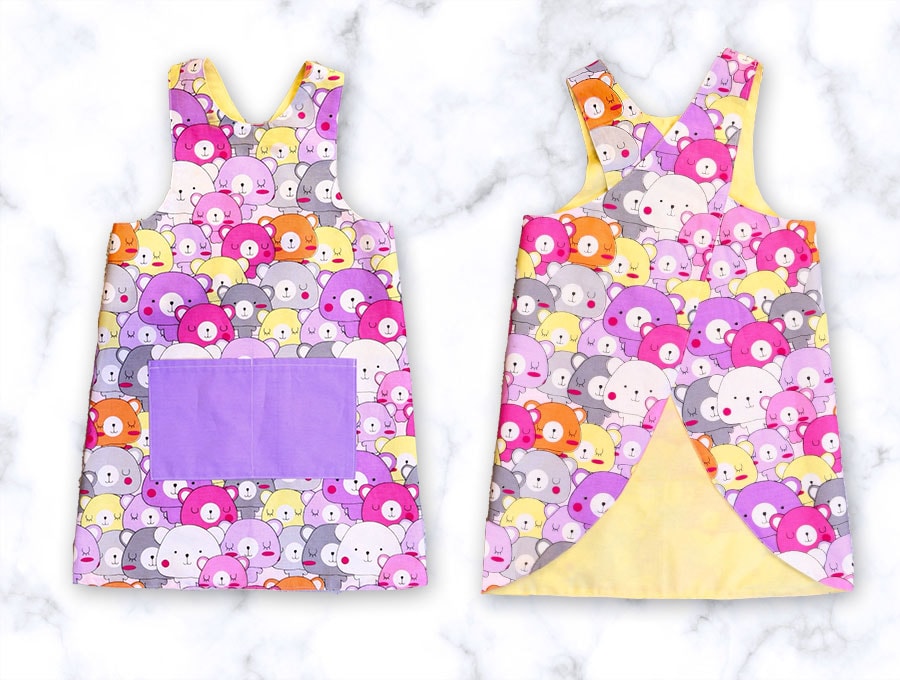
The crossback design means no fiddly neck ties to adjust or bows that won’t sit right — the straps simply cross at the back and button at the sides for a comfortable, stay-put fit that kids can even manage themselves. Better yet, this apron is fully reversible, giving you two completely different looks from a single project. Choose two coordinating fabrics and you’ve essentially made two aprons for the price of one — each side complete with its own divided front pocket, perfect for tucking in tools, treasures, or a recipe card.
The best thing? It’s reversible- basically two aprons in one. When you want something different – just flip it over and you have a whole new apron.
Below you will find my step by step written tutorial with VIDEO instructions for all the visual learners.
We occasionally link to goods offered by vendors to help the reader find relevant products. Some of the links may be affiliate meaning we earn a small commission if an item is purchased.
Table of Contents
- 1 How to make the crossback apron
- 2 Supplies and tools
- 3 How to Sew a Japanese Pinafore Apron for kids
- 3.1 Kids Crossback Apron VIDEO TUTORIAL
- 3.2 SIZING:
- 3.3 INSTRUCTIONS:
- 3.4 STEP 1:
- 3.5 STEP 2:
- 3.6 STEP 3:
- 3.7 STEP 4:
- 3.8 STEP 5:
- 3.9 STEP 6:
- 3.10 STEP 7:
- 3.11 STEP 8:
- 3.12 STEP 9:
- 3.13 STEP 10:
- 3.14 STEP 11:
- 3.15 STEP 12:
- 3.16 STEP 13:
- 3.17 STEP 14:
- 3.18 STEP 15:
- 3.19 STEP 16:
- 3.20 STEP 17:
- 3.21 STEP 18:
- 3.22 STEP 19:
- 3.23 STEP 20:
- 3.24 STEP 21:
- 3.25 STEP 22:
- 3.26 STEP 23:
- 3.27 STEP 24:
- 3.28 STEP 25:
- 3.29
How to make the crossback apron
Supplies and tools
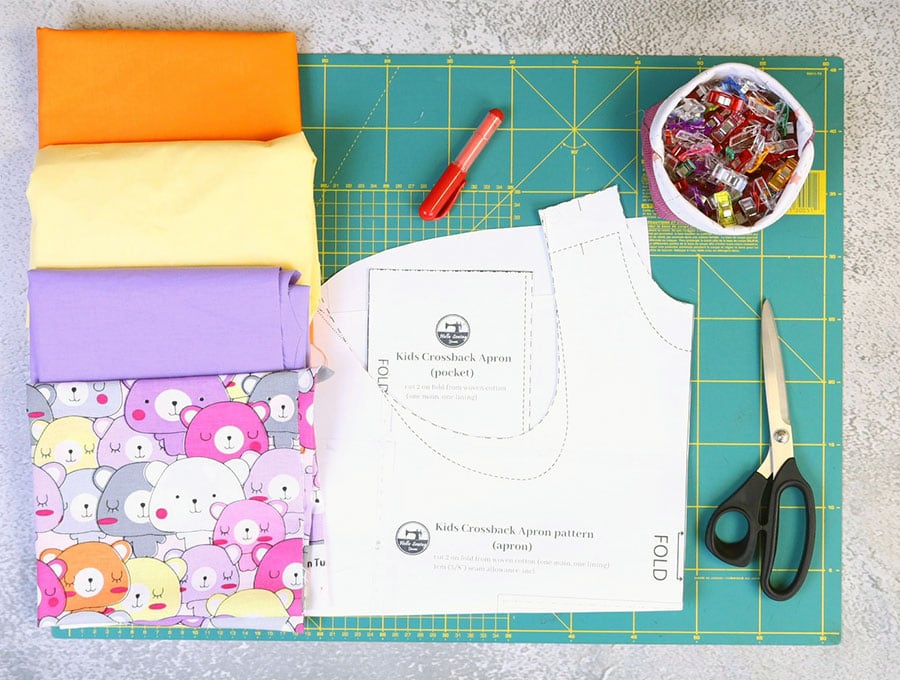
- fabric – 2 pieces of quilting cotton (one main, one lining)
- matching thread
- scissors (or rotary cutter and a cutting mat)
- ruler or measuring tape
- iron and ironing board
- sewing clips or pins
DOWNLOAD: Kids Crossback Apron pattern [Free pdf file]
If the link above does not work for you, here is an ALTERNATIVE DOWNLOAD LINK
Follow us for free patterns & tutorials! [easy-profiles]
How to Sew a Japanese Pinafore Apron for kids
Watch the diy kids pinafore apron video first and then follow the written step by step instructions below.
Please enjoy and don’t forget to Like and SUBSCRIBE over on YouTube to be kept up to date with new videos as they come out.
Kids Crossback Apron VIDEO TUTORIAL
SIZING:
If possible always go by chest size as ages are approximate.
Always choose the larger size if the chest measurement falls between sizes – kids grow fast!
- size XS – chest 20-21″ (age 2-3)
- size S – chest 23-25″ (age 4-7)
- size M – chest 27-29″ (age 8-10)
- size L – chest 31-33″ (age 12-14)
- size XL – chest 35-37″ (age 16-18)
INSTRUCTIONS:
STEP 1:
Measure your child’s chest, then choose the size from the chart above.
STEP 2:
Print out the crossover apron pattern suited to your child’s size and paste the pieces together for the main part. I would advise checking the neckline – some kids don’t like a high neckline, so you may want to scoop out the neck a little on the pattern piece before starting
STEP 3:
Choose your fabrics according to the pattern. You will need:
- 2 x main parts – one for the outer and one for the reversible side – front and back are all in one.
- 2 x pocket pieces – one for the outer and one for the reversible side.
All pattern pieces must be cut on the straight grain of the fabric.
STEP 4:
Place the main part on the fold of fabric where the pattern indicates fold, then pin or weight in place and cut out. Do the same for the reversible side.
STEP 5:
Cut the two pocket pieces on the indicated fold – one to match or complement the outer fabric and one to match or complement the inner fabric.
STEP 6:
Place pocket piece wrong side up on your ironing pad and turn up ¼” (6 mm) on the bottom and press, then turn in ¼” (6 mm) on each side and press. Turn over the top ¼” (6 mm) and press, then turn down another ¼”(6 mm) to create a double fold. Repeat this step with the second pocket piece.
STEP 7:
Clip along the top of each pocket piece, and place clips on the bottom corners to keep the folds in place.
STEP 8:
Stitch along the top of each pocket piece on the right side just under ¼” (6 mm) from the folded edge to ensure you catch the fold underneath, backtacking at the start and finish.
STEP 9:
Fold each pocket piece in half, wrong sides inside and finger press.
STEP 10:
Place your pattern piece for the main body of the apron over the folded outer and the lining and mark the line that indicates the bottom of the pocket piece on the right side of each piece using a fabric marking pen. If there isn’t a definite fold line on the main pieces you may want to finger press or press with an iron to mark the center fold.
STEP 11:
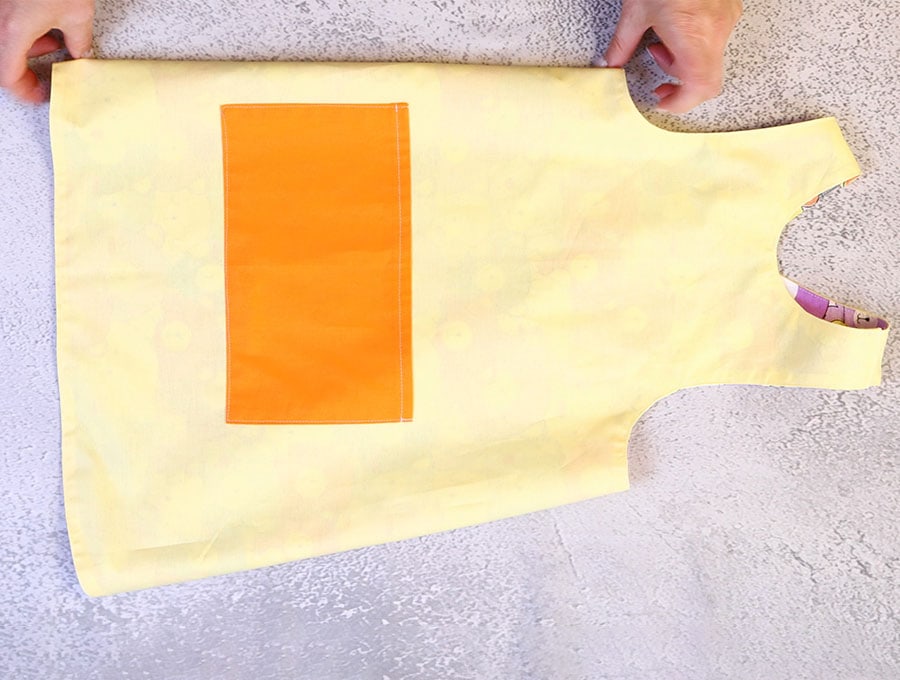
Open out the outer and the inner main body pieces, place each on your worktop right side up, then place the bottom of each pocket piece over the corresponding fabric with the center fold of the pocket lining up with the center fold of the main fabric of the apron. Check they are straight, then pin each pocket in place, stitched top of the pocket facing the top of the apron.
STEP 12:
Stitch along the sides and bottom of each pocket piece 1/8” (3 mm) from the edge. Start from one side with a backtack and go around the 3 sides and end with a backtack. A tip for getting a neat stitched corner is to stitch to where you need to turn, leave the needle down in the fabric, lift the presser foot, swing the fabric 90 degrees, depress the presser foot and carry on stitching in the new direction.
STEP 13:
Create the line to divide the pockets by stitching down the fold of each pocket, backtacking at the start and finish.
STEP 14:
Lay the fabric down, right side to right side for the apron pieces and carefully pin together around the edges, leaving a gap of around 4” (10 cm) at the center bottom of the apron through which to pull the fabric the right way out.
STEP 15:
When you stitch go around the edges 3/8” (1 cm) from the edge but do NOT stitch across the 4 small sections for the shoulders.
STEP 16:
Make small nicks into all the curved edges to ease the fabric when it is turned the right way out – be careful not to clip too close to the stitch line.
STEP 17:
Trim off a small amount of fabric, around ½” (1.3 cm) near the stitch line on each side of the 4 shoulder pieces.
STEP 18:
Fold back the raw edges of the gap at the bottom of the apron in line with the seam and finger press.
STEP 19:
Carefully pull the fabric through the gap at the bottom to turn the crossover apron the right way out, making sure the fabric on either side of the seams is pushed out and lies flat – you may want to give the item a press at this stage.
STEP 20:
Measure 3/8” (1 cm) from the raw edges at the shoulder pieces of the apron and draw a line across using a fabric marking pen. I use a handy card I have made up with common seam allowances such as 3/8” (1 cm) and ¼” (6 mm) marked on it, or you can use a ruler to measure the distance.
STEP 21:
Once all four ends are marked finger press along the lines of the two pieces at the front neckline, then tuck the marked 3/8” (1 cm) of fabric inside, so all that is visible is a fold along the top. It is up to you whether you finger press the fold in place or use an iron.
STEP 22:
Putting it all together now – lay the apron flat with the outer side up on your worktop,.
Next, take the right side and fold it over so the shoulder piece on the right is over the shoulder piece on the left of the neck. Fold the left side over to cross and meet the right shoulder piece.
STEP 23:
Tuck the raw edges of each shoulder piece of the back of the apron into the corresponding folded edges of the shoulder pieces that are alongside the neckline. Push them in 3/8” (1 cm) and pin in place once neat and level.
STEP 24:
Stitch across the shoulder pieces 1/8” (3 mm) from the edge, backtacking at the start and finish.
STEP 25:
Topstitch 1/8” (3 mm) from the edge all the way around the crossover apron, starting from the edge of the gap at the base, and working your way round to end up stitching over the gap to close it. Backtack to finish.
The crossover apron is now ready to be worn. Tired of aprons with fiddly ties that often break off or get knotted? Then our simple crossback apron is the answer – protecting clothes from projects ranging from gardening to arts and crafts and cooking. We have 5 free printable patterns ranging in sizes to fit children from toddler stage to late teens, that are easy to put on and take off. Reversible, with pockets on either side, these crossback aprons are sure to be a hit!
Love this? Please share, like, and subscribe so we can keep delivering all the newest ideas as they are published on our site. Photos of your corssback aprons can be shared in our comments section on HelloSewing.com. We always love to see what creative touches our subscribers add to their sewing projects.
Do you like this? Pin for later:
Wanna be friends? Click HERE and follow me on Pinterest
RELATED: