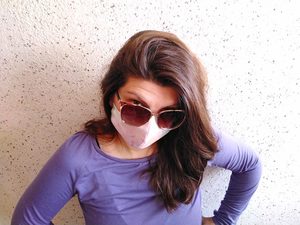
Skip to content
304

Face Mask Pattern (FREE) – How to Make DIY Mouth Mask

As the coronavirus or COVID-19 gains momentum and slowly finds its way into more and more countries each day, face masks are starting to become a kind of necessity. People are becoming more aware of the danger and everyone is trying their best to avoid infection. That is why it’s becoming incredibly difficult to find N95 respirators or surgical face masks for purchase.
While certainly N95 filter masks are designed to protect against airborne viruses, waiting for them to become available without having any kind of an alternative in the meantime is not something I’m comfortable doing.

Mind you, use this simple DIY face mask as a last resort, as a homemade face masks don’t offer the level of protection the N95 respirator masks do, and their capacity to protect from viruses according to CDC is unknown.

Due to popular demand we added a VIDEO tutorial below, added a printable pdf of the instructions, found the most suitable nose wire materials, and designed 12 more free face masks patterns.
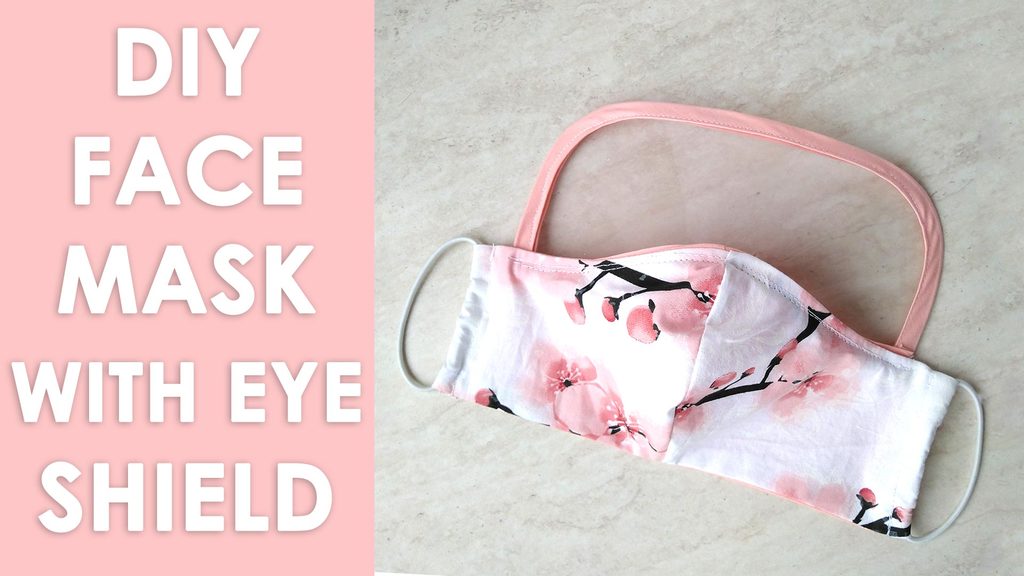
NEW VIDEO tutorial: How to add an eye shield to your face mask

We occasionally link to goods offered by vendors to help the reader find relevant products. Some of the links may be affiliate meaning we earn a small commission if an item is purchased.

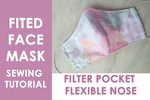
How to make a DIY face mask with a Pocket For Filter Insert

Supplies and tools

This is a relatively simple project so it doesn’t require a lot of materials and tools to be completed. You need:
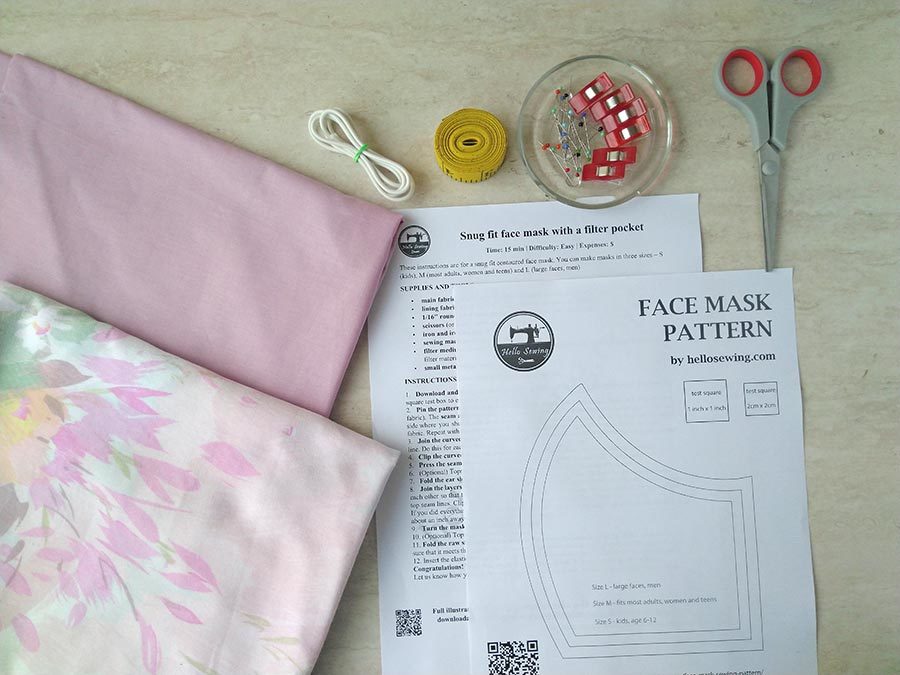
Face mask materials

Downloads:

If you’re having trouble accessing the FREE pattern, make sure your pop-up blocker is turned off.

Follow us for free patterns & tutorials!

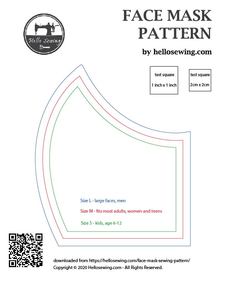
  • Printable pattern: face mask pattern (PDF file)==IMPORTANT NOTE== Don’t print the PDF pattern from the browser as the size might not be correct. Download the file on your computer, open it with Adobe Acrobat or Adobe Reader and print from there.

Once you have gathered all of these essentials, you can proceed to sewing the diy face mask.


INSTRUCTIONS:

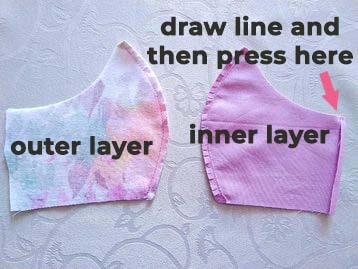
1. Download the pattern and cut the fabric

face mask pattern and supplies on the cutting matThe pattern you will be downloading does not have to be scaled down in any way. Its original dimensions are 8.5 x 11 inches, which is about the size of a letter, small enough for easy printing. If you are not sure whether the dimensions are right, there is a small test square – 1 inch x 1 inch (US) and 2cm x2cm (for those outside US) on it so go ahead and measure it.

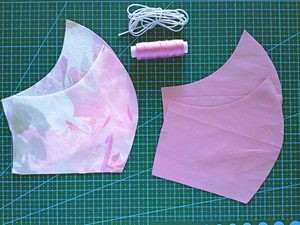
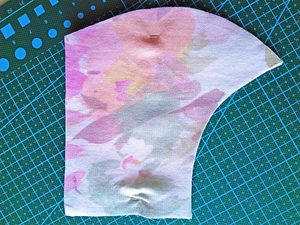
Download the pattern, print it out, and cut it accordingly. Before you put it onto your main fabric to cut it, fold the fabric in half so that the pretty sides are facing each other. Pin the pattern onto this folded fabric and cut the fabric.

cutting the outer layer of the face mask according to the pattern

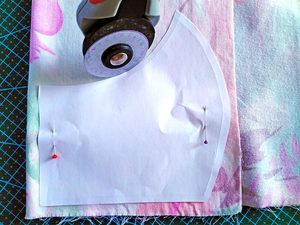
The seam allowance is 1/2 inch and is already included on all sides except for the ear side where you should add additional one inch seam allowance.

Repeat this step with the lining fabric as well. This time, however, do not add a seam allowance for the ear section.

TIPS: Several seamstresses asked us for fabric recommendations. Basically any thickly-woven cotton is fine and it is even better if you can add a filter medium.

Here’s a relevant study that tested the efficacy of homemade masks

I saw someone wearing a stethoscope fabric mask and though that this is a great way to show appreciation to our front-liners. So, I found some suitable fabrics that can be purchased online. If you spot a great design, share it in the comments below

2. Sew the curve line of the face mask

Make sure the right (pretty) of sides are on each other.

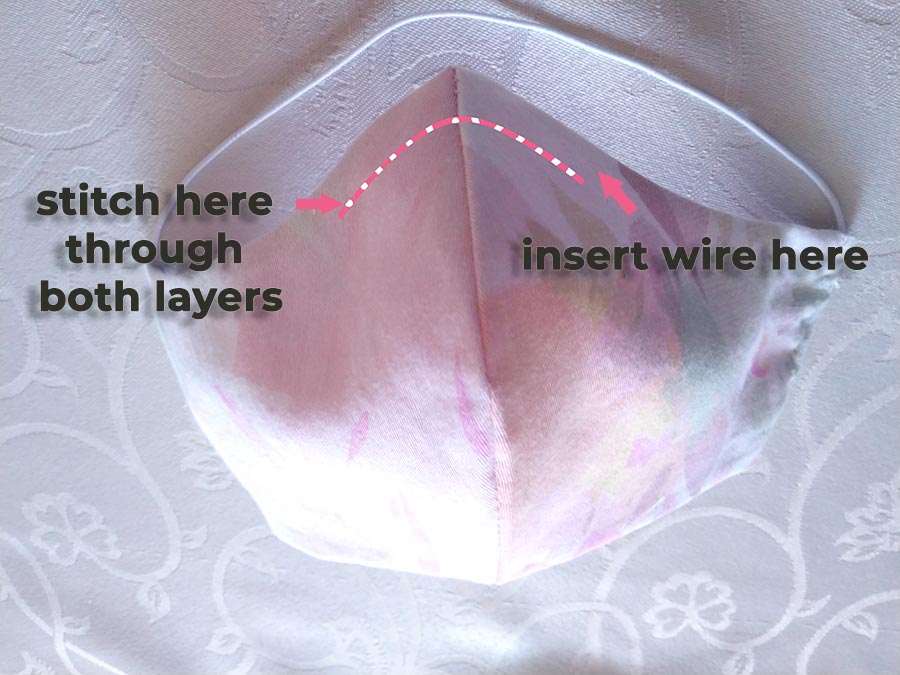
Sew along the curved line on both pieces.

Then draw a line quarter-inch away from the original side line, on the inner layer. Do this for both side seams of the inner layer.

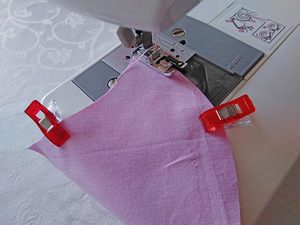
Next, you will need to clip the seam allowance on the curve part of the mask half an inch apart, both on the outer and the inner layer. Doing this allows the edge to stretch nicely instead of bulking up when you flip it inside out.

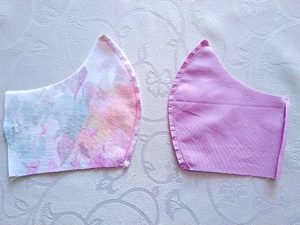
Now turn both pieces inside out and use the iron to press the seam allowances to different sides. If you want your mask to have a more professional look, topstitch near the seam line so that the seam allowances stay flat. Fold the side at the line you drew earlier and put the raw edge inside to hide it before topstitching it in place. Do this on each of the ear sides of the inner layer.

both layers of the mouth mask pinned to each other
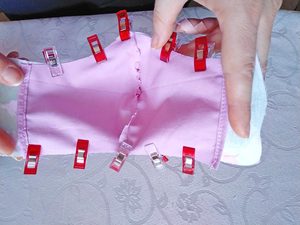
It’s time to join the two layers together now. Put the inner layer on top of the outer, right sides facing each other so that the upper and lower edges align. Make a stitch at the bottom and top seam lines. If you did everything right up to this point, you will find that the edge of the outer layer is a about an inch away from the side seam line on the inner layer. If this isn’t the case, retrace your steps and see where you made a mistake so that you can fix it.


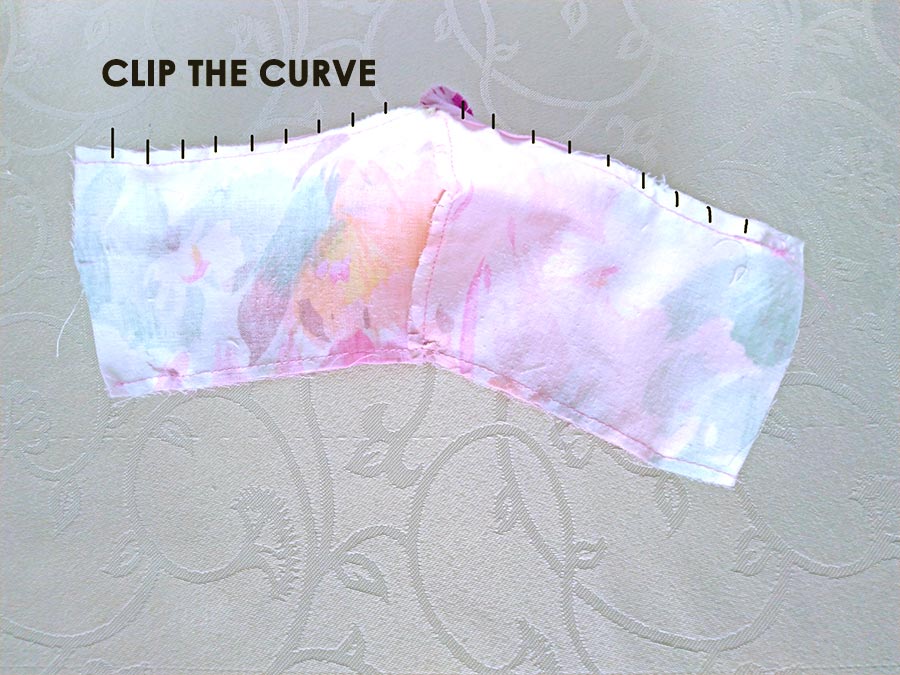
Clip that curve on the seam allowance where the two layers meet and leave about half of an inch from the ends untouched. Flip the mask inside out again. Press the seams flat.

Fold the top and bottom raw edges of the outer layer twice and topstitch along the edge. Do this on the bottom seam line as well.

3.Add the elastic band and finalize your mask

final face mask with elastic - ready to insert the filter

Now you will be making a channel for the elastic band. Fold the raw edge of the outer layer about a quarter of an inch away from the edge. Fold once again until that edge meets the edge of the inner layer.

Topstitch a vertical line across the part you just folded and you will be left with a vertical tube through which you can pull the elastic band.
– For 2 separate ear loops – you’ll need 2 x 6″-8″ of elastic for the adult sizes or 2 x 5 – 5 1/2″ (kids)
– For one continuous piece that goes around the head – use 1 x 15-17″ of elastic (again, depending on the size of the face)
TIP: Many makers report shortage of thin round elastic.  You can use hair ties , ribbons or even make ties out of fabric.

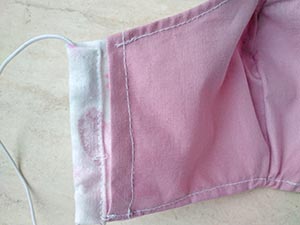
4. Insert flexible nose wire (Optional)

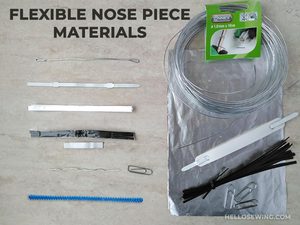
The mask will fit your face more closely if you add a flexible nose piece and mold it over your nose. I suggest using a 7″ long craft wire, couple of twist ties, or pipe cleaners but as those are not always available, we got creative.

We’ve compiled our ideas and feedback from our readers and got to work. We tested which are the most suitable materials and what is the best length for the nose piece. Here’s what we found – the most suitable materials for nose wire.

I recently saw that some aluminum nose bridge strips such as these pop over on amazon and they look like a good option.

To make a channel for a removable nose wire stitch  through both layers, the length of stitching should match the length of the wire.

5. Insert filter (optional) and use the mask

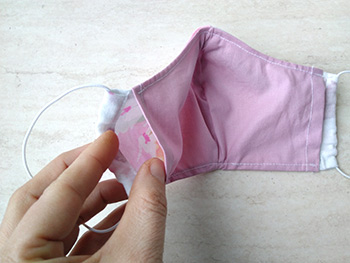
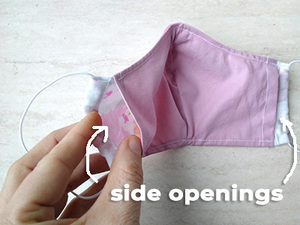
You will also notice an opening between the outer and inner layers. This is where you can put the filter in. Change it regularly and keep your mask clean by washing it in the washing machine after each use.

What to use as a FILTER? Note that these filters are not medically rated and their ability to protect is unknown:

As far as the filter goes you may use a piece of vacuum cleaner bag or HEPA filter without fiberglass, non woven fabric, or even an air-dried anti-bacterial wet wipe as filter. While those won’t be able to stop the virus, they will be able to filter out more particles than fabrics alone. It probably all boils down to finding a balance between breath-ability and filtering. You’ll have to make your own call here, and it would be smart to research whether and what filter to use.
[adinserter name=”Block 4″] Many readers asked why use vacuum dustbags as filter? According to this 2013 Cambridge university study which evaluated the capacity of several household materials to block bacterial and viral aerosols, vacuum cleaner bags were considered the most formidable household material with a rate of nearly 86 percent protection against the smallest particles they tested.

When placing the filter inside, make sure that it isn’t crumbled up and that it reaches all the way to the upper edge. Once you put the mask on, make sure that it covers your nose well and that there are no gaps between your face and the mask.

6. NEW OPTION: Add an Eye Shield to Your Face Mask

Level up your protection and add an eye shield to your mask with our easy step by step VIDEO tutorial. Here’s a sneak a peek of the design:


Here’s a quick visual of sizing – size L vs size M:

VIDEO INSTRUCTIONS:

Please enjoy and don’t forget to Like and SUBSCRIBE over on YouTube to be kept up to date with our new videos as they come out.

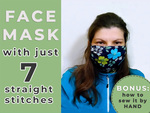
Still not sure you can sew this?

Then make our surgical style masks below. They are the easiest to sew face masks – as easy as it can get. If you can sew a straight stitch, you can make them!

Our FREE face mask patterns and tutorials:

how to sew a surgical face mask

Face Mask FAQ

  • How can YOU help fight the current face mask shortage?

1.Put your sewing skills to use – help our frontline medical staff during this COVID-19 crisis by sewing up face masks!

In light of the life-threatening, national PPE shortage, some hospitals have put out public calls for face mask donations and/or are looking for face shields.

Join one of the amazing initiatives and #SewMasks for#MillionMaskChallenges #MillionMaskMayday. Some healthcare workers face critical shortage and are in desperate need – just see how #PPEshortage #GivemePPE and #PPEwanted are really trending on Twitter.

However, before you sew up a bunch of mask make sure they are 1) actually wanted and 2) up to the intended recipient specifications. Don’t randomly pop up and drop masks at a random clinic/hospital.

2.If you have new surgical masks or N95 masks lying around consider donating them.  Anything helps, even if it’s just a box of 5 masks.

3.If you work for either an industrial company or a medical provider (like dentistry) who won’t need them now consider donating your N95 masks or face shields to local hospitals and first responders
==>If you represent a hospital in need of PPE you may add your institution to the spreadsheet here
==> Potential donors please refer to this  spreadsheet which has information regarding how to make donations to hospitals in dire need throughout the country.

  •  What’s the difference between a surgical mask and n95 respirator?

There’s a considerable difference between the two, in terms of protection against infections, as well as overall design and construction. Let’s cover the most important differences.

– A surgical mask is meant to help block large particle droplets and splashes from reaching your mouth and nose, as well as reduce exposure from your respiratory secretions to the people around you, if you wear it properly. This mask does not fit tightly and it doesn’t protect you from airborne pathogens.

– The N95 respirator, on the other hand, is designed to achieve a very close facial fit d seal protects from inhaling fine airborne particles that could carry the infection. This mask has a seal check that helps you make sure that you put it on well. However, according to the FDA, even a properly fitted N95 respirator does not completely eliminate the risk of illness or death.

Both masks are only meant to be used once and then have to be thrown away after contact with an infected individual, or once they get moist from your respiration.

For additional differences between surgical masks and N95 respirators, please check FDA’s N95 Respirators and Surgical Masks article and see CDC’s infographic.

  • Can a surgical mask or a fabric mask protect you from coronavirus?

The fabric masks’ ability to protect is unknown. For the surgical masks, see above.

However, if you start showing symptoms but have to go out in the public, a mask on your face will lower the chances of people around you getting infected by you.

Refer to the CDC website for accurate and up-to-date information regarding COVID-19.

  • How to protect yourself from coronavirus or any other respiratory virus?

The most important thing you have to do is to wash your hands thoroughly with an antibacterial soap for 20 seconds.

Use hand sanitizer (at least 60% alcohol) when there is no sink nearby —especially after touching a handrail or door handle, on public transit for example. You can also use an UV lamp to sanitize your home or your phone. Some people started using LED lamps to fight sunlight deficiency to help maintain good vitamin D levels. Others switched to touchless soap dispencers to reduce germ spread.

Don’t touch your face, mouth or eyes when you’re in public. If you cough or sneeze, do it in a tissue and throw it away as soon as possible. Stay home if you aren’t feeling well and rest.

Sleep and eat well to provide your organism with enough strength to resist the infection. If you are fatigued and lack vitamins, your immune system drops significantly and you become prone to respiratory infections. If you can, use disinfection products to clean the things you touch the most, like doorknobs, your phone, the TV remote and so. Wiping them off with a plain wet wipe or a cleaning spray will do the trick quite well if you don’t have a special disinfecting solution.

Also, you may want to have No products found., desinfectant wipes and hand sanitizer on hand. In the time of severe hand sanitizer shortage a DIY solution is to mix 2/3 pure isopropyl alcohol and 1/3 cup of aloe vera gel.

So Who Does Need a Mask?

Face masks aren’t really an effective way to prevent the most healthy people from getting infected with coronavirus, according to the Centers for Disease Control and Prevention and the World Health Organization. One of the reasons is that the ordinary people don’t wear them properly. Also, people tend to be less strict with hand washing and keeping safe distance from others when wearing a mask and according to Isaac Bogoch, M.D.”Impeccable hand hygiene is key”. So who SHOULD wear them:

  1. Medical professionals and other people who are caring for a sick person or person suspected of carrying COVID-19, you should wear a face mask according to CDC. Just as make sure you use it properly and throw it away when it becomes unusable.
  2. People with symptoms similar to COVID-19—such as fever, cough, and shortness of breath—should wear a mask when they are around others.

Pin for later:

Wanna be friends? Click HERE and follow me on Pinterest

Did you make this contoured face mask? Do you have an idea for improvement? Did you spot a great fabric design to show appreciation to our frontliners? Drop a comment below

Sharing is caring! If you find the pattern and tutorial useful please share with your friends on social media

RELATED:

Click Here to Leave a Comment Below 304 comments
Robyn Jefferson - March 8, 2020

Can you please provide link for pattern so I can copy it please.

Reply
    Helen - March 9, 2020

    Hi Robyn,
    The link is working on my end. Can you please try to download it again. stay safe and happy sewing

    Reply
      LaVonne Kuelbs - April 7, 2020

      I would appreciate a picture showing size – curved lines (that I could print/copy and then cut out and lay on my material to cut) Thank you.

      Reply
        Helen - April 8, 2020

        Hi Lavonne, I’m trying to find the best way to do that as curves are difficult to copy. Would showing the pattern over a 1/2″ grid help?

        Reply
    Pua - March 26, 2020

    how do I print the instructions also I have wide elastic is it alright to cut it in half

    Reply
      Helen - March 27, 2020

      Download the pdf instructions and print them at 100%.
      Elastic unravels, so I wouldn’t advise you to cut it in half

      Reply
        R. Welker - March 27, 2020

        If it is knit elastic it will not unravel if you cut it.

        Reply
        Rhonda B - April 21, 2020

        Try tee-shirt material or hair bands in place of elastic…

        Reply
      Deborah - April 1, 2020

      If you can find an old bungee cord you don’t need, cut it open… they are filled with appropriate width elastics …

      Reply
        kathy - April 21, 2020

        Please know that the newer bungees is like rubber bands and not elastic pieces. I ordered some because I saw somewhere that there were elastic pieces inside, but it was rubber uncoated. Do not order new bungees

        Reply
      Linda Gray - April 20, 2020

      Please send me a copy of mask, so I can make some. Thank you

      Reply
        Helen - April 20, 2020

        Linda, the pattern is free – you can download it and make it!!

        Reply
      Arlene Buchanan - April 25, 2020

      Joann’s Fabric has a tutorial that show you can cut the width of elastic lengthwise between the ribs. That has been a big help to me because supplies are depleted.

      Reply
        Helen - April 25, 2020

        This works with knit elastic. As an alternative you can use fabric ties, hair elastics, or even re-purpose elastics from old clothes

        Reply
    True - April 5, 2020

    Thxs

    Reply
VICTORIA KUSI Boateng - March 8, 2020

hi, where is the download please? great article!!

Reply
    Helen - March 9, 2020

    Hi Victoria,
    The links is in the supplies section near the top of the article. Check the link that says “download the face mask pattern”
    Sending positive thoughts your way. Stay safe

    Reply
Diane - March 9, 2020

I was unable to download the pattern. I guess the link is not active. Could you check if it is still active? I’m planning to make these for my parents since masks are not available right now. Thanks —Diane

Reply
    Helen - March 9, 2020

    Hi Dianne,
    The link is fixed now. Please try again and let me know whether it works for you.
    Happy sewing

    Reply
Teresa - March 16, 2020

The download isn’t working at this time. If possible you could give the dimensions for the mask pattern. thank you.

Reply
    Helen - March 16, 2020

    I’ve just verified that it is working. Try to reload the browser and right click on the link, then select “Save as” to download the pattern. If you still experience problems try another browser/device.
    Happy sewing and stay safe!

    Reply
Corrine L. - March 17, 2020

What length of elastic should be cut? Do you just tie the end of the elastic with a knot and then hide the knot inside the tubes? And just to confirm, should there be 2 pieces of elastic (one of each side)?

Reply
    Helen - March 20, 2020

    Corrine, there are two ways to wear the elastic – you can either use two pieces of elastics (one for each side) or you can just use a single piece of elastic that goes around the back of the head.
    you just tie the ends of the elastic with a knot and then pull the knot inside the side tubes to hide it.
    I use ~15-17″ of elastic depending on the size of the face. Some elastics have more stretch than others. More stretch is more forgiving on sizing of the elastic.
    I generally err on the side of caution and leave the elastic just a little bit longer, as short elastic makes for a tighter fit but causes the ears to pull forward too much.
    If the mask is the right size for the face, but it is uncomfortable behind the ears, the elastic is too short and is pulling on the ears. You want it to fit snug, not tight.

    Reply
      Carollyn - April 20, 2020

      I have family out of state and when making masks it became difficult to know what size would fit each person I was making a mask for, so with that said I took bias tape through the bottom of the right channel and through the top of the left channel. I used about 30 inches (you can make your own bias tape or use para cord). I tied a knot in each end. This way each make is adjustable to each individual and I didn’t have to worry about the masks not fitting once my family received them in the mail. As I’m sure you can imagine it would be difficult to “fix” the fit once they received them. Good luck everyone and stay safe.

      Reply
        Jb - April 22, 2020

        I have seen where you can cut the elastic then run ends behind the ears thru a bead that way it can be adjusted…..

        Reply
    Liana - March 24, 2020

    If you attach the elastic only to the corners (without running it through the channel) then you need at least 50% less elastic per mask. This method will help for those who have limited supplies of elastic on hand.

    Reply
      Betty - April 22, 2020

      Elastic around the head is most comfortable, but it uses a yard per mask.

      Reply
Siena - March 21, 2020

I’m having trouble too. The download is a JPEG, not PDF. When it is saved as a JPEG, the image is not at proper scale. Would the pattern provider please change the download file to a PDF? I believe that would solve the issue most are having. Also, the JPEG file does not have a square box on the page for size reference. Right clicking on the link does not give an option to “save as” for a usable pattern. Still will only save as a JPEG. I tried both Mozilla and Google with the same results.

Reply
    Helen - March 21, 2020

    Hi Sienna,
    Thanks for pointing that out. I’ve changed the download file to a PDF and added the test square for easy size reference. Now there is also a test square in centimeters for sewists outside the US.
    Hope that helps! Let me know whether everything is ok on your end

    Reply
      Siena - March 21, 2020

      Hi Helen

      It works perfectly now. Thank you for taking the time to produce this pattern.

      Siena

      Reply
        Helen - March 22, 2020

        Hey Siena, glad it was helpful!

        Reply
Aly Barzelay - March 21, 2020

My nursing friends have asked me to start making these and I was wondering if you could use flannel for the outer layer, or if quilters cotton is preferable? Thanks for having this out there and available!

Reply
    Steph - April 1, 2020

    Several patterns use flannel for the back piece!

    Reply
Dianne Frick - March 21, 2020

With the glasses on it is difficult to see if this mask seals any better than other ones. Can you posta picture of how it fits across the nose? Do you think this fits a variety of face sizes? From a petite woman to a large man or would you alter the pattern. Thank you.

Reply
    Helen - March 21, 2020

    You can fit a small metal strip/wire at the top — so that the metal can be molded over the nose and fit individual face shape better.
    To achieve that top stitch from the top of the mask about a half inch channel that is open at either end and slip a piece of wire in that channel. In one of the masks I used a piece of crafting wire bent into a loop. A friend of mine used twist ties from bread loafs to make the nose part bend and fit over the nose. The wire can be removed before washing and re-inserted before next use.

    Reply
      Shelley Ramsey - March 21, 2020

      I have seen in another video that the recommendation was to use a cut piece of aluminim (thick tin foil) from a baking dish/disposible cookie sheet. They cut it about 3-1/2 inches in length and about an inch in width and then folded it 3 times for more durability. The video showed it could actually be sew through on the sewing machine but made the nose area where it could be tightened/form fitting. Pretty genius. I was thinking maybe using a couple of bread ties from the produce section of the market. Another place used the prong fasteners used for file folders in a doctor’s office (didn’t know they even made those things anymore!)

      Reply
        Helen - March 22, 2020

        These are awesome ideas, thanks for sharing! I never thought of using prong fasteners. We’ll test them and add them to the article.

        Reply
          Tillie - March 22, 2020

          Would pipe cleaners doubled up work? Haven’t gotten started yet. Suggest washing fabrics before sewing? Just asking.

          Reply
          Helen - March 23, 2020

          Hi Tillie,
          Definitely pre-wash the fabrics to take care of any fabric shrinkage before you sew the mask. The masks are going to be washed regularly and they might end up smaller than intended if the fabrics shrink.
          I read that few Colorado nurses are using pipe cleaners as nose pieces, and while we haven’t tested them I think they would work. If you have some on hand you can sew a half inch channel that is open at either end on the top of the mask and test the fit.
          Other ideas for the nose piece suggest to use thin crafting wire or twist ties from bread loafs. Another reader suggested using prong fasteners or folded aluminum foil for the nose piece.

          Reply
          Stephen - March 25, 2020

          A nurse friend of mine who is making masks for her doctor husband’s office because the office has no masks (!) is using pipe cleaners because she has no elastic.
          I myself am taking elastic from an old fitted sheet.

          Reply
          Pam - April 26, 2020

          Yes, Pipe cleaners work fine. For my children’s face masks, I took a long pipe cleaner & folded it in fourths. (I did not cut it apart. I left it whole). Then I took the 2 loose ends & wrapped them around & through – kind of like braiding – so that they held all 4 lengths together & it would act more like one piece of fuzzy wire. I also made sure to tuck the ends – which were sharp – in among the fuzzy parts so that it couldn’t poke through the mask. I sewed it into place at the top of the mask with a simple straight stitch placed below the pipe cleaner. As hoped, it was “soft” and the kids did not complain. It was a success. Best of Luck!

          Reply
        Betty - April 14, 2020

        Dollar Tree has plant wires. Two huge rolls for $1. Zig zag stitch onto the raw edge.

        Reply
          Helen - April 16, 2020

          Have you tried them? What’s the thickness(gauge) of these wires and how flexible are they? Sounds like a steal of a deal. Thanks for sharing

          Reply
          Janis - April 22, 2020

          question on wires – found plastic coated plant ties at local Home Depot. 100 foot roll for few dollars. How best to secure these in place so they don’t shift around? They are about 2 mm in width. I thought about using 2, side by side, but would definitely have to have a way to secure them flat and in place. Maybe just one is sufficient? Thoughts please!

          Reply
          Helen - April 24, 2020

          Hi Janis, just sew around the wire to keep it from moving. Be careful not to hit it, as it would likely break your needle

          Reply
          Betty - April 22, 2020

          I’ve mad about 100 of these and Olson masks. The wire is thin, but seems sturdy enough. I suggest that people put a panty liner inside. It’s waterproof so it must stop most droplets.

          Reply
      Regina - April 19, 2020

      When sewing the channel for the nose wire, is the channel the full length of the mask? andhow and where is the wire inserted? Thanks.

      Reply
    Helen - March 23, 2020

    The pattern is available in three sizes to fit most faces.
    Make sure to prewash your fabrics to avoid shrinkage after sewing.
    However, note that we all have diverse facial shapes, sizes and features that need to be taken into consideration, and as a result it is difficult to make a snug fit mask that fits all faces. I recommend fit testing whenever possible to ensure the best possible fit

    Reply
    Cheryl Wisbrock - April 17, 2020

    I just made the mask in Large size in a relatively soft cotton woven fabric. It is very fitted, does not need nose clips or wire to stay in place. I should note, the size is more like a “medium” in my opinion as there is no excess fabric when it’s worn, even on a large man. My previous mask caused my glasses to fog up and this one is fine. I will make more. Thank you for the pattern!

    Reply
      Helen - April 18, 2020

      Hi Cheryl,
      I’m really stoked to hear you liked the pattern and that you solved your problem with fogging up the glasses. I’m working on adding Extra large size very soon. Stay tuned!

      Reply
Martha Reed - March 21, 2020

I have white cotton muslin. would that meet specificatiosn?

Reply
Clair Travis - March 21, 2020

Is there anywhere to find printable instructions without all the advertisements? I was able to print off the pattern

Reply
    Helen - March 21, 2020

    Not yet. We are working on adding an option to print the instructions. We will add it either later today or tomorrow

    Reply
    Helen - March 23, 2020

    You can now download and print the instructions. Happy sewing

    Reply
Purpleheys - March 21, 2020

Hello, I am currently following your tutorial. I have minimal sewing experience, and have never followed a pattern with instructions. I usually take apart and replicate things. I am very confused on your step 2 instructions. I am a very visual learner, and am having a hard time understanding you instructions of “Then draw a line quarter-inch away from the original side sewing line, on the inner layer. Do this for both side seams of the inner layer.” Is there anyway you could put step two in laymen’s terms at all?

Reply
    Helen - March 22, 2020

    You’ll need to press the side seams of the inner layer in the next step and drawing this line serves as a visual guide. See this image – hope that makes it clear.

    Reply
    Helen - March 23, 2020

    I’ve just posted a printable PDF of the instructions. You may find them easier to follow

    Reply
Heather P - March 22, 2020

Could you post a printable pdf of the instructions?

Reply
    Helen - March 22, 2020

    Sure, working on it

    Reply
    Helen - March 23, 2020

    You can now download a printable pdf of the instructions.

    Reply
Barbara - March 22, 2020

I’m confused about the sewing at the top and bottom of the mask. It looks like they are seamed separately and it is open at top and bottom?

Reply
    Helen - March 23, 2020

    Hi Barbara,
    First you join the curved seam that is in the center of the mask by placing the good sides together and sewing them in place. You do that for each of the layers separately.
    Then you sew the outer to the inner layer (pretty sides together) and sew the top and bottom parts. You leave the sides open.
    Hope that helps!

    Reply
Faith - March 22, 2020

A video tutorial would be helpful too! I know that’s asking a lot!

Reply
    Helen - March 23, 2020

    Thanks for letting us know what you want added! We’ll try to add a video tutorial very soon.

    Reply
Melissa - March 23, 2020

What is the length of elastic used? Making these for my sisters who are nurses.

Reply
    Helen - March 23, 2020

    15-16″ if you are making separate ear loops (which I would recommend for nurses) or ~40″ for a single piece of elastic that goes around the back of the head.

    Reply
Arlene Araneta - March 23, 2020

Can you please post a picture where the wire goes in?

Thank you,
Arlene

Reply
    Helen - March 23, 2020

    Sure, here it is. Let me know if that helps

    wire position

    Reply
Laura Braun - March 23, 2020

I made a few of these masks for my elderly neighbors who just want to get outside for a walk and wanted to feel a little safer. They know they aren’t perfect but better than nothing. The pattern worked great for me.

Reply
    Helen - March 24, 2020

    You are a great neighbor, Laura!
    While a homemade mask is far from perfect, it’s better than no mask.
    I’m glad the pattern worked great for you.

    Reply
Patrice - March 24, 2020

Would denim work for a top layer?

Reply
Mickee - March 24, 2020

Thank you so much for doing this. This is a wonderful thing you are doing.

Reply
    Helen - March 24, 2020

    Thanks for the kind words, Mickee.
    That’s the least that I can do to help. Please spread the word if you can to help more people during these hard times
    Be safe and healthy!

    Reply
MC - March 24, 2020

Any chance you can put approximate measurements on the pattern? I can’t print it 🙁

Reply
    Helen - March 24, 2020

    Have you tried tracing directly from your monitor? I know that some people who don’t have a printer or ink to print patterns off the net do that. Tape a sheet of paper to the top of your screen, make sure the image is set to 100% (no scale), and trace the pattern. Don’t press too hard and use a very soft pencil (2B or 3B) to avoid damaging your screen

    Reply
Homemade Face Shield With Household Materials (Step By Step Photo Tutorial) - March 24, 2020

[…] we can help our readers as well by improvising solutions and got to work. After coming up with a snug-fit face mask pattern we came up with a DIY face shield with off-the-shelf supplies that is super easy to make. After […]

Reply
Amanda - March 24, 2020

Can we use coffee filters?

Reply
    Helen - March 24, 2020

    You can, but it likely won’t be as efficient at capturing small particles as hepa filers are. I was curious so I dig a bit deeper here – you might find that interesting – coffee filters can usually filter out particles 10-15 microns in size. COVID-19 is approximately 0.125 micron in diameter and therefore won’t be captured
    Homemade masks capacity to block the virus is unknown – however, if properly worn, they are meant to help prevent transmission of large-particle droplets, keeping them from reaching your mouth and nose.

    Reply
      Susan Merworth - April 24, 2020

      I have been using disposable bed pads. I cut them the size that fits my masks, then sew a seam around the edge so they don’t come apart. Thanks for the pattern.

      Reply
        Helen - April 24, 2020

        Thank you for sharing, Susan

        Reply
Samantha - March 25, 2020

Hello! I love the pattern, however do you have a pattern or shape recommended to cut the filter material so it fills and fits inside by chance? Thanks!

Reply
Adrienne - March 25, 2020

Hi, Thank you for this. I don’t understand where the filter gets inserted.

Reply
    Helen - March 25, 2020

    The mask is open at both ear sides. Slide the filter through one of the side openings.

    Reply
June - March 25, 2020

I’m a bit confused about the side seams. My outer layer is 1 1/4″ larger than the innner layer because the inner layer has a 1/4″ turn back. What did I do wrong?

Reply
    Helen - March 25, 2020

    Sorry for the confusion. The important thing here is that outer layer has to be larger than the inner layer as later you’ll fold the outer layer over twice to make a casing and you don’t want both edges to overlap. The folded edge of the outer layer has to meet the edge of the lining. If you align them correctly you’ll have openings at both side seams to insert the filter
    Here’s how it looks inside

    Reply
June - March 25, 2020

The instruction says that the pattern includes 1/2″ seam allowance except for the ear sides. But they
looks smaller in the photos. How much seam allowance does it actually have?

Reply
    Helen - March 25, 2020

    I trimmed the seam allowance down to 1/4 inch after stitching but it that is completely optional

    Reply
Denise - March 25, 2020

Thank you for posting this pattern!

Reply
    Helen - March 25, 2020

    You are very welcome!
    Please share this if you can. I’ll really appreciate it

    Reply
Barbara Mathis - March 26, 2020

How long should I cut my quarter inch elastic for each ear?

Reply
    Helen - March 27, 2020

    ~8 inches so that it does not pull the ears.
    Stitch it to the sides instead of inserting it through the channel

    Reply
      Cindy - April 22, 2020

      I want to do this since I only have 1/8″ flat elastic. I am guessing this gets stitched to the outer layer and not the inner layer? And should it align with the seam or should it come down – say 1/4″?

      Reply
Patricia - March 27, 2020

I am at the filter stage and my husband and I can’t figure if you separate the outer bag from the white inner layer or just use the whole thing

Reply
    Douey Davis - March 30, 2020

    I have read that you need to zig-zag the layers together and use them all. A pattern for the insert would be helpful because the Hepa material has a little give and you don’t want a seam down the middle. I’m using a scrap of felt to get and accurate pattern before cutting any filters. Thanks for the pattern, I think that it is the best fitting one that I have seen.

    Reply
      Cheryl - April 4, 2020

      Were you able to make a template pattern out of felt, to cut the vacuum bag to fit in the mask? I would appreciate a little guidance on this step, if you can help? Maybe a picture with explanation how to insert? I’m assuming the vacuum bag needs to be rolled up or something to get inside and then flattened out somehow, inside the mask?

      Reply
corrie - March 28, 2020

Love it! cant wait to give it a try. Thank you so much for posting the pattern for free. You Rock!

Reply
    Helen - March 28, 2020

    You are very welcome!
    Thank you for the kind words, Corrie

    Reply
Maricarmen Flores - March 28, 2020

Hi! I am getting ready to sew masks this morning but I have a question: the last step listed is to insert the filter. Do you mean to insert it between the inner and outer layer? How can this be done if the mask is already closed? Thanks for your help.

Reply
    Helen - March 28, 2020

    The filter is inserted between the inner and outer layer. The mask is not sewn closed at the ear sides. see how it looks like when ready

    Reply
Diann Scott - March 28, 2020

I have made several mask and I need to know if jewelry elastic can be used?

Reply
    Rosalind Sutton - April 1, 2020

    Why not just try it? We are in survival mode of the fittest. Use any kind of household items that you can find. I am using the long elastic head band like the ponytail holders. Make it work. Good Luck and GOD Bless You & Your Family….Everybody else too. Be Safe People!!

    Signed,

    I CAN’T GO HOME I AM A C.N.A. to All the Elderly

    Reply
Faye - March 28, 2020

Why did you choose the vacuum cleaner bags you linked to? I would like to use what I have but am sure you had a reason for your choice.

Reply
dave M - March 29, 2020

Hi, When I click the elastic link it takes me to: Zealor 2 Roll 1 mm Elastic String Cord Elastic Thread Beading String Cord for Jewelry Making Bracelets Beading 100 Meters/Roll, but it’s not available. Do you have a cord that you like almost as much for this project? Thanks for all the work you’ve done to put this project togther.

Reply
    Helen - March 29, 2020

    I’m afraid that elastic has been in short supply lately. We try to link to any good elastic we find in the supplies section. I’ve linked to 1/4″ flat elastic there.
    Also – you can use hair ties like these or fabric ties instead of elastic loops.
    Our new pleated face mask uses fabric ties instead of elastic – check it out here

    Reply
JCH - March 29, 2020

For nose wire I used approx. 1 1/2 inch piece of “twist tie” from a coffee package. It is sturdy and snug.

I also can’t find elastic, so made a cotton yarn crochet chain about 40 inches long. Loop over head, ends through channels, tie behind neck. It isn’t as snug as I’d like, but it works. Could tie on top too I’d guess.

Reply
    Helen - March 29, 2020

    Nice to know. Thanks for sharing your experience

    Reply
Kristie - March 30, 2020

Hey Helen,
I’m featuring this tomorrow at the Little Cottage Link Party. Come and see it at 9:00 am.

Reply
    Helen - April 2, 2020

    Thank you so much for featuring me Kristie! I really appreciate it!

    Reply
Sissi Molina - March 30, 2020

hi! how long is the elastic for kids?

Reply
    Helen - April 2, 2020

    Hi Sissi,
    It’s about 5 – 5 1/2 inches per piece if you are making ear loops

    Reply
S - March 31, 2020

Spandex material and tshirt material is being used some now… very comfortable. Some Senior Living Facilities are requiring all their residents to wear and mask and this is good for them, form fitting. They are included a filter between the 2 fabrics. Also, can use self ties made from the fabric…

Reply
    Helen - March 31, 2020

    Great tips. Thank you so much for sharing.
    It is great that they care of their elderly residents and doing their best to protect them

    Reply
Jean - March 31, 2020

Thanks for the pattern, I’m trying to use some 3M Filtrete Furnace filters (healthy without fiberglass) a big sheet cost around $20. Any suggestions? should I make a little rectangle with the folds or should I flatten it out and maybe double it? I’m working on sewing a bunch so trying to make the best effective and cost friendly.

Reply
    Helen - March 31, 2020

    I *think* that both making little folds and doubling the filter would work a bit better than just flattening the thing out.
    I’ll have to dig a bit deeper and will share my thoughts on the blog

    Reply
Sandy R - March 31, 2020

Thanks for all your work on this.
Carolyn from SewCanShe.com (where I found the link to your page) has directions for using the HEPA filter fabric. she pleated it and sewed the edges.

Reply
Bruce L - April 1, 2020

I would beware of furnace and vacuum cleaner filters, as both may contain fiberglass which could be inhaled through the inner layer. Also as a super-novice with a sewing machine, I would have liked separate patterns for the lining and the outside layer (incorporating the additional 1/2″ seam allowance. To avoid confusion, it would help to have the parts of the pattern labeled: “ear side, center seam” and even “seam allowance” for the jargon-impaired (like me). I like the design!

Reply
MARY WILSON - April 2, 2020

WNAT TO MAKE A FACE MASK

Reply
Don S. - April 3, 2020

Made my tie using an old shoelace. The plastic ‘aglets’ on the ends of the shoelaces greatly helped with threading them through the side ‘tubes’. Went with tying around head/neck instead of around ears.

Reply
Audrey - April 3, 2020

Just love this mask it looks the best I’ve seen. But I need a video to follow pleaseeeee. I’ve downloaded pattern and instructions but I just can’t follow them. I know you’re busy but a video would be so helpful. Thank you so much. Stay safe and stay well.
Audrey.

Reply
    Helen - April 3, 2020

    We are working on a video! Hopefully it will be up tomorrow! Stay tuned
    In the meantime why don’t you try sewing up this surgical style mask – it’s super simple to sew, has a video tutorial AND written instructions

    Reply
      Audrey - April 5, 2020

      Thank you Helen.

      Reply
PAMELA P BRANDON - April 3, 2020

If you don’t have vacuum bags, I thought of maybe using pantie liners that have cotton in them to absorb particles by cutting them to fit, but you would need to make a velcro closure to change out the filter part. Of course, you would need to take the filter out before putting them in the wash. Don’t know how effective this would be.

Reply
Victoria Grecula - April 4, 2020

I’m having a problem with the size M coming out too small for my face, and I’m wondering if the 1/2″ seam allowance is included on the pattern, or does it need to be added to the pattern? My test square is 1″. From the bottom edge to the point above the nose, the pattern is approx. 5″ for medium size. when I sew 1/2″ seam allowance at the top and bottom, it is only 4 ” tall and will not cover from the bridge of my nose to the bottom of my chin.
Thank you in advance for clarifying for me!!

Respectfully,
Vicki

Reply
    Helen - April 4, 2020

    Yes, the seam allowance is already included. Size M measures approximately 4 1/2 inches from the bottom edge to the point above the nose when finished. Looks like your mask is a bit shorter than what is supposed to be. Did you trim the seam allowances? If not – trim them to about 1/8″

    Reply
Melinda - April 4, 2020

How long does the elastic need to be for an adult. For the facemask on this page.

Reply
    Helen - April 4, 2020

    – For 2 separate ear loops – you’ll need 2 x 6″-8″ of elastic (depending on the size of the face)
    – For one continuous piece that goes around the head – use 1 x 15-17″ of elastic (again, depending on the size of the face)

    Reply
Dawn - April 4, 2020

So the craft wire on links has 20 gauge & 22 gauge, respectively. Are these the correct gauges?

Also, I must of missed something, but where did it mention making a loop? And how wide of a loop? How long should it be?

And the picture provided, as requested by someone in regards to where to insert the wire, you show where to stitch, but I assume you need to also cut slits on either end?

For a filter, I read that it was very difficult to breath through a vacuum cleaner bag by itself, let alone with 2 more pieces of material on either side of it. (Though it did not state what kind of vacuum cleaner bag, as I have to assume some are thicker or thinner and/or more or less porous than others.)

Reply
    Helen - April 4, 2020

    Yes, these are the correct gauges. We use either 20 or 22 gauge craft wire, cut a 7″ long piece and curl either side about half an inch inwards. Read here for more details how you can make the nose wire piece https://hellosewing.com/flexible-nose-piece-materials/
    The picture in the comments shows how to make a removable nose stay. You don’t have to cut slits as the mask is open on both sides. You can just slid the nose wire in there and mold it to fit your nose. It would be smart to do your own research in regards to if and what to use as a filter

    Reply
      Dawn - April 5, 2020

      Thank you! ?

      Reply

Leave a Reply:

Send this to a friend