3D Clear Face Mask with REMOVABLE Window for the Deaf / Hard of Hearing
Do you know what can be unbelievably frustrating? When someone is talking to you and you have no idea what they are saying. Like talking with a foreigner who has a weird accent, or with someone who speaks way too fast.
For those who have hearing difficulties or rely on lip reading, there is no other way of understanding people who don’t know a sign language other than reading their lips.
Fortunately, there’s a solution to that issue! A mask that does its regular job but it also keeps your lips (and smile) visible. A reusable clear mask!
![]()
By using our clear face mask pattern and following our steps, you can easily and quickly make clear face masks for deaf people to read your lips through. Check out this short tutorial with VIDEO instructions to learn how to make a clear face mask in no time.
We occasionally link to goods offered by vendors to help the reader find relevant products. Some of the links may be affiliate meaning we earn a small commission if an item is purchased.
Table of Contents
- 1 How to make a clear face mask
- 2 Supplies and tools
- 3 How To Sew a Face mask with a clear panel
- 3.1 DIY 3d Clear Mask VIDEO TUTORIAL
- 3.2 INSTRUCTIONS:
- 3.3 STEP 1: Prepare the pattern
- 3.4 STEP 2: Cut the fabric
- 3.5 STEP 3: Transfer the clear window markings
- 3.6 STEP 4: Set the lining
- 3.7 STEP 5: Make the opening for the clear panel
- 3.8 STEP 6: Make the clear window
- 3.9 STEP 7: Sew both main and lining together
- 3.10 STEP 8: Flip the fabric inside-out and sew it
- 3.11 STEP 9: (Optional) Insert nose wire
- 3.12 STEP 10: Fold and sew
- 3.13 STEP 11: Fold to create a 3d shape
- 3.14 STEP 12: Insert elastic
- 3.15 STEP 13: Stitch two paralegal lines on both sides of the mask
- 3.16 Step 14: Insert the clear window
How to make a clear face mask
Supplies and tools
![]()
- fabric – 2 pieces of 100% tightly woven cotton (one main, one lining) + 2 window linings
- clear plastic sheet or clear vinyl – 2,5″ x 4″
- 1/16″ round elastic (preferable) or 1/8″ flat elastic – 2 x 5-7″ long
- matching thread thread
- scissors (or rotary cutter and a cutting mat)
- ruler or measuring tape
- iron and ironing board
- sewing clips or pins
- sewing machine (it’s an easy sew, even an entry level model will do)
- nose wire (optional)
DOWNLOAD: clear face mask pattern (Free PDF file)
Follow us for free patterns & tutorials! [easy-profiles]
How To Sew a Face mask with a clear panel
Watch the diy see-through face mask video first and then follow the written step by step instructions below.
Please enjoy and don’t forget to Like and SUBSCRIBE over on YouTube to be kept up to date with new videos as they come out.
DIY 3d Clear Mask VIDEO TUTORIAL
INSTRUCTIONS:
STEP 1: Prepare the pattern
Download the pattern and print it out on a piece of paper (print at 100% on US letter paper, don’t scale it!). Cut out all excess paper to prepare the pattern for use.
STEP 2: Cut the fabric
Start by cutting out the pieces that don’t require the use of your pattern. You will need two rectangles 5.5 x 4 inches big. The two small pieces will act as window lining while the two large pieces will be the main and lining fabrics.
Next, you will need two pieces cut out while using the pattern as a guideline. Don’t mind the rectangle opening in the middle for this step. Just cut out two octagonal shapes.
![]()
STEP 3: Transfer the clear window markings
In this step, you will be transferring the markings from the center of the pattern, onto the two octagonal fabric pieces. On their wrong sides.
Make sure to transfer both of the rectangles from the center of the pattern onto the fabric pieces.
![]()
STEP 4: Set the lining
Now it’s time to put the window lining on top of the main fabric piece. It needs to be centered so fold both fabrics twice and then unfold them. The two folding creases will form a cross, so just align the two crosses and everything will be centered.
When putting the lining piece on top of the main fabric one, make sure to put them right sides together. Pin everything in place or secure the fabrics with clips.![]()
Repeat for the lining piece
STEP 5: Make the opening for the clear panel
Make a stitch following the lines of the outer marked rectangle in the center of the main fabric piece.
Then cut out the smaller rectangle with scissors or a rotary cutter, going through both layers of fabric. Make slits on all four corners of the inner rectangle. Try to keep the cuts as close to the seam as possible. Repeat for the lining piece
![]()
STEP 6: Make the clear window
Press the seams open and then push the lining through the opening, towards the wrong side of the fabric. Pin in place.
Topstitch around the edges of the opening to finish the opening. Repeat for the lining piece
![]()
STEP 7: Sew both main and lining together
Set one fabric piece on top of the other, keeping their right sides together. Pin everything in place. Make a stitch following the markings you just made. Sew through all layers.
STEP 8: Flip the fabric inside-out and sew it
Snip the corners and clip the curves to allow the fabric to lay flat. Then turn the whole thing inside-out. Push out the corners and press everything flat.
Sew around the fabric, leaving the two vertical edges unstitched. The ones on the right and the left side. Fold these raw edges about 1/4″ in.
STEP 9: (Optional) Insert nose wire
Push the nose wire through the window and stitch around it to keep it in place
STEP 10: Fold and sew
Fold the top edge and the bottom edge so that they meet in the middle.
Stitch along the two longest edges.
![]()
STEP 11: Fold to create a 3d shape
Pull one of the top corners to meet the upper edge at a 90 degree angle. It should look like a capital “N” and it will be parallel to the side edge.
Repeat for the other 3 corners. Doing that makes the mask pop up and stand on its own when placed on a top of a table.
![]()
STEP 12: Insert elastic
Insert the elastic through both side openings and pin in place.
STEP 13: Stitch two paralegal lines on both sides of the mask
Stitch the sides and the corners that create the 3d shape. These will be two parallel lines on each side of the mask.
![]()
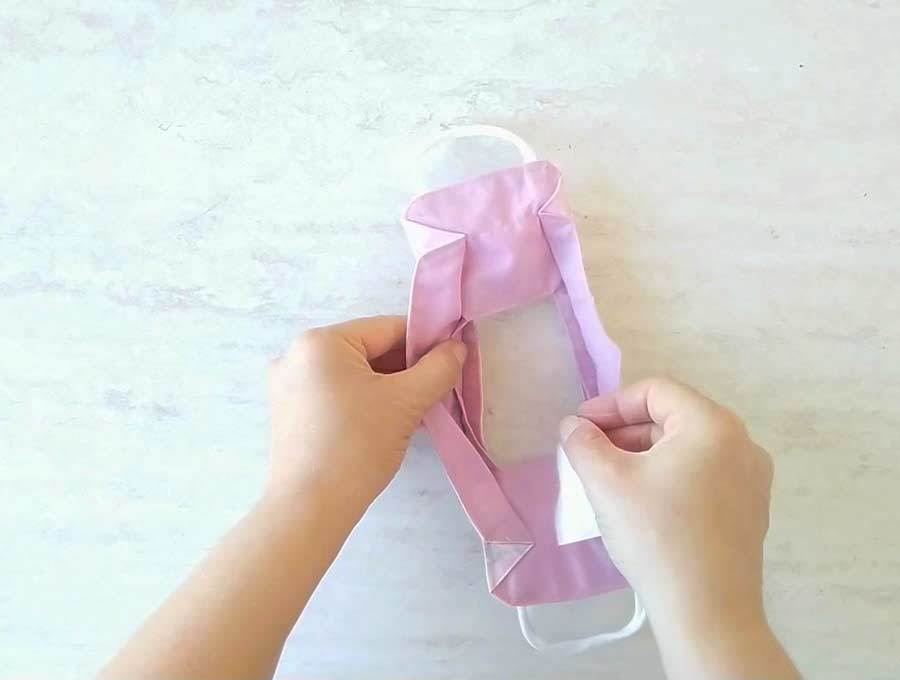
Step 14: Insert the clear window
Clip the corners of your plastic sheet and insert it into the window, between the fabric layers. You can now wear your mask!
Did you like the tutorial? Try making a few of these clear face masks for teachers and tell us how it worked. Any feedback is appreciated! Stay safe and responsible!
That’s it your clear mask is ready
Do you like this? Pin for later:
![]()
Wanna be friends? Click HERE and follow me on Pinterest
RELATED:
- How to make a Scarf face mask
- DIY 3D face mask
- Child sized face mask template (toddler, kids and teens)
- Breathable mask pattern
- DIY Gaiter face mask (12 different ways to style it!)
- Hand sew a Face mask – NO sewing machine requried (Video tutorial)
- Free Face mask pattern (fitted, contoured model)
- Best fit face mask
- DIY pleated cloth facemask with fabric ties
- How to make surgical face mask with elastic ear loops
- No elastic face mask (No elastic model, around the head ties – great for medical staff)
- Nose wire piece ideas
- Ear guard for nurses and doctors
- Surgical hat pattern (unisex model with ties)
- How to make a plastic face shield
- DIY reusable face shield with cute bow tie